Satellite Speaker Cat. No.
OVERVIEW Thank you for choosing Leviton Architectural Edition™ powered by JBL. Please take a moment to register your product on our Web site at www.leviton.com. It enables us to keep you posted on our latest advancements, and helps us to better understand our customers and build products that meet their needs and expectations. PARTS INCLUDED Cat. No.
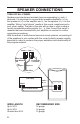
SPEAKER PLACEMENT NOTE: The satellite speakers can be placed directly on a shelf, or mounted on a wall using the included wall brackets. Left and Right Front Channels For left and right front channels, place one satellite to the left and another to the right of the television, as shown in Figures 1A and 1B. Since the speakers are magnetically shielded, you can place them very close to the TV without worrying about the magnetic field distorting the picture.
SPEAKER CONNECTIONS TURN OFF ALL POWER. Speakers and electronics terminals have corresponding (+) and (–) terminals. It is important to connect both speakers identically: (+) on the speaker to (+) on the amplifier and (–) on the speaker to (–) on the amplifier. Wiring “out of phase” results in thin sound, weak bass and a poor stereo image. The side of the wire with a ridge or other coding is usually considered positive polarity (i.e., +).
INSTALLATION WARNING: TO BE INSTALLED AND/OR USED IN ACCORDANCE WITH APPROPRIATE ELECTRICAL CODES AND REGULATIONS. NOTE: LEVITON ARCHITECTURAL EDITION™ POWERED BY JBL SATELLITE SPEAKERS WERE DESIGNED TO BE EASILY INSTALLED. HOWEVER, IF YOU ARE UNSURE OF YOUR ABILITY TO PROPERLY INSTALL THESE LOUDSPEAKERS, PLEASE CONTACT YOUR DEALER OR A QUALIFIED INSTALLER. NOTE: SPEAKER WIRE RUNS SITUATED INSIDE A WALL NEED TO BE FIRE-RATED. WHEN IN DOUBT, CONSULT YOUR LOCAL ELECTRICAL INSPECTOR FOR CORRECT WIRE RATINGS.
2. Pull the ball/shaft (3) out of the wall bracket (4). 3. Slide on the molded nut (2) onto the ball/shaft (3) with threaded opening facing the ball, and thread on the metal nut (1) all the way onto the ball/shaft (3), with the nut (1)ʼs “knurled” surface facing away from the ball. 4. Screw on the ball/shaft (3) into the threaded insert on the back of the speaker cabinet until it is fully seated against the bottom of the insert. 5.
OPERATION Surround Modes: When using the system in a Dolby* Digital or DTS® home theater system, ensure that all Cat. No. AESS5 speakers are set to “Small”. When using the Cat. No. AESS5 in a Dolby Pro Logic* home theater system, ensure that the receiver's center channel mode is set to “Normal”. Some Dolby Digital-equipped receivers/processors offer different setup options for each source or surround mode, e.g., Cd-Stereo, Videotape, Dolby, Pro Logic.
TROUBLESHOOTING IF THERE IS NO SOUND FROM ANY OF THE SPEAKERS: • Check that receiver/amplifier is on and a source is playing. • Check all wires and connections between receiver/amplifier and speakers. Make sure all wires are connected. Make sure none of the speaker wires are frayed, cut, punctured or touching each other. • Review proper operation of your receiver/amplifier. IF THERE IS NO SOUND COMING FROM ONE SPEAKER: • Check the “Balance” control on your receiver/amplifier.
NOTES
NOTES
NOTES
SPECIFICATIONS NOTES: • All features and specifications are subject to change without notice. • † The maximum recommended amplifier power rating will ensure proper system headroom to allow for occasional peaks. We do not recommend sustained operation at these maximum power levels. • * Trademark of Dolby Laboratories. DTS is a registered trademark of Digital Theater Systems, Inc.
This page is NOT to be printed in the booklet LEVITON INSTRUCTION SHEET/MANUAL SPECIFICATIONS 11.0" 8.5" DI-000-AESS5-02A-X0 Black Helvetica OVERALL SIZE 50 lb. offset Paper size: 5.5" Overall size: 11" x 8.5" (Printer Spread) 12 Pages Final fold size: 5.5" x 8.5" (booklet - saddle stitch) DOCUMENTATION N/A KKC 11/30/05 8.5" Booklet Cat. No.