
Installation Guide
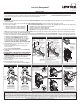
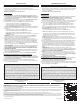

Fig. 7
INCORRECT ALIGNMENT
POSITION OF MODULE
MODULE MAL ORIENTÉ
POSICIÓN INCORRECTA DE
ALINEAMIENTO DEL MÓDULO
LOCK
UNLOCK
WARNING !
AVERTISSEMENT!
ADVERTENCIA!
Receptacle Tab #2
Taquet 2 de la prise
Pestaña #2 del Receptáculo
Standard Module
Module standard
Módulo estándar
Receptacle Tab #1
(push to release latch)
Taquet 1 de la prise
(pousser pour libérer le verrou)
Pestaña #1 del Receptáculo
(presione para soltar el seguro)
Fig. 5
LOCK
Fig. 3 Fig. 4
Correct Alignment
Position of Module
Module bien orienté
Posición correcta de
alineamiento del módulo
LOC
K
UNLOC
K
Turn Module
Clockwise to Lock
Tourner le module vers la
droite pour le verrouiller
Gire el módulo hacia la
derecha para asegurar
LOCK
UNLOCK
Rounded
Guide
Guide
Guía
redondeada
Fig. 6
Fig. 2
Receptacle
Pin Contacts
Contacts de la prise
Contactos del pin
del receptáculo
Module Contacts
Contacts du module
Contactos del módulo
Rounded
Guide
Guide
Guía redondeada
LOCK
90
o
Module
Module 90
o
Módulo de 90
o
Fig. 1a
Wire Connector
(twist clockwise)
Marette
(tourner vers la droite)
Conector de alambre
(hacia la derecha)
Protective
Label
Étiquette
protectrice
Etiqueta
protectora
Wall
Mur
Pared
Module
Module
Módulo
Wall box
Boîte murale
Caja de pared
Hot (Black)
Actif (noir)
Fase (negro)
Neutral (White)
Neutre (Blanc)
Neutro (Blanco)
NOTE: Make sure system ground
(bare copper) wire is connected to
metal box ground screw.
Electrical tape
Ruban isolant
Cinta aislante
Isolated
Ground
Terre isolée
Tierra aislada
Wire Connector
(twist clockwise)
Marette
(tourner vers la droite)
Conector de alambre
(hacia la derecha)
Protective Label
Étiquette protectrice
Etiqueta protectora
Wall
Mur
Pared
Module
Module
Módulo
Wall box
Boîte murale
Caja de pared
Hot (Black)
Actif (noir)
Fase (negro)
Neutral (White)
Neutre (Blanc)
Neutro (Blanco)
Electrical tape
Ruban isolant
Cinta aislante
Ground (Green)
Terre (vert)
Verde a tierra
Fig. 1
REMARQUE: s’assurer que le fil de terre
(cuivre nu) est raccordé à la vis de terre
de la boîte métallique.
NOTA: Asegure que el conductor a tierra (pelado de cobre)
esté conectado al tornillo a tierra de la caja de metal.
1. WARNING: TO AVOID FIRE, SHOCK, OR DEATH; TURN OFF POWER AT CIRCUIT BREAKER OR FUSE AND TEST THAT THE POWER IS OFF
BEFORE WIRING!
2. Remove pre-cut insulation from module leads, twist all strands tightly together, and strip wall box wires [about 5/8" (1.6 cm)].
3. Connect wires per Fig. 1:
For Isolated Ground Receptacles connect wires per Fig. 1a (NOTE: NOT FOR USE with nonmetallic boxes):
*5((1PRGXOHOHDGWRZDOOER[*5281' *5((1PRGXOHOHDGWR,62/$7('*5281'/($'
%/$&.PRGXOHOHDGWRZDOOER[/,1(+RW %/$&.PRGXOHOHDGWRZDOOER[/,1(+RW
:+,7(PRGXOHOHDGWRZDOOER[1(875$/ :+,7(PRGXOHOHDGWRZDOOER[1(875$/
NOTE: Make sure system ground (bare copper) wire is connected to the metal box ground screw.
NOTE:3XVKZLUHVÀUPO\LQWRZLUHFRQQHFWRUV(not supplied). Screw connectors on clockwise making sure that no bare wire shows below the connector
and secure each connector with electrical tape (Fig. 1).
4.
Remove protective label from module to expose contacts (Fig. 2). Align rounded end of module with rounded guide on back of receptacle and push module
contacts onto receptacle pin contacts (refer to Fig. 3). Turn module clockwise until it locks under receptacle tabs with an audible "snap" (Fig. 4). Module must
EHVHDWHGÁXVKZLWKUHFHSWDFOHEDVHZKHQSURSHUO\
installed (Fig. 5, 6).
WARNING: Module can only
be inserted one way onto receptacle. Do not attempt
to force improper orientation as damage to module
or receptacle may occur (Fig. 7). DO NOT USE
RECEPTACLE OR MODULE IF TABS ARE BROKEN!
5. Dress wires with a bend to minimize strain, push wire
connectors into wall box,
and mount receptacle to wall box using mounting
screws provided.
Mount wallplate (sold separately).
6. Restore power at circuit breaker or fuse. Installation is
complete.
TO DISCONNECT RECEPTACLE FROM MODULE:
1. WARNING: TO AVOID FIRE, SHOCK, OR DEATH;
TURN OFF POWER AT CIRCUIT BREAKER OR FUSE
AND TEST THAT THE POWER IS OFF BEFORE
DISCONNECTING!
2. Remove receptacle mounting screws and pull assembly
out from wall box.
3. Push receptacle tab #1 and turn module
counterclockwise until unlocked and separate (Fig. 5).
Lev-Lok Receptacle
®
PK-93828-10-02-0B
For Technical Assistance Call: 1-800-824-3005 (U.S.A. Only) www.leviton.com
LIMITED 10 YEAR WARRANTY AND EXCLUSIONS
/HYLWRQZDUUDQWVWRWKHRULJLQDOFRQVXPHUSXUFKDVHUDQGQRWIRUWKHEHQHÀWRIDQ\RQHHOVHWKDWWKLVSURGXFWDWWKHWLPHRILWVVDOHE\/HYLWRQLVIUHHRIGHIHFWVLQPDWHULDOVDQGZRUNPDQVKLSXQGHUQRUPDODQGSURSHUXVHIRUWHQ\HDUV
IURPWKHSXUFKDVHGDWH/HYLWRQҋVRQO\REOLJDWLRQLVWRFRUUHFWVXFKGHIHFWVE\UHSDLURUUHSODFHPHQWDWLWVRSWLRQLIZLWKLQVXFKWHQ\HDUSHULRGWKHSURGXFWLVUHWXUQHGSUHSDLGZLWKSURRIRISXUFKDVHGDWHDQGDGHVFULSWLRQRIWKH
problem to Leviton Mfg. Co., Inc. 201 North Service Road, Melville, N.Y. 11747. This warranty excludes and there is disclaimed liability for labor for removal of this product or reinstallation. This warranty is void if this product
is installed improperly or in an improper environment, overloaded, misused, opened, abused, or altered in any manner, or is not used under normal operating conditions or not in accordance with any labels or instructions. There
DUHQRRWKHURULPSOLHGZDUUDQWLHVRIDQ\NLQGLQFOXGLQJPHUFKDQWDELOLW\DQGÀWQHVVIRUDSDUWLFXODUSXUSRVH, but if any implied warranty is required by the applicable jurisdiction, the duration of any such implied warranty,
LQFOXGLQJPHUFKDQWDELOLW\DQGÀWQHVVIRUDSDUWLFXODUSXUSRVHLVOLPLWHGWRWHQ\HDUVLeviton is not liable for incidental, indirect, special, or consequential damages, including without limitation, damage to, or loss of use
RIDQ\ HTXLSPHQWORVW VDOHVRU SURÀWVRU GHOD\RU IDLOXUHWR SHUIRUPWKLV ZDUUDQW\REOLJDWLRQ. The remedies provided herein are the exclusive remedies under this warranty, whether based on contract, tort or otherwise.
WARNINGS AND CAUTIONS:
7REHLQVWDOOHGDQGRUXVHGLQDFFRUGDQFHZLWKDSSURSULDWHHOHFWULFDOFRGHVDQGUHJXODWLRQV Use this product with copper wire only.
,I\RXDUHQRWVXUHDERXWDQ\SDUWRIWKHVHLQVWUXFWLRQVFRQVXOWDQHOHFWULFLDQ
TO INSTALL
INSTALLATION
ENGLISH