
Install Instructions

Smart Breaker Data Hub Kit
Cat. No. LDATA
INSTALLATION INSTRUCTIONS
ENGLISH
DI-000-LDATA-00A
WARNINGS
• TO AVOID FIRE, SHOCK OR DEATH: TURN OFF POWER SUPPLYING THIS EQUIPMENT,
AND CONFIRM POWER IS OFF, before installing, removing or servicing this equipment.
• It is recommended that this equipment be installed and serviced by an electrician or other qualified
personnel.
• Replace all doors and covers before connecting power to this equipment.
• To be installed and/or used in accordance with electrical codes and regulations.
• Turn off all power to the panelboard by moving the handle of the main breaker to OFF position.
• If installing the device in a sub-panel, turn power off from the breaker located in the main panel.
CAUTIONS
• Use this device with copper or copper clad wire only.
• To ensure water tight seal is not compromised, do not loosen screws on the exterior perimeter of
the Smart Breaker Data Hub unit.
• Connection to supply source must be done in accordance with the requirements of the Local
Building Codes, the Canadian Electrical Code (CEC), CAN/CSA C22.1 and the National
Electrical Code (NEC), NFPA 70.
• Must be protected by an agency listed over-current protective device rated up to 20A.
• When the unit is to be installed for outdoor application, the antenna and RJ45 connector must be
oriented in a downward position (towards the ground).
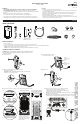
What's included
Mounting Bracket
and Robertson Screws
Data Hub Cable Extender GasketLocknut
(2) Liquid Tight Bushings
Protective Tubing
Before Installation
1. Remove panel cover.
2. Choose mounting location for hub and choose a breaker for power near mounting location.
3. Before removing the knockout, ensure the power wires will reach the breaker chosen to power the Smart Breaker Data Hub.
NOTE: The hub requires a single pole breaker rated up to 20A.
NOTE: The wires should remain twisted. The twisting is omitted in the diagrams for clarity only.
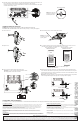
Installing inside an enclosure.
WARNING: TO AVOID FIRE, SHOCK OR DEATH: TURN OFF POWER SUPPLYING
THIS EQUIPMENT, AND CONFIRM POWER IS OFF, before installing, removing or
servicing this equipment.
2. Attach cable extender for Wi-Fi
®
or
insert ethernet cable for LAN.
1. Remove the cover.
3. Measure and trim tubing to length of cable extender.
Feed cable through tubing.
CAUTION: PROTECTIVE TUBING MUST BE USED to ensure the cable
extender does not touch any live wires.
4. Replace cover.
5. Mount bracket to panel with (2) Robertson screws. Attach hub to bracket with a locknut.
a.
b.
a.
b.
Attach
cable extender
for Wi-Fi
Or
Insert
ethernet cable
for LAN
6. Remove your chosen knockout. Poke a small hole in bushing.
For Wi-Fi, firmly push cable extender through bushing.
Snap bushing into knockout. Attach antenna to cable extender.
For ethernet, push cable through bushing.
NOTE: For any wire enter or exit point through the panel enclosure, use liquid tight
bushing to prevent liquid intrusion.
NOTE: For flush mount applications where the drywall is already installed, run the
antenna through the water tight bushing and through a knockout close to the device.
NOTE: Hub and bracket
assembly can be mounted on
the panels shown on these
suggested locations. The wires
must be directed toward the
branch breakers.
30, 42 Position Outdoor 3R Panels
20, 30, 42, 66 Position Indoor Panels
20
,
30
,
42
,
66
Position
Indoor
Panels
Antenna
20 Position Outdoor 3R Panel
Ferrite Clamp
Zip Tie
WEB VERSION