
Installation Guide

Dimmable LED Panel Light
Cat. Nos.
SKT12-CW (1x2 Cool White), SKT14-CW (1x4 Cool White), SKT22-WW (2x2 Warm White),
SKT22-CW (2x2 Cool White), SKT24-CW (2x4 Cool White)
Rating: 100-277 VAC, 50/60 Hz
PK-A3139-10-01-5B
INSTALLATION
ENGLISH
For Technical Assistance Call: 1-800-824-3005 (U.S.A. Only) www.leviton.com
© 2017 Leviton Mfg. Co., Inc.
PK-A3139-10-01-5B
WARNING AND CAUTIONS:
• TO AVOID FIRE, SHOCK, OR DEATH: TURN OFF POWER at circuit breaker or
fuse and test that power is off before wiring or servicing luminaire!
• Please read these instructions before installation and keep them for future
reference.
• To be installed and/or used in accordance with appropriate electrical codes and
regulations.
• If you are unsure about any part of these instructions, consult an electrician.
• Use this device with copper or copper clad wire only.
• For indoor applications only.
skytile
™
INSTALLATION:
WARNING AND CAUTIONS:
• DO NOT connect the GND of dimming to the output, otherwise the LED driver
cannot work normally.
NOTES:
• If 0-10V dimming is not used leave the DIM+ and DIM - connections open.
• Read the instructions and check if you have all the tools and accessories required
for proper installation.
• The light source of this luminaire is not replaceable. When the light source reaches
its end of life, the whole luminaire MUST be replaced.
TO AVOID FIRE, SHOCK, OR DEATH: TURN OFF POWER at circuit breaker or fuse and
test that power is off before wiring or servicing fixture!
SPECIFICATIONS
Cat. No.
SKT12-CW SKT14-CW SKT22-WW SKT22-CW SKT24-CW
Current (mA)
700 700 1050 1050 1050
Watts (W)
18 30 40 40 40
Color Temp. (K)
4000 4000 3000 4000 4000
Lumens (lm)
1920 3300 4120 4400 4400
Lumens per Watt (lm/W)
106 110 103 110 110
Dimension (in.)
12 x 24 x .41 12 x 48 x .41 24 x 24 x .41 24 x 24 x .41 24 x 48 x .44
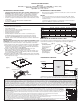
WIRING DIAGRAM
(Fig. 1)
(Fig. 3)
It is considered safe practice and required by many building codes to attach the LED
panel to the structure and not rely solely on the ceiling grid (figure 3).
MOUNTING IN A T-GRID CEILING SYSTEM:
LIMITED 5 YEAR WARRANTY AND EXCLUSIONS
Leviton warrants to the original consumer purchaser and not for the benefit of anyone else that this product at the time of its sale by Leviton is free of defects in materials and workmanship
under normal and proper use for five years from the purchase date. Leviton’s only obligation is to correct such defects by repair or replacement, at its option. For details visit
www.leviton.com or call 1-800-824-3005. This warranty excludes and there is disclaimed liability for labor for removal of this product or reinstallation. This warranty is void if this
product is installed improperly or in an improper environment, overloaded, misused, opened, abused, or altered in any manner, or is not used under normal operating conditions or not
in accordance with any labels or instructions. There are no other or implied warranties of any kind, including merchantability and fitness for a particular purpose, but if any
implied warranty is required by the applicable jurisdiction, the duration of any such implied warranty, including merchantability and fitness for a particular purpose, is limited to five years.
Leviton is not liable for incidental, indirect, special, or consequential damages, including without limitation, damage to, or loss of use of, any equipment, lost sales or profits
or delay or failure to perform this warranty obligation. The remedies provided herein are the exclusive remedies under this warranty, whether based on contract, tort or otherwise.
Z-hanger
LED
Panel
Hanger
Wire
Hook
FEATURES:
• Replaces traditional fluorescent luminaires.
• Quick and easy to install.
• 50,000 hour LED life, no bulbs to replace.
• Over 50% more efficient than fluorescent.
• Ideal for commercial applications.
• Smooth, even light distribution.
• Dimmable: Dimming requires a 0-10 Volt dimmer. Recommended devices include
Leviton part nos. IP710 or DS710. For more information, visit www.leviton.com
and enter the part no. in the search field or call our Product Information Hotline at
1-800-824-3005
1. Attach a hook
(purchased separately)
to the beam or ceiling
above each Z-hanger
(figure 3).
2. Attach hanger wire
(purchased separately)
between the hook and
Z-hanger (figure 3).
The skytile word mark is the property of JCC Lighting Products Ltd. and any use of such mark by
Leviton Mfg. Co., Inc. is under license. Other trademarks are those of their respective owners.
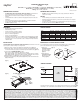
1. Remove the screw on the top of the driver enclosure and lift off cover (figure 1).
2. Pull two fixture cables, one for line voltage AC connections and one for dimming to the
1/2" trade size knock-outs (2 places) of each fixture per local electrical codes (figure 2).
3. Connect wires per WIRING DIAGRAM as follows:
Black to Line (L), White to Neutral (N), Yellow/Green to Ground.
DIM + (purple) and DIM - (gray) to dimming control. If the dimming option is not used the
DIM + (purple) and DIM - (gray) wires should be separately capped with a wire connector.
4. Replace the driver cover and tighten screw on top of the driver case.
5. Position the lamp in the drop ceiling by tilting slightly, lifting it above the framework and
letting it fall into place.
(Fig. 2)
AC Wires
0-10V
Wires
Fixture
Cables
Driver
1/2” trade size knock-outs
(2 places)
Driver Enclosure
Screw
LED
Driver
V
+ (
RED
)
Dim
+ (
PUR
)
V
- (
BLK
)
0
-10V
Dimmer
Dim
- (
GRY
)
Line (Hot)
Neutral (white)
Ground
100-277VAC
50/60 Hz
WEB VERSION