U S E R M ANUAL Ultrasonic Top-Fill Cool Mist 2-in-1 Humidifier & Diffuser Model: Dual 100 Questions or Concerns? Please contact us Mon–Fri, 9:00 am–5:00 pm PST/PDT at support@levoit.com or at (888) 726-8520.
Table of Contents Package Contents Specifications Safety Information Getting to Know Your 2-in-1 Humidifier & Diffuser Getting Started Using Your 2-in-1 Humidifier & Diffuser Care & Maintenance Troubleshooting Warranty Information Customer Support 2 2 3 4 5 7 9 11 13 14 Package Contents 1 x 2-in-1 Humidifier & Diffuser 1 x User Manual 1 x Quick Start Guide Specifications Power Supply AC 100–120V, 60Hz Rated Power 24W Water Tank Capacity 0.48 gal / 1.
S A F E T Y I N F O R M AT I O N To reduce the risk of fire, electric shock, or other injury, follow all instructions and safety guidelines. General Safety • Do not allow water or other liquids inside the air vent. • Only use the humidifier as described in this manual. • Remove the water tank from the base before moving the humidifier. • Place the humidifier and cord so that it will not be knocked over. Do not place near large pieces of furniture or in hightraffic areas.
G E T T I N G TO K N O W YO U R 2-IN-1 HUMIDIFIER & DIFFUSER A. Mist Tube G. Mist Outlet M. Float B. Water Outlet H. Transducer N. Insulation Ring C. Water Outlet Valve Assembly I. Base J. Top Cover K. Water Tank L. Sealing Ring O. Air Outlet D. Sleep Mode Button E. Mist Level Indicators F. Control Button P. Air Inlet Q. Power Cord R.
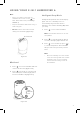
G E T T I N G S TA R T E D 1. Remove all packaging. Choose a hard, flat location for the humidifier at least 6 in / 15 cm away from any walls, furniture, bedding, and appliances. The surface must be water-resistant. [Figure 1.1] Note: Do not place the humidifier on towels, carpets, rugs, floors, or any surfaces with fibers. This will block the air inlet at the bottom of the humidifier and cause overheating. [Figure 1.2] Filling & Refilling 1. Remove the top cover from the water tank.
Filling & Refilling (cont.) C AUTI O N • Do not add water directly into the base chamber. • Do not add water through the mist tube. 2. Optionally, add 10–15 drops of essential oil into the base chamber. [Figure 1.5] Note: For best results, we recommend using pure essential oil. Figure 1.5 6 3. Place the top cover back onto the water tank. Make sure the tank is properly placed on the base by aligning the indicator marks. [Figure 1.6] 4. Plug in the humidifier. Figure 1.
U S I N G YO U R 2 - I N - 1 H U M I D I F I E R & Note: • Intelligent Sleep Mode If there is no water in the tank, the will humidifier will not turn on and blink. Fill the water tank (see Getting Started, 5). • Keep the humidifier stable while using, or water may spill. • Do not block the mist outlet. This will damage the humidifier. [Figure 2.
Important Tips • • Never pour water directly into the base chamber. Only add water to the water tank. [Figure 2.3] The humidifier will automatically release the correct amount of water into the base chamber. Avoid moving or shaking the humidifier. [Figure 2.4] This may cause the water tank to release too much water into the base chamber. • Before moving the humidifier, turn it off, unplug it, and remove the water tank.
CARE & MAINTENANCE Note: • All maintenance should be done on a water-resistant surface, such as a kitchen counter. • Change the water daily to avoid bacteria growth. • Use a tissue or cloth to clean the mist outlet regularly. • If not using the humidifier for 1 week or longer, do not leave water inside. Dry and store instead. 2. Remove and wash the top cover. [Figure 3.2] 3. Remove the water tank from the base. Pour out all water from the tank and base. [Figure 3.
Cleaning (cont.) Installing the Mist Tube 5. To remove any scale buildup inside the water tank or base chamber, soak with distilled white vinegar and wipe with a cloth and cotton swab. Make sure the mist tube is in place. If it is not, the humidifier will not create mist. 6. If you used essential oils in the humidifier, fill the water tank and the base chamber with distilled white vinegar and allow to soak. 7. To remove the mist tube for cleaning, flip the tank over.
Storing Follow the cleaning instructions (see 9) and allow all parts to dry completely before storing. Store in a cool, dry location. T R O U B L E S H O OT I N G Problem Possible Solution Humidifier doesn’t turn on, or the buttons do not work. Unplug the humidifier and plug it back in. Press humidifier on. to turn the Fill the water tank if it is empty. Little or no mist comes out. Press to use a higher mist setting. Make sure the mist tube is correctly installed (see Installing the Mist Tube, 10).
TROUBLESHOOTING (CONT.) Problem Possible Solution Humidifier produces an unusual smell. If the humidifier is new, remove the top cover, and place the water tank in a cool, dry place for 12 hours. Water may be dirty or has been sitting in the tank for a long period of time. Clean the humidifier (see Care & Maintenance, 9) and refill with clean water. If essential oils were diffused, clean with white vinegar (see Care & Maintenance, 9), and allow the humidifier to dry. White dust appears around the humidifier.
WA R R A N T Y I N F O R M AT I O N Product Model Ultrasonic Top-Fill Cool Mist 2-in-1 Humidifier & Diffuser Dual 100 For your own reference, we strongly recommend that you record your order ID and date of purchase. Order ID Date of Purchase Terms & Policy Arovast Corporation (“Arovast”) warrants this product to the original purchaser to be free from defects in material and workmanship, under normal use and conditions, for a period of one year from the date of original purchase.
C U S TO M E R S U P P O R T If you have any questions or concerns about your new product, please contact our helpful Customer Support Team. Customer Support Arovast Corporation 1202 N. Miller St., Suite A Anaheim, CA 92806 Email: support@levoit.com Toll-Free: (888) 726-8520 Support Hours Mon–Fri, 9:00 am–5:00 pm PST/PDT *Please have your order invoice and order ID ready before contacting Customer Support.
levoit.com Connect with us @LevoitLifestyle A7-02.