HP Scanjet G3010 User Guide
Contents 1 How to use the scanner........................................................................................2 Where to get additional information ........................................................................2 Accessibility ............................................................................................................2 How to use the HP Photosmart software ...............................................................3 Front panel and accessories overview ..............
1 How to use the scanner This manual describes how to use the HP Scanjet G3010 Photo Scanner and its accessories. This section presents an overview of the scanner and how to use it.
3. 4. Click the language that you want. A list of guides is displayed. Click Onscreen User Guide. Button Disable Utility To prevent buttons from being accidentally pushed, you can use the Button Disable Utility to disable the buttons. You can use the same utility to re-enable the buttons. To use the Button Disable Utility, complete the following steps: 1. 2. 3. On your hard drive, navigate to C:\Program Files\Common Files\Hewlett-Packard \Scanjet\g3010\hpbdu.exe. Double-click hpbdu.exe.
Chapter 1 Front panel buttons Icon Feature name Description Scan button Scans pictures, graphics, documents, or objects. Scan Film button Scans transparent positives (such as 35 mm slides) and negatives. Scanning film requires that you use the transparent materials adapter (TMA) located on the underside of the scanner lid. Copy button Scans the item and sends it to the printer to make a copy. Scan to PDF button Scans one or more pages and saves them as a PDF file for sharing or storing.
To start the HP Solution Center: 1. 2. Do one of the following: a. On the Windows desktop, double-click the HP Solution Center icon. b. On the taskbar, click Start, point to Programs or All Programs, point to HP, and then click HP Solution Center. If you have installed more than one HP device, click the tab for the scanner. The HP Solution Center shows only the functions, settings, and support options that are appropriate for the selected HP device.
Chapter 1 1. Place the original face down on the scanner glass, as indicated by the reference marks, and then close the lid. 2. Press the Scan button ( ). The HP Scanning dialog box appears. Under the What are you scanning? heading, click Picture. Select Scan originals from glass. Click Scan. When the scan is finished, place an item on the scanner glass and then click Scan to scan another picture, or click Done. The software saves the scan to a subfolder in the My Scans folder.
Note If you want to preview scans before they are sent to their destination, select Show Preview in the HP Scanning dialog box, or begin your scan from the HP Solution Center. Also see Preview a scanned image. 1. Place the original face down on the scanner glass, as indicated by the reference mark. 2. 3. Press the Scan button ( ). The HP Scanning dialog box appears.
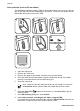
Chapter 1 Scan positives (such as 35 mm slides) The transparent materials adapter (TMA) in this model enables you to scan as many as two 35 mm slides at one time, depending on orientation. To scan 35 mm slides, use the slide holder that is part of the built-in TMA. 1. 2. 3. 4. 5. Open the scanner lid. Remove the TMA cover. Remove the negative strip holder, if present, from the slide holder. Place the slides into the slide holder.
9. Click Scan. 10. Follow the instructions on the screen to finish scanning. The scan is sent to the destination selected in the HP Scanning dialog box. 11. When finished, remove the slides. Place the negative strip holder back into the scanner lid for convenient storage. 12. Replace the TMA cover and close the scanner lid. Scan negatives To scan 35 mm negatives, use the negative strip holder.
Chapter 1 4. Slide a negative strip into the negative strip holder so that the shiny side of the negative faces you. Note Negatives are easily damaged. Touch them only on their edges. 5. Insert the negative strip holder back into the slide holder. Note If there is unused space in the negative strip holder, push the negatives all the way to the bottom of the holder and slide the TMA cover in to fill in the empty space. 6. 7. 8. 9. 10. 11. 12. 13. Close the scanner lid.
The front panel Copy button is optimized to scan and print a duplicate of what is on the scanner glass. If you want to change the image, such as lighten, darken, or adjust size, click Cancel in the hp copying dialog box. Adjust the settings, and then complete the scan. If you use the HP Solution Center, you can also click the Make Copies button and adjust the settings in the preview screen. 1. 2. Place the original face down on the scanner glass, as indicated by the reference marks.
Chapter 1 E-mail a document or picture Follow these instructions to scan pictures or documents from the scanner glass and send the scans to a supported e-mail program as an attachment. 1. Place the original face down on the scanner glass, as indicated by the reference mark. 2. 3. Press the Scan button ( ). The HP Scanning dialog box appears. Under the What are you scanning? heading, click either Document or Picture, and then select the appropriate options for the document or picture you are scanning.
To view or change the scan settings, open the HP Solution Center and select the device tab. Click Settings, point to Scan Settings, and then select the type of settings you want to view or change. To get help with settings, click Help.
2 Care and maintenance This section presents information about how to care for and maintain the scanner. ● ● ● Clean the scanner glass Clean the transparent materials adapter (TMA) Order maintenance and scanner supplies Occasional cleaning of your scanner helps ensure higher-quality scans. The amount of care necessary depends upon several factors, including the amount of use and the environment. You should perform routine cleaning as necessary.
3 Troubleshooting This section contains solutions for common problems with the scanner and the transparent materials adapter (TMA). ● ● ● Scanner initialization or hardware problems Scanner operation problems Slides, negatives, and TMA issues Scanner initialization or hardware problems This section contains solutions for initialization and hardware problems.
Chapter 3 Scanner has stopped working properly If the scanner stops scanning, complete the following steps, in order. After each step, start a scan to see if the scanner is working. If the problem continues, proceed with the next step. 1. 2. 3. 4. 5. A cable might be loose. Ensure that both the USB cable and power cable are securely connected. Turn the scanner off using the power switch, wait 60 seconds, and then turn it back on. Reboot your computer. A software conflict might exist on your computer.
Scanner will not turn on If the scanner will not turn on when you press the front panel scanner buttons, check for these possible problems: ● ● ● The scanner may have been unplugged. Check to see that the power cable has not become disconnected from the scanner or unplugged from the power source. The scanner may be turned off. Check to see that the scanner power switch is in the On position. Check to see that the TMA cable has not become disconnected from the scanner.
Chapter 3 Issues with scanning documents or text (OCR) The scanner uses optical character recognition (OCR) to convert text on a page to text that you can edit on your computer. ● If you scan text but cannot edit it, make sure that you make the following selections during scanning: – HP Scanning (Select Document.) – Scan to (Select a word-processing program or Save to File.) Note If you select Save to File, select a text file type from the File Type drop-down list.
● ● ● Items have excessive amount of dust or dirt on them. Smudges or other marks appear on scanned images. Haze or dust is on the glass. Allow the glass to dry thoroughly before scanning another image. For more details, see Care and maintenance on page 14. Slides, negatives, and TMA issues Use this section to help resolve issues with 35 mm slides or 35 mm negatives that have been scanned by using the TMA.
Chapter 3 The scanned images are dark ● ● ● Check to see if the TMA light is on before you click Scan or Accept. The bulb in the TMA light source might be broken or not working. If the bulb is broken, service is required. The selection area might not be made correctly. Make a selection area that only includes the photo, without borders. The TMA does not work at all The cable might not be connected correctly. Ensure that the TMA cable is connected securely to the TMA port on the back of the scanner.
Index A accessibility 2 attachments, e-mail C clean scanner glass 14 TMA 14 copy from scanner glass Copy button 3, 10 H hardware test 15 Help 2 HP Photosmart about 3 settings 12 HP Solution Center about 3 S scan documents 6 e-mail 12 from front panel buttons 4 from the HP Solution Center 4 from TWAIN software 5 multiple pictures 6 original types 5 pictures 5 preview image 10 transparent items 7, 10 Scan button 3, 5, 6 Scan Film button 3 Scan to PDF button 11 Scan to Share button 3 scanner hardware test 1
scan negatives 9 scan slides 7 scan slides or negatives 10 troubleshoot 19 transparencies, scan 10 troubleshoot buttons 17 fuzzy images 18 negatives 19 power 17 reset scanner 15 scanner 16 slides 19 speed 17, 18 test scanner hardware 15 turn on, troubleshoot 17 TWAIN scan from 5 W Web sites order maintenance supplies 14 22 HP Scanjet G3010