Appareil photo numérique Digital Camera MODE D’EMPLOI - INSTRUCTION MANUAL DJ048series
A B D F L 1 1
1 A 2 3 4 7 B 8 D 10 11 C 6 5 9 E 12 F LCD 13 14 17 16 15
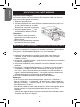
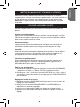
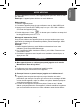
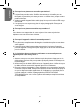
FRANÇAIS DESCRIPTION DE L’APPAREIL PHOTO Reportez-vous à l’image A 1. Flash 2. Objectif 3. Touche Marche/Arrêt 4. LED 5. Touche Lecture 6. Touche Supprimer 7. Écran LCD Reportez-vous à l’image B 8. Déclencheur Reportez-vous à l’image C 9. Douille pour trépied (trépied non fourni) Reportez-vous à l’image D 10. Attache pour dragonne 11. Compartiment des piles / Emplacement pour carte SD Reportez-vous à l’image E 12. Prise USB Reportez-vous à l’image F 13. Taille de l’image 14.
Reportez-vous à l’image D 1. Vérifiez que l’appareil est hors tension. 2. Faites glisser le couvercle du logement des piles dans la direction de la flèche pour l’ouvrir. 3. Insérez 2 piles 1,5V de type LR03/ AAA (non fournies) en veillant à respecter les polarités indiquées dans le logement des piles. 4. Refermez le logement des piles. Remarque : Quand l’indicateur d’usure des piles l’écran, remplacez les piles. s’affiche à Ne pas recharger les piles non rechargeables.
FRANÇAIS INSERTION D’UNE CARTE MEMOIRE Reportez-vous à l’image D Vous devez insérer une carte mémoire SD (maximum 8 GB, non fournie) pour pouvoir sauvegarder vos photos. 1. Éteignez l’appareil photo. 2. Poussez fermement une carte SD dans l’emplacement prévu jusqu’à ce qu’elle s’enclenche avec un déclic. Refermez le couvercle du logement. 3. Allumez l’appareil photo, doit normalement s’afficher à l’écran. Remarque : • Pour retirer la carte, poussez-la légèrement vers l’intérieur pour la désenclencher.
Maintenez la touche Marche/Arrêt enfoncée pour allumer ou éteindre l’appareil photo. Quand vous allumez l’appareil photo, son écran s’allume et un bip retentit pour confirmer que l’appareil photo est prêt à être utilisé. Remarque : L’appareil photo s’éteint automatiquement après 3 minutes d’inactivité. UTILISER L’APPAREIL PHOTO Allumez l’appareil photo pour entrer dans le mode photo et prendre des photos. Prendre une photographie Appuyez sur le DÉCLENCHEUR pour prendre une photographie.
FRANÇAIS TELECHARGER VOS PHOTOS ET VIDEOS Téléchargement manuel 1. Allumez l’appareil photo et connectez-le à votre ordinateur avec le câble USB fourni. Appuyez sur la touche LECTURE jusqu’à ce que « MSDC » s’affiche sur l’écran de l’appareil photo. 2. Sélectionnez « Copier les photos dans un dossier de mon ordinateur » et cliquez sur « OK ». 3. Suivez les instructions qui s’affichent sur l’écran de votre ordinateur jusqu’à ce que vous soyez informé que la copie est terminée.
Mode webcam 1. Allumez l’appareil photo. 2. Connectez l’appareil photo à votre ordinateur avec le câble USB fourni. 3. Appuyez sur la touche LECTURE jusqu’à ce que « PC CAM » s’affiche sur l’écran de l’appareil photo. 4. Double-cliquez sur l’icône du bureau pour visualiser en temps réel les images filmées par la Webcam. Messagerie instantanée (Chat) Vous pouvez utilisez votre appareil photo en tant que webcam pour votre application de messagerie instantanée préférée (Yahoo Messenger, MSN Messenger, Skype…).
FRANÇAIS Q: Pourquoi mes photos ne sont-elles pas claires ? R: 1. L’objectif est peut-être sale. Soufflez doucement sur la lentille pour en faire partir la poussière puis essuyez avec un chiffon doux, propre et sans produit chimique. 2. Veillez à garder l’appareil bien stable jusqu’à ce que la lumière LED rouge soit éteinte. 3. Il se peut que vous soyez trop près du sujet photographié. Essayez de vous éloigner.
Capteur Capteur CMOS Résolution de l’Image 2592 x 1944 Pixels (5 MP) Format Fichier JPEG Mémoire Externe Cartes SD / MMC / SDHC (jusqu’à 8 GB) Écran LCD 1,77” TFT Objectif f = 9,3, F3,1 Exposition Automatique Balance des Blancs Automatique ISO Automatique Flash Automatique Interface USB 2.
FRANÇAIS ENTRETIEN Protéger le produit de l’humidité. S’il est mouillé, l’essuyer immédiatement. Ne pas le laisser en plein soleil, ne pas l’exposer à une source de chaleur. Ne pas le laisser tomber. Ne pas tenter de le démonter. Pour le nettoyer, utiliser un chiffon légèrement imbibé d’eau à l’exclusion de tout produit détergent. GARANTIE Ce produit est couvert par notre garantie de un an.
GETTING TO KNOW YOUR CAMERA ENGLISH Please refer to image A 1. Flash 2. Camera lens 3. Power button 4. LED 5. Play button 6. Delete button 7. LCD Please refer to image B 8. Shutter button Please refer to image C 9. Tripod hole (tripod not included) Please refer to image D 10. Strap hole 11. Battery compartment / SD card slot Please refer to image E 12. USB jack Please refer to image F 13. Image size 14. Number of pictures left to take 15. Storage card is in use 16. Battery level indicator 17.
INSERTING NEW BATTERIES ENGLISH Please refer to image D. 1. Make sure the camera is off. 2. To open the battery door, slide it in the direction of the arrow. 3. Insert 2 x LR03/AAA 1,5V type (batteries not included) observing the polarity indicated inside the battery compartment. 4. Close the battery compartment. Note: When the low battery icon appears on the LCD screen, replace the batteries. Non-rechargeable batteries are not to be recharged.
Please refer to image D. You need to insert an SD card (8 GB maximum, not included) so you can store your pictures. 1. Turn the camera off. 2. Push the SD card firmly into the SD slot until you hear a ‘click’ sound. Close the battery door. 3. Turn the camera on and should appear on the LCD screen. Note: • To remove the card, push it in slightly to release it from the slot. • We recommend that you purchase a good quality SD card.
TURNING THE CAMERA ON AND OFF Press and hold the POWER button to turn the camera on or off. When you turn the camera on, the LCD screen lights up and a ‘beep’ sounds to confirm the camera is ready for use. Note: The camera will auto power off after 3 minutes of inactivity. ENGLISH USING THE CAMERA Turn the camera on to enter camera mode and take photos. Taking a photo Press the SHUTTER button to take a photo.
Manual downloading 1. Turn on the camera and then connect it to your computer via the USB cable provided. Press PLAY until ‘MSDC’ appears on the camera LCD screen. 2. Select ‘Copy pictures to a folder on my computer’ and click ‘OK’. 3. Follow the computer’s onscreen commands until you are notified that downloading is complete. OR, you can follow step 1 above and then: 1. Click on the ‘Start’ button in Windows. 2. Click on the ‘My computer’ icon. 3. Click on ‘Removable storage device’ then ‘DCIM’.
WEBCAM MODE Connected to your PC, your camera can be used as a webcam. Note: the camera must be in webcam mode. ENGLISH Webcam mode 1. Turn the digital camera on. 2. Connect the video camera to your computer using the USB cable provided. 3. Press PLAY until ‘PC CAM’ appears on the camera LCD screen. 4. Double-click on the icon on your desktop to view the real-time images taken by the webcam.
Q: Why are my pictures too dark? A: You may need to move closer to your subject or your subject may need to move to a lighter area. Q: Why does the camera turn off automatically? A: 1. Your batteries may be low. Place new batteries in your camera. 2. After 3 minutes of inactivity, your camera goes into power saving mode. Press the “POWER” button and see if it turns on. Q: I have taken photos but my computer does not recognize my camera. What do I do? A: 1. Ensure that you have in fact taken photos.
SPECIFICATIONS ENGLISH Image Sensor CMOS Sensor Image Resolution 2592 x 1944 Pixels (5 MP) File Format JPEG External Memory SD / MMC / SDHC Card (up to 8 GB) LCD Screen 1.77” TFT Lens f=9.3, F3.1 Exposure Automatic White Balance Automatic ISO Automatic Flash Automatic Interface USB 2.
MAINTENANCE WARRANTY This product is covered by our 1-year warranty. For any claim under the warranty or after sale service, please contact your distributor and present a valid proof of purchase. Our warranty covers any manufacturing material and workmanship defect, with the exception of any deterioration arising from the non-observance of the instruction manual or from any careless action implemented on this item (such as dismantling, exposition to heat and humidity, etc.).
FAMILIARÍZATE CON TU CÁMARA Consultar la Fig. A a modo de referencia 1. Flash 2. Lente de la cámara 3. Botón de encendido 4. Indicador LED 5. Botón de reproducción 6. Botón de eliminación 7. Pantalla LCD Consultar la Fig. B a modo de referencia 8. Botón del obturador ESPAÑOL Consultar la Fig. C a modo de referencia 9. Orificio para trípode (no incluido) Consultar la Fig. D a modo de referencia 10. Orificio para sujeción de la correa de transporte 11.
Consultar la Fig. D a modo de referencia. 1. Asegúrese de que la cámara está apagada. 2. Para abrir la tapa del compartimento de las pilas deslícela en la dirección señalada por la flecha. 3. Inserte 2 pilas de 1,5 V de tipo LR03/AAA (no incluidas) observando la polaridad correcta indicada en el fondo del compartimento de las pilas. 4. Cierre el compartimiento de las pilas.
INSTALACIÓN DE UNA TARJETA DE MEMORIA ESPAÑOL Consultar la Fig. D a modo de referencia. Necesitará instalar una tarjeta de memoria de tipo SD (de 8 GB como máximo, no incluida) para poder guardar sus archivos fotográficos. 1. Apague la cámara. 2. Inserte firmemente la tarjeta SD en la ranura prevista a tal efecto hasta que suene un chasquido, indicativo de que ha encajado correctamente en su sitio. Cierre la tapa del compartimento de las pilas. 3.
• Asegúrese de que la cámara no está conectada a su ordenador antes de instalar el controlador y el software. CÓMO ENCENDER Y APAGAR LA CÁMARA Mantenga pulsado el botón de Encendido, ya sea para encender o apagar la cámara. Una vez encendida la cámara, la pantalla LCD se iluminará y sonará un tono para confirmar que la cámara está lista para su utilización. Nota: la cámara se apagará automáticamente al cabo de 3 minutos si no detecta actividad alguna por parte del usuario.
CÓMO DESCARGAR TUS FOTOGRAFÍAS Y VÍDEOS EN TU ORDENADOR ESPAÑOL Descarga manual 1. Encienda la cámara y conéctela a su ordenador utilizando el cable USB que se suministra. Pulse el botón de Reproducción hasta que en la pantalla LCD de la cámara se muestra en la indicación “MSDC”. 2. Seleccione la opción “Copy pictures to a folder on my computer” (copiar fotos a una carpeta de mi ordenador) y, a continuación haga clic en “OK” (aceptar). 3.
MODO DE CÁMARA WEB Mientras está conectada a su ordenador, esta cámara fotográfica puede utilizarse como una cámara Web. Nota: la cámara deberá estar configurada en modo de cámara Web. Modo de cámara Web 1. Encienda la cámara fotográfica digital. 2. Conecte la cámara a su ordenador utilizando el cable USB que se suministra. 3. Pulse el botón de Reproducción hasta que en la pantalla LCD de la cámara se muestra en la indicación “PC CAM”.
P: ¿Por qué mis fotos salen borrosas? R: 1. Es posible que la lente esté sucia. Con cuidado, sopla cualquier acumulación de polvo que pudiera existir sobre la lente. A continuación, echa el aliento sobre la lente y límpiala con un paño limpio y suave, sin aplicar productos químicos al mismo. 2. Asegúrate de que al hacer la foto, sujetas la cámara de manera firme y estática una vez que el indicador LED rojo se haya apagado. 3. Es posible que estés demasiado cerca del objetivo a fotografiar.
Sensor de imagen Sensor CMOS Resolución de imagen 2592 x 1944 píxeles (5 MP) Formatos de archivo compatibles JPEG Memoria externa Tarjetas SD/MMC/SDHC (de hasta 8 GB) Pantalla LCD TFT de 1,77 pulgadas Lente f=9,3 - F3.
MANTENIMIENTO Utilice un paño suave y ligeramente húmedo para limpiar el aparato. No utilice detergentes. No exponga el aparato a la acción directa de los rayos del sol ni a cualquier otra fuente de calor. No sumerja el aparato en agua. No desarme o deje caer el aparato. No intente torcer o doblar el aparato. GARANTÍA ESPAÑOL NOTA: por favor conserve este manual de instrucciones, ya que contiene informaciones importantes. Este producto está cubierto por nuestra garantía de un año.
CONHECER A SUA CÂMARA Por favor, consulte a imagem A 1. Flash 2. Lente da câmara 3. Botão Power (energia) 4. LED 5. Botão de Reprodução 6. Botão de Apagar 7. LCD Por favor, consulte a imagem B 8. Obturador Por favor, consulte a imagem C 9. Orifício do tripé (tripé não incluído) Por favor, consulte a imagem E 12. Entrada USB Por favor, consulte a imagem F 13. Tamanho da imagem 14. Número de imagens restantes 15. O cartão de armazenamento está a ser usado 16. Indicador do nível das pilhas 17.
COLOCAR PILHAS NOVAS Por favor, consulte a imagem D. 1. Certifique-se de que a câmara está desligada. 2. Para abrir a tampa do compartimento das pilhas, faça-a deslizar na direcção da seta. 3. Instale as 2 pilhas LR03/AAA de 1,5V (não incluídas), tendo em conta os sinais da polaridade dentro do compartimento das pilhas. 4. Feche o compartimento das pilhas. Nota: Quando aparecer o ícone de pilhas fracas no ecrã LCD, substitua as pilhas. PORTUGUÊS Não recarregue pilhas não recarregáveis.
INSTALAR UM CARTÃO DE MEMÓRIA Por favor, consulte a imagem D. Precisa de inserir um cartão SD (8GB no máximo, não incluído) para poder guardar as suas imagens. 1. Desligue a câmara. 2. Prima firmemente o cartão SD na ranhura SD até ouvir um “clique”. Feche a tampa do compartimento das pilhas. 3. Ligue a câmara e deverá aparecer no ecrã LCD. Nota: • Para retirar o cartão, prima-o ligeiramente para o libertar da ranhura. • Recomendamos que compre um cartão SD de boa qualidade.
LIGAR E DESLIGAR A CÂMARA Prima e mantenha premido o botão POWER para ligar e desligar a câmara. Quando ligar a câmara, o ecrã LCD acende e ouvirá um som “beep” para confirmar que a câmara está pronta a ser utilizada. Nota: A câmara desliga-se automaticamente passados 3 minutos de inactividade. USAR A CÂMARA Ligue a câmara para entrar no modo de câmara e tirar fotografias. Tirar uma fotografia Prima o obturador para tirar uma fotografia.
DESCARREGAR AS SUAS FOTOS E VÍDEOS Descarregar usando o “ArcSoft MediaImpression” 1. Ligue a sua câmara ao seu computador através do cabo USB fornecido. A câmara é ligada automaticamente quando for ligada e aparece “MSDC” na câmara. 2. Inicie o programa “ArcSoft MediaImpression” clicando no atalho . Clique no botão “Importar” no ecrã do menu principal. 3.
MODO WEBCAM Ligada ao seu PC, a sua câmara pode ser usada como webcam. Nota: A câmara tem de estar no modo webcam. Modo webcam 1. Ligue a câmara digital. 2. Ligue a sua câmara ao seu computador através do cabo USB fornecido. 3. Prima PLAY (Reproduzir) até que “PC CAM” apareça no ecrã LCD da câmara. 4. Clique duas vezes no ícone no seu ambiente de trabalho para ver as imagens em tempo real registadas pela webcam.
P: Porque é que as minhas imagens não estão nítidas? R: 1. A lente pode estar suja. Sopre suavemente qualquer pó solto existente na lente. Depois, respire suavemente para a lente e limpe com um pano suave e limpo sem químicos. 2. Certifique-se de que segura bem a câmara até que o LED vermelho se desligue. 3. Pode estar demasiado perto do objecto. Tente afastar-se.
ESPECIFICAÇÕES PORTUGUÊS Sensor de imagem Sensor CMOS Resolução de imagem 2592 x 1944 Pixéis (5MP) Formato do ficheiro JPEG Memória externa Cartão SD / MMC / SDHC (até 8GB) Ecrã LCD 1.77” TFT Lente f=9.3, F3.1 Exposição Automática Balanço de brancos Automático ISO Automático Flash Automático Interface USB 2.
MANUTENÇÃO Use apenas um pano suave ligeiramente embebido em água para limpar a unidade. Não use detergente. Não exponha a unidade à luz directa do sol ou a qualquer outra fonte de calor. Não coloque a unidade dentro de água. Não desmonte nem deixe cair a unidade. Não tente dobrar ou torcer a unidade. GARANTIA Referência: DJ048series Criado e desenvolvido na Europa – Fabricado na China ©2010 Lexibook® AJ AGUIAR Atendimento a clientes á sua disposição: 227455403 www.lexibook.
IMPARA A CONOSCERE LA TUA FOTOCAMERA Fare riferimento alla figura A 1. Flash 2. Obiettivo 3. Tasto di alimentazione (Power) 4. LED 5. Tasto Play 6. Tasto Delete 7. LCD Fare riferimento alla figura B 8. Tasto dell’otturatore Fare riferimento alla figura C 9. Foro per il treppiede (treppiede non in dotazione) Fare riferimento alla figura D 10. Foro per il cordoncino 11. Scomparto batterie / slot per scheda SD Fare riferimento alla figura E 12. Jack USB Fare riferimento alla figura F 13.
INSERIMENTO BATTERIE NUOVE Fare riferimento alla figura D. 1. Assicurarsi che la macchina fotografica sia spenta. 2. Per aprire lo sportello dello scomparto batterie, farlo scorrere nella direzione della freccia. 3. Inserire 2 batterie LR03/AAA da 1,5V (non in dotazione) rispettando le polarità indicate all’interno dello scomparto batterie stesso. 4. Chiudere lo scomparto batterie. Nota bene: quando l’icona batteria scarica LCD, cambiare le batterie.
INSTALLARE UNA MEMORY CARD Fare riferimento alla figura D. Inserire una scheda SD (8 GB massimo, non in dotazione) per poter memorizzare le fotografie. 1. Spegnere la macchina fotografica. 2. Inserire la scheda SD nell’apposito slot fino a udire un clic. Chiudere lo sportello dello scomparto batterie. 3. Accendere la macchina fotografica: l’icona appare sullo schermo LCD. Nota bene: • Per rimuovere la scheda, premerla leggermente verso l’interno per sganciarla dallo slot.
ACCENDERE E SPEGNERE LA FOTOCAMERA Per accendere o spegnere la macchina fotografica premere il tasto POWER. Quando si accende la macchina fotografica, lo schermo LCD si accende e un “bip” suona per confermare che la macchina fotografica è pronta per l’uso. Nota bene: la macchina fotografica si spegnerà automaticamente dopo 3 minuti di inattività. UTILIZZO DELLA MACCHINA FOTOGRAFICA Accendere la macchina fotografica per entrare in modalità macchina fotografica e scattare foto.
SCARICARE FOTO E VIDEO Download manuale 1. Accendere la macchina fotografica e collegarla al computer servendosi del cavo USB in dotazione. Premere PLAY fino a quando sullo schermo LCD della macchina compare la scritta ‘MSDC’. 2. Selezionare ‘Copy pictures to a folder on my computer’ (copia immagini in una cartella presente sul computer) e cliccare su ‘OK’. 3. Seguire le indicazioni su schermo del computer fino a quando verrà comunicato che il download è completo.
MODALITÀ WEBCAM Collegata al PC, la fotocamera può essere utilizzata come webcam. Nota: la telecamera deve essere in modalità webcam. Modalità webcam 1. Accendere la macchina fotografica digitale. 2. Collegare la telecamera al computer servendosi del cavo USB in dotazione. 3. Premere PLAY fino a quando sullo schermo LCD della macchina compare la scritta ‘PC CAM’. 4. Fare doppio clic sull’icona sul desktop per visualizzare le immagini in tempo reale scattate dalla webcam.
D: Perchè le fotografie sono poco chiare ? Causa/Soluzione? R: 1. Le lenti potrebbero essere sporche. Soffiare via la polvere gentilmente dalle lenti e poi pulirle con un panno di pulizia lenti privo di agenti chimici. 2. Assicurarsi di tenere la fotocamera in posizione stabile fino a quando la luce rossa di segnalazione del LED si sia spenta. 3. L’operatore potrebbe essere troppo vicino al soggeto da ritrarre. Allontanarsi dall’obiettivo.
SPECIFICHE TECNICHE Sensore immagine Sensore CMOS Risoluzione immagine 2592 x 1944 Pixel (5 MP) Formato file JPEG Memoria esterna Schede SD / MMC / SDHC (fino a 8 GB) Schermo LCD 1,77” TFT f=9.3, F3.1 Esposizione Automatica Equilibrio del bianco Automatico ISO Automatico Flash Automatico Interfaccia USB 2.
MANUTENZIONE Pulire l’unità solo con un panno morbido leggermente umido. Non usare detergenti. Non esporre l’unità alla luce diretta del sole o ad altre fonti di calore. Non immergere l’unità in acqua. Non smontare o far cadere l’unità. Non tentare di piegare o deformare l’unità. GARANZIA NOTA: Conservare il manuale di istruzioni, contiene informazioni importanti. Questo prodotto è coperto dalla nostra garanzia di uno anno.
LERNE DEINE KAMERA KENNEN Bitte sehen Sie Bild A. 1. Blitz 2. Kameralinse 3. Ein-/Aus-Taste 4. LED 5. Wiedergabe-Taste 6. Löschen-Taste 7. LCD Bitte sehen Sie Bild B. 8. Auslöser Bitte sehen Sie Bild C. 9. Stativanschlussöffnung (Stativ nicht im Lieferumfang enthalten) Bitte sehen Sie Bild D. 10. Öse für die Trageschlaufe 11. Batteriefach / SD-Kartensteckplatz Bitte sehen Sie Bild E. 12. USB-Anschluss Bitte sehen Sie Bild F 13. Bildgröße 14. Anzahl der Bilder, die noch aufgenommen werden können 15.
NEUE BATTERIEN EINLEGEN Bitte sehen Sie Bild D. 1. Stellen Sie sicher, dass die Kamera ausgeschaltet ist. 2. Schieben Sie die Batteriefachabdeckung in Pfeilrichtung, um sie zu öffnen. 3. Legen Sie 2 x LR03/AAA 1,5 V Batterien (nicht mitgeliefert) unter Beachtung der Polarität, die im Batteriefach gekennzeichnet ist, ein. 4. Schließen Sie das Batteriefach. Hinweis: Wenn das Symbol für die schwache Batterie auf dem LC-Display erscheint, wechseln Sie die Batterien aus.
EINSETZEN EINER OPTIONALEN SPEICHERKARTE Bitte sehen Sie Bild D. Sie müssen eine SD-Karte (maximal 8 GB, nicht mitgeliefert) einlegen, damit Sie Ihre Bilder speichern können. 1. Schalten Sie die Kamera aus. 2. Schieben Sie die SD-Karte fest in den SD-Steckplatz, bis Sie ein „Klicken” hören. Schließen Sie die Batteriefachabdeckung. 3. Schalten Sie die Kamera ein und auf dem LC-Display sollte erscheinen. Hinweis: • Um die Karte zu entfernen, drücken Sie diese leicht in den Steckplatz, um sie zu lösen.
KAMERA EIN- UND AUSSCHALTEN Halten Sie die EIN-/AUS-Taste gedrückt, um die Kamera ein- oder auszuschalten. Wenn Sie die Kamera einschalten, leuchtet das LC-Display auf und ein „Piepton” signalisiert, dass die Kamera einsatzbereit ist. Hinweis: Die Kamera schaltet sich automatisch aus, wenn für 3 Minuten keine Taste gedrückt wird. BENUTZUNG DER KAMERA Schalten Sie die Kamera ein, um in den Kameramodus zu gehen und Fotos zu schießen. Aufnahme eines Fotos Drücken Sie den AUSLÖSER, um ein Foto aufzunehmen.
HERUNTERLADEN IHRER FOTOS UND VIDEOS Manuelles Herunterladen 1. Schalten Sie die Kamera ein und verbinden Sie sie mithilfe des mitgelieferten USB-Kabels mit Ihrem Computer. Drücken Sie WIEDERGABE, bis „MSDC” auf dem LC-Display der Kamera erscheint. 2. Wählen Sie „Copy pictures to a folder on my computer” (Bilder in einen Ordner auf meinem Computer kopieren) und klicken Sie OK. 3. Folgen Sie den Bildschirmbefehlen des Computers, bis Ihnen mitgeteilt wird, dass das Herunterladen abgeschlossen ist.
WEBCAMMODUS Mit deinem PC verbunden kann deine Kamera als Webcam benutzt werden. Hinweis: Die Kamera muss im Webcammodus sein. Webcammodus 1. Schalten Sie die Digitalkamera ein. 2. Verbinden Sie die Videokamera mithilfe des mitgelieferten USB-Kabels mit Ihrem Computer. 3. Drücken Sie WIEDERGABE, bis „PC CAM” auf dem LC-Display der Kamera erscheint. 4. Doppelklicken Sie auf das Symbol auf Ihrem Desktop, um die von der Webcam aufgenommenen Echtzeitbilder zu sehen.
2. Der SD-Kartenspeicher der Kamera ist möglicherweise voll. Wenn dies der Fall ist, musst du Fotos von deiner Kamera löschen. Stelle sicher, dass du alle Fotos, die du behalten möchtest, erst auf deinen Computer überträgst. 3. Eventuell läuft der Timer gerade, warte einige Sekunden. F: Warum sind meine Bilder unscharf? A: 1. Vielleicht ist die Linse schmutzig. Puste vorsichtig losen Staub weg, der sich vielleicht auf der Linse befindet.
TECHNISCHE DATEN Bildsensor CMOS-Sensor Bildauflösung 2592 x 1944 Pixel (5 MP) Dateiformat JPEG Externer Speicher SD- / MMC- /SDHC-Karte (bis zu 8 GB) LC-Display 1,77” TFT Linse f=9,3 F3,1 Belichtung Automatisch Weißabgleich Automatisch ISO Automatisch Blitz Automatisch Schnittstelle USB 2.
PFLEGE Verwenden Sie nur ein weiches, angefeuchtetes Tuch zur Reinigung des Gerätes. Verwenden Sie keine Reinigungsmittel. Setzen Sie das Gerät nicht direktem Sonnenlicht oder anderen Hitzequellen aus. Tauchen Sie das Gerät nicht in Wasser. Nehmen Sie das Gerät nicht auseinander und lassen Sie es nicht fallen. Versuchen Sie nicht, das Gerät zu verbiegen. GARANTIE HINWEIS: Bitte bewahren Sie diese Bedienungsanleitung auf, da sie wichtige Informationen enthält.
LEER UW CAMERA KENNEN Zie figuur A 1. Flits 2. Cameralens 3. Power (Stroom) knop 4. LED 5. Play (Afspelen) knop 6. Delete (Verwijderen) knop 7. LCD Zie figuur B 8. Shutter (Sluiter) knop Zie figuur C 9. Statiefgat (statief niet meegeleverd) Zie figuur D 10. Riemopening 11. Batterijvak / SD kaartgleuf Zie figuur E 12. USB-aansluiting Zie figuur F 13. Beeldgrootte 14. Aantal resterende te nemen foto’s 15. Opslagkaart is in gebruik 16. Batterijniveau-aanduiding 17.
NIEUWE BATTERIJEN PLAATSEN Zie figuur D. 1. Zorg dat de camera is uitgeschakeld. 2. Om het batterijdeksel te openen, schuif deze in de richting van de pijl. 3. Plaats 2 x LR03/AAA 1,5V type batterijen(niet meegeleverd). Let hierbij op de polariteit zoals aangegeven in het batterijvak. 4. Sluit het batterijvak. Opmerking: Vervang de batterijen zodra het lege batterijsymbool het LCD-scherm verschijnt. op Probeer niet-oplaadbare batterijen niet op te laden.
EEN FACULTATIEVE GEHEUGENKAART INSTALLEREN Zie figuur D. Plaats een SD-kaart (maximum 8 GB, niet meegeleverd) zodat u uw foto’s kunt opslaan. 1. Schakel de camera uit. 2. Duw de SD-kaart stevig in de SD-gleuf totdat u een ‘klik’ hoort. Sluit het batterijdeksel. 3. Schakel de camera in, zou op het scherm moeten verschijnen. Opmerking: • Om de kaart uit te halen, druk lichtjes op de kaart zodat deze uit de gleuf tevoorschijn komt. • We bevelen aan om een hoogwaardige SD-kaart aan te kopen.
DE CAMERA IN- EN UITSCHAKELEN Druk en houd de POWER (STROOM) knop ingedrukt om de camera aan of uit te zetten. Zodra de camera is ingeschakeld, licht het LCD-scherm op en hoort u een ‘pieptoon’ om te bevestigen dat de camera klaar voor gebruik is. Opmerking: De camera wordt automatisch na een inactiviteit van 3 minuten uitgeschakeld. DE CAMERA GEBRUIKEN Schakel de camera in om de cameramodus te openen en foto’s te nemen. Een foto nemen Druk op de SHUTTER (SLUITER) knop om een foto nemen.
UW FOTO’S EN VIDEO’S DOWNLOADEN Manueel downloaden 1. Schakel de camera in en sluit deze dan aan op uw computer met behulp van de meegeleverde USB-kabel. Druk op PLAY (AFSPELEN) totdat ‘MSDC’ op het LCD-scherm van de camera verschijnt. 2. Selecteer ‘Copy pictures to a folder on my computer’ (‘Kopieer foto’s naar een map op mijn computer’) en klik op ‘OK’. 3. Volg de instructies op het computerscherm totdat u melding krijgt dat het downloaden voltooid is. OF, u kunt bovenstaande stap 1 volgen en dan: 1.
WEBCAMMODUS Uw camera kan als een webcam worden gebruikt als deze op uw computer is aangesloten. Opmerking: De camera moet zich in de webcammodus bevinden. Webcammodus 1. Schakel de digitale camera in. 2. Sluit de camera aan op uw computer met gebruik van de meegeleverde USB-kabel. 3. Druk op PLAY (AFSPELEN) totdat ‘PC CAM’ op het LCD-scherm van de camera verschijnt. 4. Dubbelklik op het symbool op uw bureaublad, om de beelden die door de webcam worden genomen rechtstreeks te zien.
V: Waarom zijn mijn beelden onscherp? A: 1. De lens kan vuil zijn. Blaas voorzichtig het losse stof van de lens. Adem zachtjes op de lens en veeg deze met een zachte, schone doek zonder het gebruik van chemicaliën. 2. Zorg dat u de camera onbeweeglijk houdt totdat het rode LED-licht uitdooft. 3. U bevindt zich te dicht bij uw voorwerp/persoon. Ga enkele stappen achteruit. V: Waarom zijn mijn beelden te donker? A: 1.
Beeldsensor CMOS Sensor Beeldresolutie 2592 x 1944 Pixels (5 MP) Bestandsformaat JPEG Extern geheugen SD / MMC / SDHC-kaart (tot 8 GB) LCD-scherm 1,77” (4,5 cm) TFT Lens f=9,3, F3,1 Belichting Automatisch Witbalans Automatisch ISO Automatisch Flits Automatisch Interface USB 2.
ONDERHOUD Gebruik enkel een zachte, lichtjes vochtige doek om het toestel schoon te maken. Gebruik geen afwasmiddel. Stel het toestel niet bloot aan rechtstreeks zonlicht of een andere warmtebron. Dompel het toestel niet onder in water. Haal het toestel niet uit mekaar of laat hem niet vallen. Probeer niet om het toestel te verwringen of te buigen. GARANTIE OPMERKING: Gelieve deze handleiding te bewaren, daar ze belangrijke informatie bevat. Dit product wordt gedekt door onze een jaar garantie.
YOUR OPINION MATTERS / VOTRE AVIS COMPTE Country/Pays : Email : City/Ville : Last name/Nom de famille : Very disappointing/Très décevant Average/Moyen Conformément aux articles 34 et suivants de la loi « Informatique et Libertés » du 6 janvier 1978, vous disposez d'un droit d'accès, de modification, de rectification et de suppression des données qui vous concernent. Vous pouvez l'exercer sur simple demande à notre adresse.
LEXIBOOK S.