
Operation Manual

14
ENGLISH
15
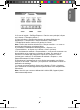
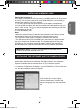
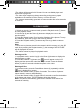
GETTING TO KNOW YOUR CAMERA
1. Flash
2. Camera lens
3. LED
4. (Flash)/SET button
5. Shutter/conrmation button
6. Power/Menu button
7. Playback mode button
8. Up button
9. Down button
10. LCD screen
11. USB connector port
12. Tripod hole (not included)
13. Battery compartment/SD
card slot
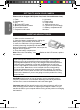
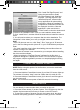
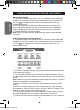
INSERTING NEW BATTERIES
1. Make sure the camera is off.
2. Open the battery compartment by sliding the
battery door in the direction of the arrow.
3. Insert 3 x LR03/AAA 1,5V type batteries (not
included) observing the polarity indicated at the
bottom of the battery compartment, and as per the
diagram shown opposite.
4. Close the battery compartment.
Non-rechargeable batteries are not to be recharged. Rechargeable
batteries are to be removed from the product before being charged.
Rechargeable batteries are only to be charged under adult supervision.
Different types of batteries or new and used batteries are not to be
mixed. Only batteries of the same or equivalent type as recommended
are to be used. Batteries are to be inserted with the correct polarity.
Exhausted batteries are to be removed from the product. The supply
terminals are not to be short circuited. Do not throw batteries into a re.
Remove the batteries if you are not going to use the product for a long
period of time.
Please refer to images A & B (front view, back view and bottom view).
Note: When the “low battery” icon ashes on the LCD screen, replace
the batteries.
WARNING: Mal-function or loss of memory may be caused by strong
frequency interference or electrostatic discharge. Should any abnormal
function occur, remove the batteries and insert them again.
Important note: all les stored into the unit’s internal memory will be lost
when switching off the camera or replacing the batteries. Make sure you
transfer the les to your computer before turning off the product or changing
the batteries.
DJ040seriesIM0119.indd 14 16/3/09 10:46:59