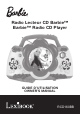
Radio Lecteur CD Barbie™ Barbie™ Radio CD Player GUIDE D’UTILISATION OWNER’S MANUAL RCD160BB
FRANÇAIS MESURES DE SÉCURITÉ MISE EN GARDE RISQUE D’ÉLECTROCUTION NE PAS OUVRIR MISE EN GARDE : AFIN DE RÉDUIRE LES RISQUES D’ÉLECTROCUTION, NE PAS ENLEVER LE COUVERCLE (NI L’ARRIÈRE). NE CONTIENT AUCUNE PIÈCE POUVANT ÊTRE RÉPARÉE NI REMPLACÉE PAR L’UTILISATEUR. CONFIER TOUTE RÉPARATION À UN TECHNICIEN QUALIFIÉ.
1. Lisez ces instructions. 2. Conservez ces instructions. 3. Respectez toutes les mises en garde. 4. Suivez toutes les instructions. 5. N’utilisez pas ce produit près de l’eau ni des endroits humides. 6. N’utilisez qu’un linge doux et sec pour nettoyer l’appareil. 7. Ne bloquez pas les ouvertures d’aération du boîtier. Installez l’appareil selon les instructions du fabricant. 8.
FRANÇAIS PROTÉGEZ VOS MEUBLES Cet appareil est doté de “pieds” de caoutchouc antidérapants qui empêchent l’appareil de bouger lorsque vous utilisez les commandes. Ces “pieds” sont faits de caoutchouc formulé spécifiquement pour ne pas laisser de marques noires ou de tâches sur vos meubles.
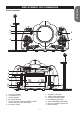
FRANÇAIS EMPLACEMENT DES COMMANDES Avant et arrière 1 2 3 5 4 6 7 8 9 10 11 12 13 1. 2. 3. 4. 5. Scène pour Barbie Compartiment CD Touche Magique Enceintes gauches Ecran LCD avec voyants MISE EN/ HORS FONCTION et FM ST. (FM stéréo) 6. Enceintes droites 7. Poignée de transport 8. Antenne FM télescopique 9. Commande de VOLUME 10. Compartiment des piles 11. Prise d’ENTRÉE AUXILIAIRE 12. Prise de CASQUE D’ÉCOUTE 13.
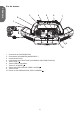
Vue du dessus FRANÇAIS 2 3 4 5 6 7 1 8 9 10 1. Commande de SYNTONISATION 2. Commutateur des BANDES (AM/FM/FM ST.) 3. Compartiment secret 4. Commutateur des FONCTIONS (AUX/RADIO/ HORS FONCTION/CD) 5. Touche STOP ( ) 6. Touche REPEAT (répétition) 7. Touche PLAY/PAUSE 8. Touche SAUT/RECHERCHE VERS L’AVANT 9. Touche PROG. 10.
Cette radio portative nécessite six (6) piles ‘C’ d’alimentation CA (inclus). (non incluses) ou le cordon INSTALLATION DES PILES 1. Retirez la porte du compartiment des piles, situé derrière l’appareil en faisant glisser le couvercle vers le bas. 2. Insérez six (6) piles ‘C’ (non incluses), en respectant le schéma de la polarité à l’intérieur du compartiment des piles (tel qu’indiqué ci-dessous). Pour maximiser la durée de fonctionnement de l’appareil, nous recommandons d’utiliser des piles alcalines. 3.
FRANÇAIS SOURCES D’ALIMENTATION (SUITE) FONCTIONNEMENT SUR LA TENSION CA Pour utiliser l’appareil sur la tension CA, raccordez la petite extrémité du cordon d’alimentation CA à la prise d’alimentation CA située à l’arrière de l’appareil et insérez la fiche dans une prise CA dotée de la tension 230V AC, 50Hz, 60 Hz seulement. Les piles sont mises automatiquement hors fonction lorsque vous utilisez l’adaptateur secteur CA.
ÉCOUTER LA RADIO 1 2 Glissez le commutateur des FONCTIONS situé sur le dessus de l’appareil sur la position RADIO afin de mettre la radio en marche et choisir le mode de la radio. Le voyant de MISE EN/HORS FONCTION s’allumera. Sélectionnez la bande désirée, AM, FM ou FM ST. (stéréo) en glissant le sélecteur des bandes BANDE sur la position désirée. Syntonisez la station radio de votre choix en tournant la commande de syntonisation . REMARQUES : • Si vous choisissez le FM ST.
FRANÇAIS FONCTIONNEMENT (SUITE) INSÉRER ET JOUER UN DISQUE COMPACT 1 2 Glissez le commutateur des FONCTIONS sur la position CD afin de mettre l’appareil en marche et de choisir le mode CD; le voyant de MISE EN/HORS FONCTION s’allumera. Ouvrez le couvercle du compartiment du CD en tirant sur la porte du CD. Insérez un disque sur le moyeu du centre (côté de l’étiquette vers le haut) et enfoncez-le délicatement afin de vous assurer qu’il est bien ancré sur le moyeu.
5 6 Appuyez sur la touche de LECTURE/PAUSE pour effectuer une pause de la lecture. Appuyez sur la touche de LECTURE/PAUSE pour continuer la lecture. Lorsque la lecture du disque est terminée, celui-ci arrêtera. Appuyez sur la touche d’ARRÊT ( ) pour arrêter le disque avant la fin. 7 Pour mettre l’appareil hors fonction, glissez le commutateur des FONCTIONS sur la position de MISE HORS FONCTION; le voyant de MISE EN/HORS FONCTION s’éteindra.
FRANÇAIS FONCTIONNEMENT (SUITE) NOTES SE RAPPORTANT À LA LECTURE DES CD : • Cet appareil peut jouer les disques compacts standard ou les disques simples de 3 po; aucun adaptateur n’est requis. • Si le disque est inséré incorrectement, s’il est sale, endommagé ou simplement absent, l’indication ‘no’ apparaîtra à l’affichage.
RÉPÉTER LA LECTURE D’UNE PISTE 1 2 Lorsque vous êtes en mode d’arrêt ou de lecture du CD, appuyez une fois sur la touche de RÉPÉTITION; ”REP 1” s’affiche sur l’écran LCD. Appuyez sur la touche de SAUT/ ou RECHERCHE pour choisir une piste et appuyez sur la touche pour lancer la de LECTURE/PAUSE lecture; l’appareil jouera sans arrêt la piste sélectionnée, jusqu’à ce que vous appuyiez sur la touche d’ARRÊT ( ) .
FRANÇAIS FONCTIONNEMENT (SUITE) PROGRAMMER LA MÉMOIRE (JUSQU’À 20 PISTES) 1 2 Lorsque vous êtes en mode d’arrêt du CD, appuyez sur la touche PROG; “PROG” et “1” (le numéro de la programmation) clignoteront sur l’écran LCD. Choisissez la première piste que vous désirez jouer à l’aide de la touche de SAUT/ RECHERCHE ou , puis appuyez de nouveau sur la touche PROG. . Répétez cette étape pour programmer des pistes additionnelles (jusqu’à 20 pistes).
Barbie a une petite surprise pour toi ! Suis simplement les instructions ci-dessous et regarde ce que tu peux faire avec ton bouton Magique! Appuie sur le bouton Magique situé à l’avant de ta radio lecteur CD.
FRANÇAIS SOIN ET ENTRETIEN ENTRETIEN DES DISQUES COMPACTS • Manipulez vos disques avec soin. Tenez les disques compacts par les rebords. Ne laissez pas vos doigts entrer en contact avec la surface brillante et non imprimée du disque. • Ne collez pas de ruban autocollant et autres autocollants sur la surface de l’étiquette du disque. • Nettoyez le disque régulièrement à l’aide d’un chiffon doux et sec, libre de toute charpie.
Si l’appareil affiche un problème, consultez le guide de dépannage ci-dessous avant de placer un appel de service.
FRANÇAIS Garantie Ce produit est couvert par notre garantie de deux ans. Pour toute mise en oeuvre de la garantie ou du service après-vente, vous devez vous adresser à votre revendeur muni de votre preuve d’achat. Notre garantie couvre les vices de matériel ou de montage imputables au constructeur à l’exclusion de toute détérioration provenant du non-respect de la notice d’utilisation ou de toute intervention intempestive sur l’article (telle que démontage, exposition à la chaleur ou à l’humidité…).
SAFETY PRECAUTIONS CAUTION ENGLISH RISK OF ELECTRIC SHOCK DO NOT OPEN CAUTION: TO REDUCE THE RISK OF ELECTRIC SHOCK, DO NOT REMOVE COVER (OR BACK). NO USER-SERVICEABLE PARTS INSIDE. REFER SERVICING TO QUALIFIED SERVICE PERSONNEL.
SAFETY INSTRUCTIONS ENGLISH 1. 2. 3. 4. 5. 6. 7. Read these instructions. Keep these instructions. Heed all warnings. Follow all instructions. Do not use this unit near water. Clean only with a dry cloth. Do not block any ventilation openings. Install in accordance with manufacturer’s instructions. 8. Do not install near any heat sources such as radiators, heat registers, stoves or other apparatus (including amplifiers) that produce heat. 9.
NOTES: • Please avoid using this unit in places of high temperature or humidity over prolonged periods of time as damage may occur. • Exposure to direct sunlight in places such as car interiors may cause the unit to become warped and/or lead to malfunctioning. • Avoid using or storing this unit in dusty or sandy locations. PREPARATION FOR USE GETTING STARTED • Operate controls and switches as described in the manual. • Before turning on the power, make certain that the AC Power cord is properly installed.
LOCATION OF CONTROLS Front and back views ENGLISH 1 2 3 5 4 6 7 8 9 10 11 12 1. 2. 3. 4. 5. Stage for Barbie CD compartment Magic button Left speakers LCD display with POWER and FM ST. (FM stereo) indicators 6. Right speakers 13 7. 8. 9. 10. 11. 12. 13.
Top side view 2 3 4 5 6 7 ENGLISH 1 8 9 10 1. 2. 3. 4. 5. 6. 7. 8. 9. 10. TUNING control BAND (AM/FM/FM ST.) switch Secret compartment FUNCTION (AUX/RADIO/ CD/OFF) switch STOP ( ) button REPEAT button PLAY/PAUSE button SKIP/SEARCH button PROG.
POWER SOURCES This Radio/CD player requires either six (6) “C” size batteries an AC power cord (included). (not included) or ENGLISH BATTERY INSTALLATION 1. Remove the Battery Compartment door on the back of the unit by sliding it open. 2. Insert six (6) “C” size batteries (not included) according to the polarity diagram inside the Battery Compartment (as shown below). Alkaline batteries are recommended for the longest playing time. 3.
POWER SOURCES (CONTINUED) ENGLISH AC OPERATION To operate the unit using AC power, connect the small end of the AC power cord to the AC power jack on the rear of the unit and insert the plug into an AC outlet having 230V AC, 50Hz only. The batteries are automatically disconnected when the AC adapter is used. CAUTION: • When not using AC power, disconnect the AC power cord from the wall outlet and from the unit by pulling the plug (not the cord). • Do not touch the AC power cord with wet hands.
OPERATION LISTENING TO THE RADIO 2 Slide the FUNCTION switch to the RADIO position to turn the unit on and select Radio mode; the POWER indicator will light. Slide the BAND switch to select AM, FM or FM ST. (Stereo). Tune a desired station by turning the TUNING control . NOTES: • If you select FM ST. and you tune to a FM Stereo station, the FM ST. indicator will light. • If you are listening to a weak FM Stereo station, you can usually improve the reception by sliding the BAND switch from FM ST.
OPERATION (CONTINUED) TO INSERT AND PLAY A CD 2 Slide the FUNCTION switch to the CD position to turn the unit on and select CD mode; the POWER indicator will light. Open the CD compartment lid by gently pulling down the door. Insert a disc onto the center spindle (label side up) and push down gently to make sure it is securely on the spindle. Close the CD compartment lid. Insert the headphones (not included) into the HEADPHONE jack or just listen through the speakers.
OPERATION (CONTINUED) 5 6 ENGLISH Press the PLAY/PAUSE playback. Press the PLAY/PAUSE playback. button to pause When the disc is through playing, it will stop. Press the STOP ( ) button to stop the disc before it is finished. button to continue 7 To turn the unit off, slide the FUNCTION switch to the OFF position; the POWER indicator will turn off.
CD PLAYBACK NOTES: • This unit is capable of playing standard CDs or 3” singles; no adapter is required. • If a disc is inserted incorrectly, dirty, damaged or not present at all, “no” will appear in the display. • Although this unit can read CD-R and CD-RW discs, in addition to normal CDs, the playability of those discs may be affected by the type of software that was used to create the discs, as well as the blank media you are using. 100% playability cannot be guaranteed.
OPERATION (CONTINUED) TO REPEATEDLY PLAY BACK ONE TRACK 1 2 ENGLISH While either in CD Stop or Playback mode, press the REPEAT button once; “REP 1” is displayed on the LCD display. or button Press the SKIP/SEARCH to select a track and press the PLAY/ PAUSE button to start playback and the unit will play the selected track over and over until the STOP ( ) button is pressed.
OPERATION (CONTINUED) TO PROGRAM THE MEMORY (UP TO 20 TRACKS) 1 ENGLISH 2 Select the first track to be played back using or button, then the SKIP/SEARCH press the PROG. button again. Repeat this step to program additional tracks (up to 20 tracks). While in CD Stop mode, press the PROG. button; “PROG” and “1” (the program number) will blink on the LCD display and “01” (the program number) will blink. 3 4 Press the PLAY/PAUSE button to begin Programmed playback. Adjust the VOLUME control as desired.
OPERATION (CONTINUED) Barbie has a surprise just for you! Just follow the instructions below and see what you can do with your Magic button! ENGLISH Press the Magic button on the front of your radio CD player.
CARING FOR COMPACT DISCS • Treat the compact disc carefully. Handle the compact disc only by its edges. Never allow your fingers to come in contact with the shiny, unprinted side of the compact disc. • Do not attach adhesive tape, stickers, etc. to the compact disc label. • Clean the compact disc periodically with a soft, lint-free, dry cloth. Never use detergents or abrasive cleaners to clean the compact disc. If necessary, use a CD cleaning kit.
TROUBLESHOOTING GUIDE If you experience a problem with this unit, check the chart below before calling for service. SYMPTOM CAUSE SOLUTION ENGLISH CD will not play. FUNCTION switch not Set FUNCTION switch set to CD. to CD. Disc inserted incorrectly. Reinsert disc correctly. AC power cord Check AC power cord not connected. connection. CD skips while CD compartment Close CD compartment. playing and/or not closed. erratic playback. Disc inserted incorrectly.
NOTE: Please keep this instruction manual, it contains important information. This product is covered by our two-year warranty. To make use of the warranty or the after-sales service, please contact your retailer and supply proof of purchase.
PRECAUCIONES DE SEGURIDAD CAUTION RIESGO DE DESCARGA ELÉCTRICA NO ABRIR PRECAUCIÓN: PARA REDUCIR EL RIESGO DE DESCARGA ELÉCTRICA, NO RETIRE LA CUBIERTA (O PARTE TRASERA). NO HAY PIEZAS EN EL INTERIOR SUSCEPTIBLES DE SER MANIPULADAS POR EL USUARIO. EN CASO DE AVERÍA, SOLICITE ASISTENCIA TÉCNICA DE PERSONAL CUALIFICADO.
1. 2. 3. 4. 5. Lea estas instrucciones. Guarde estas instrucciones. Respete todas las advertencias. Siga todas las instrucciones. No utilice este equipo cerca de agua. 6. Límpielo únicamente con un paño húmedo. 7. No bloquee ninguna abertura de ventilación. Instálelo siguiendo las instrucciones del fabricante. 8. El producto debe colocarse apartado de fuentes de calor, como radiadores, calentadores, estufas u otros productos (incluyendo amplificadores) que generen calor. 9.
PROTEJA SUS MUEBLES Este modelo está equipado con “pies” de goma antideslizante para evitar que la unidad se mueva cuando maneje los controles. Esto “pies” están fabricados con un material de goma no migratorio formulado especialmente para evitar dejar marcas o manchas en sus muebles. Sin embargo, cierto tipo de ceras para muebles, conservantes de la madera o sprays de limpieza, que utilizan aceites, pueden hacer que los “pies” de goma se ablanden y dejen marcas o un residuo de goma en el mueble.
PREPARACIÓN PARA EL USO DESEMBALADO Y PUESTA A PUNTO • Retire con cuidado la unidad principal y los cables de alimentación CA de la pantalla. Retire del equipo todo el material del embalaje. Retire cualquier etiqueta descriptiva o decorativa de la parte frontal o de la parte superior de la carcasa. No quite las etiquetas situadas en las superficies posterior o inferior de la carcasa.
SITUACIÓN DE LOS CONTROLES Vistas frontal y trasera 1 2 3 5 4 6 ESPAÑOL 7 8 9 10 11 12 13 1. 2. 3. 4. 5. Escena para Barbie Compartimento del CD Botón mágico Altavoces izquierdos Pantalla LCD con indicador POWER (encendido) y indicador FM ST. (FM estéreo) 6. Altavoces derechos 40 7. Asa de transporte 8. Antena telescópica de FM 9. Control de volumen 10. Compartimento de las pilas 11. Conector AUX IN (entrada de audio) 12. Conector auriculares 13.
Parte superior de la unidad 2 3 4 5 6 7 1 9 10 1. 2. 3. 4. 5. 6. 7. 8. 9. 10. Mando de SINTONIZACIÓN Conmutador de banda (AM/FM/FM ST.
ALIMENTACIÓN ELÉCTRICA Este radio reproductor de CD funciona con seis (6) pilas de tamaño C (no incluidas) o bien con el cable de conexión a la red eléctrica CA (incluido). INSTALACIÓN DE LAS PILAS 1. Retira la tapa del compartimento de las pilas, situado en la parte trasera de la unidad, deslizándola. 2. Introducir seis (6) pilas tamaño C (no incluidas) en la posición adecuada de acuerdo con las marcas de polaridad que se muestran en el interior del compartimento de las pilas (ver más abajo).
ALIMENTACIÓN ELÉCTRICA (CONTINUACIÓN) ESPAÑOL FUNCIONAMIENTO CON LA RED CA Para hacer funcionar el equipo con la red eléctrica CA, conectar el extremo pequeño del cable CA al conector de CA situado en la parte posterior de la unidad, y enchufar el otro extremo del cable a un enchufe de pared de 230 VCA, 50 Hz. Las pilas quedan desconectadas automáticamente cuando se utiliza la conexión de red CA. NOTA: El enchufe CA suministrado está polarizado para minimizar el riesgo de descarga eléctrica.
FUNCIONAMIENTO PARA ESCUCHAR LA RADIO ESPAÑOL 1 2 Desplaza el interruptor FUNCION a la posición RADIO para encender el equipo y seleccionar el modo de radio; se iluminará el indicador de encendido. Desplaza el selector de BANDA para seleccionar AM, FM o FM ST. (estéreo). Sintoniza la emisora de radio deseada girando del mando de sintonización . NOTAS: • Si seleccionas FM ST. y la emisora seleccionada emite en estéreo, se iluminará el indicador FM ST.
OPERACIÓN (CONTINUACIÓN) 1 2 Desplaza el interruptor de función a la posición CD para seleccionar el modo CD; se iluminará el indicador de encendido. Abre el compartimento del CD tirando de la tapa del compartimento. Introduce un disco en el eje central (la etiqueta hacia arriba) y empújalo suavemente hacia abajo para asegurar que se encaja en el eje. Cierra la tapa del compartimento del CD. Conecta los auriculares a su conector o escucha simplemente a través de los altavoces.
OPERACIÓN (CONTINUACIÓN) 5 6 ESPAÑOL Pulsa el botón PLAY/PAUSE para hacer una pausa en la reproducción. Pulsa de nuevo el botón PLAY/PAUSE para continuar la reproducción. Cuando se haya reproducido el disco en su totalidad, el equipo se detendrá. Puedes pulsar el botón STOP ( ) para detenerlo en cualquier momento. 7 Para pagar el equipo, coloca el interruptor de función en la posición OFF; el indicador de encendido se apagará.
OPERACIÓN (CONTINUACIÓN) Entrada AUX IN Utilizando un conector de audio doméstico (no incluido), puedes escuchar a través de los altavoces del equipo el sonido de una unidad externa. Antes de realizar cualquier conexión, apaga todos los equipos. Desplaza el interruptor de función a la posición AUX para encender el equipo y escuchar el sonido del equipo externo. Conecta un cable de audio (no incluido) entre el conector AUX IN (lateral de la unidad) y el conector AUX o LINE OUT del equipo externo.
OPERACIÓN (CONTINUACIÓN) PARA REPRODUCIR UNA PISTA REPETIDAMENTE 1 2 ESPAÑOL Mientras estás en modo de reproducción o en modo parada, pulsa una vez el botón REPEAT; en la pantalla LCD se mostrará fija la indicación “REP 1”. ó Pulsa el botón SKIP/SEARCH luego el para seleccionar una pista y pulsa botón PLAY/PAUSE para comenzar la reproducción: el equipo comenzará a reproducir esa pista de forma repetida hasta que pulses el botón STOP ( ) .
OPERACIÓN (CONTINUACIÓN) PARA PROGRAMAR LA MEMORIA (HASTA 20 PISTAS) 1 Mientras estás en modo parada, pulsa el botón PROG; en la pantalla parpadeará “PROG” y “1” (el número de programa). Selecciona la primera pista que quieres reproducir utilizando el botón SKIP/SEARCH ó , y pulsa luego el botón PROG. de nuevo. Repite este paso para programar más pistas (hasta 20 pistas). 3 4 Pulsa el botón PLAY/PAUSA para comenzar la reproducción programada. Ajusta el volumen según sus preferencias.
OPERACIÓN (CONTINUACIÓN) Barbie tiene una sorpresa reservada para ti! ¡Simplemente sigue las instrucciones más abajo y descubre lo que puedes hacer con el botón mágico! ESPAÑOL Pulsa el botón mágico situado en la parte frontal de tu radio reproductor de CD.
CUIDADO DE LOS DISCOS COMPACTOS • Trata con cuidado los discos compactos. Sostén los discos sólo por sus bordes. Nunca dejes que tus dedos entren en contacto con la superficie brillante, en la cara no impresa del disco compacto. • No coloques cinta adhesiva, pegatinas, etc. sobre la etiqueta del disco compacto. • Limpia el disco compacto periódicamente con un paño suave, seco y sin pelusa. Nunca uses detergentes limpiadores o abrasivos para limpiar el disco compacto.
GUÍA PARA RESOLUCIÓN DE PROBLEMAS Si tienes algún problema con el equipo, antes de mandarlo a reparar comprueba la siguiente tabla. SÍNTOMA No se reproduce el CD. ESPAÑOL El CD salta o se reproduce de manera errática. Poco o ningún sonido con AM o FM. CAUSA SOLUCIÓN El interruptor de función no está en la posición CD,. Colocar interruptor de función en CD. Disco incorrectamente insertado. Colocar correctamente el disco. Cable de red CA no conectado. Comprobar la conexión del cable de red CA.
GARANTÍA Referencia: RCD160BB Diseñado y desarrollado en Europa – Fabricado en China ©2009 Barbie, Inc. All rights Reserved. ©2009 LEXIBOOK® Lexibook Ibérica S.L, C/ de las Hileras 4, 4° dpcho 14, 28013 Madrid, España Servicio consumidores: 902 102 191. http://www.lexibook.
PRECAUÇÕES DE SEGURANÇA CUIDADO RISCO DE CHOQUE ELÉCTRICO NÃO ABRIR CUIDADO: PARA REDUZIR O RISCO DE CHOQUES ELÉCTRICOS, NÃO RETIRE A COBERTURA (OU PARTE TRASEIRA). NÃO EXISTEM PEÇAS NO INTERIOR QUE POSSAM SER REPARADAS PELO UTILIZADOR. CONSULTE PESSOAL QUALIFICADO PARA PROCEDER À REPARAÇÃO.
INSTRUÇÕES DE SEGURANÇA 11. Use apenas acessórios Leia estas instruções. especificados pelo fabricante. Guarde estas instruções. Preste atenção a todos os avisos. 12. Desligue esta unidade da tomada du rante trovoadas, ou quando não Siga todas as instruções. a utilizar durantelongos períodos de Não utilize esta unidade perto da tempo. água. 6. Limpe apenas com um pano seco. 13. Consulte pessoal qualificado para proceder a qualquer reparação. 7.
NOTAS: • Evite utilizar a unidade em locais com altas temperaturas ou humidade durante um período prolongado de tempo, pois pode dar origem a danos. • A exposição à luz directa do sol em locais como o interior dos automóveis pode deformar a unidade, ou causar um mau funcionamento. • Evite usar ou guardar esta unidade em locais com pó ou areia. PREPARAÇÃO PARA UTILIZAÇÃO INICIAR • Utilize os controlos e interruptores conforme descrito no manual.
LOCALIZAÇÃO DOS CONTROLOS Vistas dianteira e traseira 1 5 4 6 PORTUGUÊS 2 3 7 8 9 10 11 12 13 1. 2. 3. 4. 5. Cena para Barbie Compartimento do CD Botão mágico Altifalantes esquerdos Ecrã LCD com indicador da ALIMENTAÇÃO e indicador FM ST (FM estéreo) 6. Altifalantes direitos 7. Pega de transporte 8. Antena telescópica FM 9. Controlo do VOLUME 10. Compartimento das pilhas 11. Entrada AUX IN 12. Entrada dos AUSCULTADORES 13.
Parte Superior da Unidade 2 3 4 5 6 7 1 8 9 10 PORTUGUÊS 1. 2. 3. 4. 5. 6. 7. 8. 9. 10. Controlo da SINTONIZAÇÃO Interruptor da BANDA (AM/FM/FM ST.) Compartimento secreto Interruptor das FUNÇÕES (AUX/RÁDIO/CD/DESLIGADO) Botão STOP ( ) (Parar) Botão REPEAT (Repetição) Botão PLAY/PAUSE (Reproduzir/pausa) Botão SKIP/SEARCH (Avançar) Botão PROG.
FONTES DE ALIMENTAÇÃO Esta aparelhagem funciona com seis (6) pilhas de tamanho “C” incluídas) ou um fio da alimentação AC (incluído). (não PORTUGUÊS COLOCAÇÃO DAS PILHAS 1. Retire a tampa do compartimento das pilhas, na parte traseira da unidade, fazendo-a deslizar. 2. Coloque seis (6) pilhas de tamanho “C” (não incluídas), de acordo com a polaridade apresentada no interior do compartimento das pilhas (conforme apresentado abaixo).
FONTES DE ALIMENTAÇÃO (CONTINUAÇÃO) OPERAÇÃO AC Para utilizar a unidade com a alimentação AC, ligue a extremidade pequena do fio da alimentação AC à entrada da alimentação AC na parte traseira da unidade e ligue a ficha a uma tomada AC apenas de 230 V AC, 50 Hz. As pilhas são desligadas automaticamente quando utilizar o adaptador AC. PORTUGUÊS NOTA: A ficha AC fornecida com a unidade é polarizada, para ajudar a minimizar a possibilidade de choques eléctricos.
FUNCIONAMENTO OUVIR RÁDIO 1 Faça deslizar o interruptor das FUNÇÕES para a posição RÁDIO, para ligar a unidade e escolher o modo do rádio. O indicador da ENERGIA liga. Faça deslizar o interruptor da BANDA para escolher AM, FM ou FM ST. (estéreo). Sintonize a estação desejada, rodando o botão da SINTONIZAÇÃO . NOTAS: • Se escolher FM ST. e sintonizar uma estação FM estéreo, o indicador FM ST. acende.
FUNCIONAMENTO (CONTINUAÇÃO) INSERIR E REPRODUZIR UM CD PORTUGUÊS 1 2 Desplaza el interruptor de función a la posición CD para seleccionar el modo CD; se iluminará el indicador de encendido. Abra a tampa do compartimento do CD puxando a porta do CD. Introduce un disco en el eje central (la etiqueta hacia arriba) y empújalo suavemente hacia abajo para asegurar que se encaja en el eje. Cierra la tapa del compartimento del CD.
OPERACIÓN (CONTINUACIÓN) 5 6 Prima o botão PLAY/PAUSE para fazer uma pausa na reprodução. Prima de novo o botão PLAY/PAUSE para continuar a reprodução. Quando o disco acaba a reprodução, pára. Prima o botão de PARAR ( ) para parar o disco antes que este termine. PORTUGUÊS 7 Para desligar a unidade, faça deslizar o interruptor das FUNÇÕES para a posição OFF (desligado). O indicador da ALIMENTAÇÃO desliga-se.
FUNCIONAMENTO (CONTINUAÇÃO) NOTAS ACERCA DA REPRODUÇÃO DO CD • Esta unidade é capaz de reproduzir CDs padrão ou pequenos de 3”. Não precisa de adaptador. • Se um disco for inserido incorrectamente, sujo ou danificado, ou não tiver nada gravado, aparece a mensagem “no” no ecrã. • Apesar desta unidade conseguir ler CD-Rs e CD-RWs, para além dos CDs normais, a reprodução destes discos pode ser afectada pelo tipo de software que foi usado para criar os discos, bem como os meios que está a usar.
FUNCIONAMENTO (CONTINUAÇÃO) PARA REPRODUZIR REPETIDAMENTE UMA FAIXA 1 2 Enquanto está no modo de CD parado ou de reprodução, prima o botão REPEAT uma vez. “REP 1” é apresentado no ecrã LCD. Prima o botão de SALTAR/ PROCURAR ou para escolher uma faixa e prima o botão de REPRODUÇÃO/PAUSA para começar a reprodução e a unidade reproduz a faixa escolhida consecutivamente até premir o botão de PARAR ( ) . 1 2 Enquanto está no modo de CD parado ou de reprodução, prima o botão REPEAT duas vezes.
FUNCIONAMENTO (CONTINUAÇÃO) PARA PROGRAMAR A MEMÓRIA (ATÉ 20 FAIXAS) 1 2 Enquanto está no modo de CD parado, prima o botão PROG. “PROG” e “1” (o número do programa) começam a piscar no ecrã LCD. Prima o botão SALTAR/PROCURAR ou depois prima novamente o botão do PROGRAMA . Repita este passo para programar faixas adicionais (até 20 faixas). 3 4 PORTUGUÊS Prima o botão de REPRODUÇÃO/PAUSA para começar a reprodução programada. Ajuste o controlo do VOLUME conforme desejado.
FUNCIONAMENTO (CONTINUAÇÃO) Barbie tem uma surpresa para si! Basta seguir as instruções apresentadas abaixo e ver o que pode fazer com o botão Mágico! Prima o botão Mágico na parte dianteira da sua Aparelhagem Portátil.
CUIDADOS E MANUTENÇÃO PORTUGUÊS CUIDADOS A TER COM OS CDs • Trate os CDs com cuidado. Segure-os apenas pelas extremidades. Nunca permita que os seus dedos entrem em contacto com o lado brilhante sem impressão do CD. • Não cole fita adesiva, autocolantes, etc. na etiqueta do CD. • Se um disco saltar ou ficar preso numa secção do CD, é capaz de estar sujo ou danificado (riscado). • Quando limpar o CD, limpe em linhas a direito, a partir do centro do CD até à extremidade exterior.
GUIA DE RESOLUÇÃO DE PROBLEMAS Se tiver algum problema com esta unidade, verifique a tabela apresentada abaixo antes de contactar o centro de apoio. O CD salta enquanto está a ser reproduzido e/ou reprodução com erros. Sintonização AM ou FM fraca ou sem som. CAUSA SOLUÇÃO O interruptor das FUNÇÕES pode não estar em CD. Coloque o interruptor das FUNÇÕES em CD. O disco foi inserido incorrectamente. Volte a colocar o disco correctamente. O fio da alimentação AC não está ligado.
GARANTIA Este produto está coberto pela nossa garantia de dois anos. Para qualquer reclamação de garantia ou serviço após venda, é favor contactar o seu fornecedor local com a sua prova de compra. A nossa garantia cobre todos os defeitos de fabrico ou de montagem imputáveis ao fabricante mas não cobre a deterioração pelo não respeito do Manual de Instruções ou mau manuseamento do produto (tal como exposição ao calor ou humidade ou desmantelamento do produto).
PRECAUZIONI DI SICUREZZA ATTENZIONE PERICOLO DI SCOSSA ELETTRICA NON APRIRE ATTENZIONE: PER RIDURRE IL RISCHIO DI SCOSSA ELETTRICA, NON RIMUOVERE IL COPERCHIO (O LA PARTE POSTERIORE). ALL’INTERNO NON SONO PRESENTI PARTI CHE RICHIEDONO MANUTENZIONE DA PARTE DELL’UTENTE. PER LA MANUTENZIONE, RIVOLGERSI UNICAMENTE A PERSONALE QUALIFICATO.
ISTRUZIONI DI SICUREZZA 1) 2) 3) 4) 5) ITALIANO Leggere attentamente le istruzioni. Conservare le presenti istruzioni. Osservare tutti gli avvertimenti. Seguire tutte le istruzioni. Non utilizzare questo apparecchio in prossimità dell’acqua. 6) Pulire unicamente con un panno asciutto. 7) Non bloccare le aperture di ventilazione. Installare secondo le istruzioni del produttore.
PROTEZIONE DEI MOBILI Questo modello è dotato di piedini in gomma antiscivolo per evitare che il prodotto si muova quando vengono utilizzati i comandi. Questi piedini sono composti da un tipo di gomma formulato specificamente per evitare che lasci segni o macchie sui mobili. Tuttavia, determinati tipi di cere per mobili basate su olio, prodotti conservativi del legno o spray pulenti possono causare un “ammorbidimento” dei piedini che possono dunque lasciare segni o residui di gomma sui mobili.
PREPARAZIONE PER L’USO PER COMINCIARE • Servirsi di comandi e interruttori come descritto nel manuale. • Prima di accendere l’alimentazione assicurarsi che il cavo di alimentazione CA sia installato adeguatamente. • Riporre i CD in un luogo fresco per evitare che vengano danneggiati dal calore. • Quando si sposta il dispositivo, assicurarsi di scollegare innanzitutto il cavo di alimentazione.
DISPOSIZIONE DEI COMANDI Viste frontale e posteriore 1 2 3 5 4 6 7 ITALIANO 8 9 10 11 12 13 1. 2. 3. 4. 5. Scena per Barbie Vano CD Pulsante magico Casse sinistre Schermo LCD con indicatore di alimentazione e indicatore FM ST (FM stereo) 6. Casse destre 75 7. Maniglia per il trasporto 8. Antenna telescopica FM 9. Comando VOLUME 10. Vano batterie 11. Jack AUX IN 12. Jack CUFFIE 13.
Parte superiore dell’apparecchio 2 3 4 5 6 7 1 8 9 10 1. 2. 3. 4. 5. 6. 7. 8. 9. 10. Comando SINTONIZZAZIONE Interruttore BANDA (AM/FM/FM ST.) Vano segreto Interruttore FUNCTION (AUX/RADIO/ CD/OFF) Pulsante STOP ( ) Pulsante REPEAT Pulsante PLAY/PAUSE Pulsante SKIP/SEARCH Pulsante PROG.
FONTI DI ALIMENTAZIONE Questo apparecchio richiede o sei (6) batterie “C” alimentazione CA (incluso). (non incluse) o un cavo di Non servirsi di batterie non ricaricabili.
FONTI DI ALIMENTAZIONE (continua) FUNZIONAMENTO DI RETE (CA) Per utilizzare l’apparecchio servendosi dell’alimentazione di rete, collegare il capo piccolo del cavo di alimentazione all’apposito jack posto a livello della parte posteriore dell’apparecchio e inserire la spina in una presa CA da 230V, 50 Hz. Quando l’adattatore CA è in uso, le batterie vengono automaticamente scollegate.
USO 1 2 Far scorrere l’interruttore FUNCTION su RADIO per accendere l’apparecchio e selezionare la modalità radio; l’indicatore di alimentazione POWER si illumina. Far scorrere l’interruttore di banda BAND per selezionare AM, FM O FM ST. (Stereo). Sincronizzare la radio sulla stazione desiderata girando l’apposito comando TUNING . NOTE: • Se si seleziona FM ST. e ci si sintonizza su una stazione FM Stereo, l’indicatore FM ST. si illumina.
USO (continua) INSERIRE E RIPRODURRE UN CD 1 2 Far scorrere l’interruttore FUNCTION su CD per accendere l’apparecchio e selezionare la modalità CD; l’indicatore di alimentazione POWER si illumina. Aprire il vano CD tirando giù lo sportello CD. Inserire un disco sull’asse centrale (con il lato con l’etichetta rivolto verso l’alto) e premere delicatamente verso il basso per assicurarsi che sia ben fissato all’asse stesso. Chiudere il coperchio dello scomparto CD.
OPERACIÓN (CONTINUACIÓN) 5 6 Una volta terminata la riproduzione del disco, l’apparecchio si ferma. Premere il tasto STOP ( ) per fermare il disco prima che sia finito. Premere il pulsante PLAY/PAUSE per mettere in pausa l’ascolto. Premere il pulsante PLAY/PAUSE per continuare l’ascolto. 7 ITALIANO Per spegnere l’apparecchio, far scorrere l’interruttore FUNCTION su OFF; l’indicatore di alimentazione POWER si spegne.
USO (continua) NOTE CIRCA LA RIPRODUZIONE DI CD: • Questo apparecchio è in grado di riprodurre CD standard o singoli da 3”; non è necessario alcun adattatore. • Se un disco viene inserito in maniera scorretta, è sporco, danneggiato, o non è presente affatto, a display apparirà la scritta “no”.
USO (continua) ASCOLTO RIPETUTO DI UNA TRACCIA 1 2 In modalità CD Stop oppure Playback, premere il pulsante REPEAT una volta; sullo schermo LCD compare “REP 1” acceso fisso. o Premere il tasto SKIP/SEARCH per selezionare una traccia e il tasto PLAY/ PAUSE per avviare la riproduzione: l’apparecchio suonerà la traccia selezionata ininterrottamente fino a quando non viene premuto il tasto STOP ( ) .
USO (continua) PROGRAMMAZIONE DELLA MEMORIA (FINO A 20 TRACCE) 1 2 In modalità CD Stop, premere il pulsante PROG; sullo schermo LCD lampeggiano “PROG” e “1” (il numero del programma). Selezionare la prima traccia da riprodurre servendosi del tasto SKIP/SEARCH o , quindi premere nuovamente il tasto PROG. .Ripetere questo passaggio per programmare ulteriori tracce (fino a 20 tracce). 3 4 ITALIANO Premere il pulsante PLAY/PAUSE 1 volta per iniziare l’ascolto programmato.
USO (continua) Barbie ha una sorpresa solo per te! Segui le istruzioni e vedi cosa riuscirai a fare con il Pulsante magico! Premi il Pulsante magico sulla parte anteriore della radio lettore di CD.
CURA E MANUTENZIONE ITALIANO CURA DEI COMPACT DISC • Trattare i compact disc con cura. Maneggiare il compact disc solo per i bordi. Non lasciare che le dita vengano a contatto con il lato luminoso e non stampato del compact disc. • Non attacca il nastro adesivo, adesivi, ecc. all’etichetta del compact disc. • Pulire periodicamente i compact disc con un panno morbido e asciutto. Mai servirsi di detergenti o di prodotti abrasivi per pulire i compact disc.
GUIDA ALLA RISOLUZIONE DEI PROBLEMI Nel caso in cui si dovessero verificare problemi, verificare lo schema sottostante prima di chiamare il servizio di assistenza. CAUSA SOLUZIONE L’interruttore FUNCTION non è impostato su CD. Impostare l’interruttore FUNCTION su CD. Disco inserito in maniera scorretta. Inserire nuovamente il disco in maniera corretta. Cavo di alimentazione non collegato. Verificare il collegamento del cavo di alimentazione.
GARANZIA Questo prodotto è coperto dalla nostra garanzia di due anni. Per usufruire della garanzia o del servizio post-vendita, rivolgersi al rivenditore muniti della relativa prova d’acquisto. La garanzia copre i difetti del materiale o del montaggio imputabili al costruttore, a esclusione dei danni dovuti all’inosservanza del manuale d’uso o a ogni intervento improprio sul prodotto (smontaggio, esposizione al calore o all’umidità…).
SICHERHEITSHINWEISE WARNUNG VORSICHT ELEKTROSCHLAGGEFAHR NICHT ÖFFNEN VORSICHT: ZUR VERMEIDUNG DER GEFAHR VON ELEKTRISCHEN SCHLÄGEN, ENTFERNEN SIE DIE GERÄTEABDECKUNG (UND RÜCKSEITE) NICHT. KEINE VOM NUTZER ZU WARTENDEN TEILE IM INNEREN DES GERÄTS. ÜBERLASSEN SIE DIE WARTUNG QUALIFIZIERTEM FACHPERSONAL.
SICHERHEITSHINWEISE DEUTSCH 1. Lesen Sie diese Anleitungen. 2. Bewahren Sie diese Anleitungen auf. 3. Beachten Sie alle Warnhinweise. 4. Befolgen Sie alle Bedienungsanweisungen. 5. Verwenden Sie dieses Gerät nicht in der Nähe von Wasser. 6. Reinigen Sie das Gerät nur mit einem trockenen Tuch. 7. Blockieren Sie die Belüftungsöffnungen nicht. Nehmen Sie die Installation entsprechend der Herstelleranweisungen vor. 8.
SCHÜTZEN SIE IHRE MÖBEL Dieses Modell ist mit rutschfesten Gummifüßen ausgestattet, damit das Produkt nicht verrutscht, während Sie die Regler bedienen. Diese Füße bestehen aus einem haltenden Material, das keine Markierungen oder Flecken auf Ihren Möbeln hinterlässt. Allerdings könnten bestimmte Möbelpolituren auf Ölbasis, Holzpflegemittel oder Reinigungssprays die Füße aufweichen, d. h., es gibt Flecken oder Gummirückstände auf dem Möbel.
VOR DER INBETRIEBNAHME ERSTE SCHRITTE • Bedienen Sie die Regler und Schalter, wie in diesem Handbuch erläutert. • Vergewissern Sie sich, bevor Sie das Gerät einschalten, dass es der Netzstecker korrekt eingesteckt ist. • Bewahren Sie Ihre CDs an einem kühlen Ort auf, um Beschädigungen aufgrund von Hitze zu vermeiden. • Ziehen Sie den Stromstecker, bevor Sie das Gerät bewegen. AUSPACKEN UND EINRICHTEN • Entfernen Sie vorsichtig die Haupteinheit und die AC-Netzkabel vom Display.
ANORDNUNG DER REGLER Vorder- und Rückansicht 1 2 3 5 4 6 7 8 9 10 11 12 1. 2. 3. 4. 5. Barbie - Bühne CD-Fach Magische Taste Linker Lautsprecher LC-Display mit Netzmeldeleuchte und FM ST. (FM-Stereo) Anzeige 6. Rechter Lautsprecher 7. Tragegriff 8. Teleskopische FM-Antenne 9. LAUTSTÄRKE-Regler 10. Batteriefach 11. AUX IN-Buchse 12. KOPFHÖRER-Buchse 13.
Oben auf dem Gerät 2 3 4 5 6 7 1 8 9 1. 2. 3. 4. 5. 6. 7. 8. 9. 10. SENDER-Regler FREQUENZBEREICH-Schalter (AM/FM/FM ST.) Geheimnis Fach FUNKTION-Auswahlschalter (AUX/RADIO/ CD/AUS) STOPP-Taste ( ) WIEDERHOLEN-Taste WIEDERGABE/PAUSE-Taste VOR/SUCHEN-Taste PROG.
STROMQUELLEN Diese Radio/CD arbeitet mit sechs (6) “C”-Batterien (nicht im Lieferumfang enthalten) oder einem Wechselstromkabel (beiliegend). Verwenden Sie keine nicht wiederaufladbaren Batterien. Nicht wieder aufladbare Batterien können nicht aufgeladen werden. Aufladbare Batterien müssen vor der Aufladung aus dem Spielzeug genommen werden. Batterien dürfen nur unter Aufsicht eines Erwachsenen aufgeladen werden. Unterschiedliche Batterietypen bzw. alte und neue Batterien dürfen nicht gemischt werden.
STROMQUELLEN (FORTSETZUNG) WECHSELSTROMBETRIEB Für den Wechselstrombetrieb verbinden Sie das schmale Ende des Wechselstromkabels mit der Buchse an der Geräterückseite und stecken den Stecker in eine 230 V WS, 50 Hz Steckdose. Bei der Verwendung des Wechselstromadapters werden die Batterien automatisch deaktiviert. HINWEIS: Der gepolte Wechselstromstecker, der mit dem Gerät geliefert wird, reduziert die Gefahr elektrischer Schläge.
BEDIENUNG RADIO HÖREN 1 2 Schiebe den FUNKTIONSSCHALTER in die Stellung RADIO, um das Gerät einzuschalten und wähle die Betriebsart Radio aus; die NETZLEUCHTE leuchtet. Schiebe die BANDSCHALTER in die Stellung AM (MW), FM (UKW) oder FM ST. (Stereo). Die Abstimmung eines Senders nimmst du vor, indem du den ABSTIMMUNGSREGLER drehst. HINWEISE: • Wenn du einen UKW-Stereosender auswählst, leuchtet die Meldeleuchte FM ST.
BEDIENUNG (FORTSETZUNG) CD-EINLEGEN UND WIEDERGABE 1 2 Schiebe den Funktionsschalter in die Stellung CD, um das Gerät einzuschalten und wähle die Betriebsart CD aus; die NETZ-Leuchte leuchtet. Öffne das CD-Fach. Lege eine CD auf die mittlere Spindel (mit dem Etikett nach oben) und drücke sie vorsichtig hinein, damit sie sicher auf der Spindel sitzt. Schließen Sie das CD-Fach. Verbinde die Ohrhörer mit der OHRHÖRER-Buchse oder höre über die Lautsprecher Musik.
BEDIENUNG (FORTSETZUNG) 5 6 Drücke die Taste WIEDERGABE/PAUSE , um die Wiedergabe zu unterbrechen. Drücke die Taste WIEDERGABE/ PAUSE , um die Wiedergabe fortzusetzen. Nachdem die Disk abgespielt worden ist, stoppt sie. Drücken die Taste STOP ( ) um die Diskwiedergabe vorher zu beenden. 7 DEUTSCH Wenn du das Gerät ausschalten möchtest, schiebst du den Funktionsschalter in die Stellung OFF; die Strommeldeleuchte erlischt.
BEDIENUNG (FORTSETZUNG) HINWEISE ZUR CD-WIEDERGABE: • Mit diesem Gerät können normale CDs oder 3”-Singles abgespielt werden; es wird kein Adapter benötigt. • Sofern eine Disk nicht korrekt eingelegt, schmutzig, beschädigt oder überhaupt nicht vorhanden ist, wird an der Anzeige “no” eingeblendet. • Auch wenn dieses Gerät neben normalen CDs CD-Rs und CD-RWs lesen kann, kann es von der Software mit der die Disks erstellt worden sind und von den CDRohlingen abhängen, ob eine Disk wiedergeben werden kann.
BEDIENUNG (FORTSETZUNG) EINEN SONG WIEDERHOLTABSPIELEN 1 2 Wenn die CD entweder gestoppt ist oder sich im Wiedergabemodus befindet, drücke einmal die WIEDERGABE-Taste; „REP 1“ erscheint nicht blinkend auf dem LC-Display. Drücke die Taste ÜBERSPRINGEN/SUCHEN oder , um einen Titel auszuwählen und drücke die Taste WIEDERGABE/PAUSE , um die Wiedergabe zu starten. Das Gerät spielt den ausgewählten Titel so lange ab, bis die Taste STOP( ) gedrückt wird.
BEDIENUNG (FORTSETZUNG) SO PROGRAMMIERST DU DEN SPEICHER (BIS ZU 20 TITEL) 1 2 Wenn die CD angehalten ist, drücke die PROG.-Taste; „PROG“ und „1“ (die Programmnummer) blinken auf dem LCDisplay. Wähle den ersten Titel für die Wiedergabe mit der Taste ÜBERSPRINGEN/SUCHEN oder aus und drücke dannerneut die Taste PROG . Wiederhole diesen Schritt, um weitere Title zu programmieren (bis zu 20 Titel). 3 4 Drücke die WIEDERGABE/PAUSE -Taste, um die programmierte Wiedergabe zu starten.
BEDIENUNG (FORTSETZUNG) Barbie hat nur für dich eine Überraschung! Folge einfach den Anleitungen unten und finde heraus, was du mit deiner magischen Taste machen kannst! Drücke die magische Taste auf der Vorderseite deiner Radio/CD.
PFLEGE VON CDs PFLEGE VON CDs • Behandle CDs sorgfältig. Berühre CDs nur an den Kanten. Berühre die glänzende, unbedruckte Seite der Kompakt-Disk niemals mit den Fingern. • Klebe weder Klebestreifen, noch Aufkleber usw. auf das Etikett einer CD. • Reinige Kompakt-Disks regelmäßig mit einem weichen, flusenfreien, trockenen Tuch. Verwende niemals Reinigungs- oder Scheuermittel, um eine CD zu reinigen. Benutze gegebenenfalls ein CD-Reinigungsset.
LEITFADEN FÜR DIE FEHLERBEHEBUNG Sollten Probleme mit dem Gerät auftreten, versuche bitte erst das Problem anhand der folgenden Übersicht zu beheben, bevor du den Kundendienst rufst: SYMPTOM URSACHE Keine CDWiedergabe Funktionsschalter nicht in der Stellung CD. LÖSUNG Funktionsschalter in die Stellung CD schalten. Die CD ist falsch eingelegt Funktionsschalter in die Stellung CD schalten. Kabelverbindung überprüfen CD-Fach nicht geschlossen.
GARANTIE Die Garantiezeit für dieses Gerät beläuft sich auf 2 Jahre. Um die Garantie oder den Kundendienst in Anspruch zu nehmen, setzen Sie sich bitte mit Ihrem Händler oder Lieferanten in Verbindung oder senden Sie das Gerät an die unten angegebene Adresse ein. Fügen Sie Ihren Kaufbeleg bei.
OPGELET RISICO TOT ELEKTRISCHE SCHOKNIET OPENEN NEDERLANDS VEILIGHEIDSMAATREGELEN OPGELET: OM HET RISICO TOT ELEKTRISCHE SCHOKKEN TE VERMINDEREN, MAG JE HET VOORPANEEL (OF ACHTERPANEEL) NIET VERWIJDEREN. GEEN VERVANGINGSONDERDELEN BINNENIN HET TOESTEL. LAAT REPARATIE/ONDERHOUD UITVOEREN DOOR GEKWALIFICEERD REPARATIEPERSONEEL.
NEDERLANDS VEILIGHEIDSMAATREGELEN 1. Lees deze instructies. 2. Bewaar deze instructies. 3. Schenk aandacht aan alle waarschuwingen. 4. Volg alle instructies op. 5. Gebruik dit toestel niet in de nabijheid van water. 6. Reinig enkel met een droog 7. Blokkeer geen enkele ventilatieopeningen. Installeer volgens de instructies van de fabrikant. 8. Plaats het niet in de buurt van hittebronnen, zoals radiatoren, ventilatieroosters, kachels of andere hitteproducerende apparaten (inclusief versterkers).
OPMERKINGEN: • Dit toestel mag niet voor langere perioden gebruikt worden in zeer warme of vochtige ruimtes, daar dit schade kan veroorzaken. • Blootstelling aan direct zonlicht zoals in een wagen kan leiden tot vervorming van het toestel en/of slechte werking. • Gebruik en bewaar dit toestel niet op plaatsen met veel stof of zand. 109 NEDERLANDS BESCHERM JOUW MEUBELEN Dit model is uitgerust met anti-slip rubberen “voetjes” om te voorkomen dat het product zou bewegen wanneer je de toetsen hanteert.
NEDERLANDS VOORBEREIDINGEN VOOR HET GEBRUIK STARTKLAAR MAKEN • Hanteer de bedieningstoetsen en schakelaars zoals aangeduid in de handleiding. • Alvorens de stroom aan te zetten, moet je ervoor zorgen dat het ACelektriciteitssnoer correct werd geïnstalleerd. • Bewaar je CD’s in een koele ruimte om schade veroorzaakt door hitte, te voorkomen. • Wanneer je het toestel moet verplaatsen, moet je ervoor zorgen eerst het AC-elektriciteitssnoer uit te trekken.
NEDERLANDS PLAATS VAN DE BEDIENINGSTOETSEN Voor- en achteraanzicht 1 2 3 5 4 6 7 8 9 10 11 12 13 1. 2. 3. 4. 5. Barbie - toneel cd-compartiment Magische knop Linkerluidsprekers LCD-scherm met POWER indicator en FM ST. (FM stereo) indicator 6. Rechterluidsprekers 111 7. Handvat 8. FM telescopische antenne 9. VOLUME regeling 10. Batterijcompartiment 11. AUX IN aansluiting 12. KOPTELEFOONAANSLUITING 13.
NEDERLANDS Bovenkant van het toestel 2 3 4 5 6 7 1 8 9 10 1. 2. 3. 4. 5. 6. 7. 8. 9. 9. 10. TUNING regeling FREQUENTIEBAND (AM/FM/FM ST.) schakelaar Geheim compartiment FUNCTIE (AUX/RADIO/ CD/UIT) schakelaar STOP ( ) knop REPEAT (HERHALEN) knop PLAY/PAUSE (AFSPELEN/PAUZE) knop Pulsante SKIP/SEARCH Touche PROG. PROG.
Deze Radio/CD heeft ofwel zes (6) “C” batterijen nodig of een AC-elektriciteitssnoer (bijgeleverd). (niet bijgeleverd) INSTEKEN VAN DE BATTERIJEN 1. Verwijder het klepje van het batterijcompartiment dat zich achteraan het apparaat bevindt door het open te schuiven. 2. Steek zes (6) “C” batterijen in (niet bijgeleverd), rekening houdend met de polariteit, aangeduid binnenin het batterijvak (afgebeeld hieronder). Voor de langste speeltijd, raden we aan Alkaline batterijen te gebruiken. 3.
NEDERLANDS STROOMBRONNEN (VERVOLG) AC-WERKING Om het toestel te laten werken met AC-stroom, moet je het kleine uiteinde van het AC-elektriciteitssnoer in het AC-contact, aan de achterkant van het toestel, steken en moet je de stekker in het AC-stopcontact, met 230V AC en 50Hz, steken. De batterijen worden automatisch uitgeschakeld wanneer de AC-adapter verbonden is. OPMERKING: DDe AC-stekker die bij dit toestel is bijgeleverd is gepolarizeerd om electrische schokken te minimaliseren.
NAAR DE RADIO LUISTEREN 1 2 Schuif de FUNCTIE-schakelaar in de RADIOpositie om het toestel aan te zetten en selecteer RADIO modus; de STROOM indicator zal randen. Schuif de BAND-schakelaar op om AM, FM of FM ST (Stereo) te selecteren. Stem af op een gewenst station door aan de TUNING-knop te draaien. OPMERKINGEN: • Indien je FM ST selecteert en je op een FM Stereostation afstemt, zal de FM ST indicator branden.
NEDERLANDS WERKING (VERVOLG) OM EEN CD IN TE STEKEN EN TE SPELEN 1 2 Schuif de FUNCTIE-schakelaar in de CD-positie om het toestel aan te zetten en selecteer CD-modus; de STROOMindicator zal branden. Open het klepje van het cd-compartiment door. Steek een disk in op de middenas (etiket naar boven gericht) en duw het voorzichtig in om zeker te zijn dat het goed vastzit op de as. Sluit het deksel van het CD-vak. Steek de hoofdtelefoons in het HOOFDTELEFOONcontact of luister gewoon via de luidsprekers.
5 6 Druk op de PLAY/PAUSE (AFSPELEN/ PAUZE) knop om het afspelen te pauzeren. Druk op de PLAY/PAUSE (AFSPELEN/ PAUZE) knop om het afspelen te hervatten. Wanneer de disk het einde heeft bereikt, zal ze stoppen met spelen. Druk op de STOP ( ) toets om de disk eerder te stoppen. 7 Om het toestel uit te zetten, schuif je de FUNCTIE-schakelaar in de UIT-positie; de STROOM indicator zal doven.
NEDERLANDS WERKING (VERVOLG) OPMERKINGEN VOOR HET SPELEN VAN CD’S: • Dit toestel kan standaard CD’s of 3” singles afspelen; er is geen adapter nodig. • Indien de disk incorrect werd ingestoken, beschadigd is of niet aanwezig is, zal “no” (nee) op het display verschijnen. • Ook al kan dit toestel naast de normale CD’s , CD-R en CD-RW disks lezen, kan het zijn dat de kwaliteit van het afspelen van deze CD’S afhangt van de gebruikte software bij het creëren van de disks en van de blank media die je gebruikt.
OM HERHAALDELIJK EEN TRACK AF TE SPELEN 1 2 In de CD Stop of Afspeelmodus drukt u eenmaal op de REPEAT (HERHALEN) knop; “REP 1” wordt op het LCD-scherm weergegeven. of toets Druk op de SKIP/SEARCH om een track te selecteren en druk op de PLAY/ PAUSE toets om het afspelen te starten en het toestel zal de geselecteerde track herhaaldelijk afspelen tot er op de STOP ( ) toets wordt gedrukt.
NEDERLANDS BEDIENUNG (FORTSETZUNG) SO PROGRAMMIERST DU DEN SPEICHER (BIS ZU 20 TITEL) 1 2 In de CD Stop modus drukt u op de PROG. knop; “PROG” en “1” (het programmanummer) zal op het LCD-scherm knipperen. Selecteer de eerste track die je terug wil afspelen door op de SKIP/SEARCH of toets te drukken en druk daarna nogmaals op de PROG .- toets. Herhaal deze stap om bijkomende tracks te programmeren (tot max. 20 tracks).
Barbie heeft een verrassing, enkel voor u! Volg gewoon de onderstaande instructies en kijk wat u kunt doen met uw Magische knop! Druk op de Magische knop aan de voorkant van uw gettoblaster.
NEDERLANDS REINIGING EN ONDERHOUD ONDERHOUD VAN COMPACT DISCS • Neem de compact disk voorzichtig vast en enkel aan de randen. Plaats je vingers nooit op de blinkende, onbedrukte zijde van de compact disk. • Bevestig geen kleefband, stickers enz. op het etiket van de compact disk. • Reinig de compact disk regelmatig met een zachte, lintvrije, droge doek. Gebruik nooit detergenten of schurende reinigingsmiddelen om de compact disk te reinigen. Indien nodig, gebruik een CD reinigingskit.
Indien je een problem ervaart met dit toestel, kan je onderstaande table raadplegen alvorens de reparatiedienst te contacteren. SYMPTOOM CD spelt niet. CD slaat over tijdens het spleen en/of het speelt onjuist. AM of FM is zwak of er is geen geluid. OORZAAK OPLOSSING FUNCTIE-schakelaar staat niet op CD. Zet de FUNCTIE schakelaar op CD. Disk is incorrect Steek de disk correct in. AC-elektriciteitssnoer is niet verbonden. Controleer de verbinding van het AC-elektriciteitssnoer.
NEDERLANDS GARANTIE Dit product heeft een garantie van 2 jaar. Om de garantie of naverkoopdienst te gebruiken, gelieve contact op te nemen met je verkoper met een aankoopbewijs of zend het toestel terug naar ondervermeld adres met een aankoopbewijs.
YOUR OPINION MATTERS / VOTRE AVIS COMPTE Country/Pays : Email : City/Ville : Last name/Nom de famille : Very disappointing/Très décevant Average/Moyen Conformément aux articles 34 et suivants de la loi « Informatique et Libertés » du 6 janvier 1978, vous disposez d'un droit d'accès, de modification, de rectification et de suppression des données qui vous concernent. Vous pouvez l'exercer sur simple demande à notre adresse.
LEXIBOOK S.