Radio réveil projecteur Radio Alarm Clock Projector Mode d’emploi – Instruction manual RP300 series
FRANÇAIS Description du produit 3 1 4 5 6 7 2 8 10 9 11 2
Informations sur les piles Votre radio réveil projecteur fonctionne avec 4 piles de type 1.5V (non incluses). Avant la première utilisation: 1. A l’aide d’un tournevis, ouvrez le couvercle des piles situé sous l’appareil. 2. Insérez 4 piles de type AA 1.5V (non incluses) en respectant la polarité indiquée. 3. Remettez le couvercle en place et serrez les vis. AA / LR6 1.5V AA OR LR6 1.5V AA OR LR6 1.5V AA OR LR6 1.5V AA OR LR6 Ne pas recharger les piles non rechargeables.
FRANÇAIS Installation Déballage Lors du déballage, vérifiez que l’emballage contient tous les éléments suivants: 1 x radio réveil projecteur 1 x mode d’emploi AVERTISSEMENT: Tous les matériaux d’emballage, comme le scotch, les feuilles en plastique, les ficelles et les étiquettes ne font pas partie de ce produit et doivent être jetés. Réglages HORLOGE 1. Pour régler l’horloge, appuyez 3 fois sur MODE. 2. Appuyez une fois sur SET: Les minutes se mettent à clignoter. 3.
CHRONOMÈTRE 1. Appuyez une fois sur MODE. 2. Appuyez sur ADJUST pour lancer ou arrêter le chronomètre. 3. Appuyez sur SET pour remettre le chronomètre à zéro. 4. Appuyez sur MODE pour revenir au mode horloge. RADIO 1. Tournez le bouton RADIO OFF / ON / VOLUME dans le sens des aiguilles d’une montre pour allumer la radio, puis pour monter le volume. 2. Appuyez sur SCAN pour lancer une recherche de stations de radio. 3.
FRANÇAIS Garantie Ce produit est couvert par une garantie de 1 an. Pour tout service après-vente et pour toute plainte intervenant pendant la période de garantie, adressez-vous à votre magasin de vente en présentant une preuve d’achat valide.
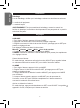
Product description 4 5 6 7 2 8 10 9 11 7 ENGLISH 3 1
ENGLISH 1. LCD screen 2. MODE button: Selects the setting mode. 3. PROJECT button: Projects the time onto the ceiling. 4. ADJUST button: Changes the number and activates the snooze function. 5. SET button: Selects a setting. 6. RADIO OFF / ON / VOLUME knob: Roll the knob to turn the radio on or off and increase or decrease the volume. 7. Battery compartment (at the bottom of the unit) 8. Radio antenna 9. Projector 10. SCAN button: Search the radio frequency to find radio channels. 11.
Installation Unpacking the device When unpacking, ensure that the following elements are included: WARNING: All packaging materials, such as tape, plastic sheets, wire ties and tags are not part of this product and should be discarded Settings CLOCK 1. To set the clock, press MODE 3 times. 2. Press SET once: the minute digit starts flashing. 3. Press ADJUST to change the setting value. Then press SET to move to the next setting.
HOURLY CHIME To turn the hourly chime on or off, press and hold SET and then press MODE. When you see the days of the week at the top of the screen the hourly chime is on. ENGLISH STOPWATCH 1. Press MODE once. 2. Press ADJUST to start or stop the stopwatch. 3. Press SET to restart the stopwatch from zero. 4. Press MODE to go back to the clock mode. RADIO 1. Roll the RADIO OFF / ON / VOLUME knob to the right to turn it on and increase the volume. 2. Press SCAN to search for radio channels. 3.
Warranty For any claim under the warranty or after sale service, please contact your distributor and present a valid proof of purchase. Our warranty covers any manufacturing material and workmanship defect, with the exception of any deterioration arising from the non-observance of the instruction manual or from any careless action implemented on this item (such as dismantling, exposition to heat and humidity, etc.). It is recommended to keep the packaging for any further reference.
Descripción del producto 3 1 4 5 ESPAÑOL 6 7 2 8 10 9 11 12
Información relacionada con las pilas Su radio reloj despertador con función de proyector funciona con 4 pilas de 1,5 V de tipo AA/LR6 (no incluidas). Antes de utilizar por primera vez su aparato modelo RP300, efectúe los siguientes pasos preliminares: 1. Utilizando un destornillador, abra la tapa del compartimento de las pilas situado en la cara inferior del aparato. 2.
Instalación Desembalaje del aparato Cuando desembale el aparato, asegúrese de que los siguientes elementos están presentes en el paquete: 1 Radio reloj despertador con función de proyector 1 manual de instrucciones ¡ADVERTENCIA! Todos los elementos utilizados para el embalaje, como por ejemplo cintas, recubrimientos plásticos, ataduras metálicas y etiquetas no forman parte del aparato y deberán desecharse. Configuración ESPAÑOL RELOJ 1. Para proceder a configurar el reloj, pulse 3 veces el botón MODE. 2.
ALARMA HORARIA Para activar o desactivar el tono de alarma horaria, mantenga pulsado el botón SET y, a continuación, pulse el botón MODE. Cuando se muestren los días de la semana en la parte superior de la pantalla, será indicativo de que la función de alarma horaria está activada. RADIO 1. Gire el mando RADIO OFF / ON / VOLUME hacia la derecha para encender la radio y aumentar el volumen. 2. Pulse el botón SCAN para buscar emisoras de radio. 3.
Garantía Este producto está cubierto por nuestra garantía de 1 año. Para efectuar cualquier reclamación en garantía o solicitud de reparación posventa, le rogamos que se ponga en contacto con su distribuidor y le presente un comprobante válido de compra.
Descrição do produto 3 1 4 5 6 8 10 9 11 17 PORTUGUÊS 7 2
1. Ecrã LCD 2. Botão MODE: Escolhe o modo de definição. 3. Botão PROJECT: Projecta as horas no tecto. 4. Botão ADJUST: Altera o número e activa a função “snooze”. 5. Botão SET: Escolhe uma definição. 6. Botão RADIO OFF / ON / VOLUME: Rode o botão para ligar e desligar o rádio e aumentar ou diminuir o volume. 7. Compartimento das pilhas (na parte inferior da unidade) 8. Antena do rádio 9. Projector 10. Botão SCAN: Procura a frequência de rádio para encontrar os canais de rádio. 11.
Instalação Retirar o aparelho da caixa Quando retirar o aparelho da caixa, certifique-se de que os seguintes elementos se encontram incluídos: 1 Rádio Despertador com Projector 1 Manual de Instruções AVISO: Todos os materiais de empacotamento, como fita, películas de plástico, arames e etiquetas não fazem parte deste produto e deverão ser eliminados. RELÓGIO 1. Para acertar o relógio, prima MODE 3 vezes. 2. Prima SET: Os dígitos dos minutos começam a piscar. 3.
DESPERTADOR HORÁRIO Para ligar ou desligar o despertador horário, prima e mantenha premido SET e depois prima MODE. Quando vir os dias da semana no topo do ecrã, o despertador horário está ligado. CRONÓMETRO 1. Prima MODE uma vez. 2. Prima ADJUST para iniciar ou parar o cronómetro. 3. Prima SET para reiniciar o cronómetro do zero. 4. Prima MODE para voltar ao modo de relógio. RÁDIO 1. Rode o botão RADIO OFF / ON / VOLUME para a direita para o ligar e aumentar o volume. 2.
Garantia Este produto é abrangido pela nossa garantia de 1 ano. Se quiser usar a garantia ou o nosso serviço pós-venda, contacte o seu distribuidor e apresente uma prova válida de compra. A nossa garantia abrange quaisquer defeitos de material ou de mão-de-obra, com a excepção de qualquer deterioração proveniente da não observância do manual de instruções ou qualquer acção descuidada implementada neste item (como desmontar, expor ao calor e humidade, etc.).
Descrizione prodotto 3 1 4 5 6 7 2 8 10 ITALIANO 9 11 22
1. Schermo LCD 2. Pulsante MODE (modalità): Sceglie la modalità da selezionare. 3. Pulsante PROJECT (proietta): Proietta l’ora sul soffitto. 4. Pulsante ADJUST (regola): Cambia il numero e attiva la funzione snooze. 5. Pulsante SET (imposta): Seleziona un’impostazione. 6. Manopola RADIO OFF / ON / VOLUME: Ruota la manopola per accendere e spegnere la radio e per alzare e abbassare il volume. 7. Vano batterie (sul fondo dell’unità) 8. Antenna radio 9. Proiettore 10.
Installazione Togliere il dispositivo dalla confezione Quando si toglie il dispositivo dalla confezione, controllare che contenga i seguenti elementi: 1 x Radio sveglia con proiettore 1 x Manuale di istruzioni AVVERTENZA: Tutti i materiali per imballaggio, ad es. nastro, fogli in plastica, lacci in plastica e targhette non fatto parte dal prodotto e devono essere eliminati. Impostazioni OROLOGIO 1. Per impostare l’orologio, premere MODE 3 volte. 2.
CRONOMETRO 1. Premere MODE una volta. 2. Premere ADJUST per avviare o fermare il cronometro. 3. Premere SET per riavviare il cronometro fino a zero. 4. Premere MODE per tornare alla modalità orologio. RADIO 1. Ruotare la manopola RADIO OFF / ON / VOLUME verso destra per accendere e per aumentare il volume. 2. Premere SCAN per cercare i canali radio. 3. Premere RESET se si vogliono cercare i canali dall’inizio della gamma di frequenza. 4.
Garanzia Questo prodotto è coperto da una garanzia di 1 anno. Per eventuali rivendicazioni secondo tale garanzia o presso il servizio post vendita, contattare il distributore e presentare uno scontrino valido. La nostra garanzia copre eventuali difetti costruttivi di materiali e manodopera, con l’eccezione di eventuale deterioramento derivante dalla mancata osservanza del manuale di istruzioni o da eventuali azioni avventate su questo dispositivo (ad es. smontaggio, esposizione a calore o umidità, ecc.).
Produktbeschreibung 3 1 4 5 6 7 2 8 10 9 DEUTSCH 11 27
1. LC-Display 2. MODE-Taste: zur Auswahl des Einstellungsmodus 3. PROJECT-Taste: zum Projizieren der Uhrzeit an die Zimmerdecke 4. ADJUST-Taste: zum Ändern der Zahlen und Aktivieren der Snooze-Funktion 5. SET-Taste: zur Auswahl einer Einstellung 6. RADIO OFF / ON / VOLUME-Regler: Drehe am Regler, um das Radio ein- oder auszuschalten und die Lautstärke leiser oder lauter zu stellen. 7. Batteriefach (am Boden des Gerätes) 8. Radioantenne 9. Projektor 10.
Aufstellen Auspacken des Gerätes Stelle beim Auspacken sicher, dass die folgenden Elemente enthalten sind: 1 x Projektor-Radiowecker 1 x Bedienungsanleitung WARNUNG: Alle Verpackungsmaterialien, wie Klebeband, Plastikfolie, Kabelbinder und Aufkleber gehören nicht zu dem Aufladen und müssen weggeworfen werden. Einstellungen UHR 1. Drücke dreimal MODE, um die Uhrzeit einzustellen. 2. Drücke einmal SET: Die Minuten beginnen zu blinken. 3. Drücke ADJUST, um den Einstellungswert zu ändern.
STOPPUHR 1. Drücke einmal MODE. 2. Drücke ADJUST, um die Stoppuhr zu starten oder anzuhalten. 3. Drücke SET, um die Stoppuhr von Null neuzustarten. 4. Drücke MODE, um in den Uhrmodus zurückzukehren. RADIO 1. Drehe den RADIO OFF / ON / VOLUME-Regler nach rechts, um das Radio einzuschalten und die Lautstärke zu erhöhen. 2. Drücke SCAN, um nach Radiosendern zu suchen. 3. Drücke RESET, wenn du nach Sendern am Anfang des Frequenzbereiches suchen willst. 4.
Garantie Dieses Produkt wird von unserer 1-Jahres-Garantie abgedeckt. Um die Garantie oder den Kundenservice zu nutzen, wenden Sie sich bitte unter Vorlage des Kaufbelegs an Ihren Einzelhändler. Unsere Garantie deckt Material- oder Herstellungsmängel ab. Davon ausgenommen sind Abnutzungserscheinungen, die durch Missachtung der Bedienungsanleitung oder jegliche fahrlässige Handlung am Gerät verursacht wurden (wie z. B. Auseinanderbauen, das Gerät Hitze oder Feuchtigkeit aussetzen usw.).
NEDERLANDS Productbeschrijving 3 1 4 5 6 7 2 8 10 9 11 32
Batterij-informatie Uw radio-alarmklok met projector wordt aangedreven door 4 x 1,5V type batterijen (niet meegeleverd). Als u de RP300 voor de eerste maal gebruikt: 1. Open het batterijvak, die zich achteraan het apparaat bevindt, met behulp van een schroevendraaier. 2. Plaats de 4 x AA 1,5V batterijen (niet meegeleverd) en let hierbij op de juiste polariteit aangegeven binnenin het batterijvak. 3. Sluit het batterijvak en draai de schroef vast. AA / LR6 1.5V AA OR LR6 1.5V AA OR LR6 1.5V AA OR LR6 1.
NEDERLANDS Installatie Het apparaat uitpakken Controleer of de volgende onderdelen aanwezig zijn tijdens het uitpakken: 1 x Radio-alarmklok met projector 1 x gebruiksaanwijzing WAARSCHUWING: Al het verpakkingsmateriaal zoals plakband, plastic vellen, draadklemmen en labels die niet deel uitmaken van dit apparaat dienen weggegooid te worden. Instellingen KLOK 1. Druk driemaal op MODE om de klok in te stellen. 2. Druk eenmaal op SET: De minutenweergave begint te knipperen. 3.
STOPWATCH 1. Druk eenmaal op MODE. 2. Druk op ADJUST om de stopwatch te starten of te stoppen. 3. Druk op SET om de stopwatch op nul te zetten. 4. Druk op MODE om terug te keren naar de klokmodus. RADIO 1. Draai de RADIO OFF / OFF / VOLUME knop naar rechts om de radio aan te zetten en het volume te verhogen. 2. Druk op SCAN om naar radiokanalen te zoeken. 3. Druk op RESET als u wilt zoeken naar kanalen vanaf het begin van het frequentiebereik. 4.
NEDERLANDS Garantie Dit product is gedekt door onze garantie van een jaar. Voor elke vordering onder de garantie of dienst na verkoop, neem contact op met uw verdeler en leg een geldig aankoopbewijs voor. Onze garantie dekt om het even welke materiaal- of fabricagefout, met uitzondering van schade veroorzaakt door het niet opvolgen van de gebruiksaanwijzing of door een onachtzame actie uitgevoerd op dit apparaat (zoals ontmanteling, blootstelling aan warmte of vocht, enz).
YOUR OPINION MATTERS / VOTRE AVIS COMPTE Country/Pays : Email : City/Ville : Last name/Nom de famille : Very disappointing/Très décevant Average/Moyen Conformément aux articles 34 et suivants de la loi « Informatique et Libertés » du 6 janvier 1978, vous disposez d'un droit d'accès, de modification, de rectification et de suppression des données qui vous concernent. Vous pouvez l'exercer sur simple demande à notre adresse.
LEXIBOOK S.