Owner's Manual
IMPORTANT SAFETY INSTRUCTIONS WARNING FOR YOUR PROTECTION READ THE FOLLOWING: KEEP THESE INSTRUCTIONS The symbols shown above are internationally accepted symbols that warn of potential hazards with electrical products. The lightning flash with arrowpoint in an equilateral triangle means that there are dangerous voltages present within the unit. The exclamation point in an equilateral triangle indicates that it is necessary for the user to refer to the owner’s manual.
IMPORTANT SAFETY INSTRUCTIONS DecLaratIon of conforMIty Manufacturer’s Name: Manufacturer’s Address: Lexicon Professional 8760 S. Sandy Parkway Sandy, Utah 84070, USA declares that the product: Product name: Lexicon IO 82 Product option: all (requires Class II power adapter that conforms to the requirements of EN60065, EN60742, or equivalent.
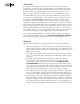
Service Info If you require technical support, contact Lexicon® Professional Customer Service. Be prepared to accurately describe the problem. Know the serial number of your unit, found on a sticker attached to the bottom of the IO 82. If you have not already taken the time to fill out your warranty registration card and send it in, please do so now. Before you return a product to the factory for service, we recommend you refer to the manual.
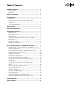
table of contents OWNeR'S MANUAL ............................................................. 1 Service Info ................................................................... 4 Warranty ....................................................................... 4 TAbLe Of CONTeNTS ........................................................... 5 INTROdUCTION ................................................................... 1 Features .........................................................................
Introduction Congratulations and thank you for purchasing the Lexicon® IO 82 desktop recording interface! The patent-pending IO 82 design fits where it makes the most sense, between your keyboard and monitor. With all level meters and gain level controls at your fingertips, you’ll wonder why no one ever thought of it before.
Unpacking your IO 82 Desktop Recording Interface Each IO 82 desktop recording interface is shipped in one carton, containing the IO 82 unit and a software DVD for Windows® and Macintosh® systems. After unpacking, save all the packaging materials in case you ever have to ship the unit. Thoroughly inspect the IO 82 unit and packing materials for signs of damage. Report any shipment damage to the carrier that delivered the product or dealer from whom you purchased the product at once.
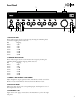
front Panel 3 1 4 5 6 78 2 9 10 11 12 1. InPut LeveL LeDS These indicate signal level for each input by showing the remaining headroom before clipping. Their values are: Red Clipping Yellow –3dB Green –6dB Green –9dB Green –12dB Green –18dB Green –24dB Green –30dB 2. MonItor MIX LeveL LeDS These indicate signal level for each monitor mix output by showing the remaining headroom before clipping.
6. Stereo Button anD Stereo LeD This button toggles between Stereo mode and Mono mode for the Mic/ Line/Instrument inputs on either side of it. The LED lights when Stereo mode is on. Each pair of inputs has one of these stereo buttons and can be set to Stereo mode or Mono mode. In Stereo mode (Stereo LED is on), the left input signal (Mic/Line/ Instrument 1, for example) is sent to the Left Main Out, while the right input signal (Mic/Line/Instrument 2, for example) is sent to the Right Main Out.
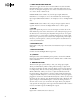
rear and Side Panels 1 234 5 6 7 8 9 10 1. InStruMent 1 anD InStruMent 2 InPutS These unbalanced inputs accept 1/4” connectors and support instrument level sources (including guitars). Note that when the Instrument 1 input is connected, the Mic/Line input 1 is disabled. The same is true for the Instrument 2 and Mic/Line 2 inputs: when the Instrument is connected, the Mic/Line is disabled. 2. Power JacK Use only the included PS1225DC power supply. 3. Power SwItch Turns the IO 82 power on and off.
8. MIc/LIne InPutS 1–8 These balanced inputs accept XLR or 1/4” connectors, and support mic and line level sources. Note that when the Instrument 1 input is connected, the Mic/Line input 1 is disabled. The same is true for the Instrument 2 and Mic/Line 2 inputs: when the Instrument is connected, the Mic/Line is disabled. 9. 48v PhantoM Power Button This button enables the phantom power to the Mic/Line inputs on either side of it.
connecting the Io 82 Microphones Plug an XLR cable directly from a microphone into the desired Mic/Line input on the IO 82 rear panel. If your microphone requires phantom power, first make sure the microphone is connected, then press the +48V button/LED for the corresponding input pair on the rear panel. If your mics don’t need phantom power, it is best to leave it off. Note: Some microphones can be damaged by +48V phantom power. Consult your microphone's documentation before enabling +48V phantom power.
Example Connections USB Cable 8
Io 82 example Project - recording a Guitar Follow the steps in this example to start using the IO 82 and become familiar with it. This example uses Cubase® LE, but the IO 82 works with many DAW applications. Install Drivers, Control Software, and Cubase® LE 1. Insert the DVD into your DVD-ROM drive. The Installer should start automatically. If the Installer doesn't start automatically, you can start it manually by opening the approprate file on the DVD: Mac®: Windows®: Open Me InstallationMenu.exe 2.
Set Up Windows® Audio and MIDI (Optional) When the Drivers and Control Software were installed, Windows may have automatically selected them as your default audio and MIDI outputs. This means that your Windows sounds will be sent to the IO 82 rather than your computer’s sound card. We need to check if these have been changed and return the settings to what they were before. 1. Select Start>Control Panel > Sound and Audio Devices (XP) or Hardware and Sound (Vista/7). 2.
Connect the Guitar 1. Turn the Mic/Line/Inst 1 knob all the way down. Mic/Line/Inst 1 Knob 2. Connect your guitar to the Instrument 1 input on the right side panel.
Connect the Headphones 1. Turn the Phones 1 knob all the way down. Phones 1 Knob 2. Connect your headphones to the Phones 1 jack on the left side panel.
Connect the Computer Connect your computer's USB port to the USB port on the IO 82 rear panel using a standard USB cable (included). USB Cable Listen to the Guitar Input (Direct) 1. Put on the headphones. 2. Set the monitor mix to 12:00. This will let you hear an equal blend of the signals going into the IO 82 as well as signals coming from Cubase. 3. Play the guitar and turn up the line 1 input level until you see signal on the line 1 input meter. 4.
Set Up Cubase® LE for Use with the IO 82 (Windows®) 1. Make sure the included USB cable is connected to your computer and to the IO 82 and the IO 82 is turned on. 2. Start Cubase® LE (from the Start menu under Lexicon®). 3. If you see the warning shown below, click OK. 4. Once you are in Cubase LE, go to Devices>Device Setup. 5. Under Devices, click on VST Audio System and select Lexicon IO 82 from the ASIO Driver pull-down menu if it is not already selected.
Set Up Cubase LE for Use with the IO 82 (Mac®) 1. Make sure the included USB cable is connected to your computer and to the IO 82, and the IO 82 is turned on. 2. Open Cubase LE (located in the Applications folder), and go to Devices>Device Setup as shown below. 3. Click VST Audio System and select Lexicon IO 82 as the ASIO Driver if it is not already selected. 4. Cubase® LE will now ask you if you would like to switch the driver. Select Switch then OK. 5. Ensure the driver is loaded by clicking Reset.
Record a Track in Cubase® LE Create a New Project In Cubase, click File > New Project. The New Project dialog opens. Select Lexicon IO 82 Mono In and click OK. Select a project folder and click Choose. Add a mono track by clicking Project -> Add Track -> Audio. Choose the Mono configuration and click OK. should already be 5. In the Audio 1 window, the Record Enable button red. If it isn't, click it so that it turns red. 1. 2. 3. 4. 6. In the Audio 1 window, click the Input Monitoring button is not lit.
Start Recording 1. Click the Record button on Cubase® LE’s Transport control. Record Button 2. Play the guitar. 3. When you are finished recording press the Stop button. Stop Button Listen to the Recording 1. In Cubase, click the Go to Zero button. Go to Zero Button 2. Turn the Phones 1 knob all the way down. 3. Put on the headphones. 4. In Cubase, click the Play button. Play Button 5. On the IO 82, gradually turn up the Phones 1 knob until you reach a comfortable listening level.
Audio Mixdown You can use the audio mixdown function in Cubase® LE to create a .wav file from your Cubase project. The .wav file can then be burned onto a CD or played using your computer's media player. Cubase LE does not mixdown to mp3 format; however, you can use other software to convert a .wav file to mp3 format. To mixdown your project, you will first need to set the left and right locators; one way to set the locators is to press [Ctrl] + [A] on your computer's keyboard and then press [P].
Block Diagram S/PDIF In Mic or Line Input 1 Level Control 1 0 to 55dB Instrument Input 1 S/PDIF Out Input 1 LEDs USB Control USB Jack A/D M1 Hi-Z Mic or Line Input 2 Output Logic D/A Level Control 2 Input 2 0 to 55dB L LEDs Instrument Input 2 M2 Hi-Z Level Control 3 Mic or Line Input 3 0 to 55dB Monitor Main Volume LEDs Right TRS Out Headphone 1 Output A/D M1 M2 Mic or Line Input 4 Left TRS Out Mix Input 3 M3 Level Control 4 R MIDI I/O Monitor Level LEDs Stereo HP 1 V
20
Specifications Microphone Inputs: Input Impedance: Phantom Power: Maximum gain: E.I.N. (at max gain): Maximum Input Level: Frequency Response: THD+N: Female XLR Pin 2 Hot 3kΩ balanced +48 Volts +58 dB −125 dBu @ 58dB gain typical (150Ω source) −128 dBu @ 58dB gain typical A-weighted (150Ω source) +20 dBu at minimum input gain +0/−1.0 dB, 20Hz - 20kHz <0.01% 20Hz - 20kHz, +4 dBu input level, +4dBu output (mic input to main output) <0.008% 1kHz, +4 dBu input level, +4 dBu output, (mic input to main output).
Harman 8760 South Sandy Parkway | Sandy, Utah 84070 U.S.A. Phone: (801)-568-7660 | Fax: (801) 568-7662 IO 82 Copyright 2011 Lexicon® U.S. Patents Pending Questions or comments? Email us at: customer@lexiconpro.com or visit us online at www.lexiconpro.