IMPORTANT SAFETY INSTRUCTIONS Save these instructions for later use. • Follow all instructions and adhere to warnings marked on the unit and in the operating instructions. • Always use with the correct line voltage. Refer to the manufacturer’s operating instructions for power requirements. Be advised that different operating voltages may require the use of a different line cord and/or attachment plug.
COMMUNICATIONS NOTICE This equipment has been tested and found to comply with the limits for a Class B digital device, pursuant to Part 15 of the FCC Rules. These limits are designed to provide reasonable protection against harmful interference in a residential installation. This equipment generates, uses and can radiate radio frequency energy and, if not installed and used in accordance with manufacturer’s instructions, may cause harmful interference to radio communications.
Introduction Introduction Lexicon Section 1: Getting Started About the MPX 550 . . . . . . . . . . . . . . . . . . . . . . . . 1-2 US Important Safety Instructions. . . . . . . . . . . . . . . iv DE Wichtige Sicherheitshinweise . . . . . . . . . . . . . . . iv ES Instrucciones de seguridad importantes . . . . . . . v FR Instructions importantes relatives à la sécurité . . . v IT Importanti norme di sicurezza . . . . . . . . . . . . . . vi PT Instruções Importantes de Segurança. . . . . . . . .
Introduction MPX 550 Section 3: System Mode Section 6: MIDI Operation System Mode Functions . . . . . . . . . . . . . . . . . . . . . 3-2 Learn Mode . . . . . . . . . . . . . . . . . . . . . . . . . . . . . . 6-2 Parameters • MIDI Dumps • Restore Default Commands Section 4: Program Descriptions MIDI Channel Assignment . . . . . . . . . . . . . . . . . . . 6-2 Program Change Messages . . . . . . . . . . . . . . . . . . 6-3 Loading Programs • Activating Bypass or Tap Functions Single Programs. . . . .
Introduction US ENGLISH IMPORTANT SAFETY INSTRUCTIONS Lexicon US Save these instructions for later use. • Follow all instructions and adhere to warnings marked on the unit and in the operating instructions. • Always use with the correct line voltage. Refer to the manufacturer’s operating instructions for power requirements. Be advised that different operating voltages may require the use of a different line cord and/or attachment plug.
Introduction MPX 550 ES ESPAÑOL INSTRUCCIONES DE SEGURIDAD IMPORTANTES ES Guarde esta instrucciones para uso posterior. • Utilice siempre el voltaje correcto. Diríjase a las instrucciones de operación del fabricante para obtener las especificaciones de potencia. Esté al tanto de que voltajes de operación distintos requieren el uso de cables y/o enchufes distintos.
Introduction IT ITALIANO IMPORTANTI NORME DI SICUREZZA Lexicon IT Conservare le presenti norme per l’utilizzo futuro. • Osservare tutte le istruzioni e le avvertenze apposte sull’unità. • Utilizzare esclusivamente con la tensione di rete corretta. Consultare le istruzioni operative fornite dal fabbricante per i dati riguardanti la tensione e l’assorbimento di corrente. Potrebbe essere necessario l’uso di cavi di rete e/o di spine diverse a seconda della tensione utilizzata.
Introduction MPX 550 DK DANSK VIGTIG INFORMATION OM SIKKERHED DK Gem denne vejledning til senere brug. • Følg alle anvisninger og advarsler på apparatet. • Apparatet skal altid tilsluttes den korrekte spænding. Der henvises til brugsanvisningen, der indeholder specifikationer for strømforsyning. Der gøres opmærksom på, at ved varierende driftsspændinger kan det blive nødvendigt at bruge andre lednings- og/eller stiktyper.
Introduction NO NORSK VIKTIG INFORMASJON OM SIKKERHET Lexicon NO SE SVENSKA VIKTIGA SÄKERHETSFÖRESKRIFTER SE Ta vare på denne veiledningen for senere bruk. • Følg alle anvisningene og advarslene som er angitt på apparatet. • Apparatet skal alltid anvendes med korrekt spenning. Produktbeskrivelsen inneholder spesifikasjoner for strømkrav. Vær oppmerksom på at det ved ulike driftsspenninger kan være nødvendig å bruke en annen ledning- og/eller støpseltype.
Introduction MPX 550 US Important User Information Lexicon is pleased to present its user guides on CD-ROM. By utilizing CD-ROM technology we are able to provide our documentation in multiple languages. The printed edition of the user guide is in English only. The enclosed CD-ROM includes the user guide in multiple languages (French, German, Italian, Portuguese, and Spanish) in easy-to-use PDF format.
Introduction DE Wichtige Benutzerinformation Lexicon ist erfreut, seine Benutzerhandbücher nun auch auf CD-ROM vorlegen zu können. Durch den Einsatz von CD-ROM-Technologie können wir unsere Dokumentation in verschiedenen Sprachen zur Verfügung stellen. Die gedruckte Ausgabe des Benutzerhandbuchs ist nur in englischer Sprache verfügbar.
Introduction MPX 550 ES Información importante para el usuario Lexicon se complace en presentar sus manuales de usuario en CD-ROM. Gracias a la utilización de la tecnología de CD-ROM, nosotros podemos ofrecer nuestra documentación en múltiples idiomas. La edición impresa del manual del usuario sólo está disponible en inglés. El CD-ROM que se entrega incluye el manual del usuario en múltiples idiomas (español, francés, italiano, alemán y portugués) en formato PDF.
Introduction FR Important - Informations Utilisateur Nous sommes fiers de présenter nos modes d’emploi en version CD-ROM. L’utilisation des CD-ROM nous per-mettent de décliner nos manuels en plusieurs langues. La version imprimée de ce manuel existe uniquement en anglais. Le CD-ROM regroupe les versions espagnole, française, italienne, allemande et portugaise au format PDF.
Introduction MPX 550 IT Importanti informazioni per l’utente Lexicon è lieta di presentare i propri manuali su CDROM. Utilizzando la tecnologia su CD-ROM siamo stati capaci offrire la nostra documentazione in più lingue. L’edizione stampata del manuale è solamente in inglese. Il CD-ROM contiene il manuale in diverse lingue (Spagnolo, Francese, Italiano, Tedesco, e Portoghese)in formato PDF, facile da utilizzare.
Introduction PT Informações Importantes ao usuário A Lexicon tem o prazer de apresentar o Guia do Usuário em CD-ROM. Através da tecnologia CD-ROM temos a possibilidade de fornecer nossa documentação em vários idiomas. A versão impressa do Guia do Usuário está apenas em Inglês. O CD-ROM contém o Guia do Usuário em vários idiomas (Espanhol, Francês, Italiano, Alemão e Português) em formato PDF.
1 Getting Started About the MPX 550 . . . . . . . . . . . . . . . . . . . . . . . . . . . . . . . . . . 1-2 Highlights Front Panel Overview . . . . . . . . . . . . . . . . . . . . . . . . . . . . . . . . . 1-4 Front Panel Display Rear Panel Overview . . . . . . . . . . . . . . . . . . . . . . . . . . . . . . . . . . 1-8 Connecting the Unit . . . . . . . . . . . . . . . . . . . . . . . . . . . . . . . . . 1-10 Footswitch • Typical Connections to a Console Setting Audio Levels . . . . . . . . . . . . . . .
Getting Started ABOUT THE MPX 550 Thank you for purchasing the MPX 550 Dual Channel Processor, featuring Lexicon’s proprietary Lexichip®. The MPX 550 is a true stereo, dual-channel processor with 24-bit internal processing, analog-to-digital conversion, and digital-to-analog conversion. It offers 255 presets with classic Lexicon reverb, including Tremolo, Rotary, Chorus, Flange, Pitch, Detune, 5.5 second Delay, Echo, and Compression.
Getting Started MPX 550 HIGHLIGHTS • Lexicon’s proprietary Lexichip • Simultaneous analog and digital outputs • World-class Lexicon reverb • Independent processing of each input • 24-bit internal processing • • 24-bit analog-to-digital conversion Dual programs that create two independent effects with four routing configurations • Dual effects that combine Delay with Reverb, or either Delay or Reverb with Chorus, Flange, or Pitch and digital-to-analog • 255 presets • 64 user programs
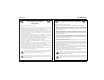
Getting Started Lexicon FRONT PANEL OVERVIEW 1 2 4 3 1. Input Trim Adjusts the level of the incoming analog input signal. 2. Edit Pages Cycles through available Edit Pages for the selected program. The LED lights to indicate that a program has been modified but not stored. 1-4 6 5 7 8 11 9 10 3. System Toggles between activating and deactivating System Mode. When System Mode is activated, EDIT knob 1 selects parameters; EDIT knob 3 changes the setting of the selected parameter.
Getting Started MPX 550 4. EDIT Knobs Adjust parameters. Numbers 1 to 4 correspond to numbers 1 to 4 beneath the front panel display. 5. Front Panel Display Indicates information about the current program. (See page 1-6 for more information about the front panel display). 6. Load Loads the selected program. The LED lights when another program is cued. 9. Store Activates store functions. When pressed with Tap, enters MIDI Learn Mode (see page 6-2). 10. Tap/Cancel Flashes to indicate tempo-based programs.
Getting Started Lexicon FRONT PANEL DISPLAY 3 4 Input level meters show calibrated values, with 0dB indicating digital saturation. Markings on the open portion of each level meter show -6, -18, and -32dB. The meters have single-pixel precision in which each pixel represents 2dB. 7 1 8 2 6 5 9 1. Input Level Meters Indicate incoming signal levels. Input level meters show a minimum when the incoming signal is more than -48dB digital full-scale.
Getting Started MPX 550 "S" stands for stereo, "L" stands for mono left, "R" stands for mono right, and "D" stands for digital. "NoD" appears when digital input is selected, but no valid digital audio signal is present. The number after the letter indicates the sample rate (44.1 or 48kHz). 5. Bank Name Indicates the name of the selected bank. 6. EDIT Knobs 1 to 4 Indicates the function of EDIT knobs 1 to 4. When the processor is in saturation, the letters "OVL" overwrite the input type indicator.
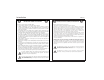
Getting Started Lexicon REAR PANEL OVERVIEW 2 3 4 6 1 1. AC Input Connector Provides power to the unit with the supplied power cord. 2. MIDI IN and MIDI OUT/THRU Two 5-pin DIN MIDI connectors are available for MIDI IN and software-selectable MIDI OUT/THRU. 5 3. FOOTSWITCH Allows footswitch control of front panel Bypass and Tap functions. A 1/4 inch Tip/Ring/Sleeve connector and a momentary contact footswitch are available. (See page 1-10 for more information.
MPX 550 Getting Started 4. S/PDIF IN and OUT Provide digital audio input and output. Two RCA S/PDIF connectors are available. The unit accepts inputs at 44.1 or 48kHz. 5. ANALOG OUTPUTs Provide analog audio output. Balanced outputs are available on either XLR or 1/4 inch Tip/Ring/Sleeve connectors. 6. ANALOG INPUTs Provide analog audio input. Balanced inputs are available on either XLR or 1/4 inch Tip/Ring/Sleeve connectors.
Getting Started CONNECTING THE UNIT The INPUT and OUTPUT connectors on the MPX 550 are 1/4 inch Tip/Ring/Sleeve and XLR sockets. Either may be used. Connections should be made utilizing high-quality shielded cables. The MPX 550 produces effects from either mono or stereo sources. Either input can be used for mono sources. It is recommended to use stereo outputs whenever possible. Only material with Dual Mono routing is designed for mono outputs. Use either output connector if mono output is required.
Getting Started MPX 550 TYPICAL CONNECTIONS TO A CONSOLE LEFT Out Ch7 Ch8 RIGHT Out LEFT In RIGHT In Aux Send 1 Aux Send 2 1-11
Getting Started SETTING AUDIO LEVELS Note: As with all audio products, it is good practice to first power on all outboard equipment, then the mixer, then the speakers. Lexicon The Input Trim knob allows the unit to be driven by an input level within a range of +8 to +20dBu. The minimum setting (fully counterclockwise) should be optimal for +4dBu (balanced) inputs. The maximum setting (fully clockwise) should be optimal for -10dBV (unbalanced) inputs. OUTPUT INPUT 1. Load Program 1. 2.
2 Basic Operation Selecting and Loading Programs . . . . . . . . . . . . . . . . . . . . . . . . . 2-2 Editing Programs . . . . . . . . . . . . . . . . . . . . . . . . . . . . . . . . . . . . 2-3 The “Adjust” Parameter. . . . . . . . . . . . . . . . . . . . . . . . . . . . . . . . 2-3 Storing Programs . . . . . . . . . . . . . . . . . . . . . . . . . . . . . . . . . . . . 2-4 The Compressor . . . . . . . . . . . . . . . . . . . . . . . . . . . . . . . . . . . . . 2-5 Tap Tempo . . . . . . . . . . . . . . .
Basic Operation Lexicon SELECTING AND LOADING PROGRAMS When powered on, the unit will load the last program that was loaded during the previous operating session. To select another program, turn the front panel PROGRAM knob. When the PROGRAM knob is turned clockwise, the unit will cycle forward through programs in the selected bank, then proceed to cycle forward through programs in the next bank.
MPX 550 Basic Operation EDITING PROGRAMS THE "ADJUST" PARAMETER Each program features up to 20 parameters, which are organized into Edit Pages with as many as four parameters each. Press the front panel Edit Pages button to cycle through available Edit Pages for the loaded program. An "Adjust" parameter has been customized for individual programs, and in most cases controls several parameters at once to handle complicated editing processes.
Basic Operation STORING PROGRAMS The User Bank contains no programs when the MPX 550 is shipped. However, it includes 64 memory locations available for storing user-modified programs. To store a program: 1. Press the Store button. The Store and Tap/Cancel LEDs will light to indicate that the store function is armed. The first empty User Bank location will be selected. To cancel the store function without saving the program, press the Tap/Cancel button.
MPX 550 THE COMPRESSOR The compressor is available in all programs, except Dynamics. (Dynamics uses a different compression mechanism, explained on page 4-33.) The compressor sits in the wet component of the signal in front of the effects in the loaded program. It is controlled with four parameters: CmpRatio, Threshld, CmpAttk, and CmpRels. These parameters are located on the last Edit Page for each program, except those in the Cmprssr Bank.
Basic Operation TAP TEMPO Lexicon AUDIO TAP To use audio input to set tempo: MATCHING RHYTHM Tap Tempo can be used to match the delay times and modulation rates of tempo-based programs with those of the music. The Tap/Cancel button LED will flash whenever a tempo-based program is loaded. The current tempo rate appears in the top-right corner of the front panel display. 1. Press and hold the Tap/Cancel button until the message "Detecting audio..." appears at the top of the front panel display.
Basic Operation MPX 550 4. If desired, turn EDIT knob 3 to further adjust tempo in bpm (beats per minute). parameter Tempo Mode to Global. The unit will ignore individual tempo settings and apply the current tempo setting to each program as it is loaded. 5. Press the Tap/Cancel button to exit this mode. BYPASS Audio tap is a must for live performances. It offers a simple method of setting delay times and modulation rates to match the music.
3 System Mode System Mode Functions . . . . . . . . . . . . . . . . . . . . . . . . . . . . . . .
System Mode Lexicon SYSTEM MODE FUNCTIONS Parameter Settings System Mode can be used to set System Mode parameters, execute MIDI Dumps, and restore default settings. To enter System Mode, press the front panel System button. The System LED will light to indicate that System Mode is active. Output Level 0dB* to -31dB Off Input Source Analog Stereo* Analog Mono L, Analog Mono R S/PDIF Digital The tables that begin at the right show System Mode functions.
System Mode MPX 550 Parameter Settings MIDI Patches Enabled* Disabled MIDI Channel Off 1* to 16 Omni MIDI Program Change Enabled* Disabled R1-MPX1 MIDI Clock In Enabled* Disabled MIDI Out/Thru Out* Thru Operating Mode Normal* Demo Locked Memory Protect Enabled Disabled* Auto Load Enabled Disabled* Display Brightness – (continued) MIDI Dumps Settings (if applicable) Dump User Bank 1-16 17-32 33-48 49-64 Dump Current Program – Dump System Data – Restore Default Commands Clear Use
System Mode Lexicon PARAMETERS Output Level (0 to -31dB, Off) Sets output level attenuation within a 0 to -31dB range, or off. Input Source (Analog Stereo; Analog Mono L and R; S/PDIF Digital) Selects input type. The current selection is indicated in the lower-left corner of the front panel display. "S" stands for Analog Stereo, "L" stands for Analog Mono L, "R" stands for Analog Mono R, and "D" stands for S/PDIF digital. The number following the prefix indicates the sample rate (48 or 44.1kHz).
System Mode MPX 550 Digital Output (Processed, Dry) Selects the source for the digital output. When set to Processed, the digital output is the same as the analog outputs. Its mix level will reflect the current setting of the Mix parameter. When set to Dry, the digital output is the input. This setting is useful for recording dry tracks while still providing processing at the analog outputs. Mix Mode (Program, Global) Controls the mix level that is applied when a new program is loaded.
System Mode MIDI Patches Lexicon (Enabled, Disabled) Enables and disables Learned Patches. When set to Enabled, the unit responds to Learned Patches. When set to Disabled, the unit ignores Learned Patches, preventing accidental changes. MIDI Channel (Off, 1 to 16, Omni) Selects the MIDI Channel for MPX 550 messages. When set to Off, the unit ignores messages sent on all MIDI channels. When set within a range of 1 to 16, the unit responds to messages sent on the selected MIDI channel.
System Mode MPX 550 • The front panel PROGRAM knob is still available for selecting user programs only. Programs stored in the User Bank are still available, but cannot be modified. • The System Mode parameter Auto Load is set to Enabled. • Bypass functions are still available. • Tempo and Patches cannot be learned. • System Mode can still be activated. Changes to the Operating Mode parameter will not take effect until the unit has been powered off, then powered on again.
System Mode Lexicon MIDI DUMPS Dump User Bank Dump System Data (1-16, 17-32, 33-48, 49-64) Executes a MIDI Dump of User Bank programs to an external MIDI device, such as a sequencer. These programs can be dumped back to the unit. This is useful to preserve User Bank programs from deletion prior to restoring default settings. User programs are dumped in groups of 16, depending on the group selected by EDIT knob 3. Once a group is selected, press the front panel Store button to execute the Dump.
MPX 550 System Mode RESTORE DEFAULT COMMANDS Clear User Bank Arms a procedure to erase the contents of the User Bank. Press the front panel Store button to execute this procedure and return the User Bank to its factory-default condition. This procedure cannot be executed when a User program is running or when the System Mode parameter Memory Protect is set to Enabled.
4 Program Descriptions Single Programs . . . . . . . . . . . . . . . . . . . . . . . . . . . . . . . . . . . . . 4-2 Plate • Gate/Inv • Hall • Chamber • Ambience • Room • Tremolo • Rotary • Chorus • Flange • Detune • Pitch • Dly/Eko Special FX. . . . . . . . . . . . . . . . . . . . . . . . . . . . . . . . . . . . . . . . . 4-16 Stereo Stage Dual Programs . . . . . . . . . . . . . . . . . . . . . . . . . . . . . . . . . . . . .
Program Descriptions SINGLE PROGRAMS PLATE Plate reverb began with a large, thin sheet of metal suspended upright under tension on springs. Transducers attached to the plate transmitted a signal that made the plate vibrate, causing sounds broadcast through it to appear to be occurring in a large, open space. The Plate programs synthesize the sound of metal plates with high initial diffusion and a relatively bright, colored sound.
Program Descriptions MPX 550 GATE/INV Gate/Inv Programs "Adjust" Tap Gated reverbs were created by feeding a reverb, such as a metal plate, through an analog gate device. Decay time was set to instant, while hold time varied duration and sound.
Program Descriptions Lexicon HALL Hall Programs "Adjust" Tap Lexicon’s Hall programs recreate the acoustics of actual places - from grand, reverberant enclosures to small concert halls. 20 Small Hall (MidRT) – 21 Medium Hall (MidRT) – The clean reverberation of Hall programs is designed to add spaciousness without altering source material. In addition to general instrumental and vocal applications, the Hall programs give separately recorded tracks a sense of belonging to the same performance.
Program Descriptions MPX 550 CHAMBER Chamber Programs "Adjust" Tap Historically, recording studio chambers were oddly shaped rooms with a loudspeaker and set of microphones to collect ambience in various parts of the room. 30 Brick Wall (HighCut) – 31 Basement (HighCut) – 32 LiveConcert (Livenes) Eko Delay 33 Drum Chamber (MidRT) – 34 Moves on . . .
Program Descriptions Lexicon AMBIENCE Ambience Programs "Adjust" Tap Ambience adds warmth, spaciousness, and depth to a performance without coloring its direct sound. It is commonly used to add a room sound to recorded music and speech. In music recording, Ambience can realistically add distance to close-mic’ed signals.
Program Descriptions MPX 550 ROOM Room Programs "Adjust" Tap Room programs simulate actual rooms where there is a strong sense of being in a small, live place. These programs are useful on drums and percussion, and can also be applied to electric guitar tracks.
Program Descriptions TREMOLO Tremolo is a rhythmic change in loudness, commonly employed as an expressive technique by vocalists and wind instrument players. It is also one of the oldest effects, frequently used with electric guitar, electric piano, and occasionally vocals. Different tremolo effects are largely determined by the rate (fast or slow) and waveform shape (smooth or sharp) of the change in loudness.
Program Descriptions MPX 550 ROTARY Rotary speaker cabinets were designed to provide a majestic vibrato/choir effect for electronic theater and church organs. The most well-known rotary speaker is the Leslie™ Model 122, which has two counter-rotating elements: a high-frequency horn and a low-frequency drum with slow and fast speeds. The sound generated as the spinning elements change speed is truly magical. The swirling, spacious effect is difficult to describe - but immediately recognizable.
Program Descriptions Lexicon CHORUS Chorus Programs "Adjust" Tap Chorus effects create lush, full sounds by multiplying the original audio source. Traditionally, these effects were used to fatten up tracks and to add body to guitar without coloring the original tone. Chorus effects are also often combined with plates, echoes, and other reverb effects.
Program Descriptions MPX 550 FLANGE Flange Programs "Adjust" Tap Flange effects were originally created by simultaneously playing back identical programs on two tape recorders, then using hand pressure against the flange of the tape reels to slow down first one machine, then the other. The result was a series of changing phase cancellations and reinforcements, with characteristic swishing, tunneling, and fading sounds.
Program Descriptions Lexicon DETUNE Detune Programs "Adjust" Tap Detune effects create delayed and pitch-shifted versions of the original source, thickening the sound. This creates a particularly effective simulation of double-tracking. These effects are also great alternatives to Chorus effects, adding the richness of a chorus without the audible sweep caused by the chorus rate.
Program Descriptions MPX 550 PITCH Pitch Programs "Adjust" Tap Altering the pitch of a sound produces a wide range of effects - from subtle detuning, to harmonies, to chords. The stereo polyphonic Pitch programs can be used to shift program material or monophonic sources within a range of one octave up to two octaves down. 85 Pch Chrmatic (Pitch) – 86 Pitch Fine (Pitch) – 87 Pch 4th-5ths (Pitch) – For pitch correction, set the Mix parameter to Wet.
Program Descriptions DLY/EKO Delays and echoes repeat a sound a short time after it first occurs. The simplest (and oldest) delay effect is tape slap - a single repeat about 100ms after the original sound. Tape slap was often used on Elvis Presley’s voice and rockabilly guitar tracks. Tape slap becomes tape echo when the output of the tape is fed back into the input (feedback). This turns a single repeat into a series of repeats, each a little softer and a little darker than the last.
Program Descriptions MPX 550 In all delay programs and dual programs, the unit uses the MstrDly parameter to scale delay times that are not controlled by Tempo. In some programs, the "Adjust" parameter controls MstrDly. MstrDly can be set within a range of 0 to 100%. It is usually set to 100% in most presets. When MstrDly is set manually (or by the "Adjust" parameter) to less than 100%, individual delay times will scale accordingly.
Program Descriptions Lexicon SPECIAL FX Special FX Programs "Adjust" Tap 105 Infinite (HighCut) Eko 106 The Abyss (Dtuning) – 107 Jet Flange (Resnce) Speed (Whole Note) 108 Verb>Chorus (HighCut) – 109 TapRot Dly (Time) Rate (Drum/Horn) 110 Fader Verb (Level) Echo 111 Low Rumble (Decay) – 112 Ducker Verb (Decay) – 113 DuckerChorus (Resnce) – 114 Stereo Stage (Width) – 115 Echoes:Beats (Delay) Delay Time 116 Panning Dlys (FeedBk) Dly Time, Pan Rate 117 DreamSequenc (P
Program Descriptions MPX 550 STEREO STAGE Stereo Stage provides stereo reverb while preserving the dry signal. To use this program, note the following: • Use the MPX 550 in line between the mixer and house amplifiers - not as an effect mixed back into the main left and right channels on the mixer. • Pan the input channels on the mixer fully to each musician’s side of the stage. • Keep the Mix parameter set to 50% (the default Program Load Mode setting).
Program Descriptions Lexicon DUAL PROGRAMS • MSplit Dly, MSplit Rvb These banks contain programs that are arranged in Mono Split configuration, which is similar to the Dual Stereo (Parallel) configuration. One effect (e.g. Flange) receives signals from the left input and the other effect (e.g. Delay) receives signals from the right input. However, both effects send signals to the left and right outputs.
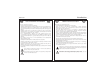
Program Descriptions MPX 550 EFX BAL The Efx Bal parameter controls the relative balance of each effect in the dual programs. In Cascade variations, the parameter also varies the amount of the first effect or dry signal fed into the second effect. The illustration below uses the Pch-Dly program to show the effect of the Efx Bal parameter at certain settings when a Cascade variation is selected. 50:50%: Provides delayed pitch shift. Pitch 75:25%: Provides pitch shift, plus delayed pitch shift.
Program Descriptions Lexicon FLNG-DLY Flng-Dly Programs "Adjust" Tap Routing 120 Flng Tap (FeedBk) Delay Time (1/4 Note) Dual Stereo (Parallel) 121 Flng .
Program Descriptions MPX 550 PCH-DLY Pch-Dly Programs "Adjust" Tap Routing 130 5th Tap (Pitch) Delay Time Dual Stereo (Parallel) 131 8ve 3pl Tap (Pitch) Delay Time Dual Stereo (Parallel) 132 8ve 8+3plTap (Pitch) Delay Time Dual Stereo (Parallel) 133 3rd4thPong (Pitch) Delay Time Dual Stereo (Parallel) 134 4th5th Xfeed (Pitch) Delay Time Dual Stereo (Parallel) 135 5th6th Xfeed (Pitch) Delay Time Dual Stereo (Parallel) 136 8ve > Xfeed (Pitch) Delay Time Cascade 137 5th > Xfee
Program Descriptions Lexicon CHOR-DLY Chor-Dly Programs "Adjust" Tap Routing 140 Chor Tap (FeedBk) Delay Time Dual Stereo (Parallel) 141 Chor .
Program Descriptions MPX 550 DLY-RVB Dly-Rvb Programs "Adjust" Tap Routing 150 Tap Small (MidRT) Delay Time Dual Stereo (Parallel) 151 3plTap MidSz (MidRT) Delay Time Dual Stereo (Parallel) 152 8+3pl Large (MidRT) Delay Time Dual Stereo (Parallel) 153 Pong Small (Decay) Delay Time Dual Stereo (Parallel) 154 Xfeed MidSz (Decay) Delay Time Dual Stereo (Parallel) 155 Xfeed Large (Decay) Delay Time Dual Stereo (Parallel) 156 Tap > Room (Livenes) Delay Time Cascade 157 8+3pl >La
Program Descriptions Lexicon FLNG-RVB Flng-Rvb Programs "Adjust" Tap Routing 160 LiteFl Small (MidRT) Speed (Whole Note) Dual Stereo (Parallel) 161 LiteFl MidSz (MidRT) Speed (Whole Note) Dual Stereo (Parallel) 162 LiteFl Large (MidRT) – Dual Stereo (Parallel) 163 DeepFl Small (MidRT) – Dual Stereo (Parallel) 164 DeepFl MidSz (MidRT) – Dual Stereo (Parallel) 165 DeepFl Large (MidRT) – Dual Stereo (Parallel) 166 LiteFl>Small (MidRT) Speed (Whole Note) Cascade 167 LiteFl >Roo
Program Descriptions MPX 550 PCH-RVB Pch-Rvb Programs "Adjust" Tap Routing 170 3rd4th Room (Pitch) – Dual Stereo (Parallel) 171 4th5th Room (Pitch) – Dual Stereo (Parallel) 172 5th6th Room (Pitch) – Dual Stereo (Parallel) 173 8ve MidSiz (Pitch) – Dual Stereo (Parallel) 174 Power MidSiz (MidRT) – Dual Stereo (Parallel) 175 Detune Room (Dtuning) – Dual Stereo (Parallel) 176 Fine > Small (Pitch) – Cascade 177 Power >Large (MidRT) – Cascade 178 4th > MidSiz (MidRT) – Cas
Program Descriptions Lexicon CHOR-RVB Chor-Rvb Programs "Adjust" Tap Routing 180 Chor1 Small (MidRT) – Dual Stereo (Parallel) 181 Chor1 MidSiz (MidRT) – Dual Stereo (Parallel) 182 Chor1 Large (MidRT) – Dual Stereo (Parallel) 183 Chor2 Small (MidRT) – Dual Stereo (Parallel) 184 Chor2 MidSiz (MidRT) – Dual Stereo (Parallel) 185 Chor2 Large (MidRT) – Dual Stereo (Parallel) 186 Chor1 > Room (Livenes) – Cascade 187 Chor2 > Room (Livenes) – Cascade 188 Chor3 > Room (Livenes)
Program Descriptions MPX 550 MSPLIT DLY MSplit Dly Programs "Adjust" Tap Routing 190 Flng + Tap (FeedBk) 1/4 Note Mono Split 191 Flng + Pong (FeedBk) 1/4 Note Mono Split 192 Flng + Xfeed (Time) – Mono Split 193 Flng + Bnce (Time) – Mono Split 194 DeepFl + Dly (Time) – Mono Split 195 5th + Tap (Pitch) Delay Time Mono Split 196 8ve + 3plTap (Pitch) Delay Time Mono Split 197 4th5th+Xfeed (Pitch) Delay Time Mono Split 198 5th6th+Xfeed (Pitch) Delay Time Mono Split 199 P
Program Descriptions Lexicon MSPLIT RVB MSplit Rvb Programs "Adjust" Tap Routing 205 Tap + MidSiz (MidRT) Delay Time Mono Split 206 Pong + Large (MidRT) Delay Time Mono Split 207 Bnce + MidSz (MidRT) Delay Time Mono Split 208 Xfeed + Small (MidRT) Delay Time Mono Split 209 Xfeed+MidSiz (MidRT) Delay Time Mono Split 210 LiteFl+MidSz (MidRT) – Mono Split 211 LiteFl+Large (MidRT) – Mono Split 212 DeepFl+Small (MidRT) – Mono Split 213 DeepFl+MidSz (MidRT) – Mono Split 2
Program Descriptions MPX 550 MSplit Rvb Programs "Adjust" Tap Routing 221 Chor1+ Large (MidRT) – Mono Split 222 Chor2+MidSiz (MidRT) – Mono Split 223 Chor2+ Large (MidRT) – Mono Split 224 Chor3+MidSiz (MidRT) – Mono Split Note: The Mono Split routing configuration is illustrated on page 4-18.
Program Descriptions Lexicon DUAL MONO Dual Mono Programs "Adjust" Tap Routing 225 Tap | Small (MidRT) Delay Time Dual Mono 226 Tap | MidSiz (MidRT) Delay Time Dual Mono 227 Tap | Large (MidRT) Delay Time Dual Mono 228 Tap | Room (Livenes) Delay Time Dual Mono 229 DeepFl | Tap (FeedBk) Speed (1/4 Note) Dual Mono 230 DeepFl | Dot8 (FeedBk) Speed (Dotted 1/4 Note) Dual Mono 231 8ves | Tap (Pitch) Delay Time Dual Mono 232 8ves | 3pl (Pitch) Delay Time Dual Mono 233 Chor2 |
Program Descriptions MPX 550 CMPRSSR Comprssr Programs "Adjust" Tap In all Cmprssr programs, the "Adjust" parameter controls gain within a range of 0 to 9.5dB. It can be used to match volume levels between the dry, bypassed, and compressed output obtained with typical music material.
Program Descriptions DYNAMICS Note: A few seconds after the Dynamics preset is loaded, the Dynamics name will flash briefly on the front panel display. This does not affect audio input or output. Dynamics is intended for use in the studio, when dynamic processing of stereo signals is required. Because of its long delay, this preset is not recommended for use in a live performance or as a mix insert. It includes effects that perform peak expansion, compression, and tape saturation in that order.
Program Descriptions MPX 550 Meters (GR, In) Selects between gain reduction (GR) and input level (In) metering. (See page 4-35 for more information.) Thresh (-31 to -0dB) Designates the compression threshold, the level the sound source must rise above before compression is applied. COMPRESSION Compression is used to lower the overall level of sound sources that rise above an adjustable compression threshold. Compression can be used to match the levels of louder sources to those of quieter sources.
Program Descriptions Lexicon TAPE SATURATION Saturation Tape saturation emulates the sound of sources recorded on analog tapes and sources recorded digitally. Because of the natural peak saturation that occurs with analog tapes, sound sources recorded on them seem louder than the same sound sources recorded digitally. To use this effect, increase the Gain parameter setting. The amount of gain used is guided by both the output level meter and, more importantly, the ear.
Program Descriptions MPX 550 2. Peak Expansion Meter 4. Input Meter When the Meters parameter is set to In, indicates the maximum left or right channel input levels, whichever is greater. The associated tick marks are placed in 3dB increments. The right-most tick mark indicates 0dB or maximum input level. Indicates the level of peaks above the peak expansion threshold. Low-level peaks are shown as one or two graduated bars. Slightly higher peaks of longer duration are shown as three graduated bars.
Program Descriptions Typical Mastering Dynamics Control Adjustment (continued) will cause the peak expansion meter to show three solid bars for short periods of time. Increase the ExpLvl parameter until the peaks in the source material sound slightly exaggerated. Then, reduce the setting until the peaks sound natural. • • Set the Ratio parameter to 4.00:1, the Attack parameter to 7.2msec, and the Release parameter to 1.4sec.
Program Descriptions MPX 550 • • In the delay programs, two delay level controls have been combined into the "Adjust" parameter: (Tap/ Dly). These programs contain two delays. The first is controlled by tempo and generally used to create longer delays and echoes. The second is set manually with the Delay parameter, and can be used to create a "slap" of 60 to 135ms.
5 Parameter Descriptions Parameter Graphics. . . . . . . . . . . . . . . . . . . . . . . . . . . . . . . . . . . 5-2 Parameter Glossary . . . . . . . . . . . . . . . . . . . . . . . . . . . . . . . . . . .
Parameter Descriptions Lexicon PARAMETER GRAPHICS The MPX 550 features graphic enhancements for each parameter, which appear on the front panel display whenever a parameter setting is changed. These graphics illustrate the point at which the selected setting falls within the entire parameter range, and provide a visual indication of the parameter’s function. As the setting changes, the graphic also changes to reflect the new setting. Examples are shown below and on the following page.
MPX 550 Parameter Descriptions When the Mix parameter setting is changed, the graphics pictured below appear. When a delay parameter setting is changed, the graphics pictured below appear. When the Level parameter setting is changed, the graphics pictured below appear. When the Width parameter setting is changed, the graphics pictured below appear.
Parameter Descriptions Lexicon PARAMETER GLOSSARY Balance In Rotary programs, determines the volume balance between the horn and drum. Note: System Mode parameters are described in Section 3. Dynamics parameters are described on pages 4-32 to 4-35. These parameters are not included in this glossary. "Adjust" (0 to 127) Functions differently from preset to preset. "Adjust" is a "magic" control that can manipulate several parameters at once or provide a set of special values for a single control.
Parameter Descriptions MPX 550 CmpRels (4 to 250msec) Controls the rate at which the compressor relaxes when compressed input signal levels fall. Decay (73ms to 19.61sec or 24ms to 6.53sec) Controls reverb time for mid frequency signals. In Ambience programs, Decay controls the length of the ambience "tail". Depth Appears in Dual programs where one effect is Dly/Eko, providing independent control over the Dly/Eko high-frequency output.
Parameter Descriptions DlyTapLvl Lexicon (off, -48 to 0dB) Appears in dual programs where one effect is Delay/Echo and one or more delay voice is controlled by Tap. DlyTapLvl controls the level of the Tap-controlled voice that is mixed into the Delay/Echo effect. Drum Dep (-100 to +100%) In Rotary programs, determines the amount of resonance, i.e. signal, fed back into the effect. Duration (100:0% to 0:100%) Controls the relative amounts of the two effects in Dual programs.
Parameter Descriptions MPX 550 HighSlope and LowSlope (-16 to +15) Determine the shape of the reverb envelope for low frequencies. HighSlope and LowSlope are found only in the Gate/Inv programs. When LowSlope is set to 0, the level of low reverb remains unchanged over its duration, then cuts off abruptly. Setting LowSlope above 0 causes the level of low-frequency reverb to rise smoothly from soft to loud until the sound is cut off.
Parameter Descriptions Mix Lexicon (Dry, 1 to 99%, Wet) Mix controls the ratio of unprocessed (Dry) and processed (Wet) signal in the output. When the MPX 550 is patched into a console, this parameter should almost always be set to Wet. MstrRate (0 to 100%) In Rotary programs, serves as a master rate control affecting both the horn and drum rates. Pch Fbk (L), (R) (-100% to +100%) Controls the amount of feedback through the Pitch presets, resulting in repeated echoes with pitch progressing up or down.
Parameter Descriptions MPX 550 R Dly 1, 2, 3 (0ms to 5.060sec) Sets the delay time of right voice 1, 2, or 3. The Dly/Eko effect has three independent voices on each side. Rate RvbLvl (off, -48dB to 0dB) In Ambience programs, controls the amount of "extra" longer-decay reverb added to the effect. In Ambience, short-decay early reflections create a real-room sound. (0 to 50.05Hz) Controls modulation speeds.
Parameter Descriptions Speed Lexicon (0 to 5000) In Flange programs, controls how rapidly the two "flange" voices move. Speed 1, 2 (0 to 5000) In Chorus programs, control the rates at which the various voices sweep through frequency. Spread (0 to 255) Controls the timing between the initial reflections that most audibly create the sound of a real room. Shape and Spread work together; if either is set to 0, the other has no effect.
Parameter Descriptions MPX 550 Wavform (See Below) In Tremolo programs, determines volume modulation. Settings are defined as follows: Setting Description Sine Smooth modulation with polarity reversal. Rectified Sine Smooth modulation with no polarity reversal. Triangle Linear ramp up and down. Sawtooth Linear ramp up with sudden reduction. Square Level modulates between maximum and minimum. Width (0 to 100%) Determines the effective separation between the left and right channels.
6 MIDI Operation Learn Mode . . . . . . . . . . . . . . . . . . . . . . . . . . . . . . . . . . . . . . . . 6-2 MIDI Channel Assignment . . . . . . . . . . . . . . . . . . . . . . . . . . . . . . 6-2 Program Change Messages . . . . . . . . . . . . . . . . . . . . . . . . . . . . . 6-3 Loading Programs • Activating Bypass or Tap Functions Continuous Controllers . . . . . . . . . . . . . . . . . . . . . . . . . . . . . . . . 6-4 MIDI Clock . . . . . . . . . . . . . . . . . . . . . . . . . . . . . . . . . . .
MIDI Operation Lexicon LEARN MODE MIDI CHANNEL ASSIGNMENT Learn Mode enables the MPX 550 to "learn" MIDI Program Change and Continuous Controller messages. To activate and deactivate Learn Mode, press the Store and Tap/Cancel buttons simultaneously. The Store and Tap/Cancel LEDs will light to indicate that Learn Mode is active. The front panel display will then show the current patching for EDIT knobs 1 to 4 (Edit Page 1). To access knobs 5 to 20, press the Edit Pages to cycle to the desired Edit Page.
MIDI Operation MPX 550 PROGRAM CHANGE MESSAGES LOADING PROGRAMS Standard MIDI Program Change messages can be used to load all 255 presets and 64 user programs. The unit conforms to the use of MIDI Continuous Controller 32 to execute Bank Select messages. MPX 550 program banks are ordered numerically from 0 to 27, beginning with the Plate Bank. (See the table at the right for additional bank numbers.
MIDI Operation ACTIVATING BYPASS OR TAP FUNCTIONS The unit can recognize MIDI Program Change messages 100 to 127 (101 to 128 on some MIDI devices) for activating Bypass or Tap functions. To assign a Program Change message to the Bypass or Tap controls: 1. Simultaneously press the Store and Tap buttons to activate Learn mode. 2. Press the desired front panel button - Bypass or Tap. The front panel display will indicate the current patch on the selected control. 3.
MIDI Operation MPX 550 2. Turn the desired EDIT knob or press the desired button on the front panel. The front panel display will indicate which control is selected, as well as the current controller range. 3. Select the desired controller using one of the following methods: A. Move the MIDI controller through its full range. To use a portion of the controller range, limit this movement to the desired range. The message area on the front panel display will indicate incoming MIDI activity. 6.
MIDI Operation Lexicon MIDI CLOCK MIDI DUMPS The unit recognizes MIDI Clock messages and applies the tempo (40 to 400bpm) to programs that use Tap Tempo. Connect a MIDI device that outputs MIDI Clock, such as the MPX R1 foot controller or a MIDI sequencer, to the MPX 550 MIDI IN connector to have the MPX 550 automatically recognize and begin to process MIDI Clock messages.
MIDI Operation MPX 550 • • Dump Current Program SYSEX MESSAGES Executes a dump of the selected program. MIDI Sysex messages can be used to access all algorithm parameters. More information about using this advanced feature with the MPX 550 and other Lexicon products is available at www.lexicon.com. The website offers instructions, sample messages, and a complete table of parameter Sysex addresses. Dump System Data Executes a dump of System Mode settings and Learned Patch assignments. 3.
MIDI Operation Lexicon MIDI IMPLEMENTATION CHART Function Transmitted Recognized Remarks Selected in System Mode Basic Channel Default Channel X X 1 1-16 Mode Default Messages Altered X Mode 2 X X Note Number True Voice X X Velocity Note ON Note OFF X X X (Off=9n, v=0) X After Touch Keys Channels X X X OX Used as controller Selected in System Mode Pitch Blender X OX Used as controller Learned Control Change X OX 1 to 119 (0 to 32 used as Bank Select) Learned 6-8
MIDI Operation MPX 550 Function Transmitted Recognized Remarks True # X 0 to 15 = 1 to 16 Bank Select X X 16 to 127 ignored; Program Change messages 1 to 15 = Program Change messages 1 to 16 for selected program bank as applicable * System Exclusive Lexicon Real Time non-Real Time O X X O X X Lexicon ID = 6; Product ID = 22 (decimal); Device ID = MIDI Channel 0 to15 = 1 to 16 System Common :Song Pos :Song Sel :Tune X X X X X X System Real Time :Clock :Commands X X O X Aux Messages
A Appendix Specifications . . . . . . . . . . . . . . . . . . . . . . . . . . . . . . . . . . . . . . . A-2 Declaration of Conformity . . . . . . . . . . . . . . . . . . . . . . . . . . . . . .
Appendix Lexicon SPECIFICATIONS Audio Inputs Connectors Level Impedance A/D Dynamic Range Crosstalk XLR, T/R/S balanced +8 to +20dBu full-scale 50K balanced 25K unbalanced 24-bits 20Hz to 20kHz±1dB 105dB, typical -96dB@1kHz Analog Audio Outputs Connectors XLR, T/R/S balanced Level +26dBu balanced +20dBu unbalanced Impedance <600Ω D/A 24-bits 20Hz to 20kHz±1dB Dynamic Range 101dB, typical Crosstalk -96dB@1kHz Digital Audio Inputs and Outputs Connectors Coaxial RCA S/PDIF (IEC-958, CP-340) Dimensions (W
Appendix MPX 550 DECLARATION OF CONFORMITY Application of Council Directive(s): 73/23/EEC, 89/336/EEC, and 93/68/EEC Standard(s) to which Conformity is Declared: EN 55103-1, EN 55103-2, and EN 60065: 1998 Manufacturer: Lexicon, Inc., 3 Oak Park, Bedford, MA 01730-1441 USA The equipment identified here conforms to the Directive(s) and Standard(s) specified above. Type of Equipment: Dual Channel Processor Model: Lexicon MPX 550 Date: February 2002 Lexicon, Inc.
I Index “Adjust” Parameter . . . . . . . . . . . . .2-3, 5-4 AC Input Connector . . . . . . . . . . . . . . . .1-8 Ambience Programs . . . . . . . . . . . . . . . .4-6 ANALOG INPUTs . . . . . . . . . . . . . . . . . .1-9 ANALOG OUTPUTs . . . . . . . . . . . . . . . .1-9 Attack Parameter . . . . .4-33 (Dynamics), 5-4 Audio Levels, Setting . . . . . . . . . . . . . .1-12 Audio Tap . . . . . . . . . . . . . . . . . .2-6 to 2-7 Auto Load Parameter* . . . . . . . . . . . . . .3-7 Balance Parameter . . . . . . .
Index Dual Mono Programs . . . . . . . . .4-18, 4-30 Dual Programs . . . . . . . . . . . . .4-18 to 4-30 Dual Stereo (Parallel) Configuration . . . .4-18 Dump Current Program . . . . . . . . .3-8, 6-7 Dump System Data . . . . . . . . . . . . .3-8. 6-7 Dump User Bank . . . . . . . . . . . . . . .3-8, 6-6 Duration Parameter . . . . . . . . . . . . . . . .5-6 Dynamics . . . . . . . . . . . . . . . .4-32 to 4-36 EDIT Knobs . . . . . . . . . . . . . . .1-5, 1-7, 2-3 Edit Pages Button . . . . . . . . . . . . . .
Index MPX 550 Output Levels, Setting . . . . . . . . . . . . .1-12 Outputs, Rear Panel . . . . . . . . . .1-8 to 1-11 OVL Indicator . . . . . . . . . . . . . . .1-6 to 1-7 Parallel (Dual Stereo) Configuration . . .4-18 Parameter Glossary . . . . . . . . . .5-4 to 5-11 Parameter Graphics . . . . . . . . . . .5-2 to 5-3 Parameters, Dynamics . . . . . . .4-32 to 4-34 Parameters, System Mode . . . . . .3-2 to 3-7 Pch (R), (L/S) Parameter . . . . . . . . . . . . .5-8 Pch Fbk (L), (R) Parameters . . . . . . . .
LIMITED WARRANTY Lexicon, Inc. offers the following warranty on this product: What is the Duration of this Warranty? This warranty will remain in effect for one (1) year from the original date of purchase. Who is Covered? This warranty may be enforced by the original purchaser and subsequent owners during the warranty period, provided the original dated sales receipt or other proof of warranty coverage is presented at time of service.
A Harman International Company Lexicon, Inc 3 Oak Park Bedford, MA 01730-1441 USA Tel 781-280-0300 Fax 781-280-0490 www.lexicon.com Customer Support Tel 781-280-0300 Fax 781-280-0495 (Sales) Fax 781-280-0499 (Service) Lexicon Part No.
Dry Tracks This card lists the dry tracks included on the CD-ROM enclosed with this user guide. A Harman International Company Percussion 2 Bass Drum . . . . . . . . 3 Snare Drum 1 . . . . . 4 Snare Drum 2 . . . . . 5 Stick . . . . . . . . . . . . 6 Shaker . . . . . . . . . . 7 Claps . . . . . . . . . . . 8 Conga . . . . . . . . . . 9 Table & Udo . . . . . . 10 Percussion 1 . . . . . . 11 Percussion 2 . . . . . . 12 Open Drum Kit . . . . 13 Funk Drum Kit . . . . .
Voice 30 Female Vocal 1 31 Female Vocal 2 32 Female Vocal 3 33 Male Vocal 1 . . 34 Male Vocal 2 . . 35 Vocal Group 1 . 36 Vocal Group 2 . . . . . . . . . . . . . . . . . . . . . . . . . . . . . . . . . . . . . . . . . . . . . . . . . . . . . . . . . . . . . . . . . . . . . . . . . . . . . . . . . . . . . . . . . . . . . . . . . . . . . . . . . . . . . . . . . . . . . . . . .(0:43) .(0:56) .(0:20) .(1:20) .(0:21) .(0:26) .(0:28) Keyboard 37 Hammond 1 . . . . . . . . . . . . . . . . . . . .