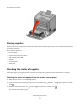
C734 and C736 Series Maintenance Guide May 2009 www.lexmark.
Contents Maintaining the printer................................................................................3 Cleaning the exterior of the printer..........................................................................................................3 Cleaning the printhead lenses...................................................................................................................3 Storing supplies............................................................................................
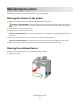
Maintaining the printer Periodically, certain tasks are required to maintain optimum print quality. Cleaning the exterior of the printer 1 Make sure that the printer is turned off and unplugged from the wall outlet. CAUTION—SHOCK HAZARD: To avoid the risk of electric shock when cleaning the exterior of the printer, unplug the power cord from the wall outlet and disconnect all cables to the printer before proceeding. 2 Remove paper from the standard exit bin. 3 Dampen a clean, lint‑free cloth with water.
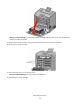
Warning—Potential Damage: To avoid overexposing the photoconductor units, do not leave the front door open for more than 10 minutes. 2 Remove all four toner cartridges. Do not remove the photoconductor units for this procedure. 3 Locate the four printhead lenses. 4 Clean the lenses using a can of compressed air. Warning—Potential Damage: Do not touch the printhead lenses. 5 Reinstall the four toner cartridges.
6 Close the front door. Storing supplies Choose a cool, clean storage area for the printer supplies. Store supplies right side up in their original packing until you are ready to use them. Do not expose supplies to: • • • • • • Direct sunlight Temperatures above 35°C (95°F) High humidity above 80% Salty air Corrosive gases Heavy dust Checking the status of supplies A message appears on the display when a replacement supply item is needed or when maintenance is required.
Checking the status of supplies from a network computer Note: The computer must be connected to the same network as the printer. 1 Open a Web browser. 2 In the address bar, type the IP address of the network printer (for example,192.264.263.17). 3 Press Enter. The Device Status Page appears. A summary of supply levels is displayed. Ordering supplies To order supplies in the U.S., contact Lexmark at 1-800-539-6275 for information about Lexmark authorized supplies dealers in your area.
When 80 Replace Fuser or 83 Replace Transfer Module appears, install the new fuser or the new transfer module. For installation information, see the documentation that came with the part. Part name Part number Fuser 40X5095 (100 volt) 40X5093 (115 volt) 40X5094 (230 volt) Transfer Module 40X5096 Ordering a waste toner box When 82 Waste toner box nearly full appears, order a replacement waste toner box. When 82 Replace waste toner box appears, you must replace the waste toner box.
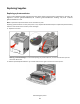
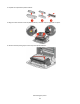
Replacing Supplies Replacing a photoconductor There are three different display messages which may appear when a photoconductor replacement is necessary: 84 Replace photoconductor, 84 photoconductor nearly low, or 84 photoconductor low. Note: A replacement photoconductor can be used with any color. Replacing a photoconductor is a two‑part process. First, complete the illustrated steps to replace the photoconductor, and then reset the life count and clear printer messages.
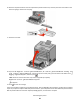
3 Unpack the replacement photoconductor. 4 Align and insert the left end of the photoconductor, and then snap the right end into place. 5 Remove the red packing strip from the top of the photoconductor.
6 Place the old photoconductor into the replacement photoconductor box, and then place the return label on the box for shipping to Lexmark for recycling. 7 Close the front door. 8 If you see 84 Replace photoconductor, 84 photoconductor nearly low, or 84 photoconductor low on the printer control panel, press the down arrow button until Supply Replaced appears, and then press . Note: Failure to reset the life count may result in degraded print quality.
If you see Ready on the printer display screen after you have replaced a photoconductor, follow Steps 1 through 7 below. 1 To specify the replaced photoconductor, press . Supplies Menu appears. 2 Press . Replace Supply appears. 3 Press . 4 Press the down arrow button until Yellow photoconductor, or just replaced. 5 Press All, Cyan photoconductor, Magenta photoconductor, Black photoconductor appears, depending on the photoconductor you . photoconductor replaced appears. Yes appears.
2 Pull up and out on the green tabs of the specified cartridge to remove it from the printer. 3 Shake the cartridge front to back and side to side to redistribute the toner. 4 Reinsert the cartridge to continue printing. 5 Repeat this process multiple times until printed text and graphics remain faded. When printed text and graphics remain faded, replace the specified cartridge. Repeat steps 1 and 2, and then follow the steps below.
6 Unpack a new cartridge. 7 Place the old cartridge in the replacement cartridge shipping box, and then attach the return label to the box for shipping. 8 Shake the new cartridge front to back and side to side to evenly distribute the toner.
9 Remove the red packing strips from the new cartridge. 10 Insert the new cartridge into the printer. 11 Close the front door. Note: Make sure each cartridge is fully pushed in. If a cartridge is not installed correctly, the printer may issue a Cartridge Missing message, where is Black, Cyan, Magenta, or Yellow. The printer may also issue the message Close front door.
3 Reinstall the specified cartridge. 4 Close the front door. 5 Check the printer control panel to see if it is clear of messages. 6 Repeat as needed for additional toner cartridge replacement. Replacing the waste toner box Replace the waste toner box when 82 Replace waste toner box or 82 Waste toner box nearly full appears. The printer will not continue printing until the waste toner box is replaced. 1 Unpack the replacement waste toner box, and remove it from its shipping box.
6 Place the bag into the shipping box you just removed the replacement part from. 7 Peel the recycling label off, and place it on the shipping box. 8 Insert the new waste toner box into the printer. Moving the printer Before moving the printer CAUTION—POTENTIAL INJURY: The printer weight is greater than 18 kg (40 lb) and requires two or more trained personnel to lift it safely.
Follow these guidelines to avoid personal injury or printer damage: • • • • Always use at least two people to lift the printer. Always turn off the printer using the power switch before moving it. Disconnect all cords and cables from the printer before moving it. Remove the printer from the options before moving it. Warning—Potential Damage: Damage to the printer caused by improper moving is not covered by the printer warranty.
Setting the printer up in a new location When the printer is set up, allow clearance around it as shown. 1 152.4 mm (6.0 in.) 2 101.6 mm (4.0 in.) 3 609.6 mm (24.0 in.) 4 101.6 mm (4.0 in.) 5 304.8 mm (12.0 in.) Shipping the printer When shipping the printer, use the original packaging or call the place of purchase for a relocation kit.