2600 Series User's Guide January 2009 Machine type(s): 4433, 4445 Model(s): Various, xxx, where "x" is any alphanumeric character www.lexmark.
Contents Safety information.............................................................................5 Introduction........................................................................................6 Finding information about the printer...........................................................................................................................6 Setting up the printer........................................................................
Printing on custom-size paper................................................................................................................................................... 35 Printing other specialty documents ........................................................................................................................................ 36 Saving and deleting print settings..........................................................................................................................
Notices................................................................................................57 Product information...........................................................................................................................................................57 Edition notice........................................................................................................................................................................57 Power consumption...........................
Safety information Use only the power supply and power supply cord provided with this product or the manufacturer's authorized replacement power supply and power supply cord. Connect the power supply cord to an electrical outlet that is near the product and easily accessible. CAUTION—POTENTIAL INJURY: Do not twist, bind, crush, or place heavy objects on the power cord. Do not subject the power cord to abrasion or stress. Do not pinch the power cord between objects such as furniture and walls.
Introduction Finding information about the printer Publications See the For Quick Setup sheet Initial setup instructions. Printed Networking Guide / Fax Guide Additional setup instructions. Note: Your printer may not come with these publications. Electronic User's Guide Complete instructions for using the printer. The electronic version installs automatically with the printer software. Windows Help Additional instructions for using the printer software on a Windows operating system.
Customer support Description Where to find (North America) Where to find (rest of world) Telephone support Call us at • US: 1-800-332-4120 – Monday–Friday (8:00 AM–11:00 PM ET), Saturday (Noon–6:00 PM ET) • Canada: 1-800-539-6275 – Support in English: Monday–Friday Telephone numbers and support hours vary by country or region. Visit our Web site at www.lexmark.com. Select a country or region, and then select the Customer Support link.
• Date purchased • Store where purchased Introduction 8
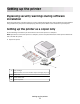
Setting up the printer Bypassing security warnings during software installation Third-party applications, including antivirus, security, and firewall programs may alert you about the printer software being installed. For your printer to work properly, allow the printer software to be installed on your computer. Setting up the printer as a copier only Use the following instructions if you do not want to connect the printer to a computer.
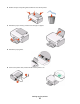
2 Remove all tape and packing material from all areas of the printer. 3 Extend the paper exit tray, and then raise the paper support. 4 Extend the paper guides. 5 Connect the power cord, and then make sure the power is on.
6 Open the printer, and then press down on the levers. 7 Remove the tape from the black cartridge, insert the cartridge in the left carrier, and then close the black cartridge carrier lid.
8 Remove the tape from the color cartridge, insert the cartridge in the right carrier, and then close the color cartridge carrier lid. 9 Close the printer, and then load paper. 10 Press and hold the button for three seconds.
An alignment page prints. 11 Place the printed page on the scanner glass. 12 Press the button. 13 Discard the alignment page.
Notes: • The alignment page may differ from the one shown. • Streaks on the alignment page are normal, and do not indicate a problem. Understanding the parts of the printer Use the To 1 Paper support Load paper. 2 Printer control panel Operate the printer. 3 Paper exit tray Hold paper as it exits. 4 Top cover Access the scanner glass. 5 Paper feed guard Prevent small objects from falling inside the printer. 6 Paper guide Keep paper straight when feeding.
Use the To 1 Scanner unit Access the print cartridges. 2 Scanner support Hold up the scanner unit. 3 Print cartridge carrier Install, replace, or remove a print cartridge. 4 Power supply with port Connect the printer to a power source. 5 USB port Connect the printer to a computer using a USB cable. Warning—Potential Damage: Do not touch the USB port except when plugging in or removing a USB cable.
Using the printer control panel Press To 1 Start a color copy of a document or photo. 2 Start a black-and-white copy of a document or photo. 3 Start a 4 x 6-inch color photo copy. 4 Scan a document or photo to the computer. 5 Load or eject paper. 6 • Turn the printer on or off. • Cancel a print, copy, or scan job in progress. • Reset the printer. 7 Cancel a print, copy, or scan job in progress. 8 Set the number of copies.
1 Check To The display Determine the number of copies to be printed. 2 The light • Determine if the color print cartridge needs to be replaced. • Determine if the color print cartridge is missing or invalid. light • Determine if the black or photo print cartridge needs to be replaced. • Determine if the black or photo print cartridge is missing or invalid.
Understanding the printer software Installing printer software Using Windows 1 Close all open software programs. 2 Insert the printer software CD. 3 From the main installation screen, click Install. 4 Follow the instructions on the screens. Using Macintosh 1 Close all open software applications. 2 Insert the printer software CD. 3 From the Finder desktop, double-click the printer CD icon that automatically appears. 4 Double-click the Install icon. 5 Follow the instructions on the screens.
To install the Microsoft QFE Patch and extract the driver: 1 Insert the installation software CD, and then click Cancel when the Setup Wizard appears. 2 Click Computer. 3 Double-click the CD or DVD drive icon, and then double-click Drivers. 4 Double-click xps, and then double-click the setupxps file. XPS driver files are copied to your computer, and any required Microsoft XPS files are launched. Follow the instructions on the screen to finish installing the patch.
Use the To Lexmark Fax Solutions Software • • • • Send a fax. Receive a fax Add, edit, or delete contacts in the built-in phone book. Access the Lexmark Fax Setup Utility. Use the Lexmark Fax Setup Utility to set the Speed Dial and Group Dial numbers, set Ringing and Answering, and print fax history and status reports. When you select File Print with a document open, a Printing Preferences dialog appears.
Use the Lexmark Network Card Reader To • View the contents of a memory device inserted into a network printer. • Transfer photos and documents from a memory device to the computer over a network. Lexmark Printer Utility • • • • • • • Get help with cartridge installation. Print a test page. Print an alignment page. Clean the print cartridge nozzles. Order ink or supplies. Register the printer. Contact customer support. Lexmark Wireless Setup Assistant Set up the printer on a wireless network.
Loading paper and original documents Loading paper 1 Make sure: • You use paper designed for inkjet printers. • If you are using photo, glossy, or heavyweight matte paper, you load it with the glossy or printable side facing you. (If you are not sure which side is the printable side, see the instructions that came with the paper.) • The paper is not used or damaged. • If you are using specialty paper, you follow the instructions that came with it. • You do not force paper into the printer.
Load up to 10 envelopes Make sure • • • • • The print side of the envelopes faces you. The stamp location is in the upper left corner. The envelopes are designed for use with inkjet printers. The envelopes are loaded in the center of the paper support. The paper guides rest against the edges of the envelopes. Warning—Potential Damage: Do not use envelopes that have metal clasps, string ties, or metal folding bars. Notes: – Do not load envelopes with holes, perforations, cutouts, or deep embossing.
Load up to 10 iron-on transfers Make sure • • • • You follow the loading instructions that came with the iron-on transfers. The print side of the transfers faces you. The transfers are loaded in the center of the paper support. The paper guides rest against the edges of the transfers. Note: For best results, load transfers one at a time. 25 greeting cards 25 index cards 25 photo cards • The print side of the cards faces you. • The cards are loaded in the center of the paper support.
Loading original documents on the scanner glass You can scan and then print photos, text documents, magazine articles, newspapers, and other publications. You can scan a document for faxing. Note: The maximum scan area for the scanner glass is 216 x 297 mm (8.5 x 11.7 in.). 1 Open the top cover. 2 Place the original document or item facedown on the scanner glass in the lower right corner. Note: Photos should be loaded as shown.
3 Close the top cover to avoid dark edges on the scanned image.
Printing Printing basic documents Printing a document 1 Load the paper. 2 Do one of the following to print: Using Windows a With a document open in a Windows program , click File Print. b Click Properties, Preferences, Options, or Setup. c Select the print quality, the number of copies to print, the type of paper to be used, and how the pages should print. d Click OK to close any printer software dialogs. e Click OK or Print.
1 Load paper. 2 Open a Web page using a supported browser. 3 Select a print option to print the page. You can also adjust settings or preview the page before printing. Printing multiple copies of a document Using Windows 1 With a document open, click File Print. 2 Click Properties, Preferences, Options, or Setup. 3 From the Copies section of the Print Setup tab, enter the number of copies that you want to print. 4 Click OK to close any printer software dialogs. 5 Click OK or Print.
Using Macintosh 1 With a document open, click File Print. 2 In the Copies field, enter the number of copies that you want to print, and then select Collated. 3 Click Print. Note: To prevent smudging when printing photos, remove each photo as it exits the printer, and then let it dry before stacking. Printing the last page first (reverse page order) Using Windows 1 With a document open, click File Print. 2 Click Properties, Preferences, Options, or Setup.
Using Macintosh 1 With a document open, choose File Print. 2 From the Printer pop-up menu, choose the printer. 3 If necessary, click the disclosure triangle. 4 From the print options pop-up menu, choose Copies & Pages, and then click Page Setup. 5 From the Paper Size pop-up menu, choose a paper size. 6 Choose an orientation, and then click OK. 7 From the print options pop-up menu, choose Layout. • From the Pages per Sheet pop-up menu, choose the number of page images that you want to print on one sheet.
Using Macintosh 1 While the document is printing, click the printer icon in the Dock. The print queue dialog appears. 2 Do one of the following: • If you want to pause a particular print job, choose the document name, and then click Hold. • If you want to pause all print jobs in the queue, click Pause Printer or Stop Jobs, depending on the operating system version that you are using. Canceling print jobs Using the printer control panel Press .
Using the taskbar in Windows 1 Double-click the printer icon in the taskbar. 2 Do one of the following: • If you want to cancel a particular print job, right-click the document name, and then select Cancel. • If you want to cancel all print jobs in the queue, click Printer Cancel All Documents. Using Macintosh 1 While the document is printing, click the printer icon in the Dock. 2 From the print queue dialog, choose the job that you want to cancel, and then click Delete.
c Select Lexmark Productivity Studio. Note: This program may not appear in your printer program folder, depending on whether you chose to install it with the printer software during installation. d Open the photo that you want to print. e Follow the instructions on the computer screen to edit and print photos. You may also view the Help associated with the program. Using Macintosh a b c d With a photo open, choose File Print. From the Printer pop-up menu, choose the printer you want to use.
Using Macintosh a b c d e With a document open, choose File Print. From the Printer pop-up menu, choose the printer. If necessary, click the disclosure triangle. From the print options pop-up menu, choose Copies & Pages, and then click Page Setup. From the Paper Size pop-up menu, choose the envelope size. If no size matches the size of the envelope, then set a custom size. f Select an orientation, and then click OK. g Click Print. Notes: • Most envelopes use landscape orientation.
Tips on loading label sheets • • • • Make sure the top of the label sheet feeds into the printer first. Make sure the adhesive on the labels does not extend to within 1 mm of the edge of the label sheet. Make sure the paper guide or paper guides rest against the edges of the label sheet. Use full label sheets. Partial sheets (with areas exposed by missing labels) may cause labels to peel off during printing, resulting in a paper jam. Note: Labels require more drying time.
7 Open the Paper Size pop-up menu again, and then choose the name of the custom paper size you added in step 6c. 8 Click OK. 9 Click Print. Printing other specialty documents When you installed the printer driver, some printer software was installed that may help you print specialty documents such as booklets, posters, iron-on transfers, transparencies, and banners. For information about printing these documents, see the Help installed with the programs or applications you choose to use.
Notes: • To retrieve your print settings, click Profiles Restore a Profile, and then select the name of the profile that you want to use. • To delete a setting, click Profiles Delete Profiles. Select the setting that you want to delete, and then click Delete. Using Macintosh The Presets pop-up menu lets you save the print settings you use often. When print settings are saved into a Preset, there is no need to adjust the print settings for every print job. 1 With a document open, click File Print.
Copying Making a copy 1 Load paper. 2 Load an original document facedown on the scanner glass. 3 If you want to print more than one copy, then press until the number of copies that you want appears on the display. 4 Press to start a color copy or to start a black-and-white copy. Copying 4 x 6 photos 1 Load a 4 x 6 in. (10 x 15 cm) photo card with the glossy or printable side facing you. (If you are not sure which side is the printable side, then see the instructions that came with the paper.
Scanning Scanning original documents You can scan and then print photos, text documents, magazine articles, newspapers, and other publications. You can also scan a document for faxing. 1 Open the top cover, and then load an original document facedown on the scanner glass. 2 Close the top cover to avoid dark edges on the scanned image. 3 Make sure that the printer is connected to a computer, and that both the printer and the computer are on. 4 From the printer control panel, press .
Using Macintosh 1 From the Finder desktop, double-click the printer folder. 2 Double-click the printer icon. 3 From the Progress dialog, click Cancel.
Faxing This chapter is applicable for Windows users only. Before you send a fax, make sure: • The printer is connected to a computer with an active fax modem, the computer is configured to fax, a phone line is connected to the computer, and both the printer and computer are on. • The Lexmark Fax Solutions and Lexmark Productivity Studio software are installed on your computer.
3 From the Settings area in the left pane of the Welcome screen, click Set up and manage faxes. 4 From the “I Want To” menu, click Adjust speed dial list and other fax settings. 5 Click the Ringing and Answering tab. 6 From the “Automatically answer incoming calls as a fax” area, select On from the Auto Answer drop-down list. 7 To turn the Auto Answer feature on and off at scheduled times, select the settings that you want from the drop-down lists.
Maintaining the printer Maintaining print cartridges Installing print cartridges 1 Open the printer, and then press down on the cartridge carrier levers. 2 Remove the used print cartridge or cartridges. 3 If you are installing new print cartridges, remove the tape from the back and bottom of the black cartridge, insert the cartridge in the left carrier, and then close the black cartridge carrier lid.
4 Remove the tape from the back and bottom of the color cartridge, insert the cartridge in the right carrier, and then close the color cartridge carrier lid. Warning—Potential Damage: Do not touch the gold contact area on the back or the metal nozzles on the bottom of the cartridge. 5 Close the printer, making sure to keep your hands out from underneath the scanner unit. Removing a used print cartridge 1 Make sure the printer is on. 2 Lift the scanner unit.
The print cartridge carrier moves and stops at the loading position, unless the printer is busy. 3 Press down on the cartridge carrier latch to raise the cartridge carrier lid. 4 Remove the used print cartridge. Note: If you are removing both cartridges, repeat step 3 and step 4 for the second cartridge. Refilling print cartridges The warranty does not cover repair of failures or damage caused by a refilled cartridge. Lexmark does not recommend use of a refilled cartridge.
• If you are using the printer without a computer, press Cancel. Lexmark's warranty does not cover damage caused by non-Lexmark ink or print cartridges. Cleaning the print cartridge nozzles Using Windows 1 Load plain paper. 2 Do one of the following: • In Windows Vista, click . • In Windows XP and earlier, click Start. 3 Click All Programs or Programs, and then select the printer program folder from the list. 4 From the printer folder, click Maintenance Clean Cartridges. 5 Click Print.
4 Using another clean section of the cloth, gently hold the cloth against the contacts for about three seconds, and then wipe in the direction shown. 5 With another clean section of the cloth, repeat step 3 and step 4, and then let the nozzles and contacts dry completely. 6 Reinsert the print cartridge(s), and then print the document again. 7 If the print quality does not improve, clean the print nozzles, and then try printing the document again. 8 Repeat step 7 up to two more times.
3 Dampen a clean, lint-free cloth with water. Warning—Potential Damage: Do not use household cleaners or detergents, as they may damage the finish of the printer. 4 Wipe only the outside of the printer, making sure to remove any ink residue that has accumulated on the paper exit tray. Warning—Potential Damage: Using a damp cloth to clean the interior may cause damage to your printer. 5 Make sure the paper support and paper exit tray are dry before beginning a new print job.
For best results when printing photos or other high-quality images, use Lexmark Photo Paper or Lexmark PerfectFinish Photo Paper and Lexmark print cartridges. Item Lexmark Photo Paper Lexmark PerfectFinish Photo Paper USB cable Description • • • • Letter • • • • • Letter A4 4 x 6 in. 10 x 15 cm A4 4 x 6 in. 10 x 15 cm L Part number 1021294 Recycling Lexmark products To return Lexmark products to Lexmark for recycling: 1 Visit our Web site at www.lexmark.com/recycle.
Troubleshooting Using the printer troubleshooting software (Windows only) The Lexmark Service Center provides step-by-step troubleshooting help and contains links to printer maintenance tasks and customer support. To open the Lexmark Service Center, use one of these methods: Method 1 Method 2 If it appears on an error message dialog, click the For additional assistance, use the Lexmark Service Center link.
Software did not install If you encountered problems while installing, or if your printer does not appear in the list in the Printers folder or as a printer option when sending a print job, you can try uninstalling and reinstalling the software. These are some other possible solutions. Try one or more of the following: MAKE SURE YOUR OPERATING SYSTEM IS SUPPORTED The following operating systems are supported: Windows Vista, Windows XP, Windows 2000 with Service Pack 3 or later, and Mac OS X version 10.
7 Follow the instructions on the computer screen to install the software. 8 When the installation is completed, enable the security software again. Page does not print These are possible solutions. Try one or more of the following: CHECK MESSAGES If an error message appears, then resolve the error before trying to print again.
In Windows XP a Click Start. b Click Printers and Faxes. In Windows 2000 a Click Start. b Click Settings Printers. 2 Double-click the printer. 3 Click Printer. • Make sure no check mark appears next to Pause Printing. • If a check mark does not appear next to Set As Default Printer, then you must select the printer for each file that you want to print. Using Macintosh For Mac OS X version 10.5 or later 1 From the Finder desktop, click System Preferences Print & Fax.
DISCONNECT AND RECONNECT POWER SUPPLY 1 Press to turn off the printer. 2 Disconnect the power cord from the wall outlet. 3 Remove the power supply from the printer. 4 Reconnect the power supply to the printer. 5 Plug the power cord into the wall outlet. 6 Press to turn on the printer.
Using Macintosh 1 Close all open software applications. 2 From the Finder desktop, double-click the printer folder. 3 Double-click the Uninstaller icon. 4 Follow the instructions on the computer screen to remove the printer software. 5 Restart the computer before reinstalling the printer software. 6 Insert the installation CD, and then follow the instructions on the computer screen to reinstall the software. If the software still does not install correctly, visit our Web site at www.lexmark.
Solving printer power problems The printer and the computer cannot exchange data. These are possible solutions. Try one or more of the following: MAKE SURE THE PRINTER POWER SUPPLY IS ATTACHED CORRECTLY 1 Press to turn the printer off. 2 Disconnect the power cord from the wall outlet. 3 Remove the power supply from the printer. 4 Reconnect the power supply to the printer. 5 Plug the power cord into the wall outlet. 6 Press to turn the printer on.
Notices Product information Product name: Lexmark 2600 Series Machine type: 4433, 4445 Model(s): Various, xxx, where "x" is any alphanumeric character Edition notice January 2009 The following paragraph does not apply to any country where such provisions are inconsistent with local law: LEXMARK INTERNATIONAL, INC.
UNITED STATES GOVERNMENT RIGHTS This software and any accompanying documentation provided under this agreement are commercial computer software and documentation developed exclusively at private expense. Trademarks Lexmark and Lexmark with diamond design are trademarks of Lexmark International, Inc., registered in the United States and/or other countries. Evercolor and PerfectFinish are trademarks of Lexmark International, Inc. All other trademarks are the property of their respective owners.
The manufacturer is not responsible for radio or television interference caused by using other than recommended cables or by unauthorized changes or modifications to this equipment. Unauthorized changes or modifications could void the user's authority to operate this equipment. Note: To assure compliance with FCC regulations on electromagnetic interference for a Class B computing device, use a properly shielded and grounded cable such as Lexmark part number 1021294 for USB attach.
Temperature information Ambient temperature 15–32° C (60–90° F) Shipping temperature -40–60° C (-40–140° F) Storage temperature 1–60° C (34–140° F) Waste from Electrical and Electronic Equipment (WEEE) directive The WEEE logo signifies specific recycling programs and procedures for electronic products in countries of the European Union. We encourage the recycling of our products. If you have further questions about recycling options, visit the Lexmark Web site at www.lexmark.
Mode Description Power consumption (Watts) Printing The product is generating hard-copy output from electronic inputs. 13.04 (ENERGY STAR-compliant X2600); 14.97 (non-ENERGY STAR-compliant X2600) Copying The product is generating hard-copy output from hard-copy original documents. 11.84 (ENERGY STAR-compliant X2600); 13.79 (non-ENERGY STAR-compliant X2600) Scanning The product is scanning hard-copy documents. 6.58 (ENERGY STAR-compliant X2600); 7.
PRINTER LICENSE AGREEMENT I agree that this patented printer is licensed for, and designed to work with only genuine Lexmark ink cartridges for the life of the patented printer. I agree to: (1) use only genuine Lexmark ink cartridges with this printer (except I may use replacement cartridges made by Lexmark but sold without single use terms as described in the below cartridge license agreement), and (2) pass this printer license/agreement to any subsequent user of this printer.
3 LIMITATION OF REMEDY. TO THE MAXIMUM EXTENT PERMITTED BY APPLICABLE LAW, ANY AND ALL LIABILITY OF LEXMARK UNDER THIS SOFTWARE LICENSE AGREEMENT IS EXPRESSLY LIMITED TO THE GREATER OF THE PRICE PAID FOR THE SOFTWARE PROGRAM AND FIVE U.S. DOLLARS (OR THE EQUIVALENT IN LOCAL CURRENCY).
6 TRANSFER. You may transfer the Software Program to another end-user. Any transfer must include all software components, media, printed materials, and this License Agreement and you may not retain copies of the Software Program or components thereof. The transfer may not be an indirect transfer, such as a consignment. Prior to the transfer, the end-user receiving the transferred Software Program must agree to all these License Agreement terms.
18 CAPACITY AND AUTHORITY TO CONTRACT. You represent that you are of the legal age of majority in the place you sign this License Agreement and, if applicable, you are duly authorized by your employer or principal to enter into this contract. 19 ENTIRE AGREEMENT. This License Agreement (including any addendum or amendment to this License Agreement that is included with the Software Program) is the entire agreement between you and Lexmark relating to the Software Program.
Avis de conformité aux normes de l’industrie du Canada Cet appareil numérique de classe B est conforme aux exigences de la norme canadienne relative aux équipements pouvant causer des interférences NMB-003. Regulatory notices for telecommunication terminal equipment This section contains regulatory information pertaining to products that contain telecommunication terminal equipment such as facsimile.
Telephone companies report that electrical surges, typically lightning transients, are very destructive to customer terminal equipment connected to AC power sources. This has been identified as a major nationwide problem. It is recommended that the customer install an appropriate AC surge arrestor in the AC outlet to which this device is connected.
Les compagnies de téléphone constatent que les surtensions électriques, en particulier celles dues à la foudre, entraînent d'importants dégâts sur les terminaux privés connectés à des sources d’alimentation CA. Il s’agit-là d’un problème majeur d’échelle nationale. En conséquence, il vous est recommandé de brancher un parasurtenseur dans la prise de courant à laquelle l’équipement est connecté.
Verwendung dieses Produkts in der Schweiz Für dieses Produkt muss ein schweizerischer Billing Tone Filter zur Zählzeichenübertragung (Lexmark Teilenummer 14B5109 oder 80D1877) für jede Leitung installiert werden, über die in der Schweiz Zeitsteuertakte übertragen werden. Die Verwendung des Lexmark Filters ist obligatorisch, da in allen analogen Telefonleitungen in der Schweiz Zeitsteuertakte vorhanden sind.
Industry Canada (Canada) This device complies with Industry Canada specification RSS-210. Operation is subject to the following two conditions: (1) this device may not cause interference, and (2) this device must accept any interference, including interference that may cause undesired operation of the device. This device has been designed to operate only with the antenna provided. Use of any other antenna is strictly prohibited per regulations of Industry Canada.
Notice to users in the European Union Products bearing the CE mark are in conformity with the protection requirements of EC Council directives 2004/108/EC, 2006/95/EC, and 1999/5/EC on the approximation and harmonization of the laws of the Member States relating to electromagnetic compatibility, safety of electrical equipment designed for use within certain voltage limits and on radio equipment and telecommunications terminal equipment. Compliance is indicated by the CE marking.
Suomi Lexmark International, Inc. vakuuttaa täten, että tämä tuote on direktiivin 1999/5/EY oleellisten vaatimusten ja muiden sitä koskevien direktiivin ehtojen mukainen. Français Par la présente, Lexmark International, Inc. déclare que l'appareil ce produit est conforme aux exigences fondamentales et autres dispositions pertinentes de la directive 1999/5/CE. Magyar Alulírott, Lexmark International, Inc.
Index Numerics E 4 x 6 color copy button 38 emission notices 58, 59, 65, 69, 70, 71 envelopes loading 23, 33 printing 33 exterior of the printer cleaning 47 B banner paper, loading 24 buttons, control panel 4 x 6 color copy 38 buttons, printer control panel 4 x 6 Copy 16 Black Copy 16 Cancel 16 Color Copy 16 Paper Feed 16 Power 16 Scan 16 Up arrow 16 C canceling print jobs 31 scan job 39 cards loading 24 cartridges, print cleaning 46 installing 43 ordering 48 preserving 47 removing 44 using genuine Lex
paper, loading 22, 27 parts paper exit tray 14 paper guide 14 paper support 14 power supply port 15 print cartridge carrier 15 printer control panel 14 scanner glass 14 scanner support 15 scanner unit 15 top cover 14 USB port 15 photo cards, loading 24 photo paper, loading 22 photos copying 4 x 6 photos 38 loading on the scanner glass 25 printing photos using FastPics or Productivity Studio 32 postcards loading 24 power button is not lit 50 power supply port 15 print cartridge carrier 15 print cartridge noz