
Owners manual
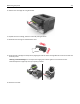
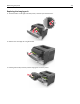

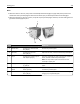
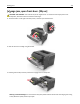
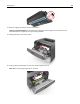
Table Of Contents
- Contents
- Safety information
- Overview
- Selecting a location for the printer
- Additional printer setup
- Installing internal options
- Installing hardware options
- Setting up the printer software
- Networking
- Preparing to set up the printer on an Ethernet network
- Installing the printer on an Ethernet network
- Preparing to set up the printer on a wireless network
- Connecting the printer using the Wireless Setup Wizard
- Connecting the printer to a wireless network using the Wi-Fi Protected Setup
- Connecting the printer to a wireless network using the Embedded Web Server
- Verifying printer setup
- Using MS510dn and MS610dn
- Learning about the printer
- Loading paper and specialty media
- Printing
- Managing the printer
- Finding advanced networking and administrator information
- Checking the virtual display
- Configuring supply notifications from the Embedded Web Server
- Modifying confidential print settings
- Copying printer settings to other printers
- Creating a printer control panel PIN
- Printing a menu settings page
- Printing a network setup page
- Checking the status of parts and supplies
- Saving energy
- Restoring factory default settings
- Securing the printer
- Using MS610de
- Learning about the printer
- Setting up and using the home screen applications
- Loading paper and specialty media
- Printing
- Managing the printer
- Setting up serial printing
- Changing port settings after installing a new network Internal Solutions Port
- Finding advanced networking and administrator information
- Checking the virtual display
- Configuring supply notifications from the Embedded Web Server
- Modifying confidential print settings
- Copying printer settings to other printers
- Creating a printer control panel PIN
- Printing a menu settings page
- Printing a network setup page
- Checking the status of parts and supplies
- Saving energy
- Restoring factory default settings
- Securing the printer
- Paper and specialty media guide
- Understanding the printer menus
- Saving money and the environment
- Maintaining the printer
- Clearing jams
- Avoiding jams
- Understanding jam messages and locations
- [x]-page jam, open front door. [20y.xx]
- [x]-page jam, open rear door. [20y.xx]
- [x]-page jam, clear standard bin. [20y.xx]
- [x]-page jam, remove tray 1 to clear duplex. [23y.xx]
- [x]-page jam, open tray [x]. [24y.xx]
- [x]-page jam, clear manual feeder. [25y.xx]
- Troubleshooting
- Understanding the printer messages
- Cartridge, imaging unit mismatch [41.xy]
- Cartridge low [88.xy]
- Cartridge nearly low [88.xy]
- Cartridge very low, [x] estimated pages remain [88.xy]
- Change [paper source] to [custom type name] load [orientation]
- Change [paper source] to [custom string] load [paper orientation]
- Change [paper source] to [paper size] load [orientation]
- Change [paper source] to [paper type] [paper size] load [orientation]
- Close front door
- Complex page, some data may not have printed [39]
- Configuration change, some held jobs were not restored [57]
- Defective flash detected [51]
- Error reading USB drive. Remove USB.
- Error reading USB hub. Remove hub.
- Imaging unit low [84.xy]
- Imaging unit nearly low [84.xy]
- Imaging unit very low, [x] estimated pages remain [84.xy]
- Incorrect paper size, open [paper source] [34]
- Insert Tray [x]
- Insufficient memory to support Resource Save feature [35]
- Insufficient memory to collate job [37]
- Insufficient memory for Flash Memory Defragment operation [37]
- Insufficient memory, some Held Jobs were deleted [37]
- Insufficient memory, some held jobs will not be restored [37]
- Load [paper source] with [custom string] [paper orientation]
- Load [paper source] with [custom type name] [paper orientation]
- Load [paper source] with [paper size] [paper orientation]
- Load [paper source] with [paper type] [paper size] [paper orientation]
- Load manual feeder with [custom type name] [paper orientation]
- Load manual feeder with [custom string] [paper orientation]
- Load manual feeder with [paper size] [paper orientation]
- Load manual feeder with [paper type] [paper size] [paper orientation]
- Maintenance kit low [80.xy]
- Maintenance kit nearly low [80.xy]
- Maintenance kit very low, [x] estimated pages remain [80.xy]
- Memory full [38]
- Network [x] software error [54]
- Non-Lexmark [supply type], see User’s Guide [33.xy]
- Not enough free space in flash memory for resources [52]
- Printer had to restart. Last job may be incomplete.
- Reinstall missing or unresponsive cartridge [31.xy]
- Reinstall missing or unresponsive imaging unit [31.xy]
- Remove paper from standard output bin
- Replace cartridge, 0 estimated pages remain [88.xy]
- Replace cartridge, printer region mismatch [42.xy]
- Replace imaging unit, 0 estimated pages remain [84.xy]
- Replace maintenance kit, 0 estimated pages remain [80.xy]
- Replace unsupported cartridge [32.xy]
- Replace unsupported imaging unit [32.xy]
- Serial option [x] error [54]
- SMTP server not set up. Contact system administrator.
- Standard network software error [54]
- Standard parallel port disabled [56]
- Standard USB port disabled [56]
- Too many flash options installed [58]
- Too many trays attached [58]
- Unformatted flash detected [53]
- Unsupported option in slot [x] [55]
- Weblink server not set up. Contact system administrator.
- Solving printer problems
- Solving print problems
- Printing problems
- Multiple-language PDF files do not print
- Error message about reading the flash drive appears
- Print jobs do not print
- Confidential and other held jobs do not print
- Print job takes longer than expected
- Job prints from the wrong tray or on the wrong paper
- Incorrect characters print
- Tray linking does not work
- Large jobs do not collate
- Unexpected page breaks occur
- Print quality problems
- Characters have jagged or uneven edges
- Clipped pages or images
- Shadow images appear on prints
- Gray background on prints
- Incorrect margins on prints
- Paper curl
- Print irregularities
- Repeating defects appear on prints
- Print is too dark
- Print is too light
- Printer is printing blank pages
- Skewed print
- Printer is printing solid black pages
- Transparency print quality is poor
- Streaked horizontal lines appear on prints
- Streaked vertical lines appear on prints
- Horizontal voids appear on prints
- Vertical voids appear on prints
- Toner specks appear on prints
- Toner fog or background shading appears on prints
- Toner rubs off
- Uneven print density
- Printing problems
- Solving home screen applications problems
- Embedded Web Server does not open
- Contacting customer support
- Understanding the printer messages
- Notices
- Product information
- Edition notice
- GOVERNMENT END USERS
- Trademarks
- Federal Communications Commission (FCC) compliance information statement
- Modular component notice
- Licensing notices
- Noise emission levels
- Waste from Electrical and Electronic Equipment (WEEE) directive
- Product disposal
- Taiwan waste dry cell batteries recycle logo notice
- Static sensitivity notice
- ENERGY STAR
- Temperature information
- Laser notice
- Laser advisory label
- Power consumption
- European Community (EC) directives conformity
- Regulatory notices for wireless products
- Exposure to radio frequency radiation
- Industry Canada (Canada)
- Notice to users in the European Union
- STATEMENT OF LIMITED WARRANTY FOR LEXMARK LASER PRINTERS, LEXMARK LED PRINTERS, AND LEXMARK MULTIFUN ...
- Patent acknowledgment
- Index

2 Pull the toner cartridge out using the handle.
3 Unpack the toner cartridge, and then remove all packing materials.
4 Shake the new cartridge to redistribute the toner.
5 Insert the toner cartridge into the printer by aligning the side rails of the cartridge with the arrows on the side rails
inside the printer.
Warning—Potential Damage: Do not expose the imaging unit to direct light for more than 10 minutes.
Extended exposure to light may cause print quality problems.
6 Close the front door.
Maintaining the printer 171