4600 MFP Menus and Messages Guide August 2006 Lexmark and Lexmark with diamond design are trademarks of Lexmark International, Inc., registered in the United States and/or other countries. © 2006 Lexmark International, Inc. All rights reserved. 740 West New Circle Road Lexington, Kentucky 40550 www.lexmark.
Edition: August 2006 The following paragraph does not apply to any country where such provisions are inconsistent with local law: LEXMARK INTERNATIONAL, INC., PROVIDES THIS PUBLICATION “AS IS” WITHOUT WARRANTY OF ANY KIND, EITHER EXPRESS OR IMPLIED, INCLUDING, BUT NOT LIMITED TO, THE IMPLIED WARRANTIES OF MERCHANTABILITY OR FITNESS FOR A PARTICULAR PURPOSE. Some states do not allow disclaimer of express or implied warranties in certain transactions; therefore, this statement may not apply to you.
Contents Contents 3 Chapter 1: Using the MFP menus ...................................................................................... 5 Understanding the multifunction printer (MFP) control panel ........................................................................... 5 Home screen ............................................................................................................................................ 8 Using the LCD touch-screen buttons ............................................
Contents Print Settings .......................................................................................................................................... 75 Security ................................................................................................................................................... 88 Set Date and Time .................................................................................................................................. 94 Help Pages ......................
1 Using the MFP menus Understanding the multifunction printer (MFP) control panel Most print settings can be changed from the application in use or the print driver. Settings changed from the application or print driver apply only to the job being sent to the MFP. Changes made to print settings from an application override changes made from the control panel. If a setting cannot be changed from the application, use the control panel, MarkVision™ Professional, or the Embedded Web Server (EWS) pages.
Using the MFP menus Callout Control panel item Function 1 LCD The liquid crystal display (LCD) shows home screen buttons, menus, menu items, and values. It allows for making selections within Copy, Fax, and so on. 2 Indicator light Gives information about the status of the MFP using the colors red and green: Status Indicates Off MFP power is off. Blinking green MFP is warming up, processing data, or printing a job. Solid green MFP is on, but idle.
Using the MFP menus Callout Control panel item Function 8 Stop Cause the printing or scanning to stop. During a scan job, the scanner finishes scanning the current page and then stops, which means paper may remain in the automatic document feeder (ADF). During a print job, the print media path is cleared before the printing stops. Stopping appears on the control panel during this process.
Using the MFP menus Home screen After the MFP is turned on and a short warm-up period occurs, the LCD shows the following basic screen, which is referred to as the home screen. Use the LCD touch-screen home screen buttons to open a menu. Once in a menu, use other buttons to scroll through a list of menu items or values, select a value to change the user default setting, and respond to messages. Copy 1 Fax 8 E-mail 2 FTP 7 6 Menus Ready. Toner low. Status/ Supplies 3 Touch any button to begin.
Using the MFP menus Callout number Button or screen item Function 6 ? (Tips) All menus have a Tips button. Tips is the context-sensitive Help feature within the LCD touch screens. 7 FTP Access the File Transfer Protocol (FTP) menus. A document can be scanned directly to an FTP site. 8 Fax Access the Fax menus. Other LCD touch-screen buttons may appear on the home screen.
Using the MFP menus Button Cancel Jobs Button name Function Unlock Device This button appears on the screen when the MFP is locked. The control panel buttons and shortcuts cannot be used while it appears and no default copy starts may occur. To unlock the MFP: 1 Touch Unlock Device to open a PIN entry screen. 2 Enter the correct PIN to unlock the numeric keypad (0—9) and the Backspace button on the control panel. Note: If an invalid PIN is entered, Invalid PIN. appears.
Using the MFP menus Using the LCD touch-screen buttons The following section provides information on navigating through several screens. Only a few are chosen to demonstrate the use of the touch-screen buttons. Sample screen one The touch screen appears as follows when the touch screen MFP is a mono printer. Copy from Sides (Duplex) Letter (8.5 x 11 in.) Portrait 1-sided to 1-sided Copy to Letter (8.5 x 11 in.
Using the MFP menus The touch screen appears as follows when the touch screen MFP is a color printer. Copy from Sides (Duplex) Letter (8.5 x 11 in.) Copy to 1 sided to 1 sided 1 sided to 2 sided 2 sided to 1 sided 2 sided to 2 sided Letter (8.5 x 11 in.
Using the MFP menus Information on LCD touch-screen buttons Button Scan the ADF Scan the flatbed Button name Function or description Select Touch the select button to have another screen appear with additional items. On the first screen, the user default setting is shown. Once the select button is touched, and the next screen appears, touching another item shown on the screen changes the user default setting.
Using the MFP menus Button Button name Function or description Back When the Back button is shaped like this, no other navigation is possible from this screen except to go back. If any other choice is made on the navigation bar, the screen closes. For example, in Sample screen one all the selections for scanning have been made. One of the preceding green buttons should be touched. The only other button available is Back.
Using the MFP menus Sample screen two Unknown paper size. Copy from: Letter (8.5 x 11 in.) Legal (8.5 x 14 in.) Executive (7.25 x 10.5 in.) Folio (8. 5 x 13 in.) Statement (5.5 x 8.5 in.) A4 (210 x 297 mm) Cancel Job Continue Information on LCD touch-screen buttons Button Button name Function or description Down arrow Touch the down arrow to move down to the next item in a list, such as a list of menu items or values. The down arrow does not appear on a screen with a short listing.
Using the MFP menus Button Button name Function or description Selected radio button This is a selected radio button. Touch a radio button to select it. The radio button changes color to show that it is selected. In Sample screen two, the only paper size selected is Letter. Cancel Job See Cancel Jobs on page 10. Continue Touch Continue after a menu item or value on a screen is selected and more changes need to be made for a job from the original screen.
Using the MFP menus Other LCD touch-screen buttons Button Button name Function or description Custom Allows for creating a custom button based on the user’s needs. Cancel Cancel an action or a selection, or cancel out of a screen and return to the previous screen. Select Select a menu. The next screen appears showing menu items. Select a menu item. The next screen appears showing values. Done Specify that a job is finished.
Using the MFP menus Button Button name Function or description Grayed out button When this button appears, it looks faded with a faded word on it. It means the button is not active or is unavailable on this screen. It was probably active on the previous screen, but the selections made on the previous screen caused it to be unavailable on the current screen. For an example, see page 96. Gray button Touch this button to select the action appearing on the button. For an example, see page 97.
Using the MFP menus Menus Factory defaults are the function settings in effect the first time the MFP is turned on. These remain in effect until they are changed. To restore factory defaults, select the Restore value from the Factory Defaults menu item. When a value or setting is selected and saved, it is stored in MFP memory. Once stored, these settings remain active until new ones are stored or the factory defaults are restored.
Using the MFP menus Paper Menu Use the Paper Menu to define settings relating to print media. Default Source Use this menu item to define the default print media source. Menu item Purpose Values and descriptions Default Source Identifies the default print media source. Tray MP Feeder Envelope Feeder Manual Paper Manual Env If the same size and type of print media are in two sources (and the Paper Size and Paper Type menu items are correctly set), the sources are automatically linked.
Using the MFP menus Menu item Purpose Values and descriptions Tray Type Identifies the type of print media loaded in each source. Note: If a user-defined name is available, it appears instead of Custom Type . If two or more custom types share the same name, the name only appears once in the Paper Type list.
Using the MFP menus Menu item Purpose Values and descriptions Envelope Feeder Size Identifies the size of envelope inserted in the envelope feeder. This menu item appears only if the optional envelope feeder is installed. 7 3/4 Envelope 9 Envelope 10 Envelope* (US) DL Envelope* (non-US) C5 Envelope B5 Envelope Other Envelope Envelope Feeder Type Identifies the type of envelope inserted in the envelope feeder. This menu item appears only if the optional envelope feeder is installed.
Using the MFP menus Configure MP This menu item is used to configure the multipurpose feeder as another source or manual feeder. If the multipurpose feeder is linked with another tray, the MFP can select print media from the multipurpose feeder before selecting print media from another tray. Menu item Purpose Values and descriptions Configure MP Determines when the MFP selects print media loaded in the multipurpose feeder. Cassette* MFP treats the multipurpose feeder like any other tray.
Using the MFP menus Paper Texture These menu items are used to set the print media texture for each of the defined print media types. This allows the MFP to optimize the print quality for the specified print media. Menu item Purpose Values and descriptions Plain Texture Identifies the texture of the print media loaded in a specific source. Smooth Normal* Rough Note: The default for Bond Texture is Rough. Vinyl Labels Texture Identifies the texture of the vinyl labels loaded in a specific source.
Using the MFP menus Menu item Purpose Values and descriptions Vinyl Labels Weight Identifies the relative weight of the vinyl labels loaded in a specific source. Light Normal* Heavy Shown if vinyl labels are a supported type. Custom Weight Identifies the relative weight of the custom paper loaded in a specific source. (x represents 1—6.) Light Normal* Heavy Shown if the custom type is supported in the specified source.
Using the MFP menus Custom Names This menu item is used to define a custom name for each print media. Menu item Purpose Values and descriptions Specifies the name of print media associated with each Custom Name available in the Paper Type menu, where x is 1—6. [user-defined name], such as: Stephen’s labels Mary’s card stock The custom print media loaded in the designated source must be a supported media type in order for a user-defined name to be assigned.
Using the MFP menus Menu item Purpose Values and descriptions Portrait Height Sets the portrait height of the universal media. Note: If the value set exceeds the maximum height, the MFP uses the maximum value allowed in inches or millimeters. 3—14.17 inches in 0.01 inch increments 76—360 mm in 1 mm increments Shows either inches or millimeters from the Units of Measure setting; 14 inches is the US default, and 356 mm is the international default.
Using the MFP menus Menu item Purpose Values and descriptions Assign Type/ Bin Sends print jobs to a specific output bin based on the requested paper type. Note: This menu item only appears when Configure Bins appears and is set to Mailbox or Type Assignment. If a user-defined name is available, it appears instead of Custom Bin. If two or more output bins share the same name, the name only appears once in the Assign Type/Bin value list.
Using the MFP menus Menu item Purpose Values and descriptions Menu Settings Page Prints information relating to: • Current settings for each of the menu items for all menus • Cartridge information • A list of installed options and features • Available MFP memory After selecting this item, the page prints and the MFP returns to Ready. Device Statistics Prints information relating to the MFP statistics. Network Setup Page Network Setup Page appears if additional network options are installed.
Using the MFP menus Network/Ports TCP/IP This menu item is used to view and change the Transmission Control Protocol/Internet Protocol settings. Internet Protocol (IP) specifies the format of packets, also called datagrams, and the addressing scheme. Most networks combine IP with a higher-level protocol called Transmission Control Protocol (TCP). TCP enables two hosts to establish a connection and exchange streams of data.
Using the MFP menus Menu item Purpose Values and descriptions WINS Server Address A server handles host names by assigning host names to IP addresses. Devices have a host name registered with the WINS server. Windows Internet Naming Service (WINS) is a system that determines the IP address associated with a particular network computer. This is called name resolution.
Using the MFP menus Menu item Purpose Values and descriptions LPD Banner Page On Off* LPD Trailer Page On Off* LPD Carriage Return Conversion On Off* IPv6 Use this menu item to view or change Internet Protocol Version 6 (IPv6) settings. Note: This menu item does not appear for non-network models. Menu item Purpose Values and descriptions IPv6 Sets the network to IPv6 (Internet Protocol Version 6).
Using the MFP menus E-mail Server Setup Menu item Purpose Values and descriptions Primary SMTP Gateway IP address field Primary SMTP Gateway Port numeric entry (25*) Secondary SMTP Gateway IP address field Secondary SMTP Gateway Port numeric entry (25*) SMTP Timeout numeric entry 5—30 (30*) Authentication header Server Requires Authentication Yes No* Userid text entry Password text entry, plain text? if not need confirm Reply Address text entry Subject text entry Message text entr
Using the MFP menus Menu item Purpose Values and descriptions Path Defines the path name. text entry Base file name Specifies the base file name. text entry A timestamp is added to the image* end of the base file name. The default value is the following word: image Note: There is a 53-character limit for the base file name.
Using the MFP menus Standard Network or Network Use these menu items to change printer settings affecting jobs sent to the MFP through a network port, either Standard Network or Network , where x represents 1 or 2. Menu item Purpose Values and descriptions PCL SmartSwitch Configures the MFP so it automatically switches to PCL emulation when a print job received through the network port requires it, regardless of the default printer language.
Using the MFP menus Menu item Purpose Values and descriptions Mac Binary PS Configures the MFP to process Macintosh binary PostScript print jobs. On The MFP processes raw binary PostScript print jobs from computers using the Macintosh operating system. Note: This setting often causes Windows print jobs to fail. Off The MFP filters PostScript print jobs using standard protocol. Auto* The MFP processes print jobs from computers using either Windows or Macintosh operating systems.
Using the MFP menus Menu item Purpose Values and descriptions USB Buffer Configures the size of the USB input buffer. Note: Changing the USB Buffer menu item automatically resets the MFP. Any permanent resources, such as fonts or macros, are lost. Disabled Job buffering is disabled. Any jobs already buffered on the hard disk are printed before normal processing of incoming jobs resumes. Auto* The MFP automatically calculates the USB Buffer size (recommended setting).
Using the MFP menus Standard Parallel or Parallel Use these menu items to change printer settings affecting jobs sent to the MFP through a parallel port, either Std Parallel or Parallel , where x represents 1 or 2. Menu item Purpose Values and descriptions PCL SmartSwitch Configures the MFP so it automatically switches to PCL emulation when a print job received through the parallel port requires it, regardless of the default printer language.
Using the MFP menus Menu item Purpose Values and descriptions Job Buffering This menu item only appears when a formatted hard disk is installed. Temporarily stores jobs on the MFP hard disk before printing. Note: Changing this menu item automatically resets the MFP. It is reset to configure memory, and any permanent resources, such as fonts or macros, are lost. Off* Does not buffer print jobs to the hard disk. On Buffers print jobs to the hard disk.
Using the MFP menus Serial Use these menu items to change printer settings affecting jobs sent to the MFP through an optional serial port. Menu item Purpose Values and descriptions PCL SmartSwitch Configures the MFP so it automatically switches to PCL emulation when a print job received through the serial port requires it, regardless of the default printer language.
Using the MFP menus Menu item Purpose Values and descriptions Job Buffering This menu item only appears when a formatted hard disk is installed. Temporarily stores jobs on the MFP hard disk before printing. Note: Changing the Job Buffering menu item automatically resets the MFP. It is reset to configure memory, and any permanent resources, such as fonts or macros, are lost. Off* Does not buffer print jobs to the hard disk. On Buffers print jobs to the hard disk.
Using the MFP menus Menu item Purpose Values and descriptions Honor DSR Determines whether the MFP uses the Data Set Ready (DSR) signal. DSR is one of the handshaking signals for most serial interface cables. The serial interface uses DSR to distinguish data sent by the computer from data created by electrical noise in the serial cable. This electrical noise can cause stray characters to print. Select On to prevent stray characters from printing.
Using the MFP menus AppleTalk Use these menu items to view or change the printer AppleTalk settings. Menu item Purpose Values and descriptions View Name Shows the assigned AppleTalk name. Select Name to show the AppleTalk name on the control panel. View Address Shows the assigned AppleTalk address. Select Address to show the AppleTalk address on the control panel. Activate Activates or deactivates the AppleTalk feature. Off On* Off–Deactivates the AppleTalk feature.
Using the MFP menus Settings General Settings Use these menu items to set various MFP settings. Menu item Purpose Values and descriptions Display Language To determine the language of the text on the control panel LCD.
Using the MFP menus Menu item Purpose Values and descriptions Custom Key 2 Allows for .co.uk type addresses. text field null .org is the default text in the field. The text entry field is limited to six characters. (Periods are considered characters, too.) If the text field is null or empty, the associated Custom Key does not appear on the keyboard. General Defaults Specifies the defaults based on geographical location. U.S.
Using the MFP menus Menu item Purpose Values and descriptions Web Page Refresh Rate 30—300 (120*) Contact Name text field NULL* Location text field NULL* Alarms Controls whether the MFP sounds an alarm when the device requires operator intervention. Alarm Control Off Single* Continuous Toner Alarm Off* Single Continuous Staple Alarm Off* Single Continuous Settings 46 The range is in seconds. Alarm Control sets the function of each alarm. Off—MFP does not sound an alarm.
Using the MFP menus Menu item Purpose Values and descriptions Timeouts Specifies the amount of time Standby Mode the MFP waits to return to the Disabled home screen, receive an end1—240 (15*) of-job message, or receive additional bytes of data from the computer. Note: Wait Timeout is only available when using Power Saver Mode PostScript emulation. This Disabled menu value has no effect on PCL emulation print jobs.
Using the MFP menus Menu item Purpose Timeouts (continued) Print Recovery Specifies whether the MFP continues from certain offline situations, reprints jammed pages, or waits until the entire page is processed and ready to be printed. Values and descriptions Print Timeout Disabled 1—255 (90*) Disabled–Disables Print Timeout. 1—255–Specifies the amount of time in seconds the MFP waits for an end-of-job message before canceling the remainder of the print job.
Using the MFP menus Menu item Purpose Values and descriptions Printer Language Specifies the default printer language used to communicate data from the computer to the MFP. Note: This menu item is not available from the control panel. It is only available on the MFP Embedded Web Server. Setting a printer language as the default does not prevent a software application from sending print jobs that use the other language.
Using the MFP menus Menu item Purpose Values and descriptions Resource Save Specifies what the MFP does with downloaded resources, such as fonts and macros stored in RAM, if the MFP receives a job that requires more memory than is available. Note: This menu item is not available from the control panel. It is only available on the MFP Embedded Web Server. Off* The MFP retains downloaded resources only until memory is needed.
Using the MFP menus Copy Settings Use these menu items to set the MFP for settings related to copying. Menu item Purpose Values and descriptions Content Specifies the type of content contained in the copy job. This menu item appears for mono and color printers. See the difference in the touch screens with the examples as follows. Text The copy job contains mostly text or line art. Text/Photo* The copy job contains a mixture of text and graphics.
Using the MFP menus Menu item Purpose Values and descriptions Color This menu item only appears for color printers. Color Gray Touch Color for a copy job that is printed in color. Touch Gray for a Black/White copy job that is printed in shading from white to black with all the shades of gray in between. For the difference between the Content touch screen and the Content/Color screen, see page 51 for the Content screen and page 52 for the Content/Color screen.
Using the MFP menus Menu item Purpose Values and descriptions Duplex To specify if an original document is duplex (twosided) or simplex (one-sided) when making a copy based on whether the sheets in the original document are simplex or duplex. If an optional duplex unit is not installed, then two-sided output cannot be selected. Only one-sided to one-sided or two-sided to one-sided is available for scanning. The orientation of each sheet defaults to portrait. The binding defaults to long edge.
Using the MFP menus Menu item Purpose Values and descriptions Print Page Borders Specifies if a border is printed around the edge of the page at the margins. On* A page border prints when Paper Saver is set to 2 on 1 Portrait, 2 on 1 Landscape, 4 on 1 Portrait, or 4 on 1 Landscape. Off A page border does not print. On* Copies the entire job the number of times specified.
Using the MFP menus Menu item Purpose Values and descriptions Darkness Specifies the level of darkness for the copy job. 1—9 (5*) A graphic representation depicts the values. As the right or left scroll button is touched, the asterisk moves back and forth on the line. 1 is next to the - and 9 is next to the +. As shown, 5 is the current value. - + Specifies the bin which receives the copy once it is printed.
Using the MFP menus Menu item Purpose Values and descriptions Shadow Detail Adjusts the amount of shadow detail visible on a copy. -4 to +4 (0*) Scan edge to edge Off* On Specifies if the original document is scanned edge-toedge prior to making copies. -4 preserves the least amount of shadow detail. +4 preserves the most shadow detail. Fax Settings Use these menu items to set the MFP for settings related to faxing.
Using the MFP menus General Fax Settings Menu item Purpose Values and descriptions Station Name Specifies the name of the fax within the MFP. The name could be a person’s name or the name of a company. text entry field The text entry field is limited to eight characters. Enter the name in the provided field using the virtual alphanumeric keyboard screen. See Virtual alphanumeric keyboard on page 58. Station Number Specifies the fax phone number.
Using the MFP menus Virtual alphanumeric keyboard abc q w e r t y u s d f g h j k l Shift lock z x c v b n m a i o p Backspace Search Space Clear Back Cancel Fax Send Settings Menu item Purpose Values and descriptions Resolution To define quality in dots per inch (dpi). A higher resolution gives greater print quality, but it increases the fax transmission time for outgoing faxes.
Using the MFP menus Menu item Purpose Values and descriptions Duplex Sets duplex scanning (two-sided scanning) either on or off for outgoing fax jobs. Off* The fax job is not set for duplex printing. Long edge The long end of the page (left edge is for portrait orientation and top edge for landscape orientation). See Duplex Bind on page 76 for more information. Short edge The short edge of the page (top edge for portrait orientation and left edge for landscape orientation).
Using the MFP menus Menu item Purpose Values and descriptions Allow Save as Shortcut Allows for saving fax numbers as shortcuts in the MFP. Yes* A Save as Shortcut button appears on the screen. No A Save as Shortcut button does not appear on the Fax Destination screen. Tone* A tone sounds for each number dialed. Pulse A pulsating noise sounds for each number dialed. Dial Mode Specifies the dialing sound, either as a tone or a pulse.
Using the MFP menus Fax Receive Settings Menu item Purpose Values and descriptions Enable Fax Receive Allows fax jobs to be received by the MFP. Yes* Fax jobs can be received. No Fax jobs cannot be received. Rings to Answer The MFP rings a set number of times to indicate an incoming fax job. 1—25 (1*) Auto Reduction Scales an incoming fax job so it fits the size of the print media loaded in the designated fax source. See Paper Source as follows for more information.
Using the MFP menus Fax Log Settings Menu item Purpose Values and descriptions Transmission Log Selects whether the MFP prints a log with details about the fax job sent. If the fax job failed to send, the header on the page reads “Fax Failed” instead of “Transmission Log.” Print Always* The MFP prints a page indicating information about the fax job sent that includes the fax number and the time the fax job was sent. Print Never The MFP never prints the log.
Using the MFP menus Speaker Settings Menu item Purpose Values and descriptions Speaker Mode Specifies how long the speaker remains on. Always Off The speaker is set off. On until Connected* The speaker is on until the fax connection is made. Always On The speaker is set on. High* The speaker volume is high. Low The speaker volume is low. Off The speaker volume is off. On* The speaker volume is on. Speaker Volume Ringer Volume Specifies the volume setting.
Using the MFP menus Menu item Purpose Values and descriptions Content Specifies the type of content contained in the fax job. Text* The fax job contains mostly text or line art. Text/Photo The fax job contains a mixture of text and images. Photo The fax job contains only images. Fax Resolution Defines quality in dots per inch (dpi). A higher resolution gives greater print quality, but it increases the fax transmission time for outgoing faxes.
Using the MFP menus E-mail Settings Menu item Purpose Values and descriptions See E-mail Server Setup on page 33. E-mail Server Setup Format Specifies the format of the file to be scanned. PDF* Portable Document Format JPEG Joint Photographic Experts Group TIFF Tagged Image File Format PDF version Sets the version of an Adobe Acrobat PDF file that is sent. This menu item applies to all scan functions. 1.2 1.3 1.4 1.5 1.6 Content Specifies the type of content contained in the e-mail.
Using the MFP menus Menu item Purpose Values and descriptions Orientation Specifies the default orientation of the document to be sent in the scan job. Portrait* Sends the original document as portrait for the scan job, which means text and graphics are parallel to the short edge. See Duplex Bind on page 76 for more information about short edge. Landscape Sends the original document as landscape for the scan job, which means text and graphics are parallel to the long edge.
Using the MFP menus Menu item Purpose Values and descriptions Duplex Sets duplex scanning (two-sided scanning) either on or off for e-mails. Off* The e-mail job is not set for duplex printing. Long edge The binding is along the long edge of the page (left edge is for portrait orientation and top edge for landscape orientation). See Duplex Bind on page 76 for more information.
Using the MFP menus Menu item Purpose Values and descriptions Log Output Bin Specifies the output bin that accepts the printed e-mail log. The menu item only appears when one optional output bin is installed. A list of available output bins is shown as values, such as Bin 1, Bin 2, and so on based on the number of bins installed. E-mail Bit Depth Enables the Mixed mode to have smaller file sizes by using 1 bit images when Color is set to Off.
Using the MFP menus FTP Settings Menu item Purpose Format Values and descriptions PDF* JPEG TIFF Portable Document Format Joint Photographic Experts Group Tagged Image File Format PDF version Sets the version of an Adobe Acrobat PDF file that is sent. This menu item applies to all scan functions. 1.2 1.3 1.4 1.5* 1.6 Content Specifies the type of content contained in the FTP job. Text The FTP job contains mostly text or line art. Text/Photo* The FTP job contains a mixture of text and images.
Using the MFP menus Menu item Purpose Values and descriptions Original Size Provides a list of possible scanner sizes to select from to specify the size of the original document to be scanned. Letter (8.5 x 11 in.)* Legal (8.5 x 14 in.) Executive (7.25 x 10.5 in.) Folio (8.5 x 13 in.) Statement (5.5x 8.5 in.) A4 (210 x 297 mm)* A5 (148 x 210 mm) JIS-B5 (182 x 257 mm) Auto Size Sense Mixed Sizes Duplex Sets duplex printing (two-sided Off* printing) either on or off for FTP jobs.
Using the MFP menus Menu item Purpose Values and descriptions Log Paper Source To select the print media source to supply print media for the MFP to print a log of all sent and received FTPs. Envelopes do not apply. Note: This menu item applies to all scan functions. Tray 1* Tray 1 or the standard tray is the specified print media source. MP Feeder The multipurpose feeder is the specified print media source.
Using the MFP menus Menu item Purpose Values and descriptions Shadow Detail Adjusts the amount of shadow detail visible on a copy. -4 to +4 (0*) Scan edge to edge Specifies if the original document is scanned edge-to-edge prior to sending the FTP job. Off* On Settings 72 -4 preserves the least amount of shadow detail. +4 preserves the most shadow detail.
Using the MFP menus Scan to USB Settings Menu item Purpose Format Values and descriptions PDF* JPEG TIFF Portable Document Format Joint Photographic Experts Group Tagged Image File Format PDF version Sets the version of an Adobe Acrobat PDF file that is sent. This menu item applies to all scan functions. 1.2 1.3 1.4 1.5* 1.6 Content Specifies the type of content contained in the scan to USB job. Text The scan to USB job contains mostly text or line art.
Using the MFP menus Menu item Purpose Values and descriptions Original Size Provides a list of possible scanner sizes to select from to specify the size of the original document to be scanned. Letter (8.5 x 11 in.)* Legal (8.5 x 14 in.) Executive (7.25 x 10.5 in.) Folio (8.5 x 13 in.) Statement (5.5x 8.5 in.) A4 (210 x 297 mm)* A5 (148 x 210 mm) JIS-B5 (182 x 257 mm) Auto Size Sense Mixed Sizes (* Denotes a country/region-specific factory default value.
Using the MFP menus Menu item Purpose Values and descriptions Base file name text entry The default value is the following word: image Note: There is a 53-character limit for the base file name. The following characters or symbols are invalid: * — asterisk : — colon ? — question mark < — less than symbol > — greater than symbol | — vertical bar A time stamp is added to the end of the base file name. Custom Job scanning Allows for scanning of custom scan to USB jobs. This is also known as Job Build.
Using the MFP menus Finishing Menu Use these menu items to set the user default settings for all jobs. Printing from an application may override user default settings. Menu item Purpose Values and descriptions Duplex Sets duplex (two-sided) printing as the default for all print jobs. Note: This menu item appears if an optional duplex unit is installed. Off* Prints on one side of the print media. On Prints on both sides of the print media.
Using the MFP menus Menu item Purpose Values and descriptions Blank Pages Specifies whether to include application-generated blank pages as part of the printed output. Do Not Print* Does not print application-generated blank pages as part of the job. Print Prints application-generated blank pages as part of the job. Keeps the pages of a print job stacked in sequence when printing multiple copies of the job. Off* Prints each page of a job the number of times specified by the Copies menu item.
Using the MFP menus Menu item Purpose Values and descriptions Multipage Order Determines the positioning of multiple page images when using Multipage Print. See Multipage Print on page 77. The positioning depends on the number of images and whether the images are portrait or landscape in orientation.
Using the MFP menus Quality Menu Use these menu items to change settings that affect print quality and save toner. Printing from an application may override user default settings. Menu item Purpose Values and descriptions Print Resolution To select printed output resolution. 600 dpi* Produces high quality output for print jobs that are mostly text. 1200 dpi Produces highest quality output for jobs where print speed is not important and memory is abundant.
Using the MFP menus Utilities Menu Use the Utilities Menu to print a variety of listings relating to available MFP resources, settings, and print jobs. Other menu items let you set up MFP hardware and troubleshoot problems. Menu item Purpose Values and descriptions Factory Defaults Returns the MFP settings to the factory default values. This menu item is also available in the Setup Menu.
Using the MFP menus Setup Menu Use the Setup Menu to configure a variety of MFP features. Menu item Purpose Values and descriptions Printer Language Specifies the default printer language used to communicate data from the computer to the MFP. Note: Setting a printer language as the default does not prevent a software application from sending print jobs that use the other language. PCL Emulation* PS Emulation PCL emulation–Uses a PCL interpreter for incoming host communications.
Using the MFP menus Menu item Purpose Values and descriptions Print Area Modifies the logical and physical printable area. Normal* Fit to Page Whole Page Note: The Whole Page setting only affects pages printed using PCL 5 interpreter. This setting has no effect on pages printed using the PCL XL or PostScript interpreters. If attempting to print any data in the non-printable area defined by Normal Print Area, the MFP clips the image at the boundary defined by the Normal defined printable area.
Using the MFP menus Menu item Purpose Values and descriptions Font Priority Establishes the font search order. Note: Font Priority only appears when a formatted flash or hard disk is installed, is neither defective nor Read/Write or Write protected, and Job Buffer Size is not set to 100%. Resident* The MFP searches printer memory for the requested font before searching the flash memory or the hard disk.
Using the MFP menus Menu item Purpose Values and descriptions PCL Emulation Settings Changes the point size for scalable typographic fonts. Point Size 1.00—1008.00 (12*) Point size refers to the height of the characters in the font. One point equals approximately 1/72 of an inch. Point sizes from 1 to 1008 in increments of 0.25 points can be selected. Note: Point Size only appears for typographic fonts. Specifies the font pitch for scalable monospaced fonts. Pitch 0.08—100.
Using the MFP menus Menu item Purpose Values and descriptions Tray Renumber Configures the MFP to work with printer drivers or applications that use different source assignments for the sources: trays, the multipurpose feeder, and the manual feed slot. Note: See the Technical Reference for more information about assigning source numbers. Assign MP Feeder Off* None 0—199 Off–The MFP uses factory default source assignments. None–Source ignores the Select Paper Feed command.
Using the MFP menus Menu item Purpose Tray Renumber (continued) Values and descriptions View Factory Default Shows the factory default value assigned to each source. For example: MPF Default = 8 T1 Default = 1 T2 Default = 4 T3 Default = 5 T4 Default = 20 T5 Default = 21 Env Default = 6 MPaper Default = 2 MEnv Default = 3 The menu item is for viewing information only. No item in the value list can be selected. All possible options appear even if they are not installed.
Using the MFP menus HTML Menu These menu items are used to change the printer HTML settings. Menu item Purpose Values and descriptions Font Name Sets the default font for HTML documents. Note: Times will be used in HTML documents that do not specify a font.
Using the MFP menus Menu item Purpose Values and descriptions Scaling Scales the image to fit the print media size. Anchor Top Left Best Fit* Anchor Center Fit Height / Width Fit Height Fit Width Note: When the Auto Fit setting is set to On, Scaling is automatically set to Best Fit. Orientation Sets the image orientation. Portrait* Landscape Portrait–Prints text and graphics parallel to the short edge of the paper. Landscape–Prints text and graphics parallel to the long edge of the paper.
Using the MFP menus Menu item Function Access Purpose Values and descriptions Menus Enabled* Disabled If Disabled is selected and set as the user default, then access to everything from the Menu button is disabled. Copy Access No authentication required* Require User ID only Require User ID and Password Function disabled If Function Disabled is selected, the menu item does not appear on the LCD. See Functions disabled transitional messages for more information.
Using the MFP menus Menu item Purpose Function Access (continued) Confidential Print This menu item appears on the Web page only; it does not appear on the control panel LCD. Values and descriptions Flash Drive Scan No authentication required* Require User ID only Require User ID and Password Function disabled Selecting Function Disabled prevents the Scan button from appearing. Selecting No authentication required lets any user perform the scan.
Using the MFP menus Menu item Purpose Values and descriptions Protect Menus These security menu items are always password protected when either an Advanced Password or a User Password is set. If both passwords are set, only the Advanced Password is valid. Paper Menu Not protected Accept Advanced Password only* Accept Advanced or User Passwords Protection is not applied unless the password is set, meaning that the password field cannot be a null field.
Using the MFP menus Menu item Purpose Protect Menus (continued) Values and descriptions LES configuration Not protected Accept Advanced Password only* Accept Advanced or User Passwords Protection is not applied for Lexmark Embedded Solutions (LES) configuration unless the password is set, meaning that the password field cannot be a null field. Create/Change Passwords See Create, Change, or Remove Passwords on page 93.
Using the MFP menus Create, Change, or Remove Passwords Create, Change, or Remove Advanced Password Menu item Values and descriptions Pop-up message Password text entry The range for a password is 8—127 characters. If a password less than eight characters is entered, a pop-up message appears to instruct the user to enter a password of a minimum of eight characters. Password must be a minimum of 8 characters.
Using the MFP menus Set Date and Time Menu item Purpose Values and descriptions Time Zone Sets the time zone for the fax. Not Set* US Hawaii US Alaska US/Can Pacific Tijuana US/Can Mountain US/Can Central US/Can Eastern US/Can Atl Newfoundland Brasilia, Braz. Mid-Atlantic Azores Cape Verde Is.
Using the MFP menus Menu item Purpose Values and descriptions DST Mode Allows methods of changing Daylight Savings Time (DST) Mode. Automatic* The time is set by the time server. Manual The time is hand set. Daylight Savings Yes No The default value depends on the date and time. Note: Once this value is changed, change DST mode to Manual. Time Server IP None Time Server Name text field Allow NTP Broadcast Yes No* Select the check box for Yes. Clear the check box for No.
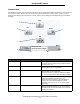
Using the MFP menus Manage Shortcuts To manage Fax, E-mail, FTP, and Profile shortcuts, only deletions of an entry or a complete list are possible. Use the up and down arrows to scroll through the listing of shortcut items if there are enough entries on the screen for the up and down arrows to appear. The following example shows a Profile shortcuts screen with no items in the list selected. It does not show arrows since there are only three shortcuts listed which all appear on one screen.
Using the MFP menus Touch the radio button beside the one listing needed, and it changes to a selected radio button as shown by the blue color. Delete Entry is now active. Touch Delete Entry to delete the selected entry. Menus->Manage Shortcuts->Manage Profiles Shortcuts legal1/my_twain_net_scan finance_report_scan customfolder/personnel/roles_profiles Delete Entry Delete List Displaying 1 - 3 / 3 The Fax, E-mail, and FTP manage shortcut screens work in the same manner.
2 Understanding MFP messages Messages appear on the MFP control panel describing the current state of the MFP and indicating possible MFP problems requiring intervention. Status messages Status messages provide information on the status of the MFP. Message Meaning Action Bin [x] Full x represents the number of the output bin that is full when the MFP bins are linked. Remove print media from the bins. The message clears once the output level of the linked bins is no longer full.
Understanding MFP messages Message Meaning Action Power Saver The MFP is ready to receive and process data. It is reducing its electricity consumption while idle. If the MFP remains inactive for the period of time specified in the Power Saver menu item (60 minutes is the factory default), the Power Saver message replaces the Ready message. Send a job to print. Press any control panel button. Printing The MFP is printing a job.
Understanding MFP messages Message Meaning Action Standard Bin Full Bin [x] Full [bin name] Full The standard bin is full. x represents the number of the bin that is full. [bin name] specifies a previously defined name for the bin, such as Mary’s bin, and it is full. Remove the stack of print media from the standard output bin or from the specified bin to clear the message. Note: These messages appear on the Menu Settings Page also. See Menu Settings Page for more information.
Understanding MFP messages Fax status messages Message Meaning Answering The MFP is answering a fax call. Call complete A fax call is completed. Connect bps The fax is connected. x is the baud rate per second. Dialing A fax number is dialed. If the number is too long to fit on the screen, only the word Dialing appears. Fax failed The fax failed to send. Fax memory full The attempted fax job is canceled since memory is full. Job stored for delayed transmission.
Understanding MFP messages Password and PIN messages Message Meaning Action Invalid or incorrect password. An incorrect password is entered. Touch Continue to return to the screen to enter a correct password. Invalid PIN. Touch Continue to return to the screen to enter a correct PIN. An incorrect Personal Identification Number (PIN) is entered. Copy, e-mail, fax, FTP, and scan button messages Message Meaning Action Insufficient resources. Try again when the system is idle.
Understanding MFP messages Message Meaning Action Change [src] to [size] Lets the user override the current print media source for the remainder of the print job. The formatted page prints as is on the print media installed in the tray. This may cause clipping of text or images. Touch Use current [src] to ignore the message and print on the print media loaded in the tray.
Understanding MFP messages Message Meaning Action Clean scanner glass During a scanner calibration, the firmware detected the scanner ADF or the flatbed (scanner) glass may be dirty. Touch Cancel Job if a scan job is processing when the attendance message appears. This cancels the job and clears the message. Touch Scan from Automatic Document Feeder if the page jam recovery is active. Scanning resumes from the ADF immediately after the last successfully scanned page.
Understanding MFP messages Message Meaning Action Insert tray [x] Occurs when the MFP detects a missing tray. x can be 1, 2, 3, 4, or 5. Insert the specified tray to clear the message. Touch Cancel Job to cancel the current job if needed. Touch Reset Active Bin to change to another linked bin. Install bin The MFP detects that bin [x] is missing where x is the number of the bin. This message occurs when pages are formatted when the bin is present, but before the pages are printed.
Understanding MFP messages Message Meaning Action Load manual feeder with [Custom Type Name] Occurs when the MFP receives a manual feed request that specific print media be loaded into the multipurpose feeder. The print media is previously defined as a custom type from Custom 1 through Custom 6. The custom type name appears on the control panel. Touch Continue. • If print media is in the multipurpose feeder, the job continues to print.
Understanding MFP messages Message Meaning Action Load [src] with [size] Occurs when a source is loaded with an incorrect print media size as specified in the Paper Menu. Touch Continue. Load the specified source that is set for the requested size. Touch Automatically select media to override manual requests for Manual Paper and Manual Env for the rest of the print job. All requests for additional pages are automatically overridden, and print media is selected from an automatic source.
Understanding MFP messages Message Meaning Action Remove paper from all bins All output bins are full. Remove the print media from all output bins. The MFP automatically senses print media removal and resumes printing. If removing the print media does not clear the message, touch Continue. Remove paper from bin [x] The specified output bin is full. Remove the stack of paper from the specified bin. The MFP automatically senses print media removal and resumes printing.
Understanding MFP messages Message Meaning Action Replace jammed originals if restarting job. One or more messages that interrupted a scan job are now cleared. Replace the original documents in the scanner to restart the scan job. Touch Restart job if page level recovery is active and the job is restartable. The message clears. A new scan job containing the same parameters as the previous job starts. Touch Cancel Job if a scan job is processing when the attendance message appears.
Understanding MFP messages Message Meaning Action 31.yy Replace defective print cartridge The MFP detects a defective print cartridge within 10—20 seconds after the top cover is closed. Remove the defective print cartridge and install a nondefective print cartridge for printing to continue. During the 10—20 second interval before the defective print cartridge is detected, the MFP may continue to print pages; however, the pages are not reprinted once the new print cartridge is installed. 32.
Understanding MFP messages Message Meaning Action 39 Complex page, some data may not have printed The data for a page is too complex to print. To avoid this error in the future: Reduce the complexity of the page by reducing the amount of text or graphics on the page and deleting unnecessary downloaded fonts or macros. Set Page Protect to On in the Setup Menu in the Settings menu. Install additional memory. Touch Continue to continue printing the job; however, data will be missing for this page.
Understanding MFP messages Message Meaning Action 53 Unformatted flash detected The MFP detects unformatted flash memory. Touch Continue to clear the message and continue printing. The MFP continues with normal operations except for flash operations. Reformat the flash to allow flash operations. If the error message reappears, the flash memory may be defective and require replacing. 54 Network [x] software error The MFP cannot establish communications with a specified installed network port.
Understanding MFP messages Message Meaning Action 56 USB port [x] disabled The MFP receives data through a specified USB port, but this USB port is disabled. x is the number of the USB port. Touch Continue. The MFP discards any data received through the specified USB port. Make sure the USB Buffer menu item is not set to Disabled. Touch Reset Active Bin to change to another linked bin. 58 Too many trays attached The MFP detects that too many optional drawers and their matching trays are installed.
Understanding MFP messages Message Meaning Action 233.yy Paper jam, check [area name]. Leave paper in bin. There is a single jam in the specified area indicated by area name. 1 Open the duplex unit. 2 Clear the jam, and close the duplex unit. 3 Touch Continue. If all print media is cleared from the path, the job resumes printing. 233.yy Paper jam,[x] pages jammed. Leave paper in bin. There are multiple jams. x indicates the number of jammed sheets of print media. 1 Open the duplex unit.
Understanding MFP messages Message Meaning Action 260.yy Paper jam, [x] pages jammed. Leave paper in bin. There are multiple jams in the envelope feeder. x indicates the number of jammed sheets of print media. 1 Clear the jams from the envelope drawer. 2 Touch Continue. If all print media is cleared from the path, the job resumes printing. 27x.yy Paper jam, check [area name]. Leave paper in bin. There is a single jam in the specified area indicated by area name.
Understanding MFP messages Message Meaning Action 283 Staple jam, check [area name]. There is a single jam in the specified area indicated by area name. area name is the stapler. Note: After the error is cleared, the printer does not reprint any pages which existed in the accumulator for stapling. 1 Open the stapler door. 2 Remove the staple cartridge. 3 Remove the jammed staple and any print media jam. 4 Close the stapler door. 5 Touch Continue.
Understanding MFP messages Message Meaning Action 291.00 Scanner jam, remove all originals from the scanner The scanner detects an original document jam at the second scanning sensor while the scanner is idle. Job level recovery is active. Clear the jam from the scanner to clear the message. 291.00 Scanner jam, remove jammed originals from the scanner The scanner detects an original document jam at the second scanning sensor while the scanner is idle. Page level recovery is active.
Understanding MFP messages Message Meaning Action 294.00 Scanner jam, remove all originals from the scanner The scanner detects a jam at the ADF exit sensor while the scanner is idle. Job level recovery is active. Remove all original documents from the ADF to clear the jam. The message clears. 294.00 Scanner jam, remove jammed originals from the scanner The scanner detects a jam at the ADF exit sensor while the scanner is idle. Page level recovery is active.
Index A Original Size 58 Redial Frequency 59 Resolution 58 Scan edge to edge 60 Shadow detail 60 General Fax Settings 57 Cancel Faxes 57 Enable Manual Fax 57 Memory Use 57 Station ID 57 Station Name 57 Station Number 57 Speaker Settings Ringer Volume 63 Speaker Mode 63 Speaker Volume 63 Annotations 86 Assign Type/Bin 28 Asterisk button 7 automatic size sensing 20 accounting statistics 80 Activate AppleTalk 43 LexLink 43 NetWare 42 Activate Hex Trace 80 Advanced Status, parallel 39 Alarms Alarm Control 46
Index Fax 9 FTP 9 gray 18 grayed out 18 Held Faxes 9 Held Jobs 9 Home 17 left arrow 13 left scroll decrease 13 Lock Device 9 Menus 8 numeric keypad 6 Pound 6 Release Held Faxes 9 Reset active bin 17 right arrow 13 right scroll increase 13 Search Held Jobs 9 Select 17 select 13 selected radio 16 Start 6 Status/Supplies 8 Stop 7 Unlock Device 10 unselected radio 15 Custom Overlay 55 Darkness 55 Duplex 53 Number of Copies 55 Original Size 54 Output Bin 55 Overlay 55 Paper Saver 53 Print Page Borders 54 Scan
Index Message 33 Password 33 Path 34 Primary SMTP Gateway 33 Primary SMTP Gateway Port 33 Reply Address 33 Secondary SMTP Gateway 33 Secondary SMTP Gateway Port 33 Send me a copy 33 Server 33 Server Requires Authentication 33 Size error message 33 SMTP Timeout 33 Subject 33 Userid 33 Web Link 34 Web Link Setup 33 E-mail Settings Allow Save as shortcut 68 Background Removal 68 Color 65 Content 65 Contrast 68 Custom Job scanning 68 Darkness 65 Duplex 67 E-mail Bit Depth 68 E-mail Server Setup 65 E-mail Serve
Index FTP Bit Depth 71 JPEG Quality 70 Log Paper Source 71 Orientation 69 Original Size 70 PDF version 69 Photo JPEG Quality 70 Resolution 69 Shadow Detail 72 Transmission Log 70 Use multi-page TIFF 70 FTP, Help Pages 95 Full 100 Function Access Copy Access 89 E-mail Access 89 Fax Access 89 Flash Drive Print 90 Flash Drive Scan 90 FTP Access 89 Held Jobs Access 89 Lexmark Embedded Solutions (LES) Access 90 Menus 89 functions disabled transitional messages turned off by system administrator
Index M in bin. 114 235.yy Paper jam, [x] pages jammed. Leave paper in bin. 114 235.yy Paper jam, check [area name]. Leave paper in bin. 114 236.yy Paper jam, [x] pages jammed. Leave paper in bin. 114 236.yy Paper jam, check [area name]. Leave paper in bin. 114 237.yy Paper jam, check [area name]. Leave paper in bin. 114 250.yy Paper jam, [x] pages jammed. Leave paper in bin. 114 250.yy Paper jam, check [area name]. Leave paper in bin. 114 260.yy Paper jam, [x] pages jammed. Leave paper in bin. 115 260.
Index 291.00 Scanner jam, remove jammed originals from the scanner 117 291.01 Scanner jam, remove all originals from the scanner 117 291.01 Scanner jam, remove jammed originals from the scanner 117 291.02 Scanner jam, remove all originals from the scanner 117 291.02 Scanner jam, remove jammed originals from the scanner 117 292 Scanner jam, remove all originals from the scanner 117 292 Scanner jam, remove jammed originals from the scanner 117 293 Replace all originals if restarting job.
Index N Fax status messages Answering 101 Call complete 101 Connect bps 101 Dialing 101 Fax failed 101 Fax memory full 101 Job stored for delayed transmission. 101 Line busy 101 No answer 101 No dial tone 101 Queued for sending 101 Receive complete 101 Receiving page [n] 101 Sending page [n] 101 Set clock 101 Waiting for redial 101 password and PIN messages Invalid or incorrect password. 102 Invalid PIN.
Index Vinyl Labels Weight 25 Substitute Size 23 Paper Size 20 Paper Size/Type 20 Paper Texture 24 Paper Type 20 paper type, custom 25 Paper Weight 24 Parallel Buffer 38 Parallel Mode 2 39 Parity 41 PCL Emulation Settings 84 A4 Width 84 Auto CR after LF 84 Auto LF after CR 84 Lines per Page 84 Orientation 84 Pitch 84 Point Size 84 PCL font name 83 PCL font source 83 PCL SmartSwitch network 35 parallel 38 serial 40 USB 36 PCL symbol set 83 PCL tray renumber 85 Portrait Height 27 Portrait Width 26 Pound butto
Index PS SmartSwitch network 35 parallel 38 serial 40 USB 36 Use multi-page TIFF 74 Security Authentication Method 88 Auto ’Log out’ delay 88 Confidential Print, See also Confidential Print 90 Create and Change Passwords functions disabled transitional messages 118 Create, Change, or Remove Passwords See Create, Change, or Remove Passwords Create/Change Passwords, See Create/Change Passwords Function Access, See Function Access functions disabled transitional messages See also functions disabled transitio
Index status message bar 8 Stop button 7 Substitute Size 23 Symbol Set, PCL 83 View Name, AppleTalk 43 View Network Number, NetWare 42 View Nickname, LexLink 43 View Print Mode, NetWare 42 virtual alphanumeric keyboard 58 T W texture bond 24 card stock 24 colored 24 Custom Texture 24 envelope 24 glossy 24 labels 24 letterhead 24 plain 24 preprinted 24 transparency 24 vinyl labels 24 textured paper 24 Timeouts Power Saver Mode 47 Print Timeout 48 Screen Timeout 47 Standby Mode 47 Wait Timeout 48 Tra