Lexmark C910 User’s Reference October 2001 www.lexmark.
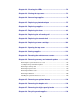
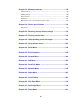
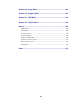
Table of contents Chapter 1: Printer overview .............................................................. 9 Print speed ......................................................................................................... 10 Memory .............................................................................................................. 10 Paper handling ...................................................................................................
Chapter 6: Using the Print and Hold function .............................. 20 Printing and deleting held jobs ........................................................................... 20 Accessing held jobs from the operator panel ..................................................... 21 Recognizing when format errors occur .............................................................. 21 Repeat Print .......................................................................................................
Choosing labels .................................................................................................. 37 Choosing card stock ........................................................................................... 37 Choosing transparencies ................................................................................... 38 Chapter 12: Loading media ............................................................ 39 Chapter 13: Loading the high capacity feeder .............................
Chapter 22: Cleaning the LEDs ...................................................... 70 Chapter 23: Closing the top cover ................................................. 72 Chapter 24: Conserving supplies .................................................. 74 Chapter 25: Replacing a photodeveloper ..................................... 75 Chapter 26: Replacing supplies ..................................................... 80 Chapter 27: Replacing the fuser ...................................................
Chapter 39: Ordering supplies ..................................................... 133 Chapter 40: Calling for service .................................................... 135 Chapter 41: Contacting Lexmark customer service on the Web ...................................................................................... 136 Chapter 42: Solving display problems ........................................ 137 Chapter 43: Solving network printing problems ........................
Chapter 52: Managing memory .................................................... 179 Printer memory ................................................................................................. 179 Adding memory ................................................................................................ 179 Flash memory .................................................................................................. 180 Hard disk .....................................................................
Chapter 69: Setup Menu ............................................................... 288 Chapter 70: Supplies Menu .......................................................... 295 Chapter 71: USB Menu .................................................................. 299 Chapter 72: Utilities Menu ............................................................ 302 Notices ............................................................................................ 307 Edition notice ............................
viii
1 Printer overview The following illustrations show a Lexmark™ C910 standard model configuration and a fully configured network printer. If you have attached paper handling options to your printer, it may look more like the fully configured model. For information on other possible configurations, refer to the Setup Guide.
The printer also offers flexible paper handling. It supports a wide variety of paper sizes, from A5 to A3 and 11x17 in., and has a standard multipurpose feeder that makes it easy to print on envelopes, transparencies, labels, card stock, and non-standard size paper. You can add up to three optional drawers to the base printer, which can increase the printer's paper capacity to 2300 sheets. You can also add an optional high capacity feeder making the total paper capacity 5300 sheets.
2 Avoiding print quality problems To prevent print quality problems, do not touch the roller on the bottom of the toner cartridge, the shiny green tube on the photodeveloper, the film on the transfer belt, or the fuser rollers. Scratches or fingerprints on any of these surfaces can affect print quality. Media and supplies Always use media that meets the recommended guidelines. Refer to the Card Stock & Label Guide for more information.
3 Canceling a print job To cancel a print job: 1 Press Menu. Job Menu appears on the first line of the display and Cancel Job appears on the second line. 2 Press Select. Canceling Job briefly appears on the display. The printer finishes printing any page already being printed, and then stops. The printer returns to the Ready state.
4 Controlling printed output Your printer driver provides you with the best quality output for various types of printing needs. However, you may want more control over how your printed document will look. Your printer default is set to give you the best screen frequency setting for high quality business graphics. You can however control the image smoothing, color correction, print mode, and toner darkness settings used during printing. Adjusting any of these settings affects the output of your documents.
Toner darkness This setting lets you adjust the amount of toner released during printing. Your printer offers five Toner Darkness settings. The values range from 1 (lightest setting) to 5 (darkest setting). The default toner darkness setting is 4. Printing text In both PostScript and PCL emulations, 100% black text prints using black toner (K of CMYK). This results in sharp, crisp text characters. The printer applies a unique screening algorithm to small text (less than 24 points in size).
Screen frequency The screen frequency is the number of halftone cells per inch. A higher screen frequency setting increases the number of halftone cells per inch. Increasing the number of halftone cells per inch does not necessarily give you better quality. The reason for this is the higher settings may make the colors or halftones seem to run together or bleed.
5 Using the operator panel This section contains information about understanding the operator panel, changing printer settings, and understanding operator panel menus. You can change most printer settings from your software application or printer driver. Settings you change from the application or printer driver apply only to the job you are preparing to send to the printer. Changes made to printer settings from a software application override changes made from the operator panel.
Using the operator panel buttons Use the five operator panel buttons to open a menu, scroll through a list of values, change printer settings, and respond to printer messages. The numbers 1 through 6 appear beside the operator panel buttons; these numbers are used to enter personal identification numbers (PIN) for Print and Hold jobs. For more information, see Using the Print and Hold function. The following information describes the functions of each button.
You can modify printer settings by: • Selecting a setting from a list of values • Changing an On/Off setting • Changing a numerical setting To select a new value as a setting: 1 From a Ready status message, press Menu. The menu names appear. 2 Continue to press and release Menu until you see the menu you need. 3 Press Select to select the menu or menu item displayed on the second line of the display. – – If the selection is a menu, the menu opens and the first printer setting in the menu appears.
4 Verify that the options you installed are correctly listed under “Installed Features.” If an option you installed is not listed, turn the printer off, unplug the power cord, and reinstall the option. Note: To prevent an electrical overload, plug your printer into a well-grounded outlet on a non-ground fault interrupter (GFI) circuit. 5 Verify the amount of memory installed is correctly listed under “Printer Information.
6 Using the Print and Hold function When sending a job to the printer, you can specify in the driver that you want the printer to hold the job in memory. When you are ready to print the job, you must go to the printer and use the operator panel menus to identify which held job you want to print.
Accessing held jobs from the operator panel 1 To access held jobs from the operator panel: – – If the printer is Busy, press Menu and the Job Menu appears. If the printer is Ready, continue to step 2. 2 Press Menu until you see Held Jobs or Confidential Job on the operator panel display, depending on the type of job you want to access. 3 Press Select. Note: If you are looking for a Confidential Job, you are prompted to enter your PIN. See Confidential jobs for more information.
Repeat Print If you send a Repeat Print job, the printer prints all requested copies of the job and stores the job in memory so you can print additional copies later. You can print additional copies as long as the job remains stored in memory. Note: Repeat Print jobs are automatically deleted from printer memory when the printer requires extra memory to process additional held jobs.
Confidential jobs When you send a job to the printer, you can enter a personal identification number (PIN) from the driver. The PIN must be four digits using the numbers 1–6. The job is then held in printer memory until you enter the same four-digit PIN from the operator panel and choose to print or delete the job. This ensures that the job does not print until you are there to retrieve it, and no one else using the printer can print the job.
7 Sending a job to print To send a job to the printer: 1 Open the file you want to print. 2 From the File menu, choose Print. 3 Verify that the correct printer is selected in the dialog box. 4 Adjust the printer settings according to your need. The printer settings available are determined by the application that opens your file. Note: Click Properties or Setup to adjust printer settings not available from the first screen, and then click OK. 5 Click OK or Print to send the job to the selected printer.
8 Color correction Color Correction lets you modify the color settings used to print your documents. The Color Correction settings you can choose from are: Auto, Display, CMYK, Off, Vivid, and Manual. Auto is the default setting when the printer is shipped from the factory. It uses different color profiles for the different objects on the page (text, graphics, and images). You can use these settings to adjust your printed color to better match the colors of other output devices or standard color systems.
If you use this setting without the necessary color management software or your application does not provide the correct information, your printed output may have unexpected results. Off When you select Off as your color correction, the printer expects to receive the necessary color correction from your software. Use this setting when you have software that manages its own color correction or if you use another color management tool.
9 Managing color There are many color management systems on the market today. They range from simple swatchbooks to specially designed and designated color servers. A color management system (CMS) helps you match colors across a number of devices, including scanners, monitors, and printers. A CMS ensures what you see at every step of the publishing process matches the printed output.
Popular color management systems There are many color management systems for you to choose from. The type of CMS you choose impacts the color quality of your printed output. Choose a CMS that best meets your cost and performance needs. Some popular color management systems are described here. Windows ICM Microsoft Windows 95/98/Me, Windows 2000, and Windows NT support Image Color Management (ICM). ICM is an operating system-level CMS based on the CIE independent color model.
10 Understanding color Your printer gives you the power to communicate in color. Color attracts attention, commands respect, and adds value to your printed material or information. Using color increases readership and is read more often than the same material printed in black and white. Color can be used to motivate people and speed the analysis of complex data. When you print on-demand color, you save money.
Primary colors Notice the three primary additive colors red, green, and blue in the illustration. You can see that when all three colors are combined, you get white. However, look at the area where any two colors overlap. What you see is cyan, magenta, or yellow. Equal amounts of green and blue produce cyan. Equal amounts of blue and red produce magenta, and equal amounts of red and green produce yellow. The toner colors used to place color on your printed material are cyan, magenta, yellow, and black.
Color difference Most software applications today provide us with a WYSIWYG (What You See Is What You Get) environment. This helps us develop the look of our document. However, the difference between the additive and subtractive colors may sometimes cause a problem between what you see and what you get. This is due to the difference between additive and subtractive colors. The reason for this lies in the color spectrum of the different devices. Your printer is capable of delivering over 16 million colors.
As your monitor ages, the colors on the screen also change. Changing the toner cartridges, photodeveloper cartridge, and paper in your printer also has a major impact on the color in your printed document. Always print a new swatch of the colors you plan on using before you invest a lot of time creating your screen designs.
11 Choosing media The print quality and feed reliability of your printer and options can vary with the type and size of print media you use. This section provides guidelines for each type of print media. For information on card stock and labels, refer to the Card Stock & Label Guide located on the Lexmark Web site at www.lexmark.com. Always print samples on the print media you are considering before buying large quantities.
Smoothness The degree of smoothness of paper directly affects print quality. If the paper is too rough, the toner does not fuse to the paper properly, resulting in poor print quality. If the paper is too smooth, it can cause paper feeding problems. Moisture content The amount of moisture in the paper affects both print quality and the ability of the printer to feed the paper properly. Leave the paper in its original wrapper until you are ready to use it.
Unsatisfactory paper The following papers are not recommended for use with the printer: • Chemically treated papers used to make copies without carbon paper, also known as carbonless papers, carbonless copy paper (CCP), or no carbon required (NCR) paper • Coated papers (erasable bond) • Multiple-part forms or documents • Preprinted papers that require a registration (the precise print location on the page) greater than ±0.09 in.
To help avoid jams or poor print quality: • Always use new, undamaged paper. • Before loading paper, know the recommended print side of the paper you’re using. This information is usually indicated on the paper package. • Do not use paper that you have cut or trimmed yourself. • Do not mix paper sizes, weights, or types in the same paper source; mixing results in jams. • Do not use coated papers. • Do not remove trays while a job is printing or Busy is displayed on the operator panel.
For best performance, use envelopes made from 75 g/m2 (20 lb bond) paper. You can use up to 105 g/ m2 (28 lb bond) weight for the multipurpose feeder as long as the cotton content is 25% or less. Envelopes with 100% cotton content must not exceed 90 g/m2 (24 lb bond) weight.
When printing on card stock: • Be sure to select Card Stock in the Paper Type menu item in the Paper Menu. (See Paper Type for detailed information about these settings.) • Be aware that preprinting, perforation, and creasing can significantly affect the print quality and cause paper handling or jamming problems. • Avoid using card stock that may release hazardous emissions when heated. For more information, refer to the Card Stock & Label Guide, available on the Lexmark Web site at www.lexmark.com.
12 Loading media This section provides information about loading media in the input options. Proper paper loading helps prevent paper jams and ensure trouble-free printing. Before loading paper, find the recommended print side of the paper you’re using. This information is usually indicated on the paper package.
13 Loading the high capacity feeder You can attach an optional high capacity feeder to your printer. This can provide an additional input of 3,000 sheets of paper. Note: Do not load any print media other than paper in the high capacity feeder. The high capacity feeder must be properly adjusted for A4 or Letter size paper. If the paper guides are in the wrong position, you may experience paper feeding problems. To load the high capacity feeder: 1 Open the top cover as shown.
3 Loosen the left and right paper guide thumbscrews. 4 Slide the guides left or right to the correct position for the size paper you are loading (A4 or Letter). 5 Tighten the left and right paper guide thumbscrews.
6 Flex the sheets back and forth to loosen them, and then fan them. Do not fold or crease the paper. Straighten the edges of the stack on a level surface. Note: Do not exceed the maximum stack height. Overfilling the tray may cause jams. 7 Place the paper against the paper guides with the print side up.
8 Press the paper tray button The paper tray lowers to let you load up another 500 sheets of paper. Note: If there is only a partial stack of paper in the tray, the paper low sensor will not allow the tray to go down. Add more paper to lower the tray. 9 Place the paper against the paper guides with the print side up. 10 Repeat step 8 and step 9 until you have filled the tray or loaded the desired quantity. 11 Close the top cover. Make sure the high capacity feeder is pushed completely against the printer.
14 Loading the multipurpose feeder The multipurpose feeder can hold several sizes and types of paper, such as transparencies and envelopes. It is useful for single page printing on letterhead, colored paper, or other special paper. Refer to the Card Stock & Label Guide for more information on paper types and sizes. You can use the multipurpose feeder one of two ways: • Paper tray—Load paper or other print media in the feeder with the intention of leaving the media in the feeder.
Trouble-free printing • Load only one size of paper or envelopes at a time in the multipurpose feeder. • To achieve the best possible print quality, use only high-quality print media that is designed for use in laser printers. For more guidelines on paper, see Choosing media. • To prevent paper jams, do not add or remove paper when there is still paper in the multipurpose feeder. This applies to other types of print media, too.
2 Slide the paper width guides to the correct position for the size paper you are loading. 3 Push down the bottom plate until it locks into place.
4 Prepare the print media for loading. – Flex paper or fan envelopes back and forth. Do not fold or crease the paper. Straighten the edges on a level surface. – Hold transparencies by the edges and avoid touching the print side. Fan the stack of transparencies to prevent jams. Be careful not to scratch or leave fingerprints on the transparencies. 5 Load one type of print media in the multipurpose feeder. Do not mix types.
Loading paper and transparencies a Load paper or transparencies in the center of the tray with the recommended print side face up. b Continue with step 6. Loading envelopes a Load envelopes flap side down with the stamp area on the right. The end of the envelope with the return address area enters the multipurpose feeder last. WARNING: Never use envelopes with stamps, clasps, snaps, windows, coated linings, or selfstick adhesives. These envelopes may severely damage the printer.
Loading letterhead a For both simplex (single-sided) and duplex printing on letterhead, place the printed side face up. b Continue with step 6. 6 Gently slide the print media into the multipurpose feeder. Note: Forcing the print media may cause it to buckle. 7 Slide the width guides until they lightly rest against the edges of the print media. Do not bend the print media. 8 Push the SET button to the left to unlock the bottom plate.
9 Select the paper source, size, and type from your software application and select paper size and type from the operator panel. a Make sure the Paper Size and Paper Type for the multipurpose feeder (MP Feeder Size and MP Feeder Type) are set to the correct value for the print media you are loading. (See Paper Size and Paper Type for detailed information about these settings.) b Press Go to return to Ready. Note: Software settings may override operator panel settings.
4 Close the multipurpose feeder door.
15 Output bins Your printer has two output bins: the standard output bin on top of the printer and an exit tray (bin 1). Your printer directs all media except transparencies and envelopes to the standard output bin. Transparencies are automatically directed to the exit tray (bin 1) to reduce curling. Note: Make sure the exit tray is down when printing transparencies or envelopes.
16 Loading a paper tray The printer lets you know when you need to load paper. If a tray has less than 50 sheets of paper, Tray x Low appears on the display, where x corresponds to a paper tray. Open the tray and load paper to remove the message. When you change the paper in the tray, make sure the paper guides are in the correct positions. The position of the left paper guide informs the printer of the size paper loaded in the tray.
2 Press the metal plate down until it locks. 3 Squeeze the left guide and slide it to the position for the size paper you are loading. 4 Release the paper guide. Note: The position of the left paper guide tells the printer the size of the paper in the tray. If the left paper guide is in the wrong position, you may experience paper feeding problems or incorrect page formatting.
5 Flex the sheets back and forth to loosen them, and then fan them. Do not fold or crease the paper. Straighten the edges of the stack on a level surface. 6 Place the paper in the tray, print side down. Note: Do not exceed the maximum stack height. Overfilling the tray may cause jams.
7 Squeeze the front paper guide lever and slide the guide until it lightly touches the stack of paper. 8 Rotate the paper size dial until the size of the paper in the tray is indicated. Note: This setting serves as a visual reminder only; it has no effect on the operation of the printer.
9 Push the tray in. Loading letterhead See Loading the multipurpose feeder for instructions on loading letterhead in the multipurpose feeder. Follow the steps in Loading paper, card stock, or labels to load transparencies in the tray. Loading transparencies See Loading the multipurpose feeder for instructions on loading transparencies in the multipurpose feeder.
17 Using the heavy media tray The optional heavy media tray replaces tray 1. For instructions on removing and installing tray 1, see Exchanging tray 1. The heavy media tray is specially designed for use with heavier plain paper, glossy paper, transparencies, labels, and card stock. Note: Using the heavy media tray with light paper such as 16–26 lb plain paper may cause jams. When the heavy media tray is installed, it turns the auto size sensing off.
7 Press Menu until you see Custom Type 1, and then press Select. 8 Press Menu until you see the type of media you loaded in the heavy media tray, and then press Select. 9 Press Go. The printer returns to the Ready state. Exchanging tray 1 1 Pull tray 1 out until it stops. 2 Lift the front of tray 1 and pull the tray forward. Note: You only need to lift the tray high enough for the tray stop to move over the slide stop.
3 Lower the front of the tray and pull the tray from the drawer slides. 4 Align the rollers on the side of the paper tray with slots on the left and right drawer slides. 5 Place the drawer rollers into the drawer slides and slide the drawer in until it stops. Note: If the slides move when you are installing the tray, you can hold one slide while you insert the drawer, and then pull the other slide out and over the drawer roller until it stops. 6 Lift the front of the tray.
7 Slide the tray in until both tray stops pass the slide stops. Note: You only need to lift the tray high enough for the tray stop to move over the slide stop. If the slides move when you are installing the tray, you can hold one slide while you insert the drawer, and then hold the other slide. Slide stop Tray stop 8 Lower the front of the tray and slide it in. 9 Move the tray in and out to make sure it functions properly.
18 Media guidelines Use recommended media (paper, transparencies, envelopes, card stock and labels) for your printer to avoid printing problems. For detailed information about media characteristics, refer to the Card Stock & Label Guide located on the Lexmark Web site at www.lexmark.com. Brief guidelines for choosing paper and other media follow.
The following table lists recommended media, weights, and the stack height guide to use when loading the paper trays.
The following are not recommended for your printer: • • • • • • • • • • • • Paper with a large cotton content Paper with a rough or heavily textured surface Coated papers, such as erasable bond Preprinted papers manufactured with chemicals that may contaminate the printer Paper designed for inkjet printers Deformed or damaged paper Paper that is wet or has absorbed moisture Paper that is punched, embossed, or perforated Multiple-part forms Synthetic papers Thermal papers Recycled paper having a weight les
When printing on envelopes: • Try a sample of any envelopes before buying large quantities. • Use envelopes made from 90 to 105 g/m2 (24 to 28 lb) bond paper.
Card stock Note: Load card stock in the multipurpose feeder and heavy media tray only. Do not load more than 50 sheets of card stock into the multipurpose feeder. Loading more than 50 sheets of card stock or using the wrong paper source may cause paper jams or a failure to feed. You can load 250 sheets of card stock in the heavy media tray. The properties of the card stock you choose—such as the orientation of the paper fibers, moisture content, thickness, and texture—can affect the print quality.
19 Tray linking Tray linking enables the automatic linking feature for trays when you use the same size and type of print media in multiple paper sources (trays). For example, let’s say you have loaded two optional trays with the same size print media and both are set to the same paper type. When one tray becomes empty, the printer automatically selects print media from the other tray since the printer sees the trays as linked.
20 Tips for successful printing Storing paper Properly storing the media helps ensure trouble-free printing. Use the following guidelines: • For best results, store media in an environment where the temperature is approximately 21°C (70°F) and the relative humidity is 40%. • Store cartons of paper on a pallet or shelf, rather than directly on the floor. • If you store individual packages of paper out of the original carton, make sure they rest on a flat surface so the edges do not buckle or curl.
21 Determining supply status Print the menu settings page to check the status of printer supply items. See Printing the menu settings page for detailed instructions. One or two pages print depending on the number of menu settings you have. Look for “Supplies Menu” on the page; each item indicates the percentage of remaining life. You can also check the status of printer supply items using the operator panel. 1 Press Menu until you see Supplies Menu. 2 Press Select.
22 Cleaning the LEDs If you are experiencing print quality problems such as voids, light streaks, or light print, you may need to clean the LEDs inside the top cover. Note: For instructions on opening the top cover, see Opening the top cover. 1 Complete the steps to open the top cover. 2 Remove all toner cartridges. See Removing a toner cartridge for more information. CAUTION: The photodevelopers are hot! Allow the photodevelopers to cool before touching.
can affect the performance of the photodeveloper. Avoid touching the photodeveloper anywhere except the handles. Note: The toner inside the toner cartridges can soil clothing. Do not clean clothing soiled with toner in hot water; this permanently adheres the toner to the clothing. Use cold water to remove toner that has soiled clothing. 3 Wipe the glass lenses of all four LED heads with a clean, dry cloth or tissue paper. 4 Reinstall all toner cartridges.
23 Closing the top cover CAUTION: Before closing the top cover make sure everyone is away from the printer and the area under the cover is free of hands, clothing, and other items. 1 Place both hands on the top cover as shown. 2 Press down firmly until the top cover clicks into place.
3 Rotate the top cover locking lever to the right. Note: If you cannot rotate the locking lever, the cover is not fully closed. Open the top cover and press down firmly until the top cover clicks into place. 4 Close the front door.
24 Conserving supplies Several settings in your application software or on the display let you conserve toner and paper: For more information, see... Supply Setting What the setting does Toner Toner Darkness in the Color Menu Lets you adjust the amount of toner released on a sheet of paper. The values range from 1 (lightest setting) to 4 (darkest setting). Toner Darkness Paper and specialty media Multipage Print in the Finishing Menu Prints two or more page images on one side of a sheet.
25 Replacing a photodeveloper Your printer monitors the life of your photodevelopers. When a photodeveloper reaches the end of its life, the printer displays 84 Black Photo Dev Exhausted or 84 Color Photo Devs Exhausted. This message indicates it is time to replace one or more specified photodevelopers. For best print quality, make sure you replace the fuser when the printer displays 84 Black Photo Dev Life Warning or 84 Color Photo Dev Life Warning. Press Go to clear the message.
2 Pull the waste toner arm away from the photodeveloper. 3 Use the tab to pull the photodeveloper approximately halfway out of the printer. Some force is initially required to pull the photodeveloper past the locking spring. 4 Grasp the photodeveloper handle and continue to pull the photodeveloper out.
Installing a photodeveloper Note: Your printer has four color-coded photodevelopers. Each photodeveloper has its own color-coded position. 1 Remove the replacement photodeveloper from the packing material. Note: The photodeveloper has a cover over the green developer film. Do not remove the cover until you begin installing the photodeveloper. 2 Remove the tape from the photodeveloper and photodeveloper cover.
3 Align the photodeveloper with the slot under the matching color label. 4 While holding the photodeveloper with the left hand and the photodeveloper cover with the right hand slide the photodeveloper into the slot until it is fully seated. As the photodeveloper slides in, slide off the photodeveloper cover.
5 Push the waste toner arm until it connects with the photodeveloper and snaps into place. 6 Repeat Removing a photodeveloper step 2 through Installing a photodeveloper step 5 to install additional photodevelopers. CAUTION: Before closing the top cover make sure everyone is away from the printer and the area under the cover is free of hands, clothing, and other items. 7 Close the top cover and the front door. Note: If you need instructions on how to close the top cover, see Closing the top cover.
26 Replacing supplies For information about replacing an individual supply item, click the headings below: Replacing a photodeveloper Replacing the fuser Replacing the oil coating roll Replacing the transfer belt Replacing a toner cartridge The printer calculates and stores information on the number of images that have been printed.
Press Go to clear the message. The Supplies status message appears on the second line of the display to remind you there are supplies that need attention. Press Menu to open the Supplies Menu and quickly determine the supply items that need to be replaced. The printer continues to display the Supplies status message until you replace the required supply items. After the Supplies status message appears, the printer continues to monitor the required supply items until the supply is exhausted.
27 Replacing the fuser Your printer monitors the life of your fuser. When the fuser reaches the end of its life, the printer displays 80 Fuser Exhausted. This message indicates it is time for you to replace the fuser. For best print quality, make sure you replace the fuser when the printer displays 80 Fuser Life Warning. Press Go to clear the message. The Supplies message appears on the second line of the display to remind you that supplies need attention.
3 Turn off or unplug any optional devices connected to the printer. WARNING: Do not touch, drop, or place anything on the transfer belt. Touching the surface of the transfer belt or placing items on it may cause damage. 4 Complete the steps to open the top cover.
5 Lift the fuser pressure release lever up. WARNING: Removing or replacing the fuser while the fuser pressure release lever is in the down position will damage the lever. CAUTION: The fuser may be hot! Allow the fuser to cool before touching. 6 Grasp the fuser handles and press both fuser release buttons.
7 Lift the fuser up and out. Note: Do not discard the old fuser at this time. The oil coating roll will be installed in the new fuser. Installing the fuser 1 Remove the replacement fuser from the packing material, and remove any packing material from the fuser.
2 Align the new fuser with the opening in the printer. 3 Lower the fuser until it snaps into place. 4 Remove the oil coating roll from the old fuser.
CAUTION: The oil coating roll may be hot! Allow the oil coating roll to cool before touching. a Pull up on the locking tab to unlock the oil coating roll. Locking tab Oil coating roll b Slide out the oil coating roll. Hold here Hold the oil coating roll by the top, as indicated by the dark areas in the illustration. Note: The underside of the oil coating roll may be covered with oil.
5 Install the oil coating roll. Make sure the oil coating roll drops down into position. It should click into place with no gap between it and the fuser. CAUTION: Before closing the top cover make sure everyone is away from the printer and the area under the cover is free of hands, clothing, and other items. 6 Close the top cover and the front door. 7 Reconnect any optional devices to the printer. 8 Turn the optional devices on. 9 Turn the printer on. The message Did you replace Fuser? appears.
10 Press Go to reset the fuser counter. Note: If you replaced the fuser after receiving the 80 Belt/Fuser Life Warning message or the 80 Belt/Fuser Exhausted message, see Replacing the transfer belt for instructions on replacing the transfer belt.
28 Replacing the oil coating roll Your printer monitors the life of your oil coating roll. When the oil coating roll reaches the end of its life, the printer displays 85 Coating Roll Exhausted. This message indicates that you must replace the oil coating roll to continue printing. For best print quality, make sure you replace the oil coating roll when the printer displays 85 Coating Roll Life Warning. Press Go to clear the message.
3 Complete the steps to open the top cover. Transfer belt CAUTION: The oil coating roll may be hot! Allow the oil coating roll to cool before touching. 4 Pull up on the locking tab to unlock the oil coating roll.
5 Slide the oil coating roll out of the fuser. Hold here Hold the oil coating roll by the top, as indicated by the dark areas in the illustration. 6 Remove packing material from the new oil coating roll.
7 Slide the oil coating roll into the fuser. Make sure the oil coating roll drops down into position. It should click into place with no gap between it and the fuser. CAUTION: Before closing the top cover make sure everyone is away from the printer and the area under the cover is free of hands, clothing, and other items. 8 Close the top cover and the front door. 9 Reconnect any optional devices to the printer. 10 Turn the optional devices on.
11 Turn the printer on.
29 Replacing the transfer belt Your printer monitors the life of your transfer belt. When the transfer belt reaches the end of its life, the printer displays 80 Belt Exhausted. This message indicates it is time for you to replace the transfer belt. For best print quality, make sure you replace the transfer belt when the printer displays 80 Belt Life Warning. Press Go to clear the message. The Supplies message appears on the second line of the display to remind you that supplies need attention.
Removing the transfer belt 1 Complete the steps in Preparing for maintenance on page 95. 2 Make sure the printer is turned off. 3 Turn off or unplug any optional devices connected to the printer. WARNING: Do not touch, drop, or place anything on the transfer belt. Touching the surface of the transfer belt or placing items on it may cause damage. 4 Complete the steps to open the top cover. Transfer belt CAUTION: The inside of the printer may be hot! Allow the printer to cool before touching.
5 Loosen the thumbscrews on each side of the transfer belt cover. 6 Lift and remove the transfer belt cover.
7 Loosen the thumbscrews on each side of the transfer belt. 8 Pull the transfer belt out.
Installing the transfer belt 1 Remove the replacement transfer belt from the packing material. 2 Align the transfer belt with the opening in the printer.
3 Slide the transfer belt in until it is fully seated. 4 Tighten the transfer belt thumbscrews.
5 Align and place the transfer belt cover as shown. 6 Tighten the transfer belt cover thumbscrews. WARNING: Do not touch, drop, or place anything on the transfer belt. Touching the surface of the transfer belt or placing items on it may cause damage.
7 Lift and remove the four shipping spacers from the transfer belt. Note: If you do not remove the four shipping spacers from the transfer belt, you may not be able to close the top cover. Transfer belt CAUTION: Before closing the top cover make sure everyone is away from the printer and the area under the cover is free of hands, clothing, and other items. 8 Close the top cover and the front door. 9 Reconnect any optional devices to the printer. 10 Turn the optional devices on. 11 Turn the printer on.
12 Press Go to reset the transfer belt counter. Once the counter is reset, the Printing Alignment Page message appears and a test page prints. After the test page has printed, you are prompted to enter alignment values for each setting. 13 Press Menu to choose the alignment value. 14 Press Select to enter the value and continue to the next value. After you have entered values for each alignment setting, the transfer belt should be aligned and the printer ready to print.
30 Replacing a toner cartridge Your printer monitors the toner level of your toner cartridges. When the toner is getting low, the printer displays 88 Toner Low. This message indicates it is time for you to replace one or more specified toner cartridges. Press Go to clear the attendance message. The Supplies status message appears on the second line of the display to remind you there are supplies that need attention. You can open the Supplies Menu to see which toner cartridge is low.
Removing a toner cartridge Note: If you need instructions on how to open the top cover, see Opening the top cover. WARNING: Do not touch, drop, or place anything on the transfer belt. Touching the surface of the transfer belt or placing items on it may cause damage. 1 Complete the steps to open the top cover. Transfer belt Note: The toner can soil clothing. Do not clean clothing soiled with toner in hot water; this permanently adheres the toner to the clothing. Use cold water to remove toner.
3 Pull the toner cartridge approximately halfway out of the printer. 4 Grasp the toner cartridge handle and continue to pull the toner cartridge out. Installing a toner cartridge 1 Remove the replacement toner cartridge from the packing material. 2 Gently shake the toner cartridge to distribute the toner evenly.
3 Remove the shipping tape and any additional packing material. 4 Align the toner cartridge with its slot in the printer. The toner cartridge is placed to the right of the corresponding colored label.
5 Slide the toner cartridge in until the cartridge is fully seated. 6 Push the waste toner arm until it snaps into place over the photodeveloper. 7 Repeat Removing a toner cartridge step 2 through Installing a toner cartridge step 6 to install additional toner cartridges. CAUTION: Before closing the top cover make sure everyone is away from the printer and the area under the cover is free of hands, clothing, and other items.
8 Close the top cover and the front door. Note: If you need instructions on how to close the top cover, see Closing the top cover.
31 Opening the top cover To access the printer supplies and some of the paper jam areas, open the top cover: 1 Open the front door. 2 Rotate the top cover locking lever to the left.
3 Push up on the right top cover locking button and lift at the points shown below. 4 Lift the top cover until it stops.
32 Storing supplies Store supplies in their original packaging until you are ready to install them.
33 Resetting the maintenance counter After replacing the fuser or transfer belt, you must reset the maintenance counter. If the message Did you replace Fuser? or Did you replace Belt? appears, press Go. Otherwise, use the following steps to reset the fuser or transfer belt counter. Note: Although the fuser is shown, the same procedure is used to clear the transfer belt. 1 Press Menu until Supplies Menu appears on the second line of the display.
5 Press Menu until Fuser appears on the second line of the display. REPLACE SUPPLIES Fuser 1 Menu 2 Select 3 Go 5 Return 4 Stop 6 6 Press Select to open the Fuser menu item. 7 Press Menu until =Replaced appears on the second line of the display. Fuser =Replaced 1 Menu 2 Select 3 Go 5 8 Press Select to reset the fuser counter to zero. 9 Press Go.
34 Removing memory and network options Previously installed memory and interface options can easily be removed by using the procedures on the following pages. 1 Turn the printer off. 2 Unplug the power cord. 3 Disconnect the parallel or Ethernet cable from the printer. If you have any other devices connected to the printer, turn them off as well and unplug any cables going to the printer.
3 Slide the cover up and away from the printer. WARNING: The system board access cover must be replaced before operating the printer. Screws Screws Locating memory and network options Use the following illustration to locate the connector for the card you want to remove.
Removing a memory card Complete the following steps if you need to remove a memory card. Otherwise, go to Installing the system board access cover. 1 Make sure the printer is turned off and the power cord is unplugged. 2 Follow the steps for Removing the system board access cover if it is still installed. WARNING: Memory cards are easily damaged by static electricity. Touch something metal such as the printer frame before you touch a memory card.
Removing an option card You need a number 2 Phillips screwdriver to remove an option card. 1 Make sure the printer is turned off and the power cord is unplugged. 2 Complete the steps for Removing the system board access cover if it is still installed. WARNING: Option cards are easily damaged by static electricity. Touch something metal such as the printer frame before you touch an option card. 3 Remove the screws securing the option card to the cover.
4 Gently pull the option card completely out. 5 Place the option card in its original packaging. If you do not have the original packaging, wrap the option card in paper and store it in a box. 6 If you are not installing another option card in the connector, cover the opening with a blank internal print server cover. Cover the opening to ensure proper airflow around the system board. If you do not have a blank cover, contact your service representative and request one.
3 Holding the firmware card by its sides, gently pull the card completely out. Avoid touching the metal pins on the bottom of the card. 4 Place the firmware card in its original packaging. If you do not have the original packaging, wrap the firmware card in paper and store it in a box. 5 If you removed an option card to access the firmware card, reinstall the option card. Removing a hard disk 1 Make sure the printer is turned off and the power cord is unplugged.
4 Flip the hard disk over, and then unplug the ribbon cable connector from the connector on the system board. 5 Remove the ribbon cable from the hard disk. 6 Place the hard disk in the original packaging. If you do not have the original packaging, wrap the parts in paper and store them in a box.
Installing the system board access cover After you have removed the options, complete the following steps to install the cover and system board. You need a number 2 Phillips screwdriver to install the cover. 1 Make sure the printer is off and unplugged. 2 Align the holes on the access cover with the screws.
3 Place the cover against the printer and slide it down. 4 Tighten the eight screws. 5 Connect the printer cables and power cord, and turn the printer on. Note: To prevent an electrical overload, plug your printer into a well-grounded outlet on a non-ground fault interrupter (GFI) circuit.
35 Removing an optional drawer 1 Turn the printer off. 2 Unplug the power cord. Note: To prevent an electrical overload, plug your printer into a well-grounded outlet on a non-ground fault interrupter (GFI) circuit. 3 Disconnect the parallel or Ethernet cable from the printer. If you have any other devices connected to the printer, turn them off and unplug any cables going to the printer. CAUTION: This printer weighs 69.9 kg (154 Ib) and requires four people to lift.
5 Lift the optional drawer.
36 Removing the duplex unit 1 Turn the printer off. 2 Open the duplex unit door.
3 Loosen the thumbscrews securing the duplex unit. 4 Slide the duplex unit out.
5 Close the duplex unit door.
37 Removing the high capacity feeder 1 Turn the printer off. 2 Unplug the high capacity feeder power cord from the electrical outlet. 3 Disconnect the interface cable from the side of the high capacity feeder. 4 Roll the high capacity feeder away from the printer. 5 Remove the high capacity feeder from the guide rail.
6 Raise the guide rail and pull it away from the docking frame. 7 Remove the wrench from the holder in the high capacity feeder.
8 Remove the four screws securing the docking frame. 9 Insert the two side covers into the screw holes on the optional drawer until they snap into place.
38 Recycling used supplies Lexmark’s Operation ReSourceSM program lets you participate in a worldwide recycling effort at no cost to you. Pack your old toner cartridge in the new toner cartridge shipping box. Follow the instructions in the box to send the old cartridge back to Lexmark. You can also recycle some replacement hardware parts, such as the transfer belt and the fuser.
39 Ordering supplies In the U.S. or Canada, call 1-800-438-2468 for information about Lexmark Authorized Supplies Dealers in your area. In other countries, contact the place where you bought your printer. You can also visit the Lexmark online store at www.lexmark.com to order supplies. Click the Web link on the bottom of this page. Replacing maintenance items as needed helps you maintain top performance, optimize print quality, and avoid printing problems.
Ordering a toner cartridge When the 88 Toner Low message appears on the display, you should order a new toner cartridge. You can continue to print after the 88 Toner Low message appears for a few hundred pages until the print fades or no longer prints satisfactorily, or until the 88 Toner Empty message appears, at which time you must replace the toner cartridge to continue printing.
40 Calling for service When you call for printer service, describe the problem you are experiencing, the message on the display, and the troubleshooting steps you have already taken to find a solution. You need your printer model type and serial number. Refer to the label on the inside of the front cover for this information. Note: The serial number is also listed on the menu settings page you can print from the Utilities Menu. See Printing the menu settings page for more information.
41 Contacting Lexmark customer service on the Web Technical support and information is available on the Web at www.lexmark.com. You can look for solutions to your printing problems using the Lexmark Technical Library, FAQs, and the Lexmark Knowledge Base. You can also contact the Customer Support Center (CSC) by e-mail. When you contact the Lexmark CSC, describe the problem you are experiencing, the message on the display, and the troubleshooting steps you have already taken to find a solution.
42 Solving display problems If the suggested corrective action does not fix the problem, call your service representative. Problem Action Operator panel displays only diamonds or is blank. • Turn the printer off, wait about 10 seconds, and turn the printer on. • Performing Self Test appears on the operator panel. When the test is completed, Ready is displayed. If these messages do not appear, turn the printer off and call the Lexmark Customer Support Center.
43 Solving network printing problems If a job did not print or incorrect characters printed, verify that the Lexmark internal print server or external print server is set up properly and the network cable is connected. Note: Refer to the drivers CD for more details. For Novell users: • Make sure the netware.drv file is dated October 24, 1994, or later. • Make sure the NT (no tabs) flag is included in the capture statement.
44 Checking an unresponsive printer If your printer is not responding, first make sure that: • The printer cable is securely attached to the printer and the host computer. • The power cord is plugged into the printer and a properly grounded electrical outlet. • The printer power switch is on. • The electrical outlet is not turned off by any switch or breaker. • The printer top cover is completely closed. • All printer options are properly installed.
45 Solving printing problems If the suggested corrective action does not fix the problem, call your service representative. Problem Action Job did not print or incorrect characters printed. Make sure Ready appears on the operator panel before you send a job to print. Press Go to return to Ready. Make sure print media is loaded. Press Go to return to Ready. Verify the printer is using the correct printer language. Verify you are using the correct printer driver.
Problem Action Unexpected page breaks appear. Increase the Print Timeout value in the Setup Menu. Transparencies jam. If you just turned the printer on or the printer has been idle for a period of time, print on paper before trying to print on transparencies. Disabling Power Saver may also prevent transparencies from jamming after the printer has been idle. See Power Saver for more information. Paper is jammed in the fuser. Rotate the fuser pressure release lever down and remove the jammed paper.
Problem Action Job prints from the wrong paper source or on the wrong print media. Check the Paper Type setting in the Paper Menu from the printer operator panel and in the printer driver. Printer does not duplex pages. • Make sure Duplex is selected in either the Finishing Menu or the application you are printing from. • Make sure you have enough printer memory installed.
46 Solving print quality problems Problem Action Print is too light, or printed images or characters have voids or dropouts. Make sure you’re using recommended paper or other media. Use media from a new package. See Media guidelines. Make sure you have selected the correct Paper Type setting for the media you’re using. Set Toner Darkness to 4 in the Color Menu. Clean the LEDs. See Cleaning the LEDs.
Problem Action Toner covers the background of the page. Make sure the affected toner cartridge is completely installed. The page has 100% coverage of one color. Replace the photodevelopers. If the page is black, you can replace just the black photodeveloper. If the page is another color, replace all three of the color photodevelopers. See Replacing a photodeveloper. Light lines or streaks appear on the printed page. Clean the LEDs. See Cleaning the LEDs.
Problem Action Printed materials delivered by the postal service arrive with ghosting or mirror images of the text visible on the page. When preparing printed materials for mailing: Quality of printed transparencies is inadequate. Make sure you’re using recommended Lexmark transparencies. See Transparencies. • Use 24 lb (90 g/m2) paper. • Avoid rough paper; select paper with a smoothness from 100 to 150 Sheffield points. • Fold sheets with the text facing outward.
47 Clearing paper jams By carefully selecting print media and loading them properly, you should be able to avoid most paper jams. If jams do occur, follow the steps outlined in this section. To resolve the paper jam messages, you must clear the jammed area and then press Go to clear the message and resume printing. The printer prints a new copy of the page that jammed if Jam Recovery is set to On or Auto; however, the Auto setting does not guarantee the page will print.
200 Paper Jam Pages Jammed (Check Areas A-F, T1-5, MPF) This message identifies the areas (A–F, MPF, or T1–T5) you need to check to remove the paper or to clear the message. The display will alternate between 200 Paper Jam Pages Jammed and Check Areas A-F.
2 Remove any paper on the transfer belt. If the paper source was the multipurpose feeder, check the area between the multipurpose feeder and the transfer belt. Transfer belt WARNING: Do not use any pointed objects to remove the paper. This could cause permanent damage to the transfer belt. 3 Check the fuser area and top cover for additional jams. If there is no jam in the fuser area or top cover, close the top cover and front door, and then press Go. If a jam is present, continue with step 4.
5 Slowly pull the paper out of the fuser toward the inside of the printer. 6 Rotate the fuser pressure release lever down. Note: The top cover will not close until the lever is in the down position. 7 Check the top cover for additional jams. If there is no jam in the top cover, close the top cover and front door. If a jam is present, continue with step 8. Note: If you need instructions on how to close the top cover, see Closing the top cover.
8 Remove the jam from the top cover. 9 Close the top cover and the front door. Note: If you need instructions on how to close the top cover, see Closing the top cover. 10 Open the jam access door on the left side of the printer. 11 Remove any paper inside the printer.
12 Close the jam access door. To prevent additional paper jams, make sure both sides of the door are closed. 13 Press Go. Check Area C Jams that cause a Check Area C message require opening the duplex jam access door. If you are printing on small paper, the following steps may not clear the jam. See Removing small size paper from the duplex unit. 1 Open the duplex jam access door on the right side of the printer. 2 Remove the jam.
3 Press Go. If the paper jam message continues, check and clear all paper from the paper path. Check Area D This message indicates a paper jam in the duplex unit area. To clear area D: 1 Open the duplex jam access door on the right side of the printer. 2 Gently pull out the duplex unit.
3 Turn the paper forwarding dial counterclockwise. If the paper advances out of the duplex unit, remove the jam and go to step 7. If the paper does not advance, go to step step 4. 4 Open the duplex unit covers. 5 Remove the jam.
6 Close the duplex unit covers. 7 Push the duplex unit until it stops. 8 Close the access door. 9 Press Go. If the paper jam message continues, check and clear all paper from the paper path.
Removing small size paper from the duplex unit When printing on both sides of A5 or other small size paper, you may need to partially remove the duplex unit to clear the jam. 1 Turn off the printer. 2 Open the duplex unit door.
3 Loosen the two screws shown. 4 Pull out the duplex unit far enough to see the duplex unit inlet.
5 Remove jam from the duplex unit inlet. 6 Slide the duplex unit in. 7 Align the thumbscrews on the duplex unit with the holes in the printer. 8 Tighten the thumbscrews to secure the duplex unit.
9 Close the duplex unit door. Check Area E This message indicates a jam in the top, middle, or bottom optional drawer paper path area. Note: If you have a high capacity feeder, pull the feeder away from the printer. 1 Open the jam access door on the top optional drawer.
2 Remove the jam. 3 Close the jam access door. 4 Open the jam access door on the middle optional drawer. 5 Remove the jam. 6 Close the jam access door.
7 Open the jam access door on the bottom optional drawer. 8 Remove the jam. 9 Close the jam access door. 10 Press Go. If the paper jam message continues, check and clear all paper from the paper path.
Check Area F 1 Pull the high capacity feeder away from the printer. 2 Open the jam access door on the top optional drawer.
3 Remove any jams. 4 Close the jam access door. 5 Slide the high capacity feeder until the feeder locks to the docking frame. When the feeder is in the correct position, you hear a click. 6 Press Go. If the paper jam message continues, check and clear all paper from the paper path.
240 Paper Jam Check MP Feeder 1 Slowly pull the jam straight out of the multipurpose feeder. If the paper will not come out, proceed with step 2. 2 Open the top cover. Note: If you need instructions on how to open the top cover, see Opening the top cover. 3 Remove the paper on the transfer belt. WARNING: Do not touch, drop, or place anything on the transfer belt. Touching the surface of the transfer belt or placing items on it may cause damage. Transfer belt 4 Close the top cover.
5 Press Go. 24 Paper Jam Check Tray Jams in five areas result in a 24 Paper Jam message, where x represents the tray number where the jam has occurred. Paper jam messages 241–244 indicate a jam has occurred in one of the paper trays. A 249 Paper Jam Check Tray message indicates a jam has occurred in the high capacity feeder. See Identifying paper jam areas for tray numbering. 241-244 Paper Jam 1 Pull out the tray indicated on the display. 2 Remove any wrinkled or creased paper.
3 Push down on the remaining paper in the tray until the bottom plate clicks into place. 4 Close the tray. 5 Press Go. If the paper jam message continues, check and clear all paper from the paper path.
249 Paper Jam Check Tray A 249 Paper Jam Check Tray message indicates a jam has occurred in the high capacity feeder. Note: If you have an optional printer cabinet, the high capacity feeder will be identified as tray 3. 1 Open the top cover. 2 Remove the jam.
3 Close the top cover. 4 Press Go.
48 Resolving other problems and questions Problem Action Need updated printer drivers or utilities. • Refer to the drivers CD that came with your printer. It contains printer drivers and utilities. • Visit the Lexmark Web site, www.lexmark.com, for the most current printer drivers or utilities. Need to attach a serial cable to the printer. If your printer is configured with a serial port, or you have installed an optional interface card, refer to the Setup Guide.
Problem Action Cannot receive faxes. Make sure neither Fax Port nor Fax Buffer is set to Disabled in the Fax Menu. Make sure the fax machine you have connected is a class 1 fax modem. If power to the modem has been interrupted, complete the following steps in the order listed: 1 Turn the printer power off. 2 Turn the modem power on. 3 Turn the printer power on. Large jobs will not collate. Reduce the complexity of your print job.
49 Configuring printer alerts You can configure the printer several ways to let you know when it requires attention. Using the Setup Menu Menu item Function Value Result Alarm Control Lets you establish whether the printer sounds an alarm when the printer requires operator intervention. Off The alarm does not sound, but printing stops until the interventions are cleared.* Single The printer stops printing, displays a message, and activates the selected alarm type.
50 Disabling operator panel menus To disable the operator panel menus so that changes cannot be made to the printer default settings: 1 Turn the printer off. Note: Disabling the operator panel menus does not prevent access to the Job Menu or to the Print and Hold function. 2 Press and hold Select and Return and turn the printer on. 3 Release the buttons when you see Performing Self Test. Config Menu appears on the first line of the display. 4 Press Menu until you see Panel Menus, and then press Select.
51 Understanding fonts Resident fonts Your printer is equipped with resident fonts stored permanently in printer memory. Different fonts are available in PCL 6 and PostScript 3 emulations. Some of the most popular typefaces, like Courier and Times New Roman, are available for all printer languages. The fonts in the PCL emulation are compatible with the fonts in the HP4500 and include four additional fonts and many extra symbol sets to support extra languages and applications.
PCL 6 emulation PostScript 3 emulation ITC Bookman Demi Italic Bookman-DemiItalic Clarendon Condensed Bold Coronet Coronet-Regular CourierPS Courier CourierPS Oblique Courier-Oblique CourierPS Bold Courier-Bold CourierPS Bold Oblique Courier-BoldOblique CG Omega CG Omega Bold CG Omega Italic CG Omega Bold Italic Garamond Antiqua Garamond-Antiqua Garamond Halbfett Garamond-Halbfett Garamond Kursiv Garamond-Kursiv Garamond Kursiv Halbfett Garamond-KursivHalbfett Helvetica Light Helvetic
PCL 6 emulation PostScript 3 emulation Courier Bold Intl-Courier-Bold Courier Bold Italic Intl-Courier-BoldOblique Letter Gothic LetterGothic Letter Gothic Italic LetterGothic-Slanted Letter Gothic Bold LetterGothic-Bold LetterGothic-BoldSlanted Marigold Marigold Century Schoolbook Roman NewCenturySchlbk-Roman Century Schoolbook Italic NewCenturySchlbk-Italic Century Schoolbook Bold NewCenturySchlbk-Bold Century Schoolbook Bold Italic NewCenturySchlbk-BoldItalic Optima Optima-Bold Optim
PCL 6 emulation PostScript 3 emulation Wingdings Wingdings-Regular ITC Zapf Chancery Medium Italic ZapfChancery-MediumItalic ITC Zapf Dingbats ZapfDingbats Univers-Extended Univers-ExtendedObl Univers-BoldExt Univers-BoldExtObl Univers-Light Univers-LightOblique Clarendon Clarendon-Light Clarendon-Bold Helvetica-Condensed Helvetica-Condensed-Bold Helvetica-Condensed-BoldObl Helvetica-Condensed-Oblique StempelGaramond-Bold StempelGaramond-BoldItalic StempelGaramond-Italic StempelGaramond-Roman Apple-C
PCL 6 emulation PostScript 3 emulation Copperplate-ThirtyTwoBC Copperplate-ThirtyThreeBC Eurostile Eurostile-Bold Eurostile-ExtendedTwo Eurostile-BoldExtendedTwo GillSans GillSans-Italic GillSans-Bold GillSans-BoldItalic GillSans-Condensed GillSans-BoldCondensed GillSans-Light GillSans-LightItalic GillSans-ExtraBold Goudy Goudy-Italic Goudy-Bold Goudy-BoldItalic Goudy-ExtraBold HoeflerText-Regular HoeflerText-Italic HoeflerText-Black HoeflerText-BlackItalic HoeflerText-Ornaments JoannaMT JoannaMT-Italic Jo
Resident bitmapped fonts PCL 6 emulation PostScript 3 emulation Line Printer 16 POSTNET Bar code Symbol sets A symbol set is an encoded collection of alphabetic and numeric characters, punctuation, and special characters available in the font you select. Symbol sets support the requirements for different languages or specific applications, such as math symbols used for scientific text.
PC-8 Greek Alternate (437G) PC-860 Portugal Ventura ITC Zapf Dingbats PC-8 Turkish (437T) PC-861 Iceland Ventura International PC-8 Latin/Greek PC-863 Canadian French Ventura Math PC-8 PC Nova PC-865 Nordic Ventura US PC-8 Polish Mazovia PC-866 Cyrillic Windows 3.
52 Managing memory Printer memory Your printer ships with at least 64MB of memory. To determine the amount of memory currently installed in your printer, select Print Menus from the Utilities Menu. The total installed memory appears on the printout. For more information about printing the menu settings page, see Printing the menu settings page. The memory shipped in your printer and the memory options available use SDRAM DIMM memory technology.
Solving memory problems If your printer encounters a memory shortage when trying to print a job, it may post an error message (37 Insufficient Collation Area, 37 Insufficient Defrag Memory, 38 Memory Full, or 39 Complex Page), depending on the task it is trying to complete. See Understanding printer messages for more information about these and other messages. If these messages appear frequently, you probably want to install additional printer memory.
Hard disk If you have a large number of permanent resources you’d like to download to your printer, you may want to install an optional hard disk. The hard disk works much like flash memory, but has a larger storage capacity for downloaded resources. You can also use the hard disk for job buffering, collating large jobs, and gathering job statistics. For instructions on installing a hard disk, refer to the Setup Guide. Job buffering You can partition a portion of the hard disk for job buffering.
Managing resources downloaded to flash or disk Use the MarkVision utility to manage the resources you store on flash memory or hard disk.
53 Printer specifications Dimensions Dimension C910 C910n C910dn Height 497 mm (19.6 in.) 626 mm (24.6 in.) 626 mm (24.6 in.) Width 695 mm (27.4 in.) 695 mm (27.4 in.) 695 mm (27.4 in.) Depth 655 mm (25.8 in.) 655 mm (25.8 in.) 655 mm (25.8 in.) Weight1 80.5 kg (177.1 lb) 99.0 kg (217.8 lb) 104.9 kg (230.
54 Restoring factory default settings 1 Make sure the printer is on and the Ready message appears. 2 Press Menu until you see Utilities Menu, and then press Select. 3 Press Menu until you see Factory Defaults, and then press Select. 4 When Restore appears, press Select. The message Restoring Factory Defaults appears followed by the Ready message. When you select Restore: – – – No other button actions are available on the operator panel while Restoring Factory Defaults appears.
55 Printing sample fonts Your printer has resident fonts stored permanently its memory. Different fonts may be available in PCL and PostScript emulations. To print samples of all the fonts currently available for your printer: 1 Make sure the printer is on and Ready appears on the display. 2 Press Menu until you see Utilities Menu, and then press Select. 3 Press Menu until you see Print Fonts, and then press Select. 4 Press Menu to display either PCL Fonts or PS Fonts.
56 Understanding printer messages The operator panel displays messages describing the current state of the printer and indicates possible printer problems you must resolve. This topic provides a list of all printer messages, explains what they mean, and tells you how to clear the messages. Ready 1 Menu 2 Select 3 Go 5 Return 4 Stop 6 Click a letter or number at the bottom of the page to locate information about a message beginning with that character.
A Formatting Disk yyy% Activating Menu Changes Formatting Flash B Fuser Maintenance Bin Full G Busy H C Held Jobs may be lost Canceling Fax I Canceling Job Infrared Change Insert Tray Check Connection Install or Cancel Job Clearing Job Accounting Stat Invalid Engine Code Close Front Door Invalid Network Code Close Side Door Invalid Standard Network Code Close Top Door Close Tray Top Cover Copying D Defragmenting Delete All Jobs Deleting Jo
O S P Serial Parallel Std Bin Full Performing Self Test Supplies Power Saver T Print Jobs on Disk Tray Empty Printer Calibrating Tray Low Printing Alignment Page Tray Missing Printing Directory List U Printing Font List Unsupported Disk Printing Job Accounting Stat USB Printing Menu Settings Prog Engine Code Prog System Code Program Flash V W Waiting Programming Disk X Programming Error P Y Q Z Queuing and Deleting Jobs 0 Queuing Jobs 1 R 1565 Emu
35 Res Save Off Deficient Memory 62 Disk Full 37 Insufficient Collation Area 63 Unformatted Disk 37 Insufficient Defrag Memory 64 Unsupported Disk Format 37 Insufficient Memory 7 38 Memory Full 39 Complex Page 8 80 Belt Exhausted 4 80 Belt/Fuser Exhausted 4 Unsupported Firmware Card 80 Belt/Fuser Life Warning 40 Tray Size Sense Error 80 Belt Life Warning 41 Open Bin 1 Exit Tray 80 Fuser Exhausted 5 80 Fuser Life Warning 51 Defective Flash 81 Engine Code CRC Failure 52 Flash Full
Activating Menu Changes What this message means: The printer is activating changes made to the printer settings. What you can do: Wait for the message to clear. See also: Disabling operator panel menus Bin Full What this message means: The specified bin is full. What you can do: Remove the stack of paper from the bin to clear the message. If you assigned the bin a name, the bin name is displayed instead of the bin number.
Canceling Job What this message means: The printer is processing a request to cancel the current print job. What you can do: Wait for the message to clear. See also: Canceling a print job Change What this message means: The printer is requesting that a different type of paper be loaded in one of the input sources. What you can do: Change the paper type in the specified source.
Clearing Job Accounting Stat What this message means: The printer is deleting all job statistics stored on the hard disk. What you can do: Wait for the message to clear. Close Front Door What this message means: The printer front door is open. What you can do: Close the printer front door to clear the message. Close Side Door What this message means: The printer side door is open. What you can do: Close the printer side door to clear the message.
Close Tray Top Cover What this message means: The high capacity feeder door is open. Note: The high capacity feeder can only be installed as Tray 3 or Tray 5. What you can do: Close the top cover to clear the message. Copying What this message means: The printer is processing a copy job originating from an OptraImage™ scanner. What you can do: Wait for the message to clear.
Deleting Jobs What this message means: The printer is deleting one or more held jobs. What you can do: Wait for the message to clear. Disabling Menus What this message means: The printer is responding to a request to disable the menus. What you can do: Wait for the message to clear. Note: While the menus are disabled, you cannot change the printer settings from the operator panel. See also: Disabling operator panel menus Disk Corrupted.
Disk Recovery x/5 yyy% What this message means: The printer is attempting to recover the hard disk. Disk recovery takes place in five phases; the second line on the operator panel display shows the percent complete of the current phase. What you can do: Wait for the message to clear. WARNING: Do not turn the printer off while this message is displayed. Enabling Menus What this message means: The printer is responding to a request to make the menus available to all users.
Enter PIN: =___ What this message means: The printer is waiting for you to enter your four-digit personal identification number (PIN). What you can do: Use the operator panel buttons to enter the PIN you identified in the driver when you sent the confidential job to the printer. See also: Using the Print and Hold function Fax What this message means: The printer is processing an incoming fax. What you can do: Wait for the message to clear.
Formatting Disk yyy% What this message means: The printer is formatting the hard disk. When formatting takes longer than usual, the second line of the display shows the percent complete. What you can do: Wait for the message to clear. WARNING: Do not turn the printer off while this message is displayed. Formatting Flash What this message means: The printer is formatting the flash memory. What you can do: Wait for the message to clear.
Held Jobs may be lost What this message means: The printer memory is too full to continue processing print jobs. What you can do: • Press Go to clear the message and continue printing. The printer frees memory by deleting the oldest held job and continues deleting held jobs until there is enough printer memory to process the job. • Press Stop to clear the message without deleting any held jobs. The current job may not print correctly. • Press Menu to open the Job Menu and cancel the current job.
Install or Cancel Job What this message means: The printer is requesting that a specified device be installed so it can print a job. What you can do: • Turn the printer off, install the specified device, and restart the printer. • Press Menu to open the Job Menu and cancel the current job. Invalid Engine Code What this message means: The printer engine code has not been programmed or is not valid. What you can do: Call for service.
Load What this message means: The printer is trying to feed paper from a source it detects is empty. What you can do: • Load paper of the size and type requested in the second line of the display in the specified tray. The printer automatically clears the message and continues printing the job. • Press Menu to open the Job Menu and cancel the current job. See also: Loading a paper tray Load Manual What this message means: A request for a manual feed job has been sent to the printer.
Menus Disabled What this message means: The printer menus are disabled. You cannot change the printer settings from the operator panel. What you can do: You can still open the Job Menu to cancel a job that is printing or to select a confidential job or a held job that you want to print. If you need access to the printer menus, contact your network administrator.
No Jobs Found. Retry? What this message means: The four-digit personal identification number (PIN) you entered is not associated with any confidential print job. What you can do: • Press Go to enter another PIN. • Press Stop to clear the PIN entry prompt. See also: Using the Print and Hold function Not Ready What this message means: The printer is not ready to receive or process data. Someone pressed Stop to take the printer offline.
Power Saver What this message means: The printer is ready to receive and process data. It is reducing its electricity consumption while idle. If the printer remains inactive for the period of time specified in the Power Saver menu item (20 minutes is the factory default), the Power Saver message replaces the Ready message. What you can do: • Send a job to print. • Press Go to quickly warm the printer to normal operating temperature and display the Ready message.
Printing Alignment Page What this message means: The printer is processing or printing a test page that shows alignment values. What you can do: Wait until the page has completed printing. See also: Replacing the transfer belt; Print Alignment Printing Directory List What this message means: The printer is processing or printing a directory of all files stored in flash memory or on a hard disk. What you can do: Wait for the message to clear.
Printing Job Accounting Stat What this message means: The printer is processing or printing all job accounting statistics stored on the hard disk. What you can do: Wait for the message to clear. See also: Job Acct Stat Printing Menu Settings What this message means: The printer is processing or printing the menu settings page. What you can do: Wait for the message to clear.
Prog System Code What this message means: The printer is programming new system code. What you can do: Wait for the message to clear and the printer to reset. WARNING: Do not turn the printer off while this message is displayed. Program Flash What this message means: The printer is storing resources, such as fonts or macros, in flash memory. What you can do: Wait for the message to clear. WARNING: Do not turn the printer off while this message is displayed.
Programming Error P What this message means: An error occurred while the printer was programming code into memory. What you can do: Correct the problem specified on the second line of the display: P105 A network file was used to program a non-network printer, or a non-network file was used to program a network printer. P109 An update file was used to program the printer, but the information did not fit within the space allocated in the Master Boot Record. P112 An upddle.
Ready What this message means: The printer is ready to receive and process print jobs. What you can do: Send a job to print. Ready Hex What this message means: The printer is in Hex Trace mode and is ready to receive and process print jobs. What you can do: • Send a job to print. All data sent to the printer is printed in hexadecimal and character representation. Control strings are printed, not executed. • Turn the printer off and then on to exit Hex Trace mode and return to Ready status.
Resetting the Printer What this message means: The printer is resetting to the current default settings. Any active print jobs are canceled. What you can do: Wait for the message to clear. See also: Changing printer settings Restore Held Jobs. Go/Stop? What this message means: Someone reset the printer or turned it on, and the printer detects Print and Hold jobs stored on the hard disk. What you can do: • Press Go. All Print and Hold jobs on the hard disk are restored to printer memory.
Restoring Factory Defaults What this message means: The printer is restoring the factory default printer settings. When factory default settings are restored: • All downloaded resources (fonts, macros, symbol sets) in the printer memory are deleted. • All menu settings return to the factory default setting except the Display Language setting in the Setup Menu, and all settings in the Parallel Menu, Serial Menu, Network Menu, Infrared Menu, LocalTalk Menu, USB Menu, and Fax Menu.
Std Bin Full What this message means: The standard bin is full. What you can do: Remove the stack of paper in the bin to clear the message. Supplies What this message means: At least one of the printer supplies requires attention. For example, you may have a toner cartridge that is low on toner. What you can do: Press Menu to open the Supplies Menu and identify which supply item needs replacing. Replace the appropriate printer supplies.
Tray Low What this message means: The specified tray is low on paper. What you can do: Add paper to the tray to clear the message. See also: Loading a paper tray Tray Missing What this message means: The specified tray is either missing or not fully inserted. What you can do: Insert the tray completely. See also: Loading a paper tray Unsupported Disk What this message means: The printer detects an unsupported disk. What you can do: • Press Go to clear the message. • Format the disk.
Waiting What this message means: The printer has received a page of data to print but is waiting for an End of Job command, a Form Feed command, or additional data. What you can do: • Press Go to print the contents of the buffer. • Press Menu to open the Job Menu and cancel the current job. See also: Canceling a print job 1565 Emul Error Load Emul Option What this message means: The download emulator version on the firmware card does not match the printer code version.
30 Coating Roll Missing What this message means: The oil coating roll is either missing or incorrectly installed. What you can do: Correctly install the oil coating roll to clear the message and continue printing. See also: Replacing the oil coating roll 30 Print Unit Missing What this message means: One or more of the color print units is either missing or incorrectly installed. What you can do: Correctly install the color print units to clear the message and continue printing.
33 Tray Config Error What this message means: The optional Heavy Media tray is inserted into any tray location except Tray 1. What you can do: Remove the Heavy Media Tray from the invalid location to clear the message. 34 Short Paper What this message means: The printer has determined that the length of the paper in the source specified on the second line of the display is too short to print the formatted data. What you can do: • Press Go to clear the message and continue printing.
37 Insufficient Collation Area What this message means: The printer memory (or hard disk, if installed) does not have the free space necessary to collate the print job. What you can do: • Press Go to print the portion of the job already stored and begin collating the rest of the job. • Press Menu to open the Job Menu and cancel the current job.
37 Insufficient Memory What this message means: The printer memory is full and cannot continue processing current print jobs. What you can do: • Press Go to clear the message and continue the current print job. The printer frees memory by deleting the oldest held job and continues deleting held jobs until there is enough printer memory to process the job. • Press Stop to clear the message without deleting any held jobs. The current job may not print correctly.
39 Complex Page What this message means: The page may not print correctly because the print information on the page is too complex. What you can do: • Press Go to clear the message and continue printing the job. The job may not print correctly. • Press Menu to open the Job Menu and cancel the current job. • To avoid this error in the future: – – – Reduce the complexity of the page by reducing the amount of text or graphics on the page and deleting unnecessary downloaded fonts or macros.
40 Tray Size Sense Error What this message means: The high capacity feeder detects an error in the size sensing mechanism. What you can do: • Turn off printer and make sure that all the high capacity feeder connectors are installed correctly. • Have the high capacity feeder size sensor checked by a service technician. 41 Open Bin 1 Exit Tray What this message means: The printer wants to send paper to the Bin 1 output tray, but the tray is closed.
52 Flash Full What this message means: There is not enough free space in the flash memory to store the data you are trying to download. What you can do: • Press Go to clear the message and continue printing. Downloaded fonts and macros not previously stored in flash memory are deleted. • Delete fonts, macros, and other data stored on the flash memory. • Install flash memory with more storage capacity. 53 Unformatted Flash What this message means: The printer detects unformatted flash memory.
54 Network Software Error 54 Std Network Software Error What these messages mean: The printer cannot establish communications with an installed network port. What you can do: • Press Go to clear the message and continue printing. The job may not print correctly. • Program new firmware for the network interface by way of the parallel port. • Press Menu to open the Job Menu and reset the printer.
56 Parallel Port Disabled 56 Std Parallel Port Disabled What this message means: Data has been sent to the printer through a parallel port, but the parallel port is disabled. What you can do: • Press Go to clear the message. The printer discards any data received through the parallel port. • Make sure the Parallel Buffer menu item in the Parallel Menu is not set to Disabled.
58 Too Many Bins Attached What this message means: • Too many output bins are installed. • An unsupported configuration of output bins is installed. What you can do: Turn off and unplug the printer. Remove or reconfigure the output bins. Plug in the printer and turn it on. Note: To prevent an electrical overload, plug your printer into a well-grounded outlet on a non-ground fault interrupter (GFI) circuit. 58 Too Many Disks Installed What this message means: Too many hard disks are installed.
58 Too Many Flash Options What this message means: Too many flash memory options are installed. What you can do: Turn off and unplug the printer. Remove the excess flash memory. Plug in the printer and turn it on. Note: To prevent an electrical overload, plug your printer into a well-grounded outlet on a non-ground fault interrupter (GFI) circuit. See also: Removing memory and network options 58 Too Many Trays Attached What this message means: Too many drawers with matching trays are installed.
61 Defective Disk What this message means: The printer detects a defective hard disk. What you can do: • Press Go to clear the message and continue printing. • Install a different hard disk before you perform any operations that require one. See also: Setup Guide 62 Disk Full What this message means: There is not enough memory on the hard disk to store the data sent to the printer. What you can do: • Press Go to clear the message and continue processing.
64 Unsupported Disk Format What this message means: The printer detects an unsupported disk format. What you can do: • Press Go to clear the message. • Format the disk. Note: Disk operations are not allowed until the disk is formatted. 80 Belt Exhausted What this message means: The transfer belt has reached its end of life. What you can do: • Replace the transfer belt.
80 Belt/Fuser Life Warning What this message means: The transfer belt and fuser are nearing their end of life. If you do not have a transfer belt and fuser on hand, order them now. You can print approximately 500 pages before the 80 Belt/ Fuser Exhausted message appears. What you can do: Press Go to clear the message and continue printing. The Supplies message is displayed until you replace the transfer belt and fuser.
80 Fuser Exhausted What this message means: The fuser has reached its end of life. What you can do: • Replace the fuser. See also: Replacing the fuser 80 Fuser Life Warning What this message means: The fuser is nearing its end of life. If you do not have a fuser on hand, order one now. You can print approximately 500 pages before the 80 Fuser Exhausted message appears. What you can do: Press Go to clear the message and continue printing. The Supplies message is displayed until you replace the fuser.
84 Print Cart Abnormal What this message means: The printer has detected an abnormal photodeveloper. What you can do: Install a new photodeveloper to clear the message and continue printing. See also: Replacing a photodeveloper 84 All Photo Devs Exhausted What this message means: All of the photodevelopers have reached their end of life. What you can do: • Replace all of the photodevelopers. Make sure you also install the new fuser coating roll that is included in each photodeveloper kit.
84 Black Photo Dev Exhausted What this message means: The black photodeveloper has reached its end of life. What you can do: • Replace the black photodeveloper. Make sure you also install the new fuser coating roll that is included in the black photodeveloper kit. • If the print quality is still acceptable and you do not want to replace the photodeveloper yet, press Go to clear the message and continue printing.
84 Color Photo Dev Abnormal What this message means: The printer has detected an abnormal color photodeveloper. What you can do: Install a new color photodeveloper to clear the message and continue printing. See also: Replacing a photodeveloper 84 Color Photo Devs Exhausted What this message means: The color photodevelopers have reached the end of their lives. What you can do: • Replace the color photodevelopers. Make sure you replace all three (Cyan, Magenta, and Yellow) at the same time.
84 Color Photo Dev Life Warning What this message means: The color photodevelopers are nearing the end of their lives. If you do not have a new color photodeveloper kit, order one now. You can print approximately 100 pages before the 84 Color Photo Devs Exhausted message appears. What you can do: Press Go to clear the message and continue printing. The Supplies message is displayed until you replace the photodevelopers. Note: The Cyan, Magenta, and Yellow photodevelopers are packaged together.
85 Coating Roll Life Warning What this message means: The oil coating roll is nearing its end of life. If you do not have an oil coating roll on hand, order one now. You can print approximately 500 pages before the 85 Coating Roll Exhausted message appears. What you can do: Press Go to clear the message and continue printing. The Supplies message is displayed until you replace the oil coating roll.
88 Toner Low What this message means: The printer has detected that the toner supply in the specified cartridge is low. If you do not have the specified toner cartridge, order one now. You can print approximately 250 more pages before the cartridge becomes empty. What you can do: • Replace the specified toner cartridge. • Press Go to clear the message and continue printing. The Supplies message is displayed until you replace the specified toner cartridge.
57 Using printer menus Select a menu from the following list for more information. Or, click a letter in the index at the bottom of the page to find a specific menu item that starts with that letter. Click here for a one-page overview of all the menus and their menu items.
A Display Language A4 Width Download Target Advanced Status Duplex Alarm Control Duplex Bind Assign Type/Bin E Auto Continue Auto CR after LF Auto LF after CR F Factory Defaults Finishing Menu B Font Name Baud Font Priority Belt Font Source Black Photo Dev Format Disk Blank Pages Format Flash C Fuser Cancel Fax G Coating Roll Collation Color Photo Dev Color Samples Toner H Held Jobs Hex Trace Honor DSR Honor Init Color Correction Color Menu Confidential Job Configure Bins
Job Accounting NPA Hosts Job Buffering Infrared Menu LocalTalk Menu Network Menu Parallel Menu Serial Menu USB Menu NPA Mode Infrared Menu LocalTalk Menu Network Menu Parallel Menu Serial Menu USB Menu Job Menu O K Orientation L P Lines per Page Page Protect LocalTalk Addr Paper Loading LocalTalk Buffer Paper Menu LocalTalk Menu Paper Size LocalTalk Name Paper Source LocalTalk Port Paper Type LocalTalk Zone Paper Weight M Parallel Buffer Mac Binary PS Network Menu Parallel Menu USB
Power Saver Serial Protocol Print Alignment Setup Menu Print Directory Substitute Size Print Fonts Supplies Menu Print Menus Std Net Setup Print Mode Supplies Life Print Net Setup Symbol Set Print PS Error T Print Timeout Toner Darkness Printer Language Transmit Delay Printer Usage Tray Renumber Protocol PS SmartSwitch Infrared Menu LocalTalk Menu Network Menu Parallel Menu Serial Menu USB Menu Q R Replace Supplies U Universal Setup USB Buffer USB Menu Utilities Menu V W Wait Ti
58 Color Menu Use the Color Menu to adjust print quality and customize color printing. Select a menu item for more details: • Color Correction • Print Mode • Manual Color • Toner Darkness Note: Values marked by an asterisk (*) are the factory default settings. Color Correction Purpose: To adjust the printed color to better match the colors of other output devices or standard color systems.
Manual Color Purpose: To let users customize color correction output from the operator panel. Values: RGB Image Vivid: Applies a color correction algorithm that produces brighter, more saturated colors. May be selected for all incoming color formats. sRGB Display*: Applies color correction to produce output that approximates the colors displayed on a computer monitor. sRGB Vivid: Increases color saturation for the sRGB Display color correction. Off: No color correction is implemented.
Print Mode Purpose: To determine whether images are printed in a monochrome grayscale or in color. Values: Color* Black & White Toner Darkness Purpose: To lighten or darken text images, or conserve toner. Values: 1–4 (4*) 1 is lightest; 4 is darkest. Select a lower value for lighter grayscale images. Select a higher value for darker grayscale images. Select a value of less than 4 to conserve toner.
59 Finishing Menu Use the Finishing Menu to define how the printer delivers the printed output. Select a menu item for more details: • Blank Pages • Multipage Order • Collation • Multipage Print • Copies • Multipage View • Duplex • Separator Sheets • Duplex Bind • Separator Source • Multipage Border Note: Values marked by an asterisk (*) are the factory default settings. Blank Pages Purpose: To specify whether to include application-generated blank pages as part of your printed output.
Collation Purpose: To keep the pages of a print job stacked in sequence, particularly when printing multiple copies of the job. Values: Off* Prints each page of a job the number of times specified by the Copies menu item. For example, if you set Copies to 2 and send three pages to print, the printer prints page 1, page 1, page 2, page 2, page 3, page 3. On Prints entire job the number of times specified by the Copies menu item.
Duplex Bind Purpose: To define the way to bind duplexed pages, and how the printing on the back of the sheet (evennumbered pages) is oriented in relation to the printing on the front (odd-numbered pages). Values: Long Edge* Assumes binding along the long end of the page (left edge for portrait orientation and top edge for landscape orientation). Short Edge Assumes binding along the short edge of the page (top edge for portrait orientation and left edge for landscape orientation).
Multipage Order Purpose: To determine the positioning of multiple page images when using Multipage Print. The positioning depends on the number of images and whether the images are portrait or landscape in orientation.
Multipage Print Purpose: To print multiple page images on one side of a sheet of paper. Also called n-up or Paper Saver. Values: Off* Prints 1 page image per side. 6 Up Prints 6 page images per side. 2 Up Prints 2 page images per side. 9 Up Prints 9 page images per side. 3 Up Prints 3 page images per side. 12 Up Prints 12 page images per side. 4 Up Prints 4 page images per side. 16 Up Prints 16 page images per side.
Separator Sheets Purpose: To insert blank separator sheets between jobs, between multiple copies of a job, or between each page of a job. Values: None* Does not insert separator sheets. Between Copies Inserts a blank sheet between each copy of a job. If Collation is Off, a blank page is inserted between each set of printed pages (all page 1’s, all page 2’s, and so on). If Collation is On, a blank page is inserted between each collated copy of the job. Between Jobs Inserts a blank sheet between jobs.
60 Infrared Menu Use the Infrared Menu to change printer settings affecting jobs sent to the printer through an infrared port. Select a menu item for more details: • Infrared Buffer • PCL SmartSwitch • Infrared Port • PS SmartSwitch • Job Buffering • Transmit Delay • Max Baud Rate • Window Size • NPA Mode Note: Values marked by an asterisk (*) are the factory default settings.
Infrared Buffer Purpose: To configure the size of the infrared input buffer. Values: Disabled Disables job buffering. Any jobs already buffered on the disk are printed before normal processing of incoming jobs resumes. Auto* Printer automatically calculates the Infrared Buffer size (recommended setting). 36K to maximum size allowed User specifies the Infrared Buffer size.
Max Baud Rate Purpose: To specify the rate at which data can be received through the infrared port. Values: 2400 115200 9600 576000 19200 1152000* 38400 4000000 57600 The maximum baud possible for both the printer and the infrared adapter is automatically set during a power on reset. However, if your printer is situated in a bright or highly reflective environment, you may experience intermittent communication problems. If you do, select a lower baud for the infrared connection.
PCL SmartSwitch Purpose: To configure the printer so it automatically switches to PCL emulation when a print job received through the infrared port requires it, regardless of the default printer language. Values: On* Printer examines the data on the infrared interface and selects PCL emulation if the data indicates that is the required printer language. Off Printer does not examine the incoming data.
Transmit Delay Purpose: To define the amount of time, in seconds, the printer must wait before transmitting meaningful infrared data to the host computer, as well as the amount of time the printer requests that the host computer wait before transmitting infrared data. Values: Auto* Printer sets the Transmit Delay value during a power-on reset to maximize link performance (recommended). None No delay is imposed by the printer.
61 Job Menu The Job Menu is only available when the printer is busy processing or printing a job, when a printer message is displayed, or when the printer is in Hex Trace mode. Press Menu to open the Job Menu. Select a menu item for more details: • Cancel Fax • Held Jobs • Confidential Job • Reset Printer Cancel Fax Purpose: To cancel outgoing faxes before they are transmitted or to cancel incoming faxes before they finish printing. Values: R D Cancels an incoming fax.
Then select a value: Print All Jobs Prints all jobs associated with your PIN. Print A Job Prints the specified Confidential Job. Press Menu to scroll through the list of confidential jobs associated with your PIN. Press Select to print a specific job. Delete All Jobs Deletes all jobs associated with your PIN. Delete A Job Deletes the specified Confidential Job. Press Menu to scroll through the list of Confidential Jobs associated with your PIN. Press Select to delete a specific job.
62 LocalTalk Menu Use the LocalTalk Menu to change printer settings affecting jobs sent to the printer through a LocalTalk port. Select a menu item for more details: • Job Buffering • LocalTalk Zone • LocalTalk Addr • NPA Hosts • LocalTalk Buffer • NPA Mode • LocalTalk Name • PCL SmartSwitch • LocalTalk Port • PS SmartSwitch Note: Values marked by an asterisk (*) are the factory default settings. Job Buffering Purpose: To temporarily store jobs on the printer hard disk before printing.
LocalTalk Addr Purpose: To identify the LocalTalk Node number assigned to the printer. This menu item cannot be modified through the operator panel. LocalTalk Buffer Purpose: To configure the size of the LocalTalk input buffer. Values: Disabled Disables job buffering. Any jobs already buffered on the disk are printed before normal processing of incoming jobs resumes. Auto* Printer automatically calculates LocalTalk Buffer size (recommended).
LocalTalk Zone Purpose: To identify the LocalTalk Zone provided by the LocalTalk network. This menu item cannot be modified through the operator panel. NPA Hosts Purpose: To specify the maximum number of NPA hosts that can register for NPA alerts. Values: 1...10 (2*) NPA Mode Purpose: To specify whether the printer performs the special processing required for bidirectional communication, following the conventions defined in the Network Printing Alliance (NPA) Protocol.
PCL SmartSwitch Purpose: To configure the printer so it automatically switches to PCL emulation when a print job received through the LocalTalk port requires it, regardless of the default printer language. Values: On* Printer examines data on the LocalTalk interface and selects PCL emulation if the data indicates that is the required printer language. Off Printer does not examine the incoming data.
63 Network Menu Use the Network Menu to change printer settings affecting jobs sent to the printer through a network port (either Standard Network or Network Opt ). Select a menu item for more details: • Job Buffering • NPA Mode • MAC Binary PS • PCL SmartSwitch • Network Buffer • PS SmartSwitch • Network Setup • Std Net Setup Note: Values marked by an asterisk (*) are the factory default settings. Job Buffering Purpose: To temporarily store jobs on the printer hard disk before printing.
MAC Binary PS Purpose: To configure the printer to process Macintosh binary PostScript print jobs. Values: On Printer processes raw binary PostScript print jobs from computers using the Macintosh operating system. Note: This setting often causes Windows print jobs to fail. Off Printer filters PostScript print jobs using standard protocol. Auto* Printer processes print jobs from computers using either Windows or Macintosh operating systems.
NPA Mode Purpose: To specify whether the printer performs the special processing required for bidirectional communication, following the conventions defined in the Network Printing Alliance (NPA) Protocol. Values: Off Printer does not perform NPA processing. Auto* Printer examines the data to determine the format and then processes it appropriately. Note: Changing this menu item automatically resets the printer.
PS SmartSwitch Purpose: To configure the printer so it automatically switches to PostScript emulation when a print job received through the network port requires it, regardless of the default printer language. Values: On* Printer examines data on the network interface connection and selects PostScript emulation if the data indicates that is the required printer language. Off Printer does not examine the incoming data.
64 Paper Menu Use the Paper Menu to define the paper loaded in each paper tray and the default paper source and output bin. Select a menu item for more details: • Assign Type/Bin • Paper Source • Configure Bins • Paper Type • Configure MP • Paper Weight • Custom Types • Substitute Size • Paper Loading • Universal Setup • Paper Size Note: Values marked by an asterisk (*) are the factory default settings.
Configure Bins Purpose: To determine which output bin(s) the printer uses for a particular job. Values: Mailbox* Sends print jobs to the output bin designated for that user. Mail Overflow Sends print jobs to the output bin designated for that user until it is full, and then sends jobs to the designated overflow bin. Type Assignment Sends each job to the output bin specified for that paper type. Configure MP Purpose: To determine when the printer selects paper loaded in the multipurpose feeder.
Paper Loading Purpose: To properly handle preprinted paper loaded in a tray, whether the job is a duplexed job or a singlesided job. Values: First select a paper type: Bond Loading Colored Loading Ltrhead Loading Glossy Loading Custom Loading Preprint Loading Then select a value: Duplex Notifies the printer that the specified paper type is loaded properly for duplex printing.
Paper Source Purpose: To identify the default paper source. Values: Tray (Tray 1*) MP Feeder Manual Paper Manual Env If you loaded the same size and type of paper in two paper sources (and the Paper Size and Paper Type menu items are correctly set), the trays are automatically linked. When one paper source is empty, paper automatically feeds from the next linked source. Paper Type Purpose: To identify the type of paper installed in each paper source.
Use this menu item to: • • • Optimize print quality for the specified paper. Select paper sources through your software application by selecting type and size. Automatically link paper sources. Any sources containing the same type and size of paper are automatically linked by the printer, if you have set the Paper Size and the Paper Type to the correct values.
Substitute Size Purpose: To have the printer substitute the specified paper size if the requested size is not loaded. Values: Off Printer prompts the user to load the requested paper size. Statement/A5 Prints A5 size jobs on statement size paper if only statement size paper is loaded, and prints statement size jobs on A5 paper if only A5 paper is loaded.
65 Parallel Menu Use the Parallel Menu to change printer settings affecting jobs sent to the printer through a parallel port (either Std Parallel or Parallel Opt ). Select a menu item for more details: • Advanced Status • Parallel Mode 1 • Honor Init • Parallel Mode 2 • Job Buffering • PCL SmartSwitch • MAC Binary PS • PS SmartSwitch • NPA Mode • Protocol • Parallel Buffer Note: Values marked by an asterisk (*) are the factory default settings.
Honor Init Purpose: To determine whether the printer honors hardware initialization requests from the computer. The computer requests initialization by activating the INIT signal on the parallel interface. Many personal computers activate the INIT signal each time the computer is turned on and off. Values: Off* Printer does not honor hardware initialization requests from the computer. On Printer honors hardware initialization requests from the computer.
NPA Mode Purpose: To specify whether the printer performs the special processing required for bidirectional communication, following the conventions defined in the Network Printing Alliance (NPA) Protocol. Values: On Printer performs NPA processing. If data is not in NPA format, it is rejected as bad data. Off Printer does not perform NPA processing. Auto* Printer examines data and determines the format and then processes it appropriately.
Parallel Mode 1 Purpose: To control the pull-up resistors on the parallel port signals. This menu item is useful for personal computers that have open collector outputs on the parallel port signals. Values: On Disables the resistors. Off* Enables the resistors. Parallel Mode 2 Purpose: To determine whether the parallel port data is sampled on the leading or trailing edge of strobe. Values: On* Samples parallel port data on the leading edge of strobe.
PS SmartSwitch Purpose: To configure the printer so it automatically switches to PostScript emulation when a print job received through the parallel port requires it, regardless of the default printer language. Values: On* Printer examines data on the parallel interface and selects PostScript emulation if the data indicates that is the required printer language. Off Printer does not examine the incoming data.
66 PCL Emul Menu Use the PCL Emul Menu to change printer settings that only affect jobs using the PCL emulation printer language. Select a menu item for more details: • A4 Width • Orientation • Auto CR after LF • Pitch • Auto LF after CR • Point Size • Font Name • Symbol Set • Font Source • Tray Renumber • Lines per Page Note: Values marked by an asterisk (*) are the factory default settings. A4 Width Purpose: To select the width of the logical page for A4 size paper.
Auto CR after LF Purpose: To specify whether the printer automatically performs a carriage return after a line feed control command. Values: Off* Printer does not perform a carriage return after a line feed control command. On Printer performs a carriage return after a line feed control command. Auto LF after CR Purpose: To specify whether the printer automatically performs a line feed after a carriage return control command.
Font Source Purpose: To determine the set of fonts displayed in the Font Name menu item. Values: Resident* Displays all fonts resident in printer RAM when the printer ships from the factory. Download Displays all fonts downloaded to printer RAM. Flash Displays all fonts stored in flash memory. Disk Displays all fonts stored on the printer hard disk. All Displays all fonts available to the printer from all sources.
Orientation Purpose: To determine how text and graphics are oriented on the page. Values: Portrait* Prints text and graphics parallel to the short edge of the paper. Landscape Prints text and graphics parallel to the long edge of the paper. Pitch Purpose: To specify the font pitch for scalable monospaced fonts. Values: 0.08...100 (in increments of 0.01 cpi) 10* Pitch refers to the number of fixed-space characters in a horizontal inch of type. You can select a pitch from 0.
Symbol Set Purpose: To choose a symbol set for a specified font name. Values: PC-8* (country-specific factory default values) PC-850* (country-specific factory default values) A symbol set is a set of alphabetic and numeric characters, punctuation, and special symbols used when printing with a selected font. Symbol sets support the different requirements for languages or specific applications, such as math symbols for scientific text.
67 PostScript Menu Use the PostScript Menu to change printer settings that only affect jobs using the PostScript emulation printer language. Select a menu item for more details: • Font Priority • Image Smoothing • Print PS Error Note: Values marked by an asterisk (*) are the factory default settings. Font Priority Purpose: To establish the font search order. Values: Resident* Printer searches printer memory for the requested font before searching flash memory or hard disk.
Image Smoothing Purpose: To enhance the contrast and sharpness of low resolution bitmapped images (such as images downloaded from the World Wide Web) and smooth their color transitions. Values: Off* Uses default resolution when printing all images. On Enhances low resolution images, such as graphics with a resolution of 72 dpi. Note: Image Smoothing has no effect on images that are 300 dpi or higher resolution.
68 Serial Menu Use the Serial Menu to change printer settings affecting jobs sent to the printer through a serial port (either Standard Serial or Serial Opt ). Select a menu item for more details: • Baud • PS SmartSwitch • Data Bits • Robust XON • Honor DSR • RS-232/RS-422 • Job Buffering • RS-422 Polarity • NPA Mode • Serial Buffer • Parity • Serial Protocol • PCL SmartSwitch Note: Values marked with an asterisk (*) are the factory default settings.
Baud Purpose: To specify the rate at which data can be received through the serial port. Values: 1200 57600 2400 115200 4800 138200 9600* 172800 19200 230400 38400 345600 See also: Technical Reference Data Bits Purpose: To specify the number of data bits that are sent in each transmission frame.
Honor DSR Purpose: To determine whether the printer uses the Data Set Ready (DSR) signal. DSR is one of the handshaking signals for most serial interface cables. Values: Off* All data received by the serial port is treated as valid data. On Only data received while the DSR signal is high is treated as valid. The serial interface uses DSR to distinguish data sent by the computer from data created by electrical noise in the serial cable. This electrical noise can cause stray characters to print.
Parity Purpose: To select the parity for serial input and output data frames. Values: Even Odd None* Ignore See also: Technical Reference PCL SmartSwitch Purpose: To configure the printer so it automatically switches to PCL emulation when a print job received through the serial port requires it, regardless of the default printer language. Values: On* Printer examines data on the serial interface and selects PCL emulation if the data indicates that is the required printer language.
PS SmartSwitch Purpose: To configure the printer so it automatically switches to PostScript emulation when a print job received through the serial port requires it, regardless of the default printer language. Values: On* Printer examines data on the serial interface and selects PostScript emulation if the data indicates that is the required printer language. Off Printer does not examine the incoming data.
RS-422 Polarity Purpose: To establish the behavior of the positive and negative signals when using RS-422 serial communication. Values: Normal* Uses default definition of one and zero. Reverse Reverses the definition of one and zero, thereby allowing a positive connection to a host computer’s negative terminal without changing the physical cable. Serial Buffer Purpose: To configure the size of the serial input buffer. Values: Disabled Disables job buffering.
Serial Protocol Purpose: To select the hardware and software handshaking values for the serial interface. Values: DTR* Hardware handshaking. DTR/DSR Hardware handshaking. XON/XOFF Software handshaking. XON/XOFF/DTR Combined hardware and software handshaking. XONXOFF/DTRDSR Combined hardware and software handshaking.
69 Setup Menu Use the Setup Menu to configure a variety of printer features. Select a menu item for more details: • Alarm Control • Page Protect • Auto Continue • Power Saver • Display Language • Print Timeout • Download Target • Printer Language • Jam Recovery • Printer Usage • Job Accounting • Resource Save • Job Acct Limit • Wait Timeout Note: Values marked by an asterisk (*) are the factory default settings.
Auto Continue Purpose: To define the amount of time (in seconds) the printer waits after displaying an operator intervention error message before it resumes printing. Values: Disabled* Printer does not resume printing until someone clears the error message. 5...255 Printer waits the specified amount of time, and then automatically resumes printing. This timeout value also applies if the menus are displayed (and the printer is offline) for the specified period of time.
Jam Recovery Purpose: To establish whether the printer reprints jammed pages. Values: On Printer reprints jammed pages. Off Printer does not reprint jammed pages. Auto* Printer reprints a jammed page unless the memory required to hold the page is needed for other printer tasks. Job Accounting Purpose: To store statistical information about your most recent print jobs on the hard disk.
Job Acct Limit Purpose: To specify the number of print jobs for which statistics are maintained on your printer hard disk. Values: Disabled Stores statistics for each print job until the hard disk is full. 10...1000 (1000*) Stores statistics for the specified number of print jobs. If you set Job Acct Limit to 10, the statistics from the 10 most recent print jobs are stored on the hard disk.
Power Saver Purpose: To specify the amount of time (in minutes) the printer waits after a job is printed before it goes into a reduced power state. Values: Disabled Disables Power Saver. 1...240 Specifies the amount of time after a print job before the printer goes into Power Saver mode. (Your printer may not support the entire range of values.) The factory default Power Saver setting depends on your printer model. Print the menu settings page to determine the current Power Saver setting.
Printer Language Purpose: To establish the default printer language used to communicate data from the computer to the printer. Values: PCL Emulation PCL emulation, compatible with Hewlett-Packard printers. PS Emulation* PostScript emulation, compatible with Adobe PostScript language. Note: Setting a printer language as the default does not prevent a software application from sending print jobs that use the other language.
Wait Timeout Purpose: To specify the amount of time (in seconds) the printer waits to receive additional bytes of data from the computer. When this timeout expires, the print job is canceled. Values: Disabled Disables Wait Timeout. 15...65535 (40*) Specifies the amount of time the printer waits for additional data before it cancels the job. Note: Wait Timeout is only available when you use PostScript emulation. This menu item has no effect on PCL emulation print jobs.
70 Supplies Menu The Supplies Menu provides information about printer supplies that require attention. It is only available when a supply is low or needs replacement. Select a menu item for more details: • Belt • Toner • Black Photo Dev • Fuser • Coating Roll • Replace Supplies • Color Photo Dev • Supplies Life Belt Purpose: To view the status of the transfer belt. Values: 80 Belt Life Warning It’s time to order a new transfer belt.
Black Photo Dev Purpose: To view the status of the black photodeveloper. Values: Life Warning Exhausted See also: Replacing a photodeveloper Coating Roll Purpose: To view the status of the oil coating roll. Values: 85 Coating Roll Life Warning It’s time to order a new oil coating roll. 85 Coating Roll Exhausted It’s time to replace the oil coating roll.
Toner Purpose: To view the status of the color toner cartridges. Values: Low Empty See also: Replacing a toner cartridge Fuser Purpose: To view the status of the fuser. Values: 80 Fuser Life Warning It’s time to order a new fuser. 80 Fuser Exhausted It’s time to replace the fuser. 80 Belt/Fuser Life Warning It’s time to order a new fuser and transfer belt. 80 Belt/Fuser Exhausted It’s time to replace the fuser and the transfer belt.
Replace Supplies Purpose: To view the status of printer supplies. Values: Fuser =Not Replaced =Replaced =Replace Now Belt =Not Replaced =Replaced =Replace Now Supplies Life Purpose: To view the status of printer supplies.
71 USB Menu Use the USB Menu to change printer settings affecting a Universal Serial Bus (USB) port (USB Option ). Select a menu item for more details: • Job Buffering • PCL SmartSwitch • MAC Binary PS • PS SmartSwitch • NPA Mode • USB Buffer Note: Values marked by an asterisk (*) are the factory default settings. Job Buffering Purpose: To temporarily store jobs on the printer hard disk before printing. Values: Off* Does not buffer print jobs to the hard disk.
MAC Binary PS Purpose: To configure the printer to process Macintosh binary PostScript print jobs. Values: On Printer processes raw binary PostScript print jobs from computers using the Macintosh operating system. Note: This setting often causes Windows print jobs to fail. Off Printer filters PostScript print jobs using standard protocol. Auto* Printer processes print jobs from computers using either Windows or Macintosh operating systems.
PS SmartSwitch Purpose: To configure the printer so it automatically switches to PostScript emulation when a print job received through the USB port requires it, regardless of the default printer language. Values: On* Printer examines data on the USB interface and selects PostScript emulation if the data indicates that is the required printer language. Off Printer does not examine the incoming data.
72 Utilities Menu Use the Utilities Menu to print a variety of listings relating to available printer resources, printer settings, and print jobs. Other menu items let you set up printer hardware and troubleshoot printer problems.
Defragment Flash Purpose: To retrieve storage area lost when resources are deleted from flash memory. Values: Yes Printer transfers all resources stored in flash memory to printer memory and then reformats the flash memory option. When the format operation is complete, the resources are loaded back into flash memory. No Printer cancels the request to defragment the flash memory. WARNING: Do not turn off the printer while the flash is defragmenting.
Format Flash Purpose: To format the flash memory. Values: Yes Deletes any data stored in flash memory and prepares the flash memory to receive new resources. No Cancels the request to format the flash memory and leaves current resources stored in flash memory. WARNING: Do not turn off the printer while the flash is formatting. Hex Trace Purpose: To help isolate the source of a print job problem.
Print Alignment Purpose: To perform a transfer belt alignment procedure by entering a series of alignment values. Values: A–L See also: Replacing the transfer belt; Printing Alignment Page Print Directory Purpose: To print a list of all the resources stored in flash memory or on the hard disk. Note: Print Directory is available only when either a nondefective flash or disk is installed and formatted, and Job Buffer Size is not set to 100%.
Print Menus Purpose: To print a listing of the current user default values, the installed options, the amount of installed printer memory, and the status of printer supplies. Print Net Setup Purpose: To print information relating to the internal print server and the network settings defined by the Network Setup menu item in the Network Menu.
73 Notices • Edition notice • Trademarks • Licensing notice • Safety information • Cautions and warnings • Electronic emission notices • Noise emission levels • Energy Star Edition notice October 2001 The following paragraph does not apply to any country where such provisions are inconsistent with local law: LEXMARK INTERNATIONAL, INC.
References in this publication to products, programs, or services do not imply that the manufacturer intends to make these available in all countries in which it operates. Any reference to a product, program, or service is not intended to state or imply that only that product, program, or service may be used. Any functionally equivalent product, program, or service that does not infringe any existing intellectual property right may be used instead.
Clarendon Linotype-Hell AG and/or its subsidiaries Eurostile Nebiolo Geneva Apple Computer, Inc.
Click the title of the document you want to review: BSD License and Warranty statements GNU General Public License The Lexmark modified GNU licensed software is free software; you can redistribute it and/or modify it under the terms of the licenses referenced above. These licenses do not provide you any rights to the Lexmark copyrighted software in this printer.
Electronic emission notices Federal Communications Commission (FCC) compliance information statement The Lexmark C910 has been tested and found to comply with the limits for a Class A digital device, pursuant to Part 15 of the FCC Rules. Operation is subject to the following two conditions: (1) this device may not cause harmful interference, and (2) this device must accept any interference received, including interference that may cause undesired operation.
Japanese VCCI notice The United Kingdom Telecommunications Act 1984 This apparatus is approved under the approval number NS/G/1234/J/100003 for the indirect connections to the public telecommunications systems in the United Kingdom. Noise emission levels The following measurements were made in accordance with ISO 7779 and reported in conformance with ISO 9296.
Index Numerics 1565 Emul Error Load Emul Option 213 2 Paper Jam 213 30 Print Unit Missing 214 30 Coating Roll Missing 214 32 Unsupported Cartridge 214 33 Tray Config Error 215 34 Short Paper 215 35 Res Save Off Deficient Memory 215 37 Insufficient Collation Area 216 37 Insufficient Defrag Memory 216 37 Insufficient Memory 217 38 Memory Full 217 39 Complex Page 218 4 Unsupported Firmware Card 218 40 Tray Size Sense Error 219 41 Open Bin 1 Exit Tray 219 51 Defective Flash 219 52
additive 30 adjusting 239, 240, 241, 293 calibration 27 capability 31 consistency 31 controlling 13 correcting 13, 25 device profile 27 difference 31 how we see 29 media 11 primary 30 settings 25 subtractive 30 supplies 11 translation 27 types 29 Color Correction (Color Menu) 239 color management systems 28 Color Menu 239 Color Correction 239 Manual Color 240 Print Mode 241 Toner Darkness 241 color models 27 Color Samples (Utilities Menu) 302 color, managing 27 Toner (Supplies Menu) 297 tone
Hex Trace (Utilities Menu) 304 high capacity feeder capacity 62 clearing jams in 164, 166 loading 40 paper sizes supported 62 paper types supported 62 removing 129 successful printing in 68 Honor DSR (Serial Menu) 283 Honor Init (Parallel Menu) 270 I Image Smoothing (PostScript Menu) 280 indicator light 16 Infrared 198 Infrared Buffer (Infrared Menu) 249 Infrared Menu 248 Infrared Buffer 249 Infrared Port 249 Job Buffering 249 Max Baud Rate 250 NPA Mode 250 PCL SmartSwitch 251 PS SmartSwitch 251 Transm
problem-solving 180 removing memory cards 117 memory card, removing 117 menu map 235 menu settings page, printing 18 menus language 289 main list of 235 printing menu settings page 18 Menus Disabled 201 messages 1565 Emul Error Load Emul Option 213 2 Paper Jam 213 30 Print Unit Missing 214 30 Coating Roll Missing 214 32 Unsupported Cartridge 214 33 Tray Config Error 215 34 Short Paper 215 35 Res Save Off Deficient Memory 215 37 Insufficient Collation Area 216 37 Insufficient Defrag M
Std Bin Full 211 Supplies 211 Tray Empty 211 Tray Low 212 Tray Missing 212 Unsupported Disk 212 USB 212 Waiting 213 Multipage Border (Finishing Menu) 244 Multipage Order (Finishing Menu) 245 multipage print border settings 244 configuring 246 order settings 245 view settings 246 Multipage Print (Finishing Menu) 246 Multipage View (Finishing Menu) 246 multipurpose feeder closing 50 configuring 264 guidelines 44 print material envelopes 47 loading 47 paper 47 transparencies 47 N Network 2
enabling resistors 272 Parity (Serial Menu) 284 PCL Emul Menu 274 A4 Width 274 Auto CR after LF 275 Auto LF after CR 275 Font Name 275 Font Source 276 Lines per Page 276 Orientation 277 Pitch 277 Point Size 277 Symbol Set 278 Tray Renumber 278 PCL emulation A4 width 274 automatic carriage return 275 automatic line feed 275 font name 275 font sample print 305 font source 276 font support 185 lines per page 276 orientation 277 pitch 277 point size 277 resident fonts 172 symbol set 278 tray renumber 278 PCL Sm
recommended papers 34 recycling supplies 132 Remove Paper 208 removing firmware card 119 hard disk 120 memory card 117 option card 118 system board access cover 115 Replace Supplies (Supplies Menu) 298 replacing fuser 82 oil coating roll 90 photodeveloper 75 supplies 79, 80, 89, 103, 109, 111 toner cartridges 104 transfer belt 95 Reset Printer (Job Menu) 254 resetting fuser counter 89 transfer belt counter 103 Resetting Maint Cnt Value 208 resetting printer 254 resetting the maintenance coun
printer settings 16 U Universal Setup (Paper Menu) 268 unsatisfactory papers 35 Unsupported Disk 212 USB 212 USB Buffer (USB Menu) 301 USB Menu 299 Job Buffering 299 MAC Binary PS 300 NPA Mode 300 PCL SmartSwitch 300 PS SmartSwitch 301 USB Buffer 301 USB port configuring buffer size 301 NPA mode 300 PCL SmartSwitch 300 PS SmartSwitch 301 Utilities Menu 302 Color Samples 302 Defragment Flash 303 Factory Defaults 303 Format Disk 303 Format Flash 304 Hex Trace 304 Job Acct Stat 304 Print Alignment 305 Pri
Lexmark and Lexmark with diamond design are trademarks of Lexmark International, Inc., registered in the United States and/or other countries. © 2000 Lexmark International, Inc.