Lexmark C920 User’s Guide March 2005 Lexmark and Lexmark with diamond design are trademarks of Lexmark International, Inc., registered in the United States and/or other countries. © 2005 Lexmark International, Inc. All rights reserved. 740 West New Circle Road Lexington, Kentucky 40550 www.lexmark.
Edition: March 2005 The following paragraph does not apply to any country where such provisions are inconsistent with local law: LEXMARK INTERNATIONAL, INC., PROVIDES THIS PUBLICATION “AS IS” WITHOUT WARRANTY OF ANY KIND, EITHER EXPRESS OR IMPLIED, INCLUDING, BUT NOT LIMITED TO, THE IMPLIED WARRANTIES OF MERCHANTABILITY OR FITNESS FOR A PARTICULAR PURPOSE. Some states do not allow disclaimer of express or implied warranties in certain transactions; therefore, this statement may not apply to you.
Contents Chapter 1: Learning about the printer .........................................................6 Understanding the printer operator panel ........................................................................ 8 Chapter 2: Installing drivers for local printing .........................................11 Windows ........................................................................................................................ 11 Macintosh ......................................................
Contents Chapter 5: Printing ......................................................................................51 Sending a job to print ..................................................................................................... 51 Printing from a USB flash memory device ..................................................................... 52 Canceling a print job ......................................................................................................
Contents Understanding jam messages ........................................................................................ 97 200 Paper Jam Pages Jammed (Check Areas A-F, T1-5, MPF) ............................ 97 250 Paper Jam Check MP Feeder ............................................................................... 125 24 Paper Jam Check Tray .............................................................................. 126 Chapter 9: Administrative support ............................
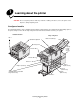
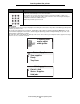
1 Learning about the printer CAUTION: Do not set up this product or make any electrical or cabling connections, such as the power cord or telephone, during a lightning storm. Configured models The following illustrations show a standard network and fully configured printer. If you attach print media handling options to the printer, it may look more like the fully configured model. Items denoted with an asterisk (*) are options.
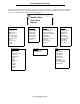
Learning about the printer A number of menus are available to make it easy for you to change printer settings. The diagram shows the menu index on the operator panel and the menus and items available under each menu. For more information about menus and menu items, see the Menus and Messages book on your publications CD.
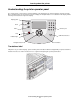
Learning about the printer Understanding the printer operator panel The operator panel on your printer is a 4-line backlit gray scale display that can show both graphics and text. The Back, Menu, and Stop buttons are located to the left of the display, the navigation buttons are located below the display, and the numeric pad is located to the right of the display.
Learning about the printer The use of the buttons and the layout of the display panel are described in the following table. Button Function Back Press the Back button to return to the last screen you viewed. Note: Changes made on a screen will not be applied if you press the Back button. Menu Press the Menu button to open the menu index. Note: The printer must be in the Ready state to access the menu index. A message indicating the menus are unavailable will appear if the printer is not ready.
Learning about the printer Button Function Numeric pad The numeric pad consists of numbers, a pound '#' sign, and a backspace button. The 5 button has a raised bump for non-visual orientation. The numbers are used to enter numeric values for items like quantities or PINs. The backspace is used to delete the number to the left of the cursor. Pressing the backspace multiple times will delete additional entries. Note: The pound '#' sign is not used.
2 Installing drivers for local printing A local printer is a printer attached to the computer using a USB or parallel cable. The local printer is intended to be used by the computer to which it is attached. If attaching a local printer, install the printer driver on the computer before setting up the printer. The printer driver is software that lets the computer communicate with the printer. The procedure to install drivers depends on the operating system used.
Installing drivers for local printing 2 Click Install Printer and Software. Note: Some Windows operating systems require that the user has administrative access to install printer drivers on the computer. 3 Click Agree to accept the license agreement. 4 Select Suggested, and click Next. The Suggested option is the default installation for local and network-attached setup. To install utilities, change settings, or customize device drivers, select Custom, and follow the instructions on the screen.
Installing drivers for local printing Before printing, establishing communication between the printer and computer is required. To do this: 1 Set serial parameters in the printer. 2 Install a printer driver on the attached computer. 3 Match the serial settings in the COM port. Setting parameters in the printer 1 Press 2 Press on the operator panel. until Reports appears, and then press .
Installing drivers for local printing 3 Click Agree to accept the Printer Software License Agreement. 4 Select Custom, and click Next. 5 Select Components, and click Next. 6 Select Local, and click Next. 7 Select the printer from the list, and click Add Printer. 8 Expand the printer item listed below Selected Components. 9 Click PORT: , and select the communications port (COM1 or COM2) needed for use. 10 Click Finish to complete the printer software installation.
Installing drivers for local printing e Select a Destination, and click Continue. f On the Easy Install screen, click Install. g Enter the user password, and click OK. All the necessary software is installed on the computer. h Click Close when installation is complete. 2 Open Finder, click Applications, and click Utilities. 3 Double-click Print Center or Printer Setup Utility. Note: A PPD for the printer is also available in a downloadable software package on the Lexmark Web site at www.lexmark.
Installing drivers for local printing UNIX/Linux Local printing is supported on many UNIX and Linux platforms, such as Sun Solaris and Red Hat. The Sun Solaris and Linux packages are available on the drivers CD and on the Lexmark Web site at www.lexmark.com. The UNIX/Linux User’s Guide in each package gives detailed instructions for installing and using Lexmark printers in UNIX and Linux environments. All the printer driver packages support local printing using a parallel connection.
3 Installing drivers for network printing Printing a network setup page If the printer is attached to a network, print a network setup page on the printer to verify the network connection. This page also provides important information that helps in configuring for network printing. 1 Make sure the printer is on. 2 Press 3 Press until Reports appears, and then press 4 Press until Network Setup Page appears, and then press on the operator panel. . .
Installing drivers for network printing 9 Using the numeric pad, enter the IP gateway. Once it is entered, press . Submitting Selection appears briefly. 10 Press until the printer returns to Ready. Verifying the IP settings 1 Print another network setup page. Look under the “TCP/IP” heading, and make sure the IP address, netmask, and gateway are correct. See Printing a network setup page if help is needed. 2 Ping the printer, and verify that it responds.
Installing drivers for network printing Follow the steps for the printing configuration and operating system in use to configure the network printer: Printing configuration Operating system Go to page Direct • Printer is connected directly to the network using a network cable, such as Ethernet. • Printer drivers are typically installed on each network computer. Windows 98 SE, Windows NT 4.
Installing drivers for network printing Shared printing using Windows NT 4.0, Windows 2000, Windows XP, or Windows Server 2003 Note: Install the printer software before connnecting the USB cable. After connecting the printer to a Windows NT 4.0, Windows 2000, Windows XP, or Windows Server 2003 computer (which will act as a server), follow these steps to configure the network printer for shared printing: Server Printer Clients 1 Install a custom printer driver. a Launch the drivers CD.
Installing drivers for network printing g Check the following to make sure the printer was successfully shared. • • The printer object in the Printers folder now has a shared indicator. For example, in Windows NT 4.0, a hand appears under the printer object. Browse Network Neighborhood. Find the host name of the server, and look for the shared name assigned to the printer.
Installing drivers for network printing Configuring Drag‘N’Print Note: Drag’N’Print™ support is not available for all printers. For detailed configuration instructions, launch the drivers CD, click View Documentation, and click Software and utilities. Macintosh Note: A PostScript Printer Description (PPD) file provides detailed information about the capabilities of a printer to UNIX or Macintosh computers.
Installing drivers for network printing 7 Verify printer installation: a Open Finder, click Applications, and click TextEdit. b Choose Print from the “File” menu. c Choose Summary from the “Copies & Pages” pop-up menu. Note: Look on the Network Setup page under the “AppleTalk” heading to find the default name of the printer to know which printer to select. • • If the PPD file displayed in the Summary window is correct for the printer, then printer setup is complete.
Installing drivers for network printing f Click Close when installation is complete. Note: A PPD for the printer is also available in a downloadable software package on the Lexmark Web site at www.lexmark.com. Step 2: Create a desktop printer 1 In the Chooser, select the LaserWriter 8 driver. 2 For a routed network, select the default zone from the list. For the zone to select, look on the Network Setup page under AppleTalk for Zone. 3 Select the new printer from the list.
4 Installing and removing options CAUTION: If you are installing memory or option cards sometime after setting up the printer, turn the printer off and unplug the power cord before continuing. If you have any other devices connected to the printer, turn them off as well and unplug any cables going to the printer. You can customize your printer memory capacity and connectivity by adding optional cards. You can also use these instructions to help you locate an option for removal.
Installing and removing options Removing the system board access cover You must remove the system board access cover to install memory cards, a firmware card, a hard disk, or an option card. CAUTION: This printer weighs 77–107 kg (170–235 Ib) and requires four people to lift. Anytime you move or lift the printer, make sure you have enough people to help. Use the handholds located on the sides to lift the printer.
Installing and removing options You need a number 2 Phillips screwdriver to remove the system board access cover. Screws Screws 1 Loosen the eight screws on the system board access cover. Do not remove the screws completely. Warning: The system board access cover must be replaced before operating the printer. 2 Slide the cover up and away from the printer.
Installing and removing options 3 Use the illustration to locate the connector for the card you want to install or remove.
Installing and removing options Installing a memory card Complete the following instructions to install a printer memory card. Note: Memory cards designed for other Lexmark printers may not work with your printer. 1 Remove the system board access cover. (See Removing the system board access cover.) 2 Push open the latches on both ends of the memory card connector. 3 Unpack the memory card. Warning: Printer memory cards are easily damaged by static electricity.
Installing and removing options 3 Holding the flash memory or firmware card by the locking clips, align the plastic pins on the card with the holes on the system board. Locking clips Pins 4 Push the flash memory or firmware card firmly into place, and release the locking clips. The entire length of the connector on the flash memory or firmware card must touch the system board and be locked into the connector. Be careful not to damage the connectors.
Installing and removing options If an option card has been installed, you may have to remove the option card before installing the hard disk. 1 Remove the system board access cover (see Removing the system board access cover). 2 Align and press the ribbon cable connector into the connector on the system board. 3 Flip the hard disk over, and then press the three posts on the mounting plate into the holes on the system board. The hard disk snaps into place.
Installing and removing options Installing an option card Your printer has one expansion card slot that supports a number of option cards. The following table describes their function. Card Function MarkNet N8000 series internal print server Adds an Ethernet, Token-Ring, or Fiber port to connect your printer to a network. Serial/Parallel 1284-C Interface Card Adds an RS-232C serial and 1284-C parallel interface port. Coax/Twinax Adapter Card for SCS Adds a coaxial/twinaxial network port. 802.
Installing and removing options 4 Align the connector on the option card with the connector on the system board. The cable connectors on the side of the option card must fit through the connector slot. 5 Push the option card firmly into the option card connector. 6 Secure the card to the system board with the screws.
Installing and removing options Reinstalling the system board access cover After you finish installing cards on the printer system board, reinstall the system board access cover. 1 Align the holes on the access cover with the screws on the printer. Hole 2 Place the cover against the printer and slide it down. 3 Tighten the eight screws. Aligning the optional high capacity feeder Note: Failure to properly align the high capacity feeder may cause paper jams.
Installing and removing options Installing height adjustment spacers If the pins on the high capacity feeder do not align with the holes in the docking frame, adjust the height of the feeder. You can either remove the factory installed spacer or add two spacers between each caster and the bottom of the high capacity feeder. Use the following steps to add or remove spacers. 1 Determine the height difference between high capacity feeder alignment pins and the docking frame.
Installing and removing options c Align and insert the screws into the screw holes on the high capacity feeder. To remove the factory installed spacer: a Remove the spacer from the top of the caster. b Insert the four screws through the caster. c Align and insert the screws into the screw holes on the high capacity feeder. 5 Tighten the four screws to secure the caster. 6 Repeat steps 3 through 5 to add or remove spacers on the remaining three casters.
Installing and removing options Aligning the finisher with the printer The following three areas must align properly to prevent paper jams. Alignment marks Docking plate pin Spacing Hole in finisher 1 The docking plate pins must enter the holes in the finisher. 2 The space between the printer and finisher must be the same at the top and bottom of the finisher. 3 The alignment marks on top of the finisher must align with the edges of the cover on the side of the printer.
Installing and removing options Lowering or raising the finisher Follow these instructions if the holes on the finisher are above or below the pins on the docking plate. Pin Hole in finisher 1 Determine if the pins are above or below the holes in the finisher.
Installing and removing options 2 Loosen the guide rail thumbscrews. 3 Rotate the adjustment knobs as needed to align the holes in the finisher with the pins. To raise the finisher, rotate the adjustment knobs clockwise. To lower the finisher, rotate the adjustment knobs counterclockwise. 4 Roll the finisher toward the printer until the finisher locks to the docking plate pins. You hear a click when the finisher locks into position.
Installing and removing options Aligning the sides of the finisher Follow these instructions if the distance between the finisher and printer is not the same at the top and bottom. 1 Loosen the guide rail thumbscrews.
Installing and removing options If you previously lowered or raised the guide rail plate, the thumbscrews will already be loose. 2 Rotate the rear adjustment knobs to equally align the top and bottom of the finisher with the printer. To move the top of the finisher closer to the printer, rotate the adjustment knobs clockwise. To move the top of the finisher away from the printer, rotate the adjustment knobs counterclockwise.
Installing and removing options Aligning the top of the finisher Follow these instructions if the alignment marks on top of the finisher are not aligned with the edges of the cover on the side of the printer. Note: Any time you move the printer or finisher, recheck printer and finisher top alignment. 1 Loosen the guide rail thumbscrews. If you made previous adjustments, the thumbscrews will already be loose. 2 Rotate the adjustment knobs as needed to raise or lower the side of the finisher.
Installing and removing options 4 Roll the finisher toward the printer until the finisher locks to the docking pins. You hear a click when the finisher locks into position. Adjusting the finisher wheels Adjust the wheels on the end of the finisher so the stand will remain aligned when moved. To adjust and lock the wheels: 1 Rotate the left and right upper adjustment knobs on the rear wheels until the wheels touch the floor. To lower the wheels, rotate the adjustment knobs clockwise.
Installing and removing options Removing the duplex unit 1 Turn the printer off. 2 Open the duplex unit door. 3 Loosen the thumbscrews securing the duplex unit.
Installing and removing options 4 Slide the duplex unit out. 5 Close the duplex unit door.
Installing and removing options Removing the high capacity feeder 1 Turn the printer off. 2 Unplug the high capacity feeder power cord from the electrical outlet. 3 Disconnect the interface cable from the side of the high capacity feeder. 4 Roll the high capacity feeder away from the printer. 5 Remove the high capacity feeder from the guide rail.
Installing and removing options 6 Raise the guide rail and pull it away from the docking frame. 7 Remove the wrench from the holder in the high capacity feeder.
Installing and removing options 8 Remove the four screws securing the docking frame. 9 Insert the two side covers into the screw holes on the optional drawer until they snap into place.
Installing and removing options Removing an optional drawer 1 Turn the printer off. 2 Unplug the power cord. Note: To prevent an electrical overload, plug your printer into a well-grounded outlet on a non-ground fault interrupter (GFI) circuit. 3 Disconnect the USB or Ethernet cable from the printer. If you have any other devices connected to the printer, turn them off and unplug any cables going to the printer. CAUTION: This printer weighs 77–107 kg (170–235 Ib) and requires four people to lift.
Installing and removing options 5 Lift the optional drawer.
5 Printing This chapter covers information about sending a job to print, printing confidential jobs, cancelling a print job, printing a menu settings page, a font list, and a directory list. This chapter also provides information on printing folio and statement size media. For tips on paper jam prevention and print media storage, see Avoiding jams or Storing print media. Sending a job to print A printer driver is software that lets your computer communicate with your printer.
Printing Printing from a USB flash memory device A USB Direct interface is located on the operator panel so you can insert a USB flash memory device and print PDF documents. Printing a document from a USB flash memory device is similar to printing a held job. For information regarding tested and approved USB flash memory devices, see our Lexmark Web site at www.lexmark.com.
Printing 3 Press until the appears next to the document you want to print, and then press . A screen asking the number of copies to be printed will appear. USB drive Copies My_document_01 My_document_02 4 To print only one copy, press 1 , or manually input the number of copies with the number pad, then press . Note: Do not remove the USB flash memory device from the USB Direct interface until the document has finished printing. The document prints.
Printing Canceling a job from the desktop 1 Minimize all programs to reveal the desktop. 2 Double-click the My Computer icon. 3 Double-click the Printers icon. A list of available printers appears. 4 Double-click the printer you selected when you sent the job. A list of print jobs appears in the printer window. 5 Select the job you want to cancel. 6 Press the Delete key on the keyboard. Canceling a job from a Macintosh computer Canceling a job from a Macintosh computer running Mac OS 9.
Printing Printing a network setup page If the printer is attached to a network, print a network setup page on the printer to verify the network connection. This page also provides important information that helps in configuring for network printing. 1 Make sure the printer is on. 2 Press 3 Press until Reports appears, and then press 4 Press until Network Setup Page appears, and then press on the operator panel. . .
Printing Printing confidential and held jobs The term held job refers to any type of print job that can be initiated by the user at the printer. This includes a confidential job, a verify print job, a reserve print job, a repeat print job, a bookmark, a profile, or a file on a USB flash memory device. When sending a job to the printer, you can specify in the driver that you want the printer to hold the job in memory.
Printing At the printer 1 Press until Held jobs appears, and then press 2 Press until Confidential jobs appears, and then press 3 Press until the 4 Enter your PIN. . . appears next to your user name, and then press . For more information, see Entering a personal identification number (PIN). 5 Press until the appears next to the job you want to print, and then press . Note: After your job prints, it is deleted from printer memory.
Printing Repeat Print If you send a Repeat Print job, the printer prints all requested copies of the job and stores the job in memory so you can print additional copies later. You can print additional copies as long as the job remains stored in memory. Note: Repeat Print jobs are automatically deleted from printer memory when the printer requires extra memory to process additional held jobs. Windows 1 From a word processor, spreadsheet, browser, or other application, select File Æ Print.
Printing Printing folio and statement sizes Folio and statement sizes are not available in the Paper Size menu until Size Sensing is turned off. To turn off Size Sensing: 1 Make sure the printer is off. 2 Press and hold the 3 Release both buttons when Performing Self Test appears on the display. and buttons while you turn the printer on. The printer performs its power-on sequence, and then Config Menu appears on the first line of the display. 4 Press 5 Press until Size Sensing appears. .
Printing Loading standard trays and optional trays Your printer has a 550-sheet standard tray. You may have also purchased one or more 550-sheet optional trays. The steps for loading a standard or optional tray are the same. Note: The steps for loading an optional high capacity feeder are different than the steps for loading a 550sheet tray. To load print media: Note: Do not remove a tray when a job is printing or when the operator panel indicator light is blinking. Doing so may cause a jam.
Printing 6 Adjust the knob to show the size of the print media currently loaded. Note: This setting serves as a visual reminder only; it has no effect on the operation of the printer. 7 Insert the tray into the printer. Loading the multipurpose feeder The multipurpose feeder can hold several sizes and types of print media, such as transparencies, postcards, note cards, and envelopes. It can be used for single-page or manual printing or as an additional tray.
Printing The icons on the multipurpose feeder show you how to load the multipurpose feeder with paper of various sizes, and how to turn an envelope for printing. Load letterhead face up for simplex printing, face down for duplex printing. 12 x 18 123 A3 123 123 B5 A5 123 123 123 123 LTR 123 A4 To load print media: Note: Do not add or remove print media when the printer is printing from the multipurpose feeder or when the operator panel indicator light is blinking. Doing so may cause a jam.
Printing 3 Push down the bottom plate until it locks into place. Note: Do not place objects on the multipurpose feeder. Also, avoid pressing down on it or applying excessive force to it. 4 Flex the sheets or envelopes back and forth to loosen them, then fan them. Do not fold or crease the print media. Straighten the edges on a level surface. Note: Hold transparencies by the edges and avoid touching the print side. Fan the stack of transparencies to prevent jams.
Printing 5 Load the media in the tray and push the set button to raise the media for feeding. Use the stack height label as a guide for stack height when loading print media. Loading paper, transparencies, or envelopes Note: Letterhead or other preprinted paper must be loaded differently depending on the options you have installed. Load envelopes flap side down. Orient them as indicated by the icons on the multipurpose feeder.
Printing Closing the multipurpose feeder 1 Remove print media from the multipurpose feeder. 2 Push the extension tray in. 3 Push down on the multipurpose feeder near the printer entry rollers to secure it for closing. 4 Close the multipurpose feeder cover. Loading the high capacity feeder The optional high capacity feeder provides an additional input of 3,000 sheets of paper. Note: Do not load any print media other than paper in the high capacity feeder.
Printing 3 Loosen the left and right paper guide thumbscrews. 4 Slide the guides left or right to the correct position for the paper size you are loading (A4 or Letter). 5 Tighten the left and right paper guide thumbscrews. 6 Flex the sheets back and forth to loosen them, and then fan them. Do not fold or crease the paper. Straighten the edges of the stack on a level surface.
Printing 7 Place the paper against the paper guides with the print side up. Note: Do not exceed the maximum stack height. Overfilling the tray may cause paper jams. 8 Press the paper tray button. The paper tray lowers so you can load another 500 sheets of paper. Note: If there is only a partial stack of paper in the tray, the paper low sensor will not allow the tray to go down. Add more paper to lower the tray. 9 10 Place the paper against the paper guides, with the print side up.
Printing 11 Close the top cover. Make sure the high capacity feeder is pushed completely against the printer. Linking trays Tray linking enables the automatic linking feature for trays when you load the same size and type of print media in multiple sources. The printer automatically links the trays; when one tray is empty, print media feeds from the next linked tray.
Printing To disable tray linking, set the Paper Type to a unique value in each one of the trays. If all the trays do not have the same type of print media when they are linked, you could mistakenly print a job on the wrong paper type. Tips for successful printing Storing print media Properly storing the media helps ensure trouble-free printing.
6 Media specifications Media is paper, card stock, transparencies, labels, and envelopes. The last four are sometimes referred to as specialty media. The printer provides high quality printing on a variety of media. A number of things must be considered concerning media before printing. This chapter provides information to help make media selections and how to care for media. Media guidelines Selecting the appropriate media for the printer helps avoid printing problems.
Media specifications Weight The printer can automatically feed paper weights from 60 to 176 g/m2 (16 to 47 lb bond) grain long. Paper lighter than 60 g/m2 (16 lb) might not be stiff enough to feed properly, causing jams. For best performance, use 90 g/m2 (24 lb bond) grain long paper. To use paper narrower than 182 x 257 mm (7.2 x 10.1 in.), it is recommended that the weight be greater than or equal to 90 g/m2 (24 lb bond). Curl Curl is the tendency of media to curve at its edges.
Media specifications Unacceptable paper The following papers are not recommended for use with the printer: • Chemically treated papers used to make copies without carbon paper, also known as carbonless papers, carbonless copy paper (CCP), or no carbon required (NCR) paper • Preprinted papers with chemicals that may contaminate the printer • Preprinted papers that can be affected by the temperature in the printer fuser • Preprinted papers that require a registration (the precise print location on the
Media specifications • If you store individual packages of paper out of the original carton, make sure they rest on a flat surface so the edges do not buckle or curl. • Do not place anything on top of paper packages. • Store paper in its original wrapper until you load it into the printer. Selecting preprinted forms and letterhead Use the following guidelines when selecting preprinted forms and letterhead paper for the printer: • • • Use grain long papers for best results for 60 to 90 g/m2 weights.
Media specifications Printing on letterhead Check with the manufacturer or vendor to determine whether the chosen preprinted letterhead is acceptable for laser printers. Page orientation is important when printing on letterhead. Use the following table for help when loading letterhead in the media sources. Media source or process Print side Top of page Trays Printed letterhead face down Letterhead goes toward the rear of the tray.
Media specifications • • • • • • Set the Paper Source in the Paper Menu based on the source in use, set the Paper Type to Envelope, and select the correct envelope size from the operator panel, the printer driver, or from MarkVision Professional. For best performance, use envelopes made from 90 g/m2 (24 lb bond) paper. Use up to 105 g/m2 (28 lb bond) weight for the 250-sheet standard tray or 105 g/m2 (28 lb bond) weight for envelopes as long as the cotton content is 25% or less.
Media specifications Labels The printer can print on many labels designed for use with laser printers. These labels are supplied in letter size, A4 size, and legal size sheets. Label adhesives, face sheet (printable stock), and topcoats must be able to withstand temperatures of 230°C (446°F) and pressure of 25 pounds per square inch (psi). Try a sample of any labels considered for use with the printer before purchasing a large quantity.
Media specifications Card stock Card stock is single ply, and has a large array of properties, such as the moisture content, thickness, and texture, that can significantly affect print quality. See Identifying media sources and specifications for information on the preferred weight for the grain direction of media. Try a sample of any card stock considered for use with the printer before purchasing a large quantity. See Media types and weights for information on the preferred weight of media.
Media specifications Identifying media sources and specifications The following tables provide information on standard and optional sources, including the media sizes available from the Paper Size menu, and supported weights. Note: If a media size not listed needs to be used, select the next larger size. For information on card stock and labels, see the Card Stock & Label Guide.
Media specifications Media sizes and support (continued) Legend ✓ — supported ✘— unsupported Media size Dimensions 550-sheet Multipurpose trays feeder Optional high capacity feeder Optional duplex unit Optional finisher**** Universal* 69.85 x 127 mm to 297 x 1219.2 mm (2.75 x 3.5 in. to 11.69 x 48 in.)*** ✘ ✓ ✘ ✘ ✘ Banner 297 x 914 mm (11.69 x 36 in.) ✘ ✓ ✘ ✘ ✘ Banner 297 x 1219.2 mm (11.69 x 48 in.) ✘ ✓ ✘ ✘ ✘ 7 3/4 Envelope (Monarch) 98.4 x 190.5 mm (3.875 x 7.5 in.
Media specifications Media support by type for optional features Legend ✓ — supported ✘— unsupported Media 550-sheet trays Multipurpose feeder Optional high capacity feeder Optional duplex Optional finisher Paper ✓ ✓ ✓ ✓ ✓ Card stock ✓ ✓ ✘ ✘ ✓ Transparencies ✓ ✓ ✘ ✘ ✓ Banner ✘ ✓ ✘ ✘ ✓1 Paper labels ✓ ✓ ✘ ✘ ✓ Envelopes ✘ ✓ ✘ ✘ ✓ Glossy paper ✓ ✓ ✘ ✓ ✓ 1Output Banner size paper to Finisher Bin 1 only.
Media specifications Media types and weights (continued) Legend ✓ — supported ✘— unsupported Media weight Media Type 550-sheet trays Multipurpose feeder Card stock—maximum (grain long)2,3 Index Bristol 163 g/m2 (90 lb) 163 g/m2 (90 lb) Tag 163 g/m2 (100 lb) 163 g/m2 (100 lb) Cover 176 g/m2 (65 lb) 176 g/m2 (65 lb) Index Bristol 199 g/m2 (110 lb) 199 g/m2 (110 lb) Tag 203 g/m2 (125 lb) 203 g/m2 (125 lb) Card stock—maximum (grain short)2,3 Cover 216 g/m2 (80 lb) 216 g/m2 (80 lb) Tra
Media specifications Media capacities Legend ✓ — supported ✘— unsupported Optional high capacity feeder Optional finisher bin 1 Optional finisher bin 2 Media type 550-sheet tray Multipurpose feeder Paper 550 sheets* 100 sheets* 3000 100 1000 Card stock 40 sheets** 11 ✘ 100 ✘ Paper labels 40 11 ✘ 30 ✘ Vinyl labels ✘ 11 ✘ 30 ✘ Transparencies 20 7 ✘ 50 ✘ Envelopes ✘ 10 of Com 10 ✘ 10 ✘ * Based on 20 lb paper.
Media specifications For sizes that are acceptable for duplex printing, see Media sizes and support. Select Duplex from the printer driver to print individual duplex jobs. Duplex printing on letterhead When duplex (two-sided) printing on letterhead from the trays, load it with the logo face-up and entering the printer first.
Media specifications Avoiding jams Use appropriate print media (paper, transparencies, labels, and card stock) to help ensure trouble-free printing. See Identifying media sources and specifications for more information. Note: Try a limited sample of any print media you are considering using with the printer before purchasing large quantities. By selecting the appropriate print media and loading it properly, you can avoid most jams.
7 Maintaining the printer Periodically, you need to complete certain tasks to maintain optimum print quality. These tasks are covered in this chapter. If several people are using the printer, you may want to designate a key operator to do the setup and maintenance of your printer. Refer printing problems and maintenance tasks to this key operator. In the U.S., contact Lexmark at 1-800-539-6275 for information about Lexmark Authorized Supplies Dealers in your area.
Maintaining the printer Determining the status of supplies The printer operator panel alerts you once a supply item or maintenance is required. You can also view the status of supplies in your printer on the operator panel unless the printer is printing or in a busy state. The header or gray area at the top of the display will indicate the printer is Ready and lets you know if any trays are low.
Maintaining the printer Ordering supplies To order supplies in the U.S., contact Lexmark at 1-800-539-6275 for information about Lexmark Authorized Supplies Dealers in your area. In other countries or regions, visit the Lexmark Web site at www.lexmark.com or contact the place where you bought your printer. Ordering a toner cartridge When the [color] Low message appears, you should order a new print cartridge. You can print a few hundred pages after the [color] Low message comes on.
Maintaining the printer Finisher For information on finisher maintenance and ordering finisher supplies, see the Finisher Setup and Users Guide that came with your finisher. Cleaning the LEDs If you are experiencing print quality problems such as voids, light streaks, or light print, you may need to clean the LEDs inside the top cover. 1 Open the top cover. a Open the front door. b Rotate the top cover locking lever to the left.
Maintaining the printer c Push up on the right top cover locking button and at the lift points shown below. d Lift the top cover until it stops.
Maintaining the printer 2 Remove and re-insert each photodeveloper. Warning: Exposing the photodevelopers to light for prolonged periods of time can damage it. Do not expose the photodevelopers to light for more than ten minutes. Fingerprints can affect the performance of the photodevelopers. Avoid touching the photodevelopers anywhere except the handles. a Open the waste toner arm. b Remove the photodeveloper completely, and then re-insert it.
Maintaining the printer c Close the waste toner arm. d Repeat steps a through c for each photodeveloper. Removing and re-inserting the photodevelopers sufficiently cleans the LEDs in most cases. If the problem persists, continue with step 3.
Maintaining the printer 3 Remove all photodevelopers and toner cartridges. Warning: Exposing the photodevelopers to light for prolonged periods of time can damage it. Do not expose the photodevelopers to light for more than ten minutes. Fingerprints can affect the performance of the photodevelopers. Avoid touching the photodevelopers anywhere except the handles. Warning: The toner inside the toner cartridges can soil clothing.
Maintaining the printer 5 Reinstall all toner cartridges. CAUTION: Before closing the top cover, make sure everyone is away from the printer and the area under the cover is free of hands, clothing, and other items. 6 Close the top cover and the front door. Closing the top cover CAUTION: Before closing the top cover make, sure everyone is away from the printer and the area under the cover is free of hands, clothing, and other items. 1 Place both hands on the top cover as shown.
Maintaining the printer 3 Rotate the top cover locking lever to the right. Note: If you cannot rotate the locking lever, the cover is not fully closed. Open the top cover and press down firmly until the top cover clicks into place. 4 Close the front door. CAUTION: An optional drawer weighs 18.5 kg (40.8 Ib.). Have someone help when lifting.
8 Clearing jams By carefully selecting print media and loading it properly, you should be able to avoid most paper jams. For more information on avoiding paper jams, see Avoiding jams. If jams do occur, follow the steps outlined in this section. To resolve the paper jam messages, you must clear the entire paper path and then press to clear the message and resume printing.
Clearing jams Identifying jam areas The following illustration shows the path that print media travels through the printer. The path varies depending on the input sources you are using.
Clearing jams Understanding jam messages The following table lists the jam messages that can occur and the action necessary to clear the message. The jam message indicates the area where the jam occurred. However, it is best to clear the entire paper path to ensure you have cleared all possible jams. 200 Paper Jam Pages Jammed (Check Areas A-F, T1-5, MPF) This message identifies the areas (A–F, MPF, or T1–T5) you need to check to remove the paper or to clear the message.
Clearing jams Check Area A This message indicates a paper jam in the transfer belt area. To clear area A: 1 Complete the steps to open the top cover. Note: If you need instructions on how to open the top cover, see Open the top cover. Photodeveloper Warning: Never touch the photodeveloper drum on the underside of the toner cartridge. Note: The paper may be covered with unfused toner, which can stain garments.
Clearing jams 2 Remove any paper on the transfer belt. If the paper source was the multipurpose feeder, check the area between the multipurpose feeder and the transfer belt. Transfer belt Warning: Do not use any pointed objects to remove the paper. This could cause permanent damage to the transfer belt. Note: If banner paper is jammed in the fuser area, continue with step 2 of the topic “Check Area B”.
Clearing jams Check Area B This message indicates a paper jam in the fuser or output roller area. To clear area B: 1 Complete the steps to open the top cover. Note: If you need instructions on how to open the top cover, see Open the top cover. Photodeveloper Warning: Never touch the photodeveloper drum on the underside of the toner cartridge. The paper may be covered with unfused toner, which can stain garments.
Clearing jams 2 If banner paper is jammed in the fuser area, lift the fuser release lever. CAUTION: The fuser may be hot. Let it cool before touching it. Pull the paper toward the inside of the printer until it is free of the fuser, then remove the jam by rolling up the paper from inside the printer until the entire banner sheet is free. To remove all other paper types jammed in the fuser area, continue with step 3.
Clearing jams 3 Grasp the fuser handles, then press the fuser release buttons with your thumbs. CAUTION: The fuser may be hot. Let it cool before touching it. 4 Lift the fuser up and out of the printer. Set it on a clean, flat surface.
Clearing jams 5 Open the standard tray, and remove the green fuser screwdriver. 6 Loosen the 2 red screws.
Clearing jams 7 Grasp the green tab, and open the fuser access door. 8 Remove the jam. 9 Replace the fuser. 10 Replace the fuser screwdriver, and close the tray. 11 Check the top cover for additional jams. If there is no jam in the top cover, close the top cover and front door. If a jam is present, continue with step 12. 12 Remove the jam from the top cover. 13 Close the top cover and the front door. 14 Press .
Clearing jams Check Area C Jams that cause a Check Area C message require opening the duplex jam access door. If you are printing on small paper, the following steps may not clear the jam. See Removing small size paper from the duplex unit. 1 Open the duplex jam access door on the right side of the printer. 2 Remove the jam. 3 Press . If the paper jam message continues, check and clear all paper from the paper path.
Clearing jams Check Area D This message indicates a paper jam in the duplex unit area. To clear area D: 1 Open the duplex jam access door on the right side of the printer. 2 Gently pull out the duplex unit. 3 Turn the paper forwarding dial counterclockwise. If the paper advances out of the duplex unit, remove the jam and go to step 7. If the paper does not advance, go to step 4.
Clearing jams 4 Open the duplex unit covers. 5 Remove the jam. 6 Close the duplex unit covers.
Clearing jams 7 Push the duplex unit until it stops. 8 Close the access door. 9 Press . If the paper jam message continues, check and clear all paper from the paper path.
Clearing jams Removing small size paper from the duplex unit When printing on both sides of A5 or other small size paper, you may need to partially remove the duplex unit to clear the jam. 1 Turn off the printer. 2 Open the duplex unit door.
Clearing jams 3 Loosen the two screws shown. 4 Pull out the duplex unit far enough to see the duplex unit inlet.
Clearing jams 5 Remove jam from the duplex unit inlet. 6 Slide the duplex unit in.
Clearing jams 7 Align the thumbscrews on the duplex unit with the holes in the printer. 8 Tighten the thumbscrews to secure the duplex unit. 9 Close the duplex unit door. 10 Press .
Clearing jams Check Area E This message indicates a jam in the top, middle, or bottom optional drawer paper path area. Note: If you have a high capacity feeder, pull the feeder away from the printer. 1 Open the jam access door on the top optional drawer. 2 Remove the jam. 3 Close the jam access door. 4 Repeat these steps for jams in the middle and bottom drawers. 5 Press . If the paper jam message continues, check and clear all paper from the paper path.
Clearing jams Check Area F 1 Pull the high capacity feeder away from the printer. 2 Open the jam access door on the top optional drawer.
Clearing jams 3 Remove any jams. 4 Close the jam access door. 5 Slide the high capacity feeder until the feeder locks to the docking frame. When the feeder is in the correct position, you hear a click. 6 Press . If the paper jam message continues, check and clear all paper from the paper path.
Clearing jams Check Area G This message indicates a jam in the input area of the finisher. To clear area G: 1 Open the finisher top cover and remove any jams. 2 Close the top cover. 3 Press . Check Area H This message indicates a paper jam inside the finisher. You need to check both the upper access area and accumulator area. To clear area H: 1 Push the latch in and hold it. Latch 2 Roll the finisher away from the printer. 3 Release the latch.
Clearing jams 4 Remove any jams from the finisher entry guide. Entry guide Upper access area 1 Lift the finisher entry guide handle. Handle 2 Lift the hole punch box, rotate the bottom outward and then remove it. 3 Release the handle.
Clearing jams 4 Lift the jam access cover. Jam access cover 5 Remove any jams from the finisher. Knob Rotate the knob to move the paper into the access cover area. 6 Release the jam access cover.
Clearing jams 7 Lift the finisher entry guide handle. 8 Place the top of the box in the finisher, and then rotate the bottom of the box into the finisher. 9 Release the handle.
Clearing jams Accumulator area 1 Open the stapler door. 2 Remove any jams from the accumulator. Accumulator knob Rotate the accumulator knob counterclockwise to move the paper down.
Clearing jams 3 Close the stapler door. 4 Roll the finisher toward the printer until the finisher locks to the docking pins. You hear a click when the finisher locks into position. 5 Press .
Clearing jams Check Area I This message indicates a jam in one of the output areas of the finisher. To clear area I: 1 Open the finisher top cover and remove any jams. 2 Close the top cover. 3 Push the latch in and hold it. Latch 4 Roll the finisher away from the printer. 5 Release the latch.
Clearing jams 6 Open the stapler door. 7 Remove any jams from the accumulator. Accumulator knob Rotate the accumulator knob counterclockwise to move the paper down.
Clearing jams 8 Close the stapler door. 9 Roll the finisher toward the printer until the finisher locks to the docking pins. You hear a click when the finisher locks into position. 10 Press . You must clear any printer paper jams before the printer will resume printing. For instructions on clearing printer paper jams, see your printer’s Quick Reference or publications CD.
Clearing jams 250 Paper Jam Check MP Feeder 1 Slowly pull the jam straight out of the multipurpose feeder, except when feeding banner paper (11.69 X 48 in.). Clear banner paper jams only in the paper feed direction. If the paper will not come out, proceed with step 2. 2 Open the top cover. 3 Remove the paper on the transfer belt. Warning: Do not touch, drop, or place anything on the transfer belt. Touching the surface of the transfer belt or placing items on it may cause damage.
Clearing jams 24 Paper Jam Check Tray Jams in five areas result in a 24 Paper Jam message, where x represents the tray number where the jam has occurred. Paper jam messages 241–244 indicate a jam has occurred in one of the paper trays. A 249 Paper Jam Check Tray message indicates a jam has occurred in the high capacity feeder. See Identifying jam areas for tray numbering. 241-244 Paper Jam 1 Pull out the tray indicated on the display. 2 Remove any wrinkled or creased paper.
Clearing jams 3 Close the tray. 4 Press . If the paper jam message continues, check and clear all paper from the paper path.
Clearing jams 249 Paper Jam Check Tray A 249 Paper Jam Check Tray message indicates a jam has occurred in the high capacity feeder. Note: If you have an optional printer cabinet, the high capacity feeder will be identified as tray 3. 1 Open the top cover. 2 Remove the jam.
Clearing jams 3 Close the top cover. 4 Press .
9 Administrative support Adjusting operator panel brightness and contrast The LCD operator panel contrast and brightness can be adjusted through the Utilities menu. For more information, see the Menus and Messages Guide. The LCD Brightness and LCD Contrast settings are adjusted separately. To change the LCD Brightness or LCD Contrast settings: 1 Make sure your printer is on.
Administrative support Enabling operator panel menus 1 Turn the printer off. 2 Press and hold 3 Release both buttons when Performing Self Test appears on the display. and while turning the printer on. The printer performs its power-on sequence, and then Config Menu appears on the first line of the display. 4 Press until Panel Menus appears, and then press 5 Press until Enable appears, and then press . .
Administrative support Adjusting Power Saver To adjust the Power Saver setting: 1 Make sure the printer is on and Ready appears on the display. 2 Press 3 Press until Settings appears, and then press 4 Press until Setup Menu appears, and then press 5 Press until Power Saver appears, and then press 6 Using the numeric pad or the right and left arrows on the operator panel, enter the number of minutes for the printer to wait before entering Power Saver. on the operator panel. . . .
Administrative support 5 Press until Disable appears, and then press . Contents will be lost. Continue? appears. 6 Press until Yes appears, and then press . The Encrypting Disk progress bar appears. 7 When disk encryption has finished, press 8 Press until . Exit Config Menu appears, and then press . Setting security using the Embedded Web Server (EWS) You can enhance the security of network communications and device configuration by using the advanced security options.
Administrative support • • • No authentication and no encryption Authentication with no encryption Authentication and encryption Note: Only the selected level and later may be used to communicate. Supporting IPSec (Internet Protocol Security) IP Security protocol provides authentication and encryption of communications at the network layer allowing all application and network communications over the IP protocol to be secure.
Administrative support Using 802.1x Authenticating 802.1x port authentication allows the printer to join networks that require authentication before allowing access. 802.1x port authentication can be used with the WPA (Wi-Fi Protected Access) feature of an optional internal wireless print server to provide WPA-Enterprise security support. Support for 802.1x requires the establishment of credentials for the printer. The printer must be known to the Authentication Server (AS).
Administrative support Printing Lockout Printing Lockout lets you lock or unlock a printer using an assigned PIN. When locked, every job the printer receives will buffer to the hard disk. A user can print jobs only by entering the correct PIN on the operator panel. You can assign a PIN through the Web page of the device. Note: This setting is only available when a hard disk is installed. Note: Back channel data will be processed while the printer is locked.
Administrative support Black only mode In black only mode, all colors print in grayscale. The printer prints fastest when in black only mode. Black only mode is off by default. Be sure to select black only mode both in the driver and through the printer operator panel. To turn on black only mode through the printer operator panel: 1 Turn the printer off. 2 Press and hold 3 Release both buttons when Performing Self Test appears on the display. and while turning the printer on.
10 Troubleshooting Online customer support Customer support is available on our Lexmark Web site at www.lexmark.com. Calling for service When you call for printer service, describe the problem you are experiencing, the message on the display, and the troubleshooting steps you have already taken to find a solution. You need to know your printer model type and serial number. See the label on the inside top front cover of the printer for this information.
Troubleshooting Solving printing problems Symptom Cause Solution The operator panel display is blank or displays only diamonds. The printer self test failed. Turn the printer off, wait about 10 seconds, and turn the printer back on. If the Performing Self Test and Ready messages do not appear, turn the printer off and call for service. The message Error reading USB drive appears when using a USB device. The USB device you are using may not be supported or has an error.
Troubleshooting Symptom Cause Solution Incorrect characters print. You are using an incompatible parallel cable. If you are using a parallel interface, make sure you are using an IEEE 1284-compliant parallel cable. We recommend Lexmark part number 1329605 (10 ft) or 1427498 (20 ft) for the standard parallel port. The printer is in Hex Trace mode. If Ready Hex appears on the display, you must exit Hex Trace mode before you can print your job. Turn the printer off and back on to exit Hex Trace mode.
Troubleshooting Solving option problems If an option does not operate correctly after it is installed or if it quits working: • Turn the printer off, wait for about 10 seconds, and turn the printer on. If this does not fix the problem, unplug the printer, and check the connection between the option and printer. • Print the menu settings page and check to see if the option is listed in the Installed Options list. If the option is not listed, reinstall it.
Troubleshooting Solving high capacity feeder problems Problem Solution The paper tray does not raise when the loading door is closed, or the paper tray does not lower when the door is opened and the paper tray button is pushed. Check the following: • The printer is properly attached to the high capacity feeder. • The printer is powered on. • The power cord is plugged firmly into the back of the high capacity feeder. • The power cord is plugged into an outlet. • The outlet has power.
Troubleshooting Solving paper feed problems Symptom Cause Solution Paper frequently jams. You are using paper that does not meet the printer specifications. Use recommended paper and other specialty media. See the Card Stock & Label Guide available on our Lexmark Web site at www.lexmark.com for detailed specifications. See Avoiding jams for information that can help prevent jams from occurring. You have loaded too much paper or too many envelopes.
Troubleshooting Solving print quality problems To help isolate print quality problems, print the Print Quality Test Pages. 1 Turn the printer off. 2 Press appears. and . Hold them while you turn the printer on, and until the Performing Self Test message Config Menu.appears. 3 Press until Prt Quality Pgs appears, and then press . The pages are formatted. The Printing Quality Test Pages message appears, then the pages print. The message remains on the operator panel until all the pages print.
Troubleshooting Symptom Cause Solution Dark Lines A toner cartridge, a photodeveloper, or the transfer belt is defective. If the problem is on the front (print side) of the page: 1 Replace the color cartridge causing the line. 2 If you still have the problem, replace the photodeveloper (black alone or all other colors at once). If the problem is on the back of the page, replace the transfer belt. The LEDs are dirty. See Cleaning the LEDs.
Troubleshooting Symptom Cause Solution Print too light • The Toner Darkness setting is too light, RGB Brightness is too bright, or RGB Contrast is too high. • You are using paper that does not meet the printer specifications. • Color Saver is On. • Toner is low. • A toner cartridge is defective or has been installed in more than one printer. • Select a different Toner Darkness setting, RGB Brightness setting, or RGB Contrast setting from the printer driver before sending the job to print.
Troubleshooting Symptom Cause Solution Uneven print density • A toner cartridge is defective. • A photodeveloper is worn or defective. • The transfer belt is worn or defective. • Replace the toner cartridge. • Replace the photodeveloper (black alone or all other colors at once). • Replace the transfer belt. Characters have jagged or uneven edges A downloaded font is not supported.
Troubleshooting Symptom Cause Solution Solid color pages • A toner cartridge is defective. • Your printer requires servicing. • Replace the toner cartridge. • Call for service. The paper curls badly once it prints and exits to a bin • The Type and Weight settings are not appropriate for the type of paper or specialty media you are using. • The paper has been stored in a high humidity environment. • Change Paper Type and Paper Weight to match the paper or specialty media loaded in the printer.
Troubleshooting Menu item Purpose Values Color Saver To conserve toner in graphics and images yet maintain high quality text. The amount of toner used to print graphics and images is reduced; however, text is printed with default toner usage. If selected, this setting overrides Toner Darkness settings. Color Saver is not supported in PPDS, and partially supported by the PCL emulation driver. On* RGB Brightness To assist in making brightness, contrast, and saturation adjustments to color output.
Troubleshooting Menu item Purpose Values Manual Color To let users customize the RGB or CMYK color conversions applied to each object on the printed page. Color conversion of the data specified using RGB combinations can be customized based on object type (text, graphics, or image) through the printer operator panel. RGB Image sRGB Display*: Applies a color conversion table to produce output that approximates the colors displayed on a computer monitor.
Troubleshooting Solving color quality problems This section helps answer some basic color-related questions and describes how some of the features provided in the Quality Menu can be used to solve typical color problems. Note: Read Solving print quality problems which provides solutions for common print quality problems, some of which may affect the color quality of the printed output.
Troubleshooting The printed page appears tinted. Can I slightly adjust the color? Sometimes a user may consider printed pages to appear tinted (for example, everything printed seems to be too red). This can be caused by environmental conditions, paper type, lighting conditions, or user preference. In these instances, Color Balance may be used to create more preferable color. Color Balance provides the user with the ability to make subtle adjustments to the amount of toner being used in each color plane.
Troubleshooting Off, the color is based on the print job information; no color conversion is implemented.
Troubleshooting Cyan, Magenta, and Yellow. The increment value defined by the user for Detailed Color Samples applies to Cyan, Magenta, Yellow, and Black.
Notices Licensing notice • Licensing notice • Conventions • Electronic emission notices • The United Kingdom Telecommunications Act 1984 • Noise emission levels • ENERGY STAR • Waste from Electrical and Electronic Equipment (WEEE) directive • Radio frequency statements • European Community (EC) directives conformity • India emissions notice • Statement of Limited Warranty for Lexmark C920 The printer resident software contains software developed and copyrighted by Lexmark.
Notices Electronic emission notices Federal Communications Commission (FCC) compliance information statement The Lexmark C920, Machine Type 5056, has been tested and found to comply with the limits for a Class A digital device, pursuant to Part 15 of the FCC Rules. Operation is subject to the following two conditions: (1) this device may not cause harmful interference, and (2) this device must accept any interference received, including interference that may cause undesired operation.
Notices Waste from Electrical and Electronic Equipment (WEEE) directive Korean MIC statement If this symbol appears on your product, the accompanying statement is applicable. For available information regarding the Waste from Electrical and Electronic Equipment (WEEE) directive, visit the Lexmark Web site at www.lexmark.com or contact your Lexmark representative. This equipment has undergone EMC registration as a business product. It should not be used in a residential area.
Notices This product satisfies the limits of EN 55022 (Class A); safety requirements of EN 60950; radio spectrum requirements of ETSI EN 300 330-1 and ETSI EN 300 330-2; and the EMC requirements of EN 55024, ETSI EN 301 489-1 and ETSI EN 301 489-3. Italian Con la presente Lexmark International Inc. dichiara che questo Short Range Device è conforme ai requisiti essenziali ed alle altre disposizioni pertinenti stabilite dalla direttiva 1999/ 5/CE. English Hereby, Lexmark International Inc.
Notices India emissions notice This device uses very low power low range RF communication that has been tested and found not to cause any interference whatsoever. The manufacturer is not responsible in case of any disputes arising out of requirement of permissions from any local authority, regulatory bodies or any organization, required by the end-user to install and operate this product at his premises. Statement of Limited Warranty for Lexmark C920 Lexmark International, Inc.
Notices Limitation of liability Your sole remedy under this limited warranty is set forth in this document. For any claim concerning performance or nonperformance of Lexmark or a Remarketer for this product under this limited warranty, you may recover actual damages up to the limit set forth in the following paragraph. Lexmark's liability for actual damages from any cause whatsoever will be limited to the amount you paid for the product that caused the damages.
Index Numerics Embedded Web Server 133 emission statement 156 enabling operator panel menus 131 envelope sizes 7 3/4 (Monarch) 79 550 sheet drawer 6 A adjust paper tray 60 adjusting Power Saver 132 authorized supplies dealers 85 automatic size sensing 68, 82 automatic tray linking 68, 82 F FCC statement 156 folio size 58 G B guidelines media 70 paper storing 69 printing letterhead 74 binding, duplex 83 C card stock loading 60 card stock, guidelines 77 characteristics, media 70 letterhead 73 confide
Index guidelines 61 icons 62 print media loading 64 transparencies 63 guidelines 73 loading input tray 64 page orientation 74 printing 74 linking 68, 82 trays 68, 82 Linux 15, 24 load line 60, 64 loading print media card stock 60 letterhead input tray 64 paper input tray 60 multipurpose feeder 61 transparencies input tray 60 lock feature, security 135 N NetWare 24 network setup page 17, 54 O P paper avoiding jams 69 letterhead 73 preprinted forms 73 recommended types 70 storing 69 unacceptable 72 paper
Index tray linking 68, 82 job prints 139 from wrong tray 139 on wrong paper or specialty media 139 large jobs do not collate 140 operator panel 139 blank 139 displays black diamonds 139 paper feed blank pages in output bin 143 frequent jams 142 jammed page does not reprint 143 Paper Jam message remains after clearing jam 143 print time seems long 139 tray linking does not work 140 unexpected page breaks 140 U UNIX 15, 24 USB Direct interface 52 USB flash memory device 52 V verify print 57 W R repeat p