C950 Series User's Guide August 2015 Machine type(s): 5058 Model(s): 030 www.lexmark.
Contents 2 Contents Safety information........................................................................................ 6 Learning about the printer...........................................................................8 Finding information about the printer.............................................................................................................8 Selecting a location for the printer..............................................................................................
Contents 3 Configuring Universal paper settings.......................................................................................................... 56 Loading the standard or optional 520‑sheet tray.....................................................................................56 Loading the optional 850‑ and 1,150‑sheet trays......................................................................................59 Loading the 2000‑sheet high‑capacity feeder........................................
Contents 4 Maintaining the printer.............................................................................145 Cleaning the exterior of the printer.............................................................................................................145 Cleaning the printhead lenses..................................................................................................................... 145 Emptying the hole punch box....................................................................
Contents 5 Solving option problems...............................................................................................................................220 Solving paper feed problems...................................................................................................................... 223 Solving print quality problems.....................................................................................................................224 Solving color quality problems..............
Safety information 6 Safety information Connect the power cord directly to an appropriately rated and properly grounded electrical outlet that is near the product and easily accessible. CAUTION—POTENTIAL INJURY: Do not use this product with extension cords, multioutlet power strips, multioutlet extenders, or other types of surge or UPS devices.
Safety information 7 CAUTION—POTENTIAL INJURY: Do not cut, twist, bind, crush, or place heavy objects on the power cord. Do not subject the power cord to abrasion or stress. Do not pinch the power cord between objects such as furniture and walls. If any of these things happen, a risk of fire or electrical shock results. Inspect the power cord regularly for signs of such problems. Remove the power cord from the electrical outlet before inspecting it.
Learning about the printer 8 Learning about the printer Finding information about the printer What are you looking for? Find it here Initial setup instructions: Setup documentation—The setup documentation came with the printer and is also available at http://support.lexmark.com.
Learning about the printer What are you looking for? 9 Find it here The latest supplemental information, updates, and customer Lexmark support Web site— http://support.lexmark.com support: • • • • • Documentation Driver downloads Live chat support E‑mail support Voice support Note: Select your country or region, and then select your product to view the appropriate support site.
Learning about the printer 10 5 1 4 3 1 Right side 307.34 mm (12.1 in.) 2 Front 444.5 mm (17.5 in.) 3 Left side 374.65 mm (14.75 in.) 4 Rear 100 mm (3.9 in.) 5 Top 152.4 mm (6 in.
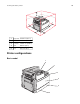
Learning about the printer 1 Printer control panel 2 Exit tray 2 11 Note: Exit tray 2 is supported in any configuration except when a finisher is installed. 3 Standard exit bin 4 Front door 5 Standard 520‑sheet tray 6 Multipurpose feeder Configured models You can configure your basic printer by adding optional trays. A 2,000-sheet high‑capacity feeder and a finisher bin can also be added.
Learning about the printer 12 Fully configured model 1 2 1 Finisher bin The finisher bin can either be one of the following: • Standard finisher (Punch/Stapler) • Booklet finisher (Punch/Stapler/Booklet) 2 2,000‑sheet high‑capacity feeder CAUTION—TIPPING HAZARD: Floor‑mounted configurations require additional furniture for stability. You must use either a printer stand or printer base if you are using a high‑capacity input tray, a duplex unit and an input option, or more than one input option.
Learning about the printer 13 Using the printer control panel 2 1 3 1@! 2 ABC 3 DEF 4 GHI 5 JKL 6 MNO 7 PQRS 8 TUV 9 WXYZ 0 4 # 5 7 Use 6 To 1 Display View printing options as well as status and error messages. 2 Home Navigate back to the home screen. 3 Keypad Enter numbers, letters, or symbols. 4 Sleep button Enable Sleep Mode or Hibernate Mode. • A short press will enable Sleep Mode. • A long press will enable Hibernate Mode.
Understanding the home screen 14 Understanding the home screen Understanding the home screen When the printer is turned on, the display shows a basic screen, referred to as the home screen. Use the home screen buttons and icons to initiate an action. Note: Your home screen, icons, and the buttons may vary depending on your home screen customization settings, administrative setup, and active embedded solutions. 1 2 3 4 123.123.123.
Understanding the home screen 15 This may also appear on the home screen: Touch To Search Held Jobs Search current held jobs. Features Feature Description Attendance message alert If an attendance message affects a function, then this icon appears and the red indicator light blinks. Warning If an error condition occurs, then this icon appears. The IP address of your network printer is located at the top left corner of the Sample: 123.123.123.123.
Understanding the home screen Touch To 2 Delete folder Delete the file you selected. 3 Left arrow Scroll to the left. 4 Right arrow Scroll to the right. 5 Right scroll increase Scroll to another value in increasing order. 6 Left scroll decrease Scroll to another value in decreasing order. 7 Down arrow Scroll down. 8 Accept Save a setting. 9 Cancel 10 Back • Cancel an action or a selection. • Cancel out a screen and return to the previous screen.
Setting up and using the home screen applications 17 Setting up and using the home screen applications Notes: • Your home screen may vary depending on your home screen customization settings, administrative setup, and active embedded applications. Some applications are supported only in some printer models. • There may be additional solutions and applications available for purchase. For more information, go to www.lexmark.com or contact the place where you purchased the printer.
Setting up and using the home screen applications 18 Activating the home screen applications Your printer comes with preinstalled home screen applications. You can activate and set up these applications using the Embedded Web Server. To access the Embedded Web Server, see “Accessing the Embedded Web Server” on page 17. For detailed information about configuring and using the home screen applications, go to the Lexmark support Web site at http://support.lexmark.com.
Setting up and using the home screen applications 19 Understanding Eco‑Settings Icon Description The application lets you easily manage energy consumption, noise, toner, and paper usage settings to help reduce the environmental impact of your printer. Understanding Showroom Icon Description The application lets you create and display a customized slide show on the touch screen of your printer. You can load images either from a flash drive or through the printer Embedded Web Server.
Setting up and using the home screen applications 20 Exporting and importing a configuration You can export configuration settings into a text file, and then import the file to apply the settings to other printers. 1 Open a Web browser, and then type the printer IP address in the address field. Note: View the IP address on the printer home screen. The IP address appears as four sets of numbers separated by periods, such as 123.123.123.123.
Additional printer setup Additional printer setup Turning on the printer 1 Open the front door. 2 Press the printer power switch. 3 Close the front door.
Additional printer setup 22 Installing internal options CAUTION—SHOCK HAZARD: If you are accessing the system board or installing optional hardware or memory devices sometime after setting up the printer, then turn the printer off, and unplug the power cord from the wall outlet before continuing. If you have any other devices attached to the printer, then turn them off as well, and unplug any cables going into the printer.
Additional printer setup Note: This task requires a flathead screwdriver. 1 Turn the screws counterclockwise to loosen them. 2 Pull the system board forward to remove it. 3 Use the following illustration to locate the appropriate connectors. Warning—Potential Damage: System board electronic components are easily damaged by static electricity. Touch something metal on the printer before touching any system board electronic components or connectors.
Additional printer setup 24 1 2 3 1 ISP connector 2 Firmware and flash memory card connectors 3 Memory card connectors 4 Push the system board back into place. Installing a memory card CAUTION—SHOCK HAZARD: If you are accessing the system board or installing optional hardware or memory devices sometime after setting up the printer, then turn the printer off, and unplug the power cord from the wall outlet before continuing.
Additional printer setup 25 3 On the system board, open the memory card connector latches. 4 Align the notch on the memory card to the ridge on the connector.
Additional printer setup 26 5 Push the memory card into the connector until it clicks into place. Installing a flash memory or firmware card The system board has two connections for an optional flash memory or firmware card. Only one of each may be installed, but the connectors are interchangeable.
Additional printer setup 27 3 Holding the card by its sides, align the plastic pins on the card with the holes on the system board. 2 1 1 Plastic pins 2 Metal pins 4 Push the card firmly into place. Notes: • The entire length of the connector on the card must touch and be flush against the system board. • Be careful not to damage the connectors. Installing an Internal Solutions Port The system board supports one optional Lexmark Internal Solutions Port (ISP).
Additional printer setup 28 Warning—Potential Damage: System board electronic components are easily damaged by static electricity. Touch something metal on the printer before touching any system board electronic components or connectors. 1 Access the system board. For more information, see “Accessing the system board” on page 22. 2 Remove the printer hard disk. For more information, see “Removing a printer hard disk” on page 34 3 Unpack the ISP kit.
Additional printer setup 5 Use the provided screw to attach the ISP solution to the system board cage. 6 Connect the ISP solution interface cable into the receptacle of the system board.
Additional printer setup 30 7 Firmly connect the ISP solution to the system board cage using two screws. Installing a printer hard disk Note: This task requires a flathead screwdriver. CAUTION—SHOCK HAZARD: If you are accessing the system board or installing optional hardware or memory devices sometime after setting up the printer, then turn the printer off, and unplug the power cord from the wall outlet before continuing.
Additional printer setup 31 3 Locate the appropriate connector on the system board. Note: If an optional ISP is currently installed, then the printer hard disk must be installed onto the ISP. To install a printer hard disk onto the ISP: a Using a flathead screwdriver, loosen the screws. b Remove the screws attached to the printer hard disk mounting bracket, and then remove the bracket.
Additional printer setup 32 c Align the standoffs of the printer hard disk to the holes in the ISP, and then press down on the printer hard disk until the standoffs are in place. d Insert the plug of the printer hard disk interface cable into the receptacle of the ISP. Note: The plugs and receptacles are color‑coded.
Additional printer setup 33 To install a printer hard disk directly on the system board: a Align the standoffs of the printer hard disk to the holes in the system board, and then press down on the printer hard disk until the standoffs are in place. b Use the two provided screws to attach the printer hard disk mounting bracket. c Insert the plug of the printer hard disk interface cable into the receptacle of the system board. Note: The plugs and receptacles are color‑coded.
Additional printer setup Removing a printer hard disk Note: This task requires a flathead screwdriver.
Additional printer setup 35 Warning—Potential Damage: System board electronic components are easily damaged by static electricity. Touch something metal on the printer before touching any system board electronic components or connectors. 1 Access the system board. For more information, see “Accessing the system board” on page 22. 2 Unplug the printer hard disk interface cable from the system board, leaving the cable attached to the printer hard disk.
Additional printer setup 36 3 Remove the screws while holding the printer hard disk in place, and then remove the printer hard disk. 4 Set aside the printer hard disk. Installing hardware options Order of installation CAUTION—TIPPING HAZARD: Floor-mounted configurations require additional furniture for stability. You must use either a printer stand or printer base if you are using a high-capacity input tray, a duplex unit and an input option, or more than one input option.
Additional printer setup 37 CAUTION—POTENTIAL INJURY: The printer weight is greater than 18 kg (40 lb) and requires two or more trained personnel to lift it safely.
Additional printer setup 38 1 Unpack the optional tray, and then remove all packing material. 2 Place the tray near the printer. 3 Turn off the printer. 4 Align the printer with the tray, and then lower the printer into place.
Additional printer setup 39 1 2 1 Tandem‑tray module 2 2,000‑sheet high‑capacity feeder 5 Turn the printer back on. 6 Set the printer software to recognize the optional tray. For more information, see “Adding available options in the print driver” on page 42. Attaching cables CAUTION—POTENTIAL INJURY: Do not use the fax feature during a lightning storm.
Additional printer setup 40 1 2 3 1 USB printer port 2 USB port 3 Ethernet port Warning—Potential Damage: Do not touch the USB cable, any network adapter, or the printer in the area shown while actively printing. A loss of data or a malfunction can occur.
Additional printer setup 41 Printing a menu settings page From the home screen, navigate to: > Reports > Menu Settings Page Printing a network setup page If the printer is attached to a network, then print a network setup page to verify the network connection. This page also provides important information that aids network printing configuration.
Additional printer setup 42 c Press Enter, or click OK. In Macintosh Click the CD icon on the desktop. Note: D is the letter of your CD or DVD drive. 3 Click Install, and then follow the instructions on the computer screen. Adding available options in the print driver For Windows users 1 Open the printers folder. In Windows 8 From the Search charm, type run, and then navigate to: Run > type control printers > OK In Windows 7 or earlier a Click , or click Start and then click Run.
Additional printer setup 43 Networking Notes: • Purchase a MarkNet N8352 wireless network adapter before setting up the printer on a wireless network. For information on installing the wireless network adapter, see the instruction sheet that came with the adapter. • A Service Set Identifier (SSID) is a name assigned to a wireless network. Wired Equivalent Privacy (WEP), Wi-Fi Protected Access (WPA), WPA2, and 802.1X - RADIUS are types of security used on a network.
Additional printer setup 44 • Security Method—There are four basic options for Security Method: – WEP key If your network uses more than one WEP key, then enter up to four in the provided spaces. Select the key currently in use on the network by selecting the default WEP transmit key. – WPA or WPA2 preshared key or passphrase WPA includes encryption as an additional layer of security. The choices are AES or TKIP.
Additional printer setup 45 Note: Make sure the printer and the computer are fully on and ready. Warning—Potential Damage: Do not connect the USB cable until instructed to do so on the computer screen. 2 Obtain a copy of the software installer package. • From the Software and Documentation CD that came with your printer. • From our Web site: Go to http://support.lexmark.
Additional printer setup 46 6 From the Wireless Configuration dialog, select Guided Setup (Recommended). Note: Choose Advanced Setup only if you want to customize your installation. 7 Temporarily connect a USB cable between the computer on the wireless network and the printer. Note: After the printer is configured, the software will instruct you to disconnect the temporary USB cable so you can print wirelessly. 8 Follow the instructions on the computer screen.
Additional printer setup 47 Enter the printer information 1 Access the AirPort options: In Mac OS X version 10.5 or later From the Apple menu, navigate to either of the following: • System Preferences > Network > Wi‑Fi • System Preferences > Network > AirPort In Mac OS X version 10.
Additional printer setup 48 Configure your computer to use the printer wirelessly To print on a network printer, each Macintosh user must install a custom printer driver file and create a print queue in the Printer Setup Utility or Print Center. 1 Install a printer driver file on the computer: a Obtain a copy of the software installer package. • From the Software and Documentation CD that came with your printer. • From our Web site: Go to http://support.lexmark.
Additional printer setup 49 In Mac OS X version 10.5 1 From the Apple menu, navigate to: System Preferences > Print & Fax 2 Click +, and then navigate to: AppleTalk > select the printer from the list > Add In Mac OS X version 10.4 1 From the Finder, navigate to: Applications > Utilities 2 Double‑click Printer Setup Utility or Print Center. 3 From the Printer List, click Add. 4 Click Default Browser tab > More Printers. 5 From the first pop‑up menu, select AppleTalk.
Additional printer setup Note: Serial printing reduces print speed. 1 Set the parameters in the printer. a From the control panel, navigate to the menu for the port settings. b Locate the menu for the serial port settings, and then adjust the settings, if necessary. c Save the settings. 2 From your computer, open the printers folder, and then select your printer. 3 Open the printer properties, and then select the COM port from the list. 4 Set the COM port parameters in Device Manager.
Minimizing your printer's environmental impact 51 Minimizing your printer's environmental impact Lexmark is committed to environmental sustainability and is continually improving its printers to reduce their impact on the environment. We design with the environment in mind, engineer our packaging to reduce materials, and provide collection and recycling programs. For more information, see: • The Notices chapter • The Environmental Sustainability section of the Lexmark Web site at www.lexmark.
Minimizing your printer's environmental impact 52 Check your first draft for accuracy Before printing or making multiple copies of a document: • Use the preview feature to see how the document looks like before you print it. • Print one copy of the document to check its content and format for accuracy. Avoid paper jams Correctly set the paper type and size to avoid paper jams. For more information, see “Avoiding jams” on page 179.
Minimizing your printer's environmental impact 53 Choose To Off Use factory default settings. This setting supports the performance specifications of your printer. Note: Selecting Photo from the driver may disable Quiet Mode and provide better print quality and full speed printing. On Reduce printer noise. • Print jobs will process at a reduced speed. • Printer engine motors do not start until a document is ready to print. There will be a short delay before the first page is printed.
Minimizing your printer's environmental impact Using the printer control panel 1 From the home screen, navigate to: > Settings > General Settings > Press Sleep Button or Press and Hold Sleep Button > Hibernate 2 Touch . Adjusting the brightness of the printer display To save energy, or if you have trouble reading from the display, adjust the brightness of the display. Using the Embedded Web Server 1 Open a Web browser, and then type the printer IP address in the address field.
Minimizing your printer's environmental impact 55 Recycling Lexmark packaging Lexmark continually strives to minimize packaging. Less packaging helps to ensure that Lexmark printers are transported in the most efficient and environmentally sensitive manner and that there is less packaging to dispose of. These efficiencies result in fewer greenhouse emissions, energy savings, and natural resource savings. Lexmark cartons are 100% recyclable where corrugated recycling facilities exist.
Loading paper and specialty media 56 Loading paper and specialty media Setting the paper size and type The Paper Size setting is automatically sensed according to the position of the paper guides in each tray except the multipurpose feeder. The Paper Size setting for the multipurpose feeder must be set manually from the Paper Size menu. The Paper Type setting must be set manually for all trays that do not contain plain paper.
Loading paper and specialty media 57 CAUTION—POTENTIAL INJURY: To reduce the risk of equipment instability, load each paper drawer or tray separately. Keep all other drawers or trays closed until needed. 1 Pull the tray out. Notice the size indicators at the bottom of the tray. Use these indicators to help position the length and width guides.
Loading paper and specialty media 58 2 Squeeze and then slide the width guide to the correct position for the paper size loaded. 3 Squeeze and then slide the length guide to the correct position for the paper size loaded. Note: The length guide has a locking device. To unlock, slide the button on top of the length guide down. To lock, slide the button up when a length has been selected. 4 Flex the sheets back and forth to loosen them. Do not fold or crease the paper.
Loading paper and specialty media 59 Notes: • • • • Place print side facedown for duplex printing. Place pre-punched paper with the holes toward the front of the tray. Place letterheads with the header on the left side of the tray. Make sure the paper is below the maximum fill line located on the edge of the paper tray. Warning—Potential Damage: Overloading the tray can cause paper jams and possible printer damage. 6 Insert the tray.
Loading paper and specialty media 60 CAUTION—POTENTIAL INJURY: To reduce the risk of equipment instability, load each paper drawer or tray separately. Keep all other drawers or trays closed until needed. 1 Pull the tray out. 2 Squeeze and then slide the length guide to the correct position for the paper size you are loading. 3 Flex the sheets back and forth to loosen them. Do not fold or crease the paper. Straighten the edges on a level surface.
Loading paper and specialty media 61 4 Load the paper stack with the recommended print side faceup. Notes: • • • • • Place print side facedown for duplex printing. Place pre-punched paper with the holes toward the front of the tray. Place letterheads faceup with the header on the left side of the tray. Place letterheads facedown with the header on the right side of the tray for duplex printing. Make sure the paper is below the maximum fill line located on the edge of the paper tray.
Loading paper and specialty media 62 Loading the 2000‑sheet high‑capacity feeder The high‑capacity feeder can hold up to 2,000 sheets of letter‑, A4‑, and legal‑size paper (80 g/m2 or 20 lb). 1 Pull the tray out. 2 Adjust the width guide as necessary.
Loading paper and specialty media 63 3 Flex the sheets back and forth to loosen them. Do not fold or crease the paper. Straighten the edges on a level surface. 4 Load paper into the tray with the print side faceup. Note: Make sure the paper is below the maximum fill line located on the edge of the paper tray. Overloading the tray can cause paper jams and possible printer damage.
Loading paper and specialty media 64 Notes: • Place pre-punched paper with the holes toward the front of the tray. • Place letterheads faceup with the header on the left side of the tray. • Place letterheads facedown with the header on the right side of the tray for duplex printing. 5 Insert the tray. Loading the multipurpose feeder The multipurpose feeder can hold several sizes and types of print media, such as transparencies, labels, card stock, and envelopes.
Loading paper and specialty media 65 2 For paper or specialty media that is longer than letter-size paper, gently pull the extension until it is fully extended. 3 Flex the sheets of paper or specialty media back and forth to loosen them. Do not fold or crease them. Straighten the edges on a level surface. Paper Envelopes Transparencies Note: Avoid scratching or touching the print side.
Loading paper and specialty media 66 4 Push the paper pick tab, and then load the paper or specialty media. Slide the stack gently into the multipurpose feeder until it comes to a stop, and then release the paper pick tab. Warning—Potential Damage: Pulling the paper out, without pushing the paper pick tab first, may cause jams or the paper pick tab to break. • Load paper and transparencies with the recommended print side facedown and the long edge entering the printer first.
Loading paper and specialty media 67 5 Adjust the width guide to lightly touch the edge of the stack. Make sure the paper or specialty media fits loosely in the multipurpose feeder, lies flat, and is not bent or wrinkled. 6 From the printer control panel, set the Paper Size and Paper Type for the multipurpose feeder (MP Feeder Size and MP Feeder Type) based on the paper or specialty media loaded.
Loading paper and specialty media 68 The standard exit bin holds up to 550 sheets of 20‑lb paper. If you need additional output capacity, you can purchase other optional exit bins. Note: Not all exit bins support every paper size and type. 1 From the home screen, navigate to: > Paper Menu > Bin Setup 2 Touch the bin or bins you want to link, and then touch Configure Bins > Link.
Paper and specialty media guide 69 Paper and specialty media guide Notes: • Make sure that the paper size, type, and weight are set correctly on the computer or on the control panel. • Flex, and straighten specialty media before loading them. • The printer may print at a reduced speed to prevent damage to the fuser. • For more information on card stock and labels, see the Card Stock & Label Guide on the Lexmark support Web site at http://support.lexmark.com.
Paper and specialty media guide 70 Store paper in its original wrapper in the same environment as the printer for 24 to 48 hours before printing. Extend the time to several days if the storage or transportation environment is very different from the printer environment. Thick paper may also require a longer conditioning period. Grain direction Grain refers to the alignment of the paper fibers in a sheet of paper.
Paper and specialty media guide 71 Selecting preprinted forms and letterhead Use these guidelines when selecting preprinted forms and letterhead: • Use grain long for 60 to 90 g/m2 (16 to 24 lb) weight paper. • Use only forms and letterhead printed using an offset lithographic or engraved printing process. • Avoid papers with rough or heavily textured surfaces. Use papers printed with heat‑resistant inks designed for use in xerographic copiers.
Paper and specialty media guide 72 Lexmark does not endorse specific suppliers, although a converter’s product list for special applications is maintained. However, the following paper choice guidelines will help alleviate the environmental impact of printing: 1 Minimize paper consumption. 2 Be selective about the origin of wood fiber. Buy from suppliers who carry certifications such as the Forestry Stewardship Council (FSC) or The Program for the Endorsement of Forest Certification (PEFC).
Paper and specialty media guide 73 Supported paper sizes, types, and weights The following tables provide information on standard and optional paper sources and the sizes, types, and weights of paper they support. Note: To use a paper size that is unlisted, configure a Universal paper size. Supported paper sizes Paper size and dimension 520‑sheet tray A4 2,000‑sheet drawer MP feeder Manual paper Manual Duplex envelope 2,6 2,6 X 2 X 2,5 2,5 X 2,5 X 2 2 X 1 1,6 210 x 297 mm (8.27 x 11.
Paper and specialty media guide Paper size and dimension 74 520‑sheet tray 12x18 2,000‑sheet drawer MP feeder Manual paper Manual Duplex envelope 7 X 2 2 X 2 2 X 2 2 X 2 1 X 2 2 X 2 1,5 X 2,5 2,5 X 2,5 2 X 2 2 X 2 X X 2 9 Envelope 98 x 226 mm (3.875 x 8.9 in.) X X Com 10 Envelope X X 2 X 2 X DL Envelope 110 x 220 mm (4.33 x 8.66 in.) X X 2 X 2 X C5 Envelope X X 2 X 2 X X X 305 x 457 mm (12 x 18 in.) Oficio (México) 216 x 340 mm (8.5 x 13.
Paper and specialty media guide 75 Paper size and dimension 520‑sheet tray 2,000‑sheet drawer Other Envelope X X MP feeder 2 Manual paper Manual Duplex envelope X X 2 86 x 165 mm to 216 x 356 mm (3.375 x 6.50 in. to 8.5 x 14 in.) 1 Source supports size with size sensing. 2 Source supports size without size sensing. 3 Paper size is supported if set to metric. 4 Paper size is supported if set to US. 5 Paper size is supported if loaded in the short‑edge orientation.
Paper and specialty media guide Paper type 76 520‑sheet 2,000‑she MP feeder tray et drawer Manual paper Labels Manual envelope Duplex X X • Paper Envelopes X X X X Finisher The paper capacity of each exit bin is listed in parentheses. Paper capacity estimations are calculated based on 75 g/m2 (20 lb) paper.
Paper and specialty media guide 77 Supported finishing features 4 1 2 3 1 Finisher standard bin 2 Finisher bin 1 3 Finisher bin 2 (booklet‑maker) 4 Paper transport Notes: • The finisher shown is the booklet finisher. Bin 2 is available only when the booklet finisher is installed. • All paper tray capacities are based on 75‑g/m2 (20‑lb) paper. Paper transport • • • • The paper capacity is 50 sheets. Finishing options are not supported in this bin. Envelopes are routed here.
Paper and specialty media guide Size 78 Punch* Offset Single/Double staple Double dual staple X X X A3 A4 A5 X X Executive Folio X X JIS B4 X JIS B5 X Legal X X Letter Statement X X X Tabloid X Universal Envelopes (any size) X X X X * For the Universal paper size, the finishing edge must be at least 9 in. (229 mm) for a 3‑hole punch and 10 in. (254 mm) for a 4‑hole punch.
Paper and specialty media guide Size 79 Bi fold Booklet fold Saddle staple X X X X X X Universal X X X Envelopes (any size) X X X 12 x 18 Folio JIS B4 JIS B5 Legal Letter (only SEF) Statement Tabloid SEF—The paper is loaded in the short edge orientation. The short edge of the paper enters the printer first. Bi fold—Each page is individually folded and stacked separately. Booklet fold—A multiple-page job is folded along the center into a single booklet.
Printing 80 Printing The selection and handling of paper and specialty media can affect how reliably documents print. For more information, see “Avoiding jams” on page 179 and “Storing paper” on page 72. Printing a document Printing a document 1 From the printer control panel Paper menu, set the Paper Type and Paper Size to match the loaded paper. 2 Send the print job: For Windows users a With a document open, click File > Print. b Click Properties, Preferences, Options, or Setup.
Printing 81 If you do not know the IP address of the printer, you can: • View the IP address on the printer control panel in the TCP/IP section under the Networks/Ports menu. • Print a network setup page or the menu settings pages and locate the IP address in the TCP/IP section. 2 Click Settings > Print Settings > Quality Menu > Toner Darkness. 3 Adjust the toner darkness setting. 4 Click Submit.
Printing 82 Printing from a flash drive Printing from a flash drive Notes: • Before printing an encrypted PDF file, enter the file password from the printer control panel. • You cannot print files for which you do not have printing permissions. 1 Insert a flash drive into the USB port. Notes: • If you insert the flash drive when the printer requires attention, such as when a jam has occurred, then the printer ignores the flash drive.
Printing 83 2 From the printer control panel, touch the document you want to print. 3 Touch the arrows to increase the number of copies to print, and then touch Print. Notes: • Do not remove the flash drive from the USB port until the document has finished printing. • If you leave the flash drive in the printer after leaving the initial USB menu screen, then you can still print files from the flash drive as held jobs. Supported flash drives and file types Flash drive • Lexar JumpDrive 2.
Printing 84 Printing on specialty media Tips on using letterhead • • • • Use letterhead designed specifically for laser/LED printers. Print samples on the letterhead being considered for use before buying large quantities. Before loading letterhead, flex the sheets to prevent them from sticking together. Page orientation is important when printing on letterhead. Source Print side Paper orientation Standard and optional trays (simplex printing) Preprinted letterhead design is placed faceup.
Printing 85 Tips on using envelopes Print samples on the envelopes being considered for use before buying large quantities. • Use envelopes designed specifically for laser/LED printers. Check with the manufacturer or vendor to ensure that the envelopes can withstand temperatures up to 220°C (446°F) without sealing, wrinkling, curling excessively, or releasing hazardous emissions. • For best performance, use envelopes made from 90 g/m2 (24 lb bond) paper or 25% cotton.
Printing 86 • Use full label sheets. Partial sheets may cause labels to peel off during printing, resulting in a jam. Partial sheets also contaminate the printer and the cartridge with adhesive, and could void the printer and cartridge warranties. • Do not use labels with exposed adhesive. • Do not print within 1 mm (0.04 in.) of the edge of the label, of the perforations, or between die‑cuts of the label. • Be sure adhesive backing does not reach to the sheet edge.
Printing 87 Print job type Description Confidential Confidential lets you hold print jobs in the computer until you enter the PIN from the control panel. Note: The PIN is set from the computer. It must be four digits, using the numbers 0–9. Verify Verify lets you print one copy of a print job while the printer holds the remaining copies. It allows you to examine if the first copy is satisfactory. The print job is automatically deleted from the printer memory once all copies are printed.
Printing 88 5 From the printer home screen, release the print job. • For confidential print jobs, navigate to: Held jobs > your user name > Confidential Jobs > enter PIN > select print job > specify number of copies > Print • For other print jobs, navigate to: Held jobs > your user name > select print job > specify number of copies > Print Printing information pages Printing a font sample list 1 From the home screen, navigate to: > Reports > Print Fonts 2 Touch PCL Fonts or PostScript Fonts.
Printing In Windows 7 or earlier a Click or click Start, and then click Run. b In the Start Search or Run dialog, type control printers. c Press Enter, or click OK. 2 Double‑click the printer icon. 3 Select the print job you want to cancel. 4 Click Delete.
Understanding the printer menus 90 Understanding the printer menus Menus list Supplies Menu Paper Menu Reports Settings Cyan Cartridge Default Source Menu Settings Page General Settings Magenta Cartridge Paper Size/Type Device Statistics Flash Drive Menu Yellow Cartridge Black Cartridge Configure MP Substitute Size Network Setup Page Network [x] Setup Page Print Settings Cyan Photoconductor Unit Paper Texture Magenta Photoconductor Unit Paper Loading Profiles List Print Fonts Yellow Pho
Understanding the printer menus 91 Supplies menu Menu item Description Cyan Cartridge Early Warning Low Invalid Replace Missing or Defective OK Unsupported Shows the status of the cyan print cartridge Magenta Cartridge Early Warning Low Invalid Replace Missing or Defective OK Unsupported Shows the status of the magenta print cartridge Yellow Cartridge Early Warning Low Invalid Replace Missing or Defective OK Unsupported Shows the status of the yellow print cartridge Black Cartridge Early Warning L
Understanding the printer menus 92 Menu item Description Magenta Photoconductor Unit Early Warning Low Replace Missing OK Shows the status of the magenta photoconductor unit Yellow Photoconductor Unit Early Warning Low Replace Missing OK Shows the status of the yellow photoconductor unit Black Photoconductor Unit Early Warning Low Replace Missing OK Shows the status of the black photoconductor unit Waste Toner Bottle Near Full Replace Missing OK Shows the status of the waste toner bottle Staples
Understanding the printer menus 93 Menu item Description 480K Maintenance Kit Near End of Life End of Life OK Shows the status of the maintenance kit Paper menu Default Source menu Menu item Description Default Source Tray [x] MP Feeder Manual Paper Manual Envelope Sets a default paper source for all print jobs Notes: • Tray 1 (standard tray) is the factory default setting. • From the Paper menu, Configure MP feeder must be set to Cassette for MP feeder to appear as a menu setting.
Understanding the printer menus 94 Menu item Description Tray [x] Type Plain Paper Card Stock Transparency Recycled Glossy Heavy Glossy Labels Bond Letterhead Preprinted Colored Paper Light Paper Heavy Paper Rough/Cotton Paper Custom Type [x] Specifies the paper type loaded in each tray MP Feeder Size Letter Legal Executive JIS‑B4 A3 11 x 17 12 x 18 Oficio (México) Folio Statement Universal 7 3/4 Envelope 10 Envelope DL Envelope C5 Envelope Other Envelope A4 A5 A6 JIS B5 SRA3 Specifies the paper size lo
Understanding the printer menus 95 Menu item Description MP Feeder Type Custom Type [x] Plain Paper Card Stock Transparency Recycled Glossy Heavy Glossy Labels Bond Envelope Rough Envelope Letterhead Preprinted Colored Paper Light Paper Heavy Paper Rough/Cotton Paper Specifies the paper type loaded in the multipurpose feeder Manual Paper Size Letter Legal Executive JIS‑B4 A3 11 x 17 12 x 18 Oficio (México) Folio Statement Universal A4 A5 A6 JIS B5 SRA3 Specifies the paper size being manually loaded Not
Understanding the printer menus 96 Menu item Description Manual Paper Type Plain Paper Card Stock Transparency Recycled Glossy Heavy Glossy Labels Bond Letterhead Preprinted Colored Paper Light Paper Heavy Paper Rough/Cotton Paper Custom Type [x] Specifies the paper type being manually loaded Manual Envelope Size 10 Envelope DL Envelope C5 Envelope Other Envelope 7 3/4 Envelope Specifies the envelope size being manually loaded Manual Envelope Type Envelope Rough Envelope Custom Type [x] Specifies the
Understanding the printer menus 97 Substitute Size menu Menu item Description Substitute Size All Listed Off Statement/A5 Letter/A4 11 x 17/A3 Substitutes a specified paper size if the requested paper size is not available Notes: • All Listed is the factory default setting. All available substitutions are allowed. • Off indicates that no size substitutions are allowed. • Setting a size substitution lets the print job continue without a Change Paper message appearing.
Understanding the printer menus 98 Menu item Description Labels Texture Normal Rough Smooth Specifies the relative texture of the labels loaded Bond Texture Rough Smooth Normal Specifies the relative texture of the bond paper loaded Envelope Texture Normal Rough Smooth Specifies the relative texture of the envelopes loaded Rough Envelope Texture Rough Specifies the relative texture of the envelopes loaded Letterhead Texture Normal Rough Smooth Specifies the relative texture of the letterhead loaded
Understanding the printer menus 99 Paper Loading menu Use To Card Stock Loading Duplex Off Determine and set two-sided printing for all print jobs with Card Stock as the paper type. Recycled Loading Duplex Off Determine and set two-sided printing for all print jobs with Recycled as the paper type. Glossy Loading Duplex Off Determine and set two-sided printing for all print jobs with Glossy as the paper type.
Understanding the printer menus 100 Use To Custom [x] Loading Duplex Off Determine and set two-sided printing for all print jobs with Custom [x] as the paper type. Note: Custom [x] Loading is available only when the custom type is supported. Notes: • Off is the factory default setting for all Paper Loading menu selections.
Understanding the printer menus 101 Universal Setup menu Use To Units of Measure Inches Millimeters Specify the unit of measure. Portrait Width 3–48 inches 76–1219 mm Set the portrait width. Note: Inches is the U.S. factory default setting. Millimeters is the international factory default setting. Notes: • 11.00 inches is the U.S. factory default setting. 297.4 mm is the international factory default setting. • If the width exceeds the maximum, then the printer uses the maximum width allowed.
Understanding the printer menus 102 Menu item Description Assign Type/Bin Plain Paper Bin Card Stock Bin Transparency Bin Recycled Bin Glossy Bin Heavy Glossy Bin Labels Bin Bond Bin Envelope Bin Rough Envelope Bin Letterhead Bin Preprinted Bin Colored Bin Light Paper Bin Heavy Paper Bin Rough/Cotton Bin Custom [x] Bin Selects an output bin for each supported paper type Available selections for each type are: Disabled Standard Bin Bin [x] Note: Disabled is the factory default setting.
Understanding the printer menus 103 Use To Print Demo Demo Page Print demo files that are available in the firmware, the flash option, and the disk option. Network/Ports menu Active NIC menu Menu item Description Active NIC Auto [list of available network cards] Notes: • Auto is the factory default setting. • This menu item appears only if an optional network card is installed. Standard Network or Network [x] menus Note: Only active ports appear in this menu; all inactive ports are omitted.
Understanding the printer menus Menu item 104 Description Network Buffer Sets the size of the network input buffer Auto Notes: 3KB to [maximum size allowed] • Auto is the factory default setting. • The value can be changed in 1‑KB increments. • The maximum size allowed depends on the amount of memory in the printer, the size of the other link buffers, and whether Resource Save is set to On or Off.
Understanding the printer menus 105 Network Reports menu This menu is available from the Network/Ports menu: Network/Ports > Standard Network or Network [x] > Standard Network Setup or Network [x] Setup > Reports or Network Reports Menu item Description Print Setup Page Prints a report containing information about the network printer settings, such as the TCP/IP address Network Card menu This menu is available from the Network/Ports menu: Network/Ports > Standard Network or Network [x] > Standard Netwo
Understanding the printer menus 106 Menu item Description IP Address Lets you view or change the current TCP/IP address Note: Manually setting the IP address sets the Enable DHCP and Enable Auto IP settings to Off. It also sets Enable BOOTP and Enable RARP to Off on systems that support BOOTP and RARP.
Understanding the printer menus 107 Menu item Description Auto Configuration On Off Specifies whether the network adapter accepts the automatic IPv6 address configuration entries provided by a router Set Hostname Lets you set the printer host name View Address Shows the printer IPv6 address Note: On is the factory default setting. Note: The IPv6 address can be changed only from the Embedded Web Server.
Understanding the printer menus 108 Menu item Description Compatibility 802.11b/g 802.11b/g/n Specifies the wireless standard for the wireless network Choose Network [list of available networks] Lets you select an available network for the printer to use View Signal Quality Lets you view the quality of the wireless connection View Security Mode Lets you view the encryption method that a wireless network uses Note: The 802.11b/g/n is the factory default setting.
Understanding the printer menus 109 Standard USB menu Menu item Description PCL SmartSwitch On Off Sets the printer to automatically switch to PCL emulation when a print job received through a USB port requires it, regardless of the default printer language Notes: • On is the factory default setting. • When set to Off, the printer does not examine incoming data. The printer uses PostScript emulation if the PS SmartSwitch is set to On.
Understanding the printer menus 110 Menu item Description Job Buffering Off On Auto Temporarily stores print jobs on the printer hard disk before printing Notes: • Off is the factory default setting. • On buffers jobs on the printer hard disk. • Auto buffers print jobs only if the printer is busy processing data from another input port. • Changing this setting from the printer control panel and then exiting the menus causes the printer to restart. The menu selection is then updated.
Understanding the printer menus 111 Menu item Description PS SmartSwitch On Off Sets the printer to automatically switch to PS emulation when a print job received through a serial port requires it, regardless of the default printer language Notes: • On is the factory default setting. • When set to Off, the printer does not examine incoming data. The printer uses PCL emulation if PCL SmartSwitch is set to On.
Understanding the printer menus 112 Menu item Description Protocol Fastbytes Standard Specifies the parallel port protocol Notes: • Fastbytes is the factory default setting. It provides compatibility with most existing parallel ports and is the recommended setting. • Standard tries to resolve parallel port communication problems. Honor Init Off On Determines if the printer honors printer hardware initialization requests from the computer Notes: • Off is the factory default setting.
Understanding the printer menus 113 Serial [x] menu Menu item Description PCL SmartSwitch On Off Sets the printer to automatically switch to PCL emulation when a print job received through a serial port requires it, regardless of the default printer language Notes: • On is the factory default setting. • When set to Off, the printer does not examine incoming data. The printer uses PostScript emulation if PS SmartSwitch is set to On.
Understanding the printer menus 114 Menu item Description Job Buffering Off On Auto Temporarily stores print jobs on the printer hard disk before printing Notes: • Off is the factory default setting. The printer does not buffer print jobs on the printer hard disk. • On buffers print jobs on the printer hard disk. • Auto buffers print jobs only if the printer is busy processing data from another input port.
Understanding the printer menus 115 Menu item Description Honor DSR Off On Determines whether the printer uses the DSR Signal Notes: • Off is the factory default setting. • DSR is a handshaking signal used by most serial cables. The serial port uses DSR to distinguish data sent by the computer from data created by electrical noise in the serial cable. The electrical noise can cause stray characters to print. Set this to On to prevent stray characters from printing.
Understanding the printer menus 116 Menu item Description Device‑Initiated E‑mail None Use Device SMTP Credentials Specifies what credentials will be used when communicating to the SMTP server. Some SMTP servers require credentials to send an email. Notes: User‑Initiated E‑mail None • None is the factory default setting for Device and User‑Initiated E‑mail.
Understanding the printer menus Use 117 To Security Reset Jumper Adjust the security settings. Access controls=”No Security” Notes: No Effect • “Access controls=’No Security’” retains all the security information that Reset factory security defaults the user has defined. “No Security" is the factory default setting. • “No Effect” means the reset has no effect on the printer security configuration.
Understanding the printer menus 118 Menu item Description Repeat Job Expiration Off 1 hour 4 hours 24 hours 1 week Sets a time limit on how long the printer stores print jobs Verify Job Expiration Off 1 hour 4 hours 24 hours 1 week Sets a time limit on how long the printer stores print jobs needing verification Reserve Job Expiration Off 1 hour 4 hours 24 hours 1 week Sets a time limit on how long the printer stores print jobs for printing at a later time Note: Off is the factory default setting.
Understanding the printer menus 119 Use To Scheduled Method Single pass Multi‑pass Specify a method for a scheduled disk wiping. Note: Single pass is the factory default setting. Security Audit Log menu Menu item Description Export Log Enables an authorized user to export the audit log Notes: • To export the audit log from the printer control panel, a flash drive must be attached to the printer. • From the Embedded Web Server, the audit log can be downloaded to a computer.
Understanding the printer menus 120 Menu item Description Enable NTP On Off Enables Network Time Protocol, which synchronizes the clocks of devices on a network Notes: • On is the factory default setting. • The setting is turned off if you manually set the date and time.
Understanding the printer menus 121 Use To Quiet Mode Off On Minimize the printer noise. Run Initial setup Yes No Run the setup wizard. Keyboard Keyboard Type English Francais Francais Canadien Deutsch Italiano Espanol Greek Dansk Norsk Nederlands Svenska Suomi Portugues Russian Polski Swiss German Swiss French Korean Magyar Turkish Czech Simplified Chinese Traditional Chinese Japanese Custom Key [x] Specify a language and custom key information for the display keyboard. Paper Sizes U.S.
Understanding the printer menus 122 Use To Displayed Information Left side Right side Custom Text [x] Specify what is displayed on the upper corners of the home screen. For Left side and Right side, select from the following options: None IP Address Hostname Contact Name Location Date/Time mDNS/DDNS Service Name Zero Configuration Name Custom Text [x] Model Name Notes: • IP Address is the factory default setting for Left side. • Date/Time is the factory default setting for Right side.
Understanding the printer menus 123 Use To Displayed Information (continued) Paper Jam Load Paper Service Errors Customize the displayed information for certain menus. Select from the following options: When to Display Do not display Alternate Message to display Default Alternate Default [text entry] Alternate [text entry] Notes: • Do not display is the factory default setting for Display. • Default is the factory default setting for Message to display.
Understanding the printer menus 124 Use To Audio Feedback Button Feedback On Off Volume 1–10 Specify the audio volume for the buttons. Tactile Touchscreen Feedback On Off Enable touch‑screen sensation feedback. Web Page Refresh Rate 30–300 Specify the number of seconds between Embedded Web Server refreshes. Notes: • On is the factory default setting for Button Feedback. • 3 is the factory default setting for Volume. Note: On is the factory default setting.
Understanding the printer menus 125 Use To Timeouts Hibernate Timeout Disabled 20 minutes 1–3 hours 6 hours 1–3 days 1–2 weeks 1 month Set the amount of time the printer waits before it enters Hibernate mode. Hibernate Timeout on Connection Hibernate Do Not Hibernate Set the printer to Hibernate mode even if there is an active Ethernet connection. Timeouts Screen Timeout 15–300 Set the amount of time in seconds before returning the control panel to a Ready state.
Understanding the printer menus 126 Use To Print Recovery Auto Continue Disabled 5–255 Let the printer automatically continue printing from certain offline situations when these are not resolved within the specified time period. Print Recovery Jam Recovery On Off Auto Specify whether the printer reprints jammed pages. Note: Disabled is the factory default setting. Notes: • Auto is the factory default setting.
Understanding the printer menus 127 Print Settings Finishing menu Menu item Description Sides (Duplex) 1 sided 2 sided Specifies whether duplex (2‑sided) printing is set as the default setting for all print jobs Notes: • 1 sided is the factory default setting. • You can set 2‑sided printing from the software program. For Windows users, click File > Print, and then click Properties, Preferences, Options, or Setup.
Understanding the printer menus 128 Menu item Description Separator Source Tray [x] Manual Feeder Specifies the paper source for separator sheets Notes: • Tray 1 (standard tray) is the factory default setting. • From the Paper menu, Configure MP must be set to Cassette for Manual Feeder to appear as a menu setting.
Understanding the printer menus 129 Menu item Description Offset Pages None Between Copies Between Jobs Offsets pages at certain instances Notes: • None is the factory default setting. • Between Copies offsets each copy of a print job if Collate is set to On. If Collate is set to Off, each set of printed pages are offset, such as all page 1's and all page 2's. • Between Jobs sets the same offset position for the entire print job regardless of the number of copies printed.
Understanding the printer menus 130 Use To Color Balance Cyan ‑5 to 5 Magenta ‑5 to 5 Yellow ‑5 to 5 Black ‑5 to 5 Reset Defaults Enable an equal balance of colors in the output. Color Samples sRGB Display sRGB Vivid Display—True Black Vivid Off—RGB US CMYK Euro CMYK Vivid CMYK Off—CMYK Print sample pages for each of the RGB and CMYK color conversion tables used in the printer. Manual Color RGB Image RGB Text RGB Graphics Customize the RGB color conversions. Note: 0 is the factory default setting.
Understanding the printer menus 131 Job Accounting menu Note: This menu item appears only if a formatted, non-defective printer hard disk is installed. The printer hard disk cannot be read/write‑ or write‑protected. Menu item Description Job Accounting Log Off On Determines if the printer creates a log of the print jobs it receives Note: Off is the factory default setting.
Understanding the printer menus 132 Menu item Description E‑mail Address to Send Logs Specifies the e‑mail address to which the device sends job accounting logs Log File Prefix Note: The current host name defined in the TCP/IP menu is used as the default log file prefix. Setup menu Menu item Description Printer Language PS Emulation PCL Emulation Sets the default printer language Notes: • PS Emulation is the factory default printer language.
Understanding the printer menus 133 Menu item Description Black Only Mode Off On Sets the printer to print text and graphics using only the black toner cartridge Download Target RAM Flash Disk Sets the storage location for downloads Note: Off is the factory default setting. Notes: • RAM is the factory default setting. Downloads stored in RAM are temporary. • Storing downloads in flash memory or on a printer hard disk places them in permanent storage.
Understanding the printer menus 134 Menu item Description Font Priority Resident Flash/Disk Establishes the font search order Notes: • Resident is the factory default setting. • This menu item is available only if a formatted flash memory option card or printer hard disk is installed and operating properly. • Make sure the flash memory option or printer hard disk is not read/write‑, write‑, or password‑protected. • Job Buffer Size must not be set to 100%.
Understanding the printer menus 135 Menu item Description PCL Emulation Settings Point Size 1.00–1008.00 Changes the point size for scalable typographic fonts Notes: • 12 is the factory default setting. • Point Size refers to the height of the characters in the font. One point equals approximately 1/72 of an inch. • Point sizes can be increased or decreased in 0.25‑point increments. PCL Emulation Settings Pitch 0.
Understanding the printer menus 136 Menu item Description Tray Renumber Assign MP Feeder Off None 0–199 Assign Tray [x] Off None 0–199 Assign Manual Paper Off None 0–199 Assign Manual Env Off None 0–199 Configures the printer to work with printer software or programs that use different source assignments for trays, drawers, and feeders Notes: • Off is the factory default setting. • None ignores the Select Paper Feed command.
Understanding the printer menus 137 PDF menu Menu item Description Scale to Fit No Yes Scales page content to fit the selected paper size Annotations Do Not Print Print Prints annotations in a PDF Note: No is the factory default setting. Note: Do Not Print is the factory default setting.
Understanding the printer menus 138 Menu item Description Scale 1–400% Scales the default font for HTML documents Notes: • 100% is the factory default setting. • Scaling can be increased in 1% increments. Orientation Portrait Landscape Sets the page orientation for HTML documents Margin Size 8–255 mm Sets the page margin for HTML documents Note: Portrait is the factory default setting. Notes: • 19 mm is the factory default setting. • Margin size can be increased in 1‑mm increments.
Understanding the printer menus 139 Flash Drive menu Use To Copies 1–999 Specify a default number of copies for each print job. Paper Source Tray [x] Manual Paper Manual Envelope Set a default paper source for all print jobs. Color Color Black Only Specify whether to print the document in color. Collate Off (1,1,12,2,2) On (1,2,1,2,1,2) Stack the pages of a print job in sequence when printing multiple copies. Sides (Duplex) 1 sided 2 sided Enable two‑sided printing for incoming print jobs.
Understanding the printer menus 140 Use To Paper Saver Ordering Horizontal Reverse Horizontal Reverse Vertical Vertical Specify the positioning of multiple‑page images. Separator Sheets Off Between Copies Between Jobs Between Pages Specify whether to insert blank separator sheets. Separator Sheet Source Tray [x] Specify the paper source for separator sheets. Blank Pages Do Not Print Print Specify whether to insert blank pages in a print job. Notes: • Horizontal is the factory default setting.
Securing the hard disk and other installed memory 141 Securing the hard disk and other installed memory Statement of Volatility Your printer contains various types of memory that are capable of storing device and network settings, information from embedded solutions, and user data. The types of memory—along with the types of data stored by each—are described below. • Volatile memory—Your device utilizes standard Random Access Memory (RAM) to temporarily buffer user data during simple print and copy jobs.
Securing the hard disk and other installed memory 142 Erasing volatile memory The volatile memory (RAM) installed on your printer requires a power source to retain information. To erase the buffered data, simply power down the device. Erasing non‑volatile memory • Individual settings, device and network settings, security settings, and embedded solutions—Erase information and settings by selecting Wipe All Settings in the Configuration menu.
Securing the hard disk and other installed memory 143 Notes: • A status bar will indicate the progress of the disk wiping task. • Disk wiping can take from several minutes to more than an hour, during which the printer will be unavailable for other user tasks. 5 Touch Back > Exit Config Menu. The printer will perform a power‑on reset, and then return to normal operating mode. Configuring printer hard disk encryption Note: Your printer may not have a hard disk installed.
Securing the hard disk and other installed memory 144 • Disk encryption can take from several minutes to more than an hour, during which the printer will be unavailable for other user tasks. 5 Touch Back, and then Exit Config Menu. The printer will power‑on reset, and then return to normal operating mode.
Maintaining the printer 145 Maintaining the printer Periodically, certain tasks are required to maintain optimum performance of your printer. Cleaning the exterior of the printer 1 Make sure that the printer is turned off and unplugged from the wall outlet. CAUTION—SHOCK HAZARD: To avoid the risk of electric shock when cleaning the exterior of the printer, unplug the power cord from the wall outlet and disconnect all cables to the printer before proceeding. 2 Remove paper from the standard exit bin.
Maintaining the printer 2 Slide the release lever to the left to unlock the cover. 3 Open the cover. Warning—Potential Damage: To avoid overexposing the photoconductor unit, do not leave the cover open for more than 10 minutes.
Maintaining the printer 147 4 Locate the printhead wipers. 5 Gently pull the printhead wipers out until it stops, and then slowly slide them back into place.
Maintaining the printer 6 Close the cover. 7 Slide the release lever to the right to lock the cover.
Maintaining the printer 8 Close the front door. Emptying the hole punch box 1 Open door G.
Maintaining the printer 2 Pull out the hole punch box. 3 Empty the container.
Maintaining the printer 151 4 Insert the emptied hole punch box back into the finisher until it stops. 5 Close door G. Storing supplies Choose a cool, clean storage area for the printer supplies. Store supplies right side up in their original packing until you are ready to use them.
Maintaining the printer 152 1 Open a Web browser, and then type the printer IP address in the address field. Note: View the printer IP address on the printer control panel home screen. The IP address appears as four sets of numbers separated by periods, such as 123.123.123.123. 2 Click Device Status. Ordering parts and supplies To order parts and supplies in the U.S., contact Lexmark at 1-800-539-6275 for information about Lexmark authorized supplies dealers in your area.
Maintaining the printer 153 Part name Part number CMY (Cyan, Magenta, Yellow) Photoconductor Kit C950X73G Note: CMY photoconductor units may reach end of life all at the same time. Ordering a waste toner bottle When 82.xx Waste toner bottle nearly full appears, order a replacement waste toner bottle. When 82.xx Replace waste toner bottle appears, replace the waste toner bottle. Note: Waste toner bottle reuse is not recommended.
Maintaining the printer 154 Replacing parts and supplies Replacing a maintenance kit 1 Replace the maintenance kit. 2 Reset the maintenance count to zero to clear the 80 scheduled maintenance [x] message. Note: For more information on replacing the maintenance kit and resetting the maintenance count, see the instruction sheets that came with the maintenance kit. Replacing a photoconductor unit 1 Open the front door. 2 Rotate the release lever counterclockwise to open the cover.
Maintaining the printer 3 Lower the cover. Warning—Potential Damage: To avoid overexposing the photoconductor unit, do not leave the door open for more than 10 minutes. 4 Grasp the handle of the photoconductor unit and pull it out of the machine. 5 Unpack the replacement photoconductor unit.
Maintaining the printer 6 Align and insert the end of photoconductor unit. 7 Remove the tape from the top of the photoconductor unit.
Maintaining the printer 8 Push the tab forward to insert the photoconductor unit.
Maintaining the printer 158 10 Gently pull the printhead wipers out until it stops, and then slowly slide them back into place. 3x 11 Close the cover.
Maintaining the printer 12 Rotate the release lever clockwise to lock the cover. 13 Close the front door. Replacing a toner cartridge 1 Open the front door.
Maintaining the printer 2 Put your hand under the dent of the toner cartridge, and then slightly lift up the cartridge. 3 Pull out the toner cartridge.
Maintaining the printer 161 4 Unpack the replacement toner cartridge, and then shake it front‑to‑back and side‑to‑side to evenly distribute the toner. 5 Remove the red packing strip from the new cartridge. 6 Insert the new cartridge into the printer. 7 Close the front door.
Maintaining the printer Replacing the waste toner bottle 1 Turn the printer off. 2 Open the front door. 3 Remove the used waste toner bottle. 4 Unpack the new waste toner bottle.
Maintaining the printer 5 Insert the new waste toner bottle into the printer until it clicks into place. 6 Rotate the release lever counterclockwise to open the cover.
Maintaining the printer 164 7 Lower the cover. 8 Slide out the printhead wipers.
Maintaining the printer 9 Slide the printhead wipers back into place. 10 Close the cover.
Maintaining the printer 11 Rotate the release lever clockwise to lock the cover. 12 Close the front door. 13 Turn the printer back on.
Maintaining the printer Replacing a staple cartridge Note: A message on the printer display indicates which staple cartridge needs to be replaced. Replacing staple cartridge in the standard stapler unit 1 Open door G. 2 Grasp the handle of the staple cartridge holder, and then pull out the holder to the right. 3 Pull the staple cartridge out of the finisher. Note: Use just a slight force when removing the staple cartridge.
Maintaining the printer 168 4 Squeeze both sides of the empty staple case with your fingers, and then remove the staple case from the cartridge. 2 1 1 5 Insert the front side of the new staple case into the staple cartridge, and then push the rear side into the cartridge.
Maintaining the printer 6 Push the staple cartridge into the finisher until it clicks into place. 7 Close door G. Replacing staple cartridge in the booklet stapler unit Note: This task is applicable only when a booklet finisher is installed. 1 Open door G.
Maintaining the printer 170 2 Press the handles of the staple cartridge to the right, and then take the staple cartridge unit out of the finisher.
Maintaining the printer 3 Hold the tabs on both sides of the staple cartridge.
Maintaining the printer 4 Rotate the booklet staple cartridge at an angle.
Maintaining the printer 173 5 Lift the booklet staple cartridge out of the unit. 6 Squeeze both sides of the empty staple case with your fingers, and then remove the staple case from the cartridge.
Maintaining the printer 174 7 Insert the front side of the new staple case into the staple cartridge, and then push the rear side into the cartridge. 2 1 8 Return the cartridge to its original position, and then gently push the cartridge in until it clicks into place.
Maintaining the printer 175 9 Return the unit to its original position. 10 Close door G. Moving the printer Before moving the printer CAUTION—POTENTIAL INJURY: The printer weight is greater than 18 kg (40 lb) and requires two or more trained personnel to lift it safely. CAUTION—POTENTIAL INJURY: Before moving the printer, follow these guidelines to avoid personal injury or printer damage: • Turn the printer off using the power switch, and then unplug the power cord from the wall outlet.
Maintaining the printer Shipping the printer When shipping the printer, use the original packaging or call the place of purchase for a relocation kit.
Administrative support 177 Administrative support Finding advanced networking and administrator information This chapter covers basic administrative support tasks using the Embedded Web Server. For more advanced system support tasks, see the Networking Guide on the Software and Documentation CD or the Embedded Web Server — Security: Administrator's Guide on the Lexmark support Web site at http://support.lexmark.com. Checking the virtual display 1 Open an Embedded Web Server associated with your printer.
Administrative support 178 If you do not know the IP address of the printer, you can: • View the IP address on the printer control panel in the TCP/IP section under the Networks/Ports menu. • Print a network setup page or the menu settings pages and locate the IP address in the TCP/IP section. 2 Click Settings. 3 Under Other Settings, click E‑mail Alert Setup. 4 Select the items for notification, and type the e‑mail addresses. 5 Click Submit.
Clearing jams 179 Clearing jams Carefully select paper and specialty media and load it properly to avoid most jams. If jams occur, follow the steps outlined in this chapter. Note: Jam Recovery is set to Auto by default. The printer reprints jammed pages unless the memory required to hold the pages is needed for other printer tasks. Avoiding jams Paper tray recommendations • • • • • Make sure the paper lies flat in the tray. Do not remove a tray while the printer is printing.
Clearing jams 180 1 2 3 13 12 11 10 4 5 9 6 7 8 Area Area name Jam numbers What to do 1 Cover F 281 4yy.xx Open cover F, and then remove the jammed paper. 2 Door G 455 Open door G, and then remove the jammed paper. 3 Door H 4 Standard exit bin 4yy.xx For staple jams, remove the staple cartridge, and then clear the staple jam. 4yy.xx Open door H, and then remove the jammed paper. 201–202 203 Remove all paper from the standard exit bin, and then remove the jammed paper.
Clearing jams Area Area name 181 Jam numbers What to do 10 Multipurpose feeder 250 Remove all paper from the multipurpose feeder, and then remove the jammed paper. 11 Door B 230 Open door B, and then remove the jammed paper. 12 Door A 201–202 Open door A, and then remove the jammed paper. 231 281 13 Door D 203 Open door A, and then door D, and then remove the jammed paper.
Clearing jams 182 Paper jam in the fuser 1 Open door A by lifting the release latch and lowering the door. CAUTION—HOT SURFACE: The inside of the printer might be hot. To reduce the risk of injury from a hot component, allow the surface to cool before touching. 2 Lift the green lever. 2 1 3 Firmly grasp the jammed paper on each side, and then gently pull it out. Warning—Potential Damage: Do not touch the center of the fuser unit. Doing so will damage the fuser.
Clearing jams 183 Note: Make sure all paper fragments are removed. 1 Open door A, and then door D by lifting the release latch of each door and lowering the doors. CAUTION—HOT SURFACE: The inside of the printer might be hot. To reduce the risk of injury from a hot component, allow the surface to cool before touching. 2 Firmly grasp the jammed paper on each side, and then gently pull it out. Note: Make sure all paper fragments are removed. 3 Close door D, and then close door A.
Clearing jams 184 230 paper jam 1 Lower the multipurpose feeder, and then open door B. 1 2 2 Firmly grasp the jammed paper on each side, and then gently pull it out. Note: Make sure all paper fragments are removed. 3 Close door B. 4 If necessary, touch Continue from the printer control panel. 231 paper jam 1 Open door A by lifting the release latch, and then lowering the door. CAUTION—HOT SURFACE: The inside of the printer might be hot.
Clearing jams 185 1 2 2 Lift the green lever. 2 1 3 Firmly grasp the jammed paper on each side, and then gently pull it out. Note: Make sure all paper fragments are removed. 4 Push the green lever back into place.
Clearing jams 5 Close door A. 6 If necessary, touch Continue from the printer control panel. 24x paper jam Note: Make sure all paper fragments are removed when pulling out any jammed paper. Paper jam in Tray 1 1 Open Tray 1.
Clearing jams 2 Firmly grasp the jammed paper on each side, and then gently pull it out. 3 Close Tray 1. 4 If necessary, touch Continue, jam cleared from the printer control panel. Paper jam in one of the optional trays (Trays 2–4) 1 Check door C, and then firmly grasp the jammed paper and then pull it out. 2 Open the specified tray.
Clearing jams 188 3 Firmly grasp the jammed paper on each side, and then gently pull it out. 4 Close the tray. 5 If necessary, touch Continue, jam cleared from the printer control panel. Paper jam in Tray 5 (high‑capacity feeder) Paper jam inside the tray 1 Pull out the tray until it stops. Warning—Potential Damage: Do not pull out the tray with too much force. Doing so may hit and injure your knees.
Clearing jams 2 Firmly grasp the jammed paper on each side, and then gently pull it out. 3 Push the tray gently until it stops. 4 If necessary, touch Continue, jam cleared from the printer control panel. Paper jam in the tray exit 1 Gently move the tray to the left until it stops. 2 Firmly grasp the jammed paper on each side, and then gently pull it out.
Clearing jams 190 3 Gently put the tray back into position. 4 If necessary, touch Continue, jam cleared from the printer control panel. Paper jam in the top cover 1 Gently move the tray to the left until it stops. 2 Open the top cover.
Clearing jams 3 Firmly grasp the jammed paper on each side, and then gently pull it out. 4 Close the top cover. 5 Gently put the tray back into position. 6 If necessary, touch Continue, jam cleared from the printer control panel.
Clearing jams 192 250 paper jam 1 Remove any jammed pages from the multipurpose feeder. 2 Load paper into the multipurpose feeder. 3 If necessary, touch Continue, jam cleared from the printer control panel. 281 paper jam Paper jam in door A 1 Open door A. CAUTION—HOT SURFACE: The inside of the printer might be hot. To reduce the risk of injury from a hot component, allow the surface to cool before touching.
Clearing jams 193 1 Remove the thumbscrew from each side of the fuser unit by rotating them counterclockwise. 2 Lift the handles on each side of the fuser, and then pull to remove the fuser unit. 1 1 2 3 Lift the green lever, firmly grasp the paper on each side, and then gently pull it out. Notes: • Make sure all paper fragments are removed. • If the paper is in the fuser, then lower the fuser nip release lever and switch it to envelope mode.
Clearing jams 194 Paper jam in cover F (paper transport) 1 Open cover F. 2 Firmly grasp the jammed paper on each side, and then gently pull it out. Note: Make sure all paper fragments are removed. Note: If the paper jam on the right is difficult to remove, then rotate the knob counterclockwise. 3 Close cover F. 4 If necessary, touch Continue from the printer control panel. 4yy.
Clearing jams 1 Standard finisher bin 2 Finisher bin 1 3 Finisher bin 2 Note: Finisher bin 2 is available only when a booklet finisher is installed. Note: Make sure all paper fragments are removed. Paper jam in door H 1 Open door H. Note: Door H is located between the finisher exit bins. 2 Firmly grasp the jammed paper on each side, and then gently pull it out. Note: Make sure all paper fragments are removed.
Clearing jams 196 3 Close door H. 4 If necessary, touch Continue from the printer control panel. Paper jam in door G 1 Open door G. 1 2 3 4 5 6 7 Area Cover, knob, or handle name 1 Cover G1 2 Cover G2 3 Knob G3 4 Cover G4 5 Cover G7 6 Knob G8 7 Handle G9 2 Lift cover G1 lever.
Clearing jams 197 3 Firmly grasp any jammed paper, and then gently pull it out. Note: Make sure to remove all paper fragments after gently pulling out any jammed paper inside door G. 4 Move cover G2 to the right, and then remove any jammed paper. Note: If the paper is jammed in the rollers, then rotate knob G3 counterclockwise. 5 Move cover G4 down, and then remove any jammed paper. 6 Move cover G7 to the left, and then remove any jammed paper. 7 Pull handle G9 until the tray is completely open.
Clearing jams Paper jam in cover F (paper transport) 1 Open cover F. 2 Firmly grasp the jammed paper on each side, and then gently pull it out. Note: Make sure all paper fragments are removed. Note: If the paper jam on the right is difficult to remove, then rotate the knob counterclockwise. 3 Close cover F. 4 If necessary, touch Continue from the printer control panel. 455 staple jam 1 Open door G.
Clearing jams 199 2 Press the latch to open the stapler door. Note: The stapler door is located behind the finisher. 3 Lower the latch of the staple cartridge holder, and then pull the staple cartridge holder out of the printer. 4 Use the metal tab to lift the staple guard, and then remove any jammed or loose staples.
Clearing jams 200 5 Close the staple guard. 6 Press down on the staple guard until it clicks into place. 7 Push the staple cartridge holder firmly back into the stapler unit until the staple cartridge holder clicks into place. 8 Close the stapler door. 9 Close door G. 10 If necessary, touch Continue, jam cleared from the printer control panel.
Troubleshooting 201 Troubleshooting Solving basic printer problems If there are basic printer problems, or the printer is unresponsive, make sure: • • • • • • The power cord is plugged into the printer and a properly grounded electrical outlet. The electrical outlet is not turned off by any switch or breaker. The printer is not plugged into any surge protectors, uninterrupted power supplies, or extension cords. Other electronic equipment plugged into the outlet is working. The printer is turned on.
Troubleshooting 202 Change [paper source] to [custom type name] load [orientation] Try one or more of the following • Touch Use current [paper source] to ignore the message and print from the selected tray. • Load the correct paper size and type in the tray, verify the paper size and type settings are specified in the printer control panel Paper menu, and then touch Paper changed, continue. • Touch Cancel job to cancel the print job.
Troubleshooting 203 Check [src] orientation or guides Try one or more of the following: • Move the paper guides in the tray to the correct positions for the paper size loaded. • Make sure the paper size setting matches the paper loaded in the tray: 1 From the printer control panel Paper menu, check the Paper Size setting. 2 Before sending the print job, specify the correct size setting: – For Windows users, specify the paper size from Print Properties.
Troubleshooting 204 Insert the hole punch box Insert the hole punch box into the finisher, and then touch Continue to clear the message. Insert Tray [x] Insert the specified tray into the printer. Install bin [x] Try one or more of the following: • Install the specified bin: 1 Turn the printer off. 2 Unplug the power cord from the wall outlet. 3 Install the specified bin. 4 Connect the power cord to a properly grounded electrical outlet. 5 Turn the printer back on. • Cancel the print job.
Troubleshooting 205 • Cancel the print job. Load [src] with [type] [size] Try one or more of the following: • Load the specified paper in the tray or feeder. • Touch Paper loaded, continue to clear the message and continue printing. If the printer finds a tray that has the correct paper type and size, it feeds from that tray. If the printer cannot find a tray with the correct paper type and size, it feeds from the default paper source. • Cancel the print job.
Troubleshooting 206 • Touch Automatically select paper to use the paper loaded in the tray. • Cancel the print job. Manual feeder expects [paper size]. Check [paper source] guides Try one or more of the following: • Load the specified paper size in the manual feeder. • Physically adjust [paper source] guides to a recognized paper size. • Touch Continue to clear the message and continue printing. If the printer finds a tray that has the correct paper type and size, then it feeds from that tray.
Troubleshooting 207 Print quota exceeded. Print job incomplete. The print job did not complete because the print quota has been exceeded. Contact your system support person. Restore held jobs? Try one or more of the following: • Touch Restore to restore all held jobs stored on the printer hard disk. • Touch Do not restore if you do not want any print jobs to be restored. Remove packaging material, [area name] Remove any remaining packaging material from the specified location.
Troubleshooting 208 34 Incorrect paper size, check [paper source] Try one or more of the following: • Load the appropriate paper or specialty media in the proper tray. • Confirm that the wheel on Tray 1 is set to the paper size loaded in the tray. Make sure the paper size matches the document you are trying to print. • • • • Touch Continue to clear the message and print using a different tray. Check the tray length and width guides and make sure the paper is loaded properly in the tray.
Troubleshooting 209 37 Insufficient memory to collate job Try one or more of the following: • Touch Continue to print the portion of the job already stored and begin collating the rest of the print job. • Cancel the current print job. 37 Insufficient memory for Flash Memory Defragment operation Try one or more of the following: • Touch Continue to stop the defragment operation and continue printing. • Delete fonts, macros, and other data in printer memory. • Install additional printer memory.
Troubleshooting 210 53 Unformatted flash detected Try one or more of the following: • Touch Continue to stop the defragment operation and continue printing. • Format the flash memory. If the error message remains, the flash memory may be defective and require replacing. 54 Serial option [x] error Try one or more of the following: • Check that the serial cable is properly connected and is the correct one for the serial port.
Troubleshooting 211 56 Parallel port [x] disabled Try one or more of the following: • Touch Continue to clear the message. The printer discards any data received through the parallel port. • Make sure the Parallel Buffer menu item is not set to Disabled. 56 Serial port [x] disabled Try one or more of the following: • Touch Continue to clear the message. The printer discards any data received through the serial port. • Make sure the Serial Buffer menu is not set to Disabled.
Troubleshooting 212 Touch Continue to clear the message. 58 Too many disks installed 1 Turn the printer off. 2 Unplug the power cord from the wall outlet. 3 Remove the excess disks. 4 Connect the power cord to a properly grounded electrical outlet. 5 Turn the printer back on. 58 Too many flash options installed 1 Turn the printer off. 2 Unplug the power cord from the wall outlet. 3 Remove the excess flash memory. 4 Connect the power cord to a properly grounded outlet. 5 Turn the printer back on.
Troubleshooting 213 62 Disk full Try one or more of the following: • Touch Continue to clear the message and continue processing. • Delete fonts, macros, and other data stored on the printer hard disk. • Install a printer hard disk with larger capacity. 80 Scheduled maintenance [x] Contact customer support, and report the message. The printer is scheduled for maintenance.
Troubleshooting 214 84.xx [color] photoconductor low 1 Order a replacement photoconductor immediately. 2 When print quality is reduced, install the new photoconductor, following the instruction sheet that came with the replacement part. 3 Touch Continue to clear the message and continue printing. 84.xx [color] photoconductor missing Install the specified color photoconductor, following the instruction sheet that came with the replacement part. 84.
Troubleshooting 215 Solving printing problems Multiple‑language PDF files do not print The PDF files may contain unavailable fonts. 1 Open the document you want to print in Adobe Acrobat. 2 Click the printer icon > Advanced > Print as image > OK > OK. Printer control panel display is blank or displays only diamonds The printer self test failed. Turn the printer off, wait about 10 seconds, and then turn the printer back on.
Troubleshooting 216 Make sure the internal print server is working properly • Make sure the internal print server is properly installed and that the printer is connected to the network. • Print a network setup page and check that the status shows Connected. If the status is Not Connected, then check the network cables, and then try printing the network setup page again. Contact your system support person to make sure the network is functioning correctly.
Troubleshooting 217 > Settings > General Settings > Print Recovery > Page Protect > Off > Change the environmental settings When using Eco‑Mode or Quiet Mode settings, you may notice a reduction in performance. Job prints from the wrong tray or on the wrong paper Check the paper type and paper size settings Make sure the paper type setting matches the paper loaded in the tray: 1 From the printer control panel Paper menu, check the paper type and paper size settings.
Troubleshooting 218 Reduce the complexity of the print job Reduce the complexity of the print job by eliminating the number and size of fonts, the number and complexity of images, and the number of pages in the job. Make sure the printer has enough memory Add printer memory or an optional hard disk.
Troubleshooting 219 Contact customer support If you still cannot isolate the problem, then contact customer support. Forms and Favorites troubleshooting Forms are not available or are not working Make sure the bookmark pointing to the form is in the Bookmarks root folder If the bookmark pointing to the form was created in a subfolder of the Bookmarks folder, then it will not be available under the Forms solution. Delete the bookmark and recreate it under the Bookmarks root folder.
Troubleshooting 220 If you do not know the IP address or host name of the printer, then you can: • View the information on the printer control panel home screen, or in the TCP/IP section under the Networks/Ports menu. • Print a network setup page or menu settings page and locate the information in the TCP/IP section. 2 Click Settings or Configuration. 3 Click Device Solutions > Solutions (eSF), or click Embedded Solutions. 4 Click System tab > Log. 5 From the Filter menu, select an application status.
Troubleshooting 221 3 Make sure the paper guides are aligned against the edges of the paper. 4 Make sure the paper tray closes properly. Reset the printer Turn the printer off, wait about 10 seconds, and then turn the printer on. Make sure the paper tray is installed correctly If the paper tray is listed on the menu settings page, but paper jams when it enters or exits the tray, then it may not be properly installed. Reinstall the paper tray.
Troubleshooting 222 Internal Solutions Port does not operate correctly Try one or more of the following: Check the Internal Solutions Port (ISP) connections Make sure the ISP is securely connected to the printer system board. Check the cable Make sure you are using the correct cable and that it is securely connected to the Internal Solutions (ISP) port.
Troubleshooting 223 Solving paper feed problems Paper frequently jams These are possible solutions. Try one or more of the following: Check the paper Use recommended paper and specialty media. For more information, see the chapter about paper and specialty media guidelines. Make sure there is not too much paper in the paper tray Make sure the stack of paper you load does not exceed the maximum stack height indicated in the tray or on the multipurpose feeder.
Troubleshooting 224 Solving print quality problems If the solutions here do not correct the problem, contact customer support. You may have a printer part that requires adjustment or replacement. Printer is printing blank pages Try one or more of the following: Make sure there is no packing material left on the toner or print cartridge Remove the cartridge and make sure the packing material is properly removed. Reinstall the cartridge.
Troubleshooting 225 Clipped images Try one or more of the following: Check the guides Move the width and length guides in the tray to the correct positions for the paper size loaded. Check the paper size setting Make sure the paper size setting matches the paper loaded in the tray: 1 From the printer control panel Paper menu, check the Paper Size setting. 2 Before sending the job to print, specify the correct size setting: • For Windows users, specify the size from Print Properties.
Troubleshooting 226 Make sure the toner cartridge is not low on toner When 88.xx [color] cartridge low appears, make sure the toner is distributed evenly within the toner cartridge. 1 Remove the toner cartridge. Warning—Potential Damage: Be careful not to touch the photoconductor drum. Doing so may affect the print quality of future print jobs. 2 Firmly shake the cartridge side-to-side and front-to-back several times to redistribute the toner. 3 Reinsert the toner cartridge.
Troubleshooting 227 Check the paper guides Move the guides in the tray to the correct positions for the paper size loaded. Check the paper size setting Make sure the paper size setting matches the paper loaded in the tray: 1 From the printer control panel Paper menu, check the Paper Size setting. 2 Before sending the job to print, specify the correct size setting: • For Windows users, specify the size from Print Properties. • For Macintosh users, specify the size from the Page Setup dialog.
Troubleshooting 228 Paper curl Try one or more of the following: Check the paper type and weight settings Make sure the paper type and weight settings match the paper loaded in the tray or feeder: 1 From the printer control panel Paper menu, check the Paper Type and Paper Weight settings. 2 Before sending the print job, specify the correct paper type setting: • For Windows users, specify the paper type from Print Properties. • For Macintosh users, specify the paper type from the Print dialog.
Troubleshooting 229 Make sure the transfer belt is not defective Replace the defective transfer belt. For more information, see the instruction sheet that came with the replacement part. Make sure the fuser is not defective Replace the defective fuser. For more information, see the instruction sheet that came with the replacement part.
Troubleshooting 230 Print is too light Try one or more of the following: Check the darkness, brightness, and contrast settings The Toner Darkness setting may be too light, the Brightness setting may be too light, or the Contrast setting may be too low. • Change these settings from the printer control panel Quality menu. • For Windows users, change these settings from Print Properties • For Macintosh users: 1 Choose File > Print. 2 From the Orientation pictures drop‑down menu, choose Printer Features.
Troubleshooting 231 Make sure the fuser is not defective The fuser may be defective if the marks occur down repeatedly in all colors. • Replace the fuser if the defects occur every 141 mm (5.55 in.). Skewed print Try one or more of the following: Check the paper guides Adjust the length and width guides in the tray to the correct positions for the paper size loaded. • Make sure the guides are not too far from the paper stack.
Troubleshooting 232 4 Clean the paper feed rollers. Warning—Potential Damage: Do not touch the rubber. Doing so will damage the rollers. 5 Reinstall the paper feed rollers. Note: Make sure to replace the worn or defective paper feed rollers. Solid color pages Make sure the photoconductor is not defective and is installed correctly Remove and then reinstall the photoconductor. If the problem continues, then the photoconductor may need to be replaced.
Troubleshooting 233 Make sure the print cartridge is not low on toner When 88.xx [color] cartridge low appears, make sure the toner is distributed evenly within the print cartridge: 1 Remove the print cartridge. Warning—Potential Damage: Be careful not to touch the photoconductor drum. Doing so may affect the print quality of future print jobs. 2 Firmly shake the cartridge side-to-side and front-to-back several times to redistribute the toner. 3 Reinsert the print cartridge.
Troubleshooting 234 Make sure the fuser is not worn or defective Replace the worn or defective fuser. Make sure the printer has recalibrated recently Perform color adjust from the Quality menu. Make sure the application has not specified an off‑white background Check the application settings. Make sure no toner is in the paper path Contact customer support.
Troubleshooting 235 Transparency print quality is poor Try one or more of the following: Check the transparencies Use only transparencies that meet the printer specifications. Check the paper type setting Make sure the paper type setting is set to Transparency: 1 From the printer control panel Paper menu, check the Paper Type setting. 2 Before sending the job to print, specify the correct type setting: • For Windows users, specify the type from Print Properties.
Troubleshooting 236 Should I use PostScript or PCL emulation printer software? What settings should I use for the best color? The PostScript driver is strongly recommended for best color quality. The default settings in the PostScript driver provide preferred color quality for the majority of printouts.
Troubleshooting 237 Note: The Manual Color Correction setting is not useful if the software application does not specify colors with RGB or CMYK combinations. It is also not effective in situations where the software application or the computer operating system controls the adjustment of colors. How can I match a particular color (such as a corporate logo)? Occasionally, you may have a need for the printed color of a particular object to closely match a specific color.
Troubleshooting 238 What are Detailed Color Samples and how do I access them? These pages require the use of the Embedded Web Server. The Embedded Web Server is a series of resident pages stored in the network printer firmware. To access these pages, browse to the IP address of the network printer. Click Configuration Menu, and then click Detailed Color Samples. For more information about using the Embedded Web Server, see the User's Guide on the Software and Documentation CD.
Troubleshooting 239 Lexmark has various ways to help you solve your printing problem. Visit the Lexmark Web site at http://support.lexmark.com, and then select one of the following: Tech Library You can browse our library of manuals, support documentation, drivers, and other downloads to help you solve common problems. E-mail You can send an e-mail to the Lexmark team, describing your problem. A service representative will respond and provide you with information to solve your problem.
Notices 240 Notices Product information Product name: Lexmark C950de Machine type: 5058 Model(s): 030 Edition notice August 2015 The following paragraph does not apply to any country where such provisions are inconsistent with local law: LEXMARK INTERNATIONAL, INC., PROVIDES THIS PUBLICATION “AS IS” WITHOUT WARRANTY OF ANY KIND, EITHER EXPRESS OR IMPLIED, INCLUDING, BUT NOT LIMITED TO, THE IMPLIED WARRANTIES OF MERCHANTABILITY OR FITNESS FOR A PARTICULAR PURPOSE.
Notices 241 Trademarks Lexmark, Lexmark with diamond design, MarkNet, and MarkVision are trademarks of Lexmark International, Inc., registered in the United States and/or other countries. PrintCryption is a trademark of Lexmark International, Inc. Mac and the Mac logo are trademarks of Apple Inc., registered in the U.S. and other countries. PCL® is a registered trademark of the Hewlett-Packard Company.
Notices Univers 242 Linotype-Hell AG and/or its subsidiaries All other trademarks are the property of their respective owners. AirPrint and the AirPrint logo are trademarks of Apple, Inc. Federal Communications Commission (FCC) compliance information statement This product has been tested and found to comply with the limits for a Class A digital device, pursuant to Part 15 of the FCC Rules.
Notices 243 1-meter average sound pressure, dBA Printing 53 Ready 22 Values are subject to change. See www.lexmark.com for current values. Waste from Electrical and Electronic Equipment (WEEE) directive The WEEE logo signifies specific recycling programs and procedures for electronic products in countries of the European Union. We encourage the recycling of our products. If you have further questions about recycling options, visit the Lexmark Web site at www.lexmark.
Notices 244 ENERGY STAR Any Lexmark product bearing the ENERGY STAR emblem on the product or on a start-up screen is certified to comply with Environmental Protection Agency (EPA) ENERGY STAR requirements as configured when shipped by Lexmark. Temperature information Ambient temperature 10.0 to 33.0°C (50 to 91.
Notices 245 Sleep Mode This product is designed with an energy-saving mode called Sleep Mode. The Sleep Mode saves energy by lowering power consumption during extended periods of inactivity. The Sleep Mode is automatically engaged after this product is not used for a specified period of time, called the Sleep Mode Timeout. Factory default Sleep Mode Timeout for this product (in minutes): 5 By using the configuration menus, the Sleep Mode Timeout can be modified between 1 minute and 120 minutes.
Notices 246 European Community (EC) directives conformity This product is in conformity with the protection requirements of EC Council directives 2004/108/EC, 2006/95/EC, and 2011/65/EU on the approximation and harmonization of the laws of the Member States relating to electromagnetic compatibility, safety of electrical equipment designed for use within certain voltage limits, and on the restrictions of use of certain hazardous substances in electrical and electronic equipment.
Notices 247 The term "IC:" before the certification/registration number only signifies that the Industry Canada technical specifications were met. Industry Canada (Canada) Cet appareil est conforme à la norme RSS-210 d'Industry Canada. Son fonctionnement est soumis aux deux conditions suivantes : (1) cet appareil ne doit pas provoquer d'interférences et (2) il doit accepter toute interférence reçue, y compris celles risquant d'altérer son fonctionnement.
Notices 248 Compliance is indicated by the CE marking. Operation is allowed in all EU and EFTA countries, but is restricted to indoor use only. The manufacturer of this product is: Lexmark International, Inc., 740 West New Circle Road, Lexington, KY, 40550 USA. The authorized representative is: Lexmark International Technology Hungária Kft.
Notices 249 Latviski Ar šo Lexmark International, Inc. deklarē, ka šis izstrādājums atbilst Direktīvas 1999/5/EK būtiskajām prasībām un citiem ar to saistītajiem noteikumiem. Lietuvių Šiuo Lexmark International, Inc. deklaruoja, kad šis produktas atitinka esminius reikalavimus ir kitas 1999/5/EB direktyvos nuostatas. Malti Bil-preżenti, Lexmark International, Inc.
Notices 250 If you transfer this product to another user, warranty service under the terms of this statement is available to that user for the remainder of the warranty period. You should transfer proof of original purchase and this statement to that user.
Notices 251 —Refurbishment, repair, refilling or remanufacture by a third party of products, supplies or parts —Products, supplies, parts, materials (such as toners and inks), software, or interfaces not furnished by Lexmark TO THE EXTENT PERMITTED BY APPLICABLE LAW, NEITHER LEXMARK NOR ITS THIRD PARTY SUPPLIERS OR REMARKETERS MAKE ANY OTHER WARRANTY OR CONDITION OF ANY KIND, WHETHER EXPRESS OR IMPLIED, WITH RESPECT TO THIS PRODUCT, AND SPECIFICALLY DISCLAIM THE IMPLIED WARRANTIES OR CONDITIONS OF MERCHANT
Notices 252 The use of certain patents in this product or service is subject to the reasonable, non-discriminatory terms in the Intellectual Property Rights (IPR) Disclosure of Certicom Corp. at the IETF for AES-CCM ECC Cipher Suites for TLS implemented in the product or service. The use of this product or service is subject to the reasonable, non-discriminatory terms in the Intellectual Property Rights (IPR) Disclosure of Certicom Corp.
Index 253 Index Numerics 1565 Emulation error, load emulation option 214 1‑tray module installing 37 2,000‑sheet high‑capacity feeder installing 37 2000‑sheet high‑capacity feeder loading 62 201–202 paper jams 181 203 paper jam 182 230 paper jam 184 231 paper jam 184 24x paper jam 186 250 paper jam 192 281 paper jam 192 31.xx Missing or Defective [color] cartridge 207 32.
Index cannot open Embedded Web Server 238 card stock loading, multipurpose feeder 64 tips 86 Change [paper source] to [custom string] 202 Change [paper source] to [custom string] load [orientation] 202 Change [paper source] to [custom type name] 201 Change [paper source] to [custom type name] load [orientation] 202 Change [paper source] to [paper size] [paper type] 202 Change [paper source] to [paper size] [paper type] load [orientation] 202 Check [src] orientation or guides 203 checking an unresponsive pr
Index F factory defaults restoring 178 FAQ about color printing 235 FCC notices 242, 246 finding more information about the printer 8 finisher exit bins 79 finishing features 77 supported paper sizes 77 Finishing menu 127 firmware card installing 26 flash drive printing from 82 Flash Drive menu 139 flash drives supported file types 83 flash memory card installing 26 troubleshooting 221 font sample list printing 88 Forms and Favorites setting up 18 G General Settings menu 120 Green settings Eco‑Mode 52 Hibernate M
Index transparencies, multipurpose feeder 64 loading letterhead paper orientation 84 loading the standard tray 56 M maintenance kit ordering 153 replacing 154 Manual feeder expects [paper size].
Index Universal 101 Paper Size/Type menu 93 paper sizes supported 73 Paper Texture menu 97 paper type setting 56 paper types duplex support 75 supported by printer 75 supported by the finisher 75 where to load 75 Parallel [x] menu 110 parts checking status 151 checking, from printer control panel 151 checking, using the Embedded Web Server 151 parts, replacing maintenance kit 154 PCL Emul menu 134 PDF menu 137 photoconductor unit replacing 154 photoconductor units ordering 152 port settings configuring 49 Po
Index 54 Network [x] software error 210 54 Serial option [x] error 210 54 Standard network software error 210 55 Unsupported option in slot [x] 210 56 Parallel port [x] disabled 211 56 Serial port [x] disabled 211 56 Standard parallel port disabled 211 56 Standard USB port disabled 211 56 USB port [x] disabled 211 57 Configuration change, some held jobs were not restored 211 58 Too many disks installed 212 58 Too many flash options installed 212 58 Too many trays attached 212 59 Incompatible tray [x] 212 61
Index 259 printing a network setup page 41 printing confidential and other held jobs from a Macintosh computer 87 from Windows 87 printing from a flash drive 82 printing from a mobile device 81 printing in black and white 80 publications where to find 8 reports viewing 178 Reports menu 102 reserve print jobs 86 printing from a Macintosh computer 87 printing from Windows 87 Restore held jobs? 207 restoring factory default settings 178 Q S Quality menu 129 Quiet Mode print quality troubleshooting 225 safe
Index toner cartridge replacing 159 toner cartridges ordering 152 recycling 55 toner darkness adjusting 80 toner fog or background shading appears on the page 233 toner rubs off 234 touch screen buttons, using 15 transparencies loading 84 loading, multipurpose feeder 64 tips on using 84 using 84 trays linking 67 unlinking 67 troubleshooting A network destination stopped working or is invalid 219 an application error has occurred 218 cannot open Embedded Web Server 238 checking an unresponsive printer 201 F
Index wireless network configuration information 43 installation, using Macintosh 46 installation, using Windows 44 wireless network setup in Windows 44 wireless printer setup in Macintosh 46 X XPS menu 136 261