Wireless Setup Guide © 2008 Lexmark International, Inc. All rights reserved.
Edition notice January 2008 The following paragraph does not apply to any country where such provisions are inconsistent with local law: LEXMARK INTERNATIONAL, INC., PROVIDES THIS PUBLICATION “AS IS” WITHOUT WARRANTY OF ANY KIND, EITHER EXPRESS OR IMPLIED, INCLUDING, BUT NOT LIMITED TO, THE IMPLIED WARRANTIES OF MERCHANTABILITY OR FITNESS FOR A PARTICULAR PURPOSE. Some states do not allow disclaimer of express or implied warranties in certain transactions; therefore, this statement may not apply to you.
Contents Edition notice......................................................................................2 Setting up the printer........................................................................5 Follow these steps to set up your printer......................................................................................................................5 Setting up the printer hardware.................................................................................................................
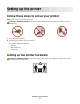
Setting up the printer Follow these steps to set up your printer Note: Do not connect cables until instructed. CAUTION—POTENTIAL INJURY: Refer to the enclosed Safety Sheet before making any cable or electrical connection. 1 Set up the printer hardware. 2 Decide how you want to connect the printer.
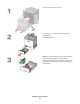
Unpack the printer, cables, and CD. Grasp the paper tray handle, and then pull the tray completely out. Raise the support bin. Note: Use the size indicators on the bottom of the tray to help position the width and length guides. Squeeze the width guide tabs together, and then slide the guide to the correct position for the size of paper being loaded.
Squeeze the length guide tabs together, and then slide the guide to the correct position for the size of paper being loaded. Note: The length guide has a locking device. To unlock the tray, slide the button on top of the length guide to the left, as illustrated. To lock the tray once the desired length has been selected, slide the button to the right. Flex a stack of paper back and forth to loosen the sheets, and then fan them. Do not fold or crease the paper. Straighten the edges on a level surface.
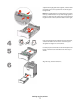
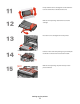
Grasp the handle, and pull forward to open the front door. Allow the front door to open completely. Pull the protective sheet straight out of the toner cartridge area to remove it. Pull each toner cartridge straight out of the printer, one at a time.
Firmly shake the toner cartridge side-to-side and frontto-back several times to distribute the toner. Remove the red packing material from each toner cartridge. Place each toner cartridge back into the printer. Pull out on each side of the packing strip, and then pull it forward to remove it from the transfer module. Remove the red packing strip from the top of each photoconductor.
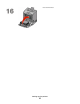
Close the front door.
Choosing a connection method Note: Do not connect cables until instructed. Connect to a wireless network using Windows For detailed steps, see “Information you will need to set up the printer on a wireless network” on page 12 and “Installing the printer on a wireless network (Windows)” on page 14.
Preparing to connect wirelessly Information you will need to set up the printer on a wireless network Note: Do not connect the installation or network cables until prompted to do so by the setup software. • SSID—The SSID is also referred to as the network name. • Wireless Mode (or Network Mode)—The mode will be either infrastructure or ad hoc. • Channel (for ad hoc networks)—The channel defaults to auto for infrastructure networks. Some ad hoc networks will also require the auto setting.
If the printer has a factory-installed internal print server, the MAC address is a series of letters and numbers located on the MAC address sheet that shipped with the printer. The MAC address appears in the following format: 00:04:12:34:56:78 Note: Print a network setup page if you cannot locate the printer MAC address. It will appear on the network setup page. Refer to the User's Guide on the Software and Documentation CD for more information on printing a network setup page.
Connecting to a wireless network using Windows Installing the printer on a wireless network (Windows) Before you install the printer on a wireless network, make sure that: • Your wireless network is set up and working properly. • The computer you are using is connected to the same wireless network where you want to set up the printer. 1 Connect the power cable to the printer and then to a properly grounded electrical outlet, and then turn the printer on.
3 Click Install. 4 Click Agree. 5 Click Suggested. 6 Click Wireless Network Attach. 7 Temporarily connect a USB cable between the computer on the wireless network and the printer. Note: After the printer is configured, the software will instruct you to disconnect the temporary USB cable so you can print wirelessly. 8 Follow the on-screen instructions to complete the software installation. Note: Basic is the recommended path to choose. Choose Advanced only if you want to customize your installation.
Connecting to a wireless network using Macintosh Installing the printer on a wireless network (Macintosh) Prepare to configure the printer 1 Locate the printer MAC address on the sheet that shipped with the printer. Write the last six digits of the MAC address in the space provided below: MAC address: ___ ___ ___ ___ ___ ___ 2 Connect the power cable to the printer and then to a properly grounded electrical outlet, and then turn the power on. Enter the printer information 1 Access the AirPort options.
2 From the Network popup menu, select print server xxxxxx, where the x’s are the last six digits of the MAC address located on the MAC address sheet. 3 Open the Safari browser. 4 From the Bookmarks drop-down menu, select Show. 5 Under Collections, select Bonjour or Rendevous, and then double-click the printer name. 6 From the main page of the Embedded Web Server, navigate to the page where the wireless settings information is stored.
h Type the user password, and then click OK. All necessary software is installed on the computer. i Click Close when installation is complete. 2 Add the printer: a For IP printing: In Mac OS X version 10.5 1 2 3 4 5 From the Finder desktop, click Apple menu System Preferences. Click Print & Fax. Click +. Select the printer from the list. Click Add. In Mac OS X version 10.4 1 2 3 4 5 6 From the Finder desktop, click Go Applications. Double-click the Utilities folder.
Setting up serial printing In serial printing, data is transferred one bit at a time. Although serial printing is usually slower than parallel printing, it is the preferred option when there is a great deal of distance between the printer and computer or when an interface with a better transfer rate is not available. After installing the serial port, you will need to configure the printer and the computer so they can communicate.
3 Set the COM port parameters: After the printer driver is installed, you must set the serial parameters in the communications (COM) port assigned to the printer driver. The serial parameters in the COM port must match the serial parameters you set in the printer. a Open the Device Manager. Do one of the following: In Windows Vista 1 2 3 4 5 Click . Click Control Panel. Click System and Maintenance. Click System. Click Device Manager. In Windows XP 1 2 3 4 5 Click Start. Click Control Panel.
Troubleshooting wireless setup For more information on networking terms and concepts, refer to the User's Guide on the Software and Documentation CD. Wireless troubleshooting checklist Before beginning to troubleshoot the wireless printer, verify that: • The printer is turned on and plugged in to a working outlet. • The SSID is correct. Print a network setup page to verify the SSID the printer is using. If you are not sure if the SSID is correct, run the wireless setup again.
Cannot print over wireless network If you encountered problems while installing, or if your printer does not appear in the printers folder or as a printer option when sending a print job, you can try uninstalling and reinstalling the software. These are possible solutions. Try one or more of the following: MAKE SURE YOUR COMPUTER IS CONNECTED TO YOUR WIRELESS ACCESS POINT (WIRELESS ROUTER) • See if you have access to the Internet by opening your Web browser and accessing any site.
b Type ipconfig. c Press Enter. • The “Default Gateway” entry is typically the wireless access point. • The IP address appears as four sets of numbers separated by periods, such as 192.168.0.100. Your IP address might also start with the numbers 10 or 169. This is determined by your operating system or wireless network software. 2 Type your user name and password for the wireless access point when prompted. 3 Click OK. 4 On the main page, click Wireless or another selection where settings are stored.
d Click Advanced. e Click TCP/IP. The “Router” entry is typically the wireless access point. In Mac OS X version 10.4 and earlier a From the menu bar, click Apple menu System Preferences. b Click Network. c From the Show pop-up menu, select Airport. d Click TCP/IP. The “Router” entry is typically the wireless access point. 2 Type your user name and password when prompted. 3 Click OK. 4 On the main page, click Wireless or another selection where settings are stored. The SSID will be displayed.
CHECK YOUR ADVANCED SECURITY SETTINGS • If you are using MAC address filtering to limit access to your wireless network, you must add the printer MAC address to the list of addresses allowed to connect to the wireless access point. • If you set the wireless access point to issue a limited number of IP addresses, you must change this so that the printer can be added.
2 Attach the small, square connector to the printer. WEP key or WPA pre-shared key not valid ERROR MADE WHEN ENTERING KEY • Carefully retype the key. • Verify that the key has the correct number of characters and the right kind of characters. WEP key A valid WEP key must be: • Exactly 10 or 26 hexadecimal characters. Hexadecimal characters are A-F, a-f, and 0-9. or • Exactly 5 or 13 ASCII characters. ASCII characters are letters, numbers, and symbols found on a keyboard.
THE PRINTER WILL BE MOVED TO A REMOTE NETWORK • It is not necessary to access the wireless network from the Wireless Networks list if the setup and security information for that network is correct. • Continue setting up the printer. It will join the remote network when it is moved within proximity of that network: 1 Select I want to enter a different network. 2 Click Next, and then complete the required network information.
THERE IS AN OBJECT BLOCKING THE SIGNAL BETWEEN THE PRINTER AND THE ACCESS POINT The wireless signal can also be distorted or blocked by objects in the path between the access point and the printer.
Wireless Setup Utility stops responding during wireless printer configuration If the Wireless Setup Utility stops responding during the wireless configuration process, restart the computer. Insert the Software and Documentation CD and run the Wireless Setup Utility again. Printer does not print after wireless configuration completes These are possible solutions. Try one or more of the following: MAKE SURE THE PRINTER IS TURNED ON • Verify that printer is turned on and the power light is lit.
VERIFY THAT THE PRINTER IS WORKING • Insert the Software and Documentation CD and set up the printer using a USB connection. • If the printer works over a USB connection, the printer is working properly. MAKE SURE THE PRINTER DRIVER IS INSTALLED ON THE PRINTER All computers that print to the wireless printer must first have the printer driver installed. • Insert the Software and Documentation CD and install the printer driver.
c Press Enter. • The “Default Gateway” entry is typically the access point. • The IP address appears as four sets of numbers separated by periods, such as 192.168.1.1. 2 Type the user name and password for the access point when prompted. 3 Click OK. 4 Locate the page where the SSID is displayed. 5 Write down the SSID, security type, and the WEP key or WPA passphrase, if they are shown. Note: Make sure you copy them down exactly, including any capital letters.
Connecting using a USB cable USB setup and connection 1 Insert the Software and Documentation CD. 2 Click Install. 3 Click Agree. 4 Click Suggested. 5 Click Local Attach. 6 Connect the installation cable to a USB port on the computer and the USB port on the back of the printer. 7 Connect the power cable to the printer and then to a properly grounded electrical outlet, and then turn the printer on. 8 Follow the on-screen instructions to complete the USB configuration.
Connecting using an Ethernet network Wired setup and connection 1 Connect the Ethernet cable to the printer and to an active Ethernet port on the network. Make sure the computer you are using to configure the printer is attached to a working network port on the same network as the printer. 2 Connect the power cable to the printer and then to a properly grounded electrical outlet, and then turn the printer on. 3 Insert the Software and Documentation CD. 4 Click Install. 5 Click Agree. 6 Click Suggested.
Networking glossary ad hoc mode A setting for a wireless device that lets it communicate directly with other wireless devices without an access point or router. ad hoc network A wireless network that does not use an access point. AutoIP address An IP address automatically assigned by a network device. If the device is set to use DHCP, but no DHCP server is available, an AutoIP address may be assigned by the device.
security key A password, such as a WEP key or a WPA pass phrase, used to make a network secure. signal strength Measure of how strongly a transmitted signal is being received. SSID (Service Set Identifier) The name of a wireless network. When you connect a printer to a wireless network, the printer needs to use the same SSID as the network. Also referred to as network name or BSS (Basic Service Set). Static IP address An IP address assigned manually by you.