C770, C772 User’s Guide March 2006 Lexmark and Lexmark with diamond design are trademarks of Lexmark International, Inc., registered in the United States and/or other countries. © 2006 Lexmark International, Inc.
Edition: March 2006 The following paragraph does not apply to any country where such provisions are inconsistent with local law: LEXMARK INTERNATIONAL, INC., PROVIDES THIS PUBLICATION “AS IS” WITHOUT WARRANTY OF ANY KIND, EITHER EXPRESS OR IMPLIED, INCLUDING, BUT NOT LIMITED TO, THE IMPLIED WARRANTIES OF MERCHANTABILITY OR FITNESS FOR A PARTICULAR PURPOSE. Some states do not allow disclaimer of express or implied warranties in certain transactions; therefore, this statement may not apply to you.
Contents Chapter 1: Installing and removing options ..................................................................... 5 Installing a 2000-sheet drawer ......................................................................................................................... 6 Installing a 500-sheet drawer ........................................................................................................................... 7 Installing a duplex unit ....................................................
Contents Print cartridges ............................................................................................................................................... 59 Toner waste container ................................................................................................................................... 60 Fuser and ITU ................................................................................................................................................
1 Installing and removing options You can customize your printer memory capacity and connectivity by adding optional cards and input devices. You can also use these instructions to help you locate an option for removal. Install the printer and any options you have purchased in the following order: CAUTION: If you are installing options after setting up the printer, turn the printer off and unplug the power cord before continuing.
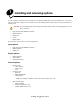
Installing and removing options – MarkNet™ N8000 Series internal print servers (also called internal network adapters or INAs) Note: Some options may not be available on some models. Installing a 2000-sheet drawer Your printer supports one optional 2000-sheet drawer. Warning: If you have an optional duplex unit and a 2000-sheet drawer, you must install a 500-sheet drawer between the duplex unit and the 2000-sheet drawer. 1 Unpack the 2000-sheet drawer and remove any packing material.
Installing and removing options Installing a 500-sheet drawer Your printer supports up to three additional 500-sheet drawers. However, if you install a 2000-sheet drawer, you can only add one additional 500-sheet drawer. Warning: If you have an optional duplex unit and a 2000-sheet drawer, you must install a 500-sheet drawer between the duplex unit and the 2000-sheet drawer. 1 Unpack the 500-sheet drawer and remove any packing material.
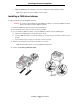
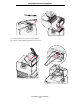
Installing and removing options Installing a duplex unit Your printer supports an optional duplex unit that lets you print on both sides of a sheet of paper. Warning: If you have an optional duplex unit and a 2000-sheet drawer, you must install a 500-sheet drawer between the duplex unit and the 2000-sheet drawer. 1 Unpack the duplex unit and remove any packing material. 2 Place the duplex unit in the location you have chosen for your printer or install it on a 500-sheet drawer.
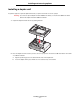
Installing and removing options Installing the printer CAUTION: The printer weighs 48–82 kg (105–181 lb). It requires at least three (3) people to lift it safely. Use the printer handholds to lift it, do not lift by the front of the printer, and make sure your fingers are not under the printer when you set it down. 1 Unpack the printer. 2 Place the printer on the duplex unit or 500-sheet drawer: a Align the positioning posts on the duplex or 500-sheet drawer with the holes in the printer.
Installing and removing options 5 Attach the printer top cover to the output expander. 6 Attach the output expander paper bail to the top cover.
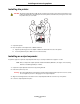
Installing and removing options Installing a 5-bin mailbox Your printer supports a 5-bin mailbox that lets you collate and stack up to 500 sheets of paper. Note: After you unpack the mailbox, install it immediately. Otherwise, the edges of the mounting brackets could damage tabletops or fabrics. 1 Unpack the mailbox and remove any packing material. 2 Remove the printer top cover. Warning: The mailbox is designed to hold the weight of print material only.
Installing and removing options 5 Attach the printer top cover to the mailbox. 6 Attach the mailbox paper bail to the top cover. Installing a StapleSmart finisher Your printer supports a StapleSmart finisher. See the information sheet included with the finisher for detailed installation instructions.
Installing and removing options Installing memory and option cards CAUTION: If you are installing memory or option cards sometime after setting up the printer, turn the printer off and unplug the power cord before continuing. If you have any other devices connected to the printer, turn them off as well and unplug any cables going to the printer. Removing the system board access cover 1 Locate the access cover on the back of the printer. 2 Remove the four access cover screws (two at top, two at bottom).
Installing and removing options Latch Notch Connection points 3 Push open the latches on both ends of the memory connector. 4 Align the notches on the bottom of the card with the notches on the connector. 5 Push the memory card firmly into the connector until the latches on either end of the connector snap into place. It may require some force to fully seat the card.
Installing and removing options Pins Installing a hard disk Follow the instructions in this section to install an optional hard disk. You need a small flathead screwdriver to attach the hard disk to the mounting plate. Warning: Hard disks are easily damaged by static electricity. Touch something metal on the printer before you touch a disk. If an option card has been installed, you may need to remove it before installing the hard disk. 1 Remove the system board access cover.
Installing and removing options 7 Press the ribbon cable connector into the connector on the system board. 8 Flip the hard disk over, and then press the three posts on the mounting plate into the holes on the system board. The hard disk snaps into place. Installing an option card Your printer has one expansion card slot that supports a number of option cards. The following table describes their function.
Installing and removing options Connector Installing memory and option cards 17
Installing and removing options Removing memory and option cards To remove memory or option cards, use the following illustration to locate the connector for the card you want to remove. Option card connector Memory card connector Firmware and flash memory card connectors Hard disk connector Accessing the printer system board 1 Turn the printer off. 2 Unplug the printer power cord. 3 Disconnect all cables from the back of the printer. 4 Locate the access cover on the back of the printer.
Installing and removing options Removing memory cards Complete the following steps to remove printer memory or flash memory cards. Warning: Printer memory and flash memory cards are easily damaged by static electricity. Touch something metal on the printer before you touch a memory card. 1 Remove the system board access cover. For more information, see Accessing the printer system board. 2 Locate the memory card you want to remove. 3 Push the latches on both ends of the connector away from the card.
Installing and removing options 3 Remove the screw that secures the card to the system board connector slot. 4 Gently pull the card out of the connector. 5 If you saved the metal plate that covers the connector slot and you do not plan to insert another card, attach the plate. a Slide the clip side of the plate in first, making sure the clip end covers the groove on the system board. b Use the screw to secure the other end of the metal plate to the system board.
Installing and removing options Removing a hard disk Warning: Hard disks are easily damaged by static electricity. Touch something metal on the printer before you touch a disk. 1 Remove the system board access cover. For more information, see Accessing the printer system board. 2 Locate the hard disk. 3 Gently pull the three posts on the hard disk mounting plate out of the holes on the system board. 4 Gently pull the ribbon cable connector out of the connector on the system board.
Installing and removing options Removing a firmware card Warning: Optional firmware cards are easily damaged by static electricity. Touch something metal on the printer before you touch an optional firmware card. 1 Remove the system board access cover. For more information, see Accessing the printer system board. 2 Grasp the firmware card gently and pull it straight out in one motion. Do not pull one side and then the other.
Installing and removing options Reinstalling the system board access cover 1 Align the slots at the top of the access cover with the screws near the top of the printer. 2 Slide the cover up under the top cover lip as far as it will go, and then tighten the screws at the top of the cover. 3 Insert and tighten the four screws to the bottom of the cover. 4 Reconnect all cables on the back of the printer. 5 Plug in the printer power cord. 6 Turn the printer on.
2 Printing Understanding the printer operator panel The printer operator panel has a four-line, back lit, gray scale display that can show both graphics and text. The Back, Menu, and Stop buttons are located to the left of the display, the navigation buttons are located below the display, and the numeric pad is located to the right of the display.
Printing Operator panel buttons Button Function Back Press the Back button to return to the last screen viewed. Note: Changes made on a screen will not be applied if you press the Back button. Menu Press the Menu button to open the menu index. Note: The printer must be in the Ready state to access the menu index. A message indicating the menus are unavailable will appear if the printer is not ready. Stop Press the Stop button to stop the mechanical operation of the printer.
Printing Button Function Numeric pad The numeric pad consists of numbers, a pound (#) sign, and a backspace button. The 5 button has a raised bump for non-visual orientation. The numbers are used to enter numeric values for items like quantities or PINs. The backspace is used to delete the number to the left of the cursor. Pressing the backspace multiple times will delete additional entries. Note: The pound (#) sign is not used.
Printing Printing from a USB flash memory device A USB Direct interface is located on the operator panel so you can insert a USB flash memory device and print PDF documents and supported graphic files. Printing a document from a USB flash memory device is similar to printing a held job. Note: Supported graphic types are .gif, .jpeg, .jpg, .bmp, .png, .tiff, .tif, .pcx, and .dcx. For information regarding tested and approved USB flash memory devices, see the Lexmark Web site at www.lexmark.com.
Printing 3 Press until appears next to the document you want to print, and then press . A screen asking the number of copies to be printed will appear. USB drive Copies My_document_01 My_document_02 4 To print only one copy, press 1 , or manually input the number of copies with the number pad, then press . Note: Do not remove the USB flash memory device from the USB Direct interface until the document has finished printing. The document prints.
Printing 4 Double-click the printer you selected when you sent the job. A list of print jobs appears in the printer window. 5 Select the job you want to cancel. 6 Press the Delete key on the keyboard. Canceling a job from a Macintosh computer Canceling a job from a Macintosh computer running Mac OS 9.x When you send a job to print, the printer icon for your selected printer appears on the desktop. 1 Double-click the printer icon on your desktop. A list of print jobs appears in the printer window.
Printing 4 Press until Network Setup Page appears, and then press . Note: If an optional MarkNet N8000 series internal print server is installed, Print Net1 Setup appears on the display. 5 Check the first section on the network setup page, and confirm that Status is “Connected.” If Status is “Not Connected”, the LAN drop may not be active, or the network cable may be malfunctioning.
Printing • Flex the print media back and forth to loosen the sheets, and then fan them. Do not fold or crease the print media. Straighten the edges of the stack on a level surface. Warning: Never remove paper trays while a print job is printing. It could damage the tray or the printer. Loading 500-sheet trays To load any of the 500-sheet trays: 1 Remove the tray and place it on a flat, level surface. 2 Squeeze the front guide lever and slide the guide to the front of the tray.
Printing 5 Place the paper in the tray as shown, print side down. Do not load bent or wrinkled paper. Maximum stack height indicator Note: Do not exceed the maximum stack height. Overfilling the tray may cause jams. 6 Squeeze the front guide lever and slide the guide until it firmly touches the stack of paper. 7 Reinstall the tray. Make sure the tray is pushed completely into the printer.
Printing Loading the 2000-sheet tray Follow these instructions to load a 2000-sheet tray. Do not load any print media other than paper in the 2000-sheet tray. 1 Pull open the tray. 2 Squeeze the side guide lever, lift the guide, and place it into the appropriate slot for the size paper you are loading. 3 Squeeze the two front guide levers and slide the guide to the correct position for the size paper you are loading. LT.LG A5 EX A4 LT.
Printing 4 Slide the bottom support toward the front of the tray until it touches the front guide. 5 Flex the sheets back and forth to loosen them, and then fan them. Do not fold or crease the paper. Straighten the edges of the stack on a level surface. 6 Place the paper against the back left corner of the tray, print side down. Do not load bent or wrinkled print media. 7 Close the tray. Make sure the tray is pushed completely into the printer. Note: Do not exceed the maximum stack height.
Printing Loading the multipurpose feeder You can use the multipurpose feeder one of two ways: • Paper tray—As a paper tray, you can load paper or specialty media in the feeder with the intention of leaving the media in the feeder. • Manual bypass feeder—As a manual bypass feeder, you send a print job to the feeder while specifying the type and size of media from your computer. The printer then prompts you to load the appropriate print media before it prints.
Printing 4 Arrange the stack of paper or specialty media correctly for the size, type, and print method you are using. 5 Place the paper or specialty media, print side up, along the left side of the multipurpose feeder, and then push it in as far as it will easily go. Do not force the media. Note: Do not exceed the maximum stack height. Overfilling the feeder may cause jams. 6 Squeeze the paper guide lever and slide the guide until it lightly touches the side of the stack.
Printing Printing on specialty media (transparencies, labels, other) Follow these instructions when you want to print on media such as transparencies, card stock, glossy paper, labels, or envelopes. 1 Load the media as specified for the tray you are using. For help, see any of the following: – – 2 Loading the trays Loading the multipurpose feeder Set the Paper Size and Paper Type for the multipurpose feeder (MP Feeder Size and MP Feeder Type) to the correct value for the print media you loaded.
Printing 3 Choose the paper size from the Paper pop-up menu. 4 Click OK. 5 Select File 6 Select the General panel, and then choose the paper source from the pop-up menus as appropriate. 7 Select the Paper panel, and then choose the paper type from the Paper Type pop-up menu. 8 Send your print job as usual. Print. Mac OS X 1 In your word processor, spreadsheet, browser, or other application, select File Page Setup. 2 Choose the correct printer in the Format For pop-up menu.
Printing Linking output bins If you attach an optional finisher or mailbox to your printer, you can link output bins, or otherwise specify how the printer sends jobs to the bins, by changing the Configure Bins settings in the Paper Menu. Value Description Mailbox* Lets you select an output bin when you send a job to print. (If you prefer, you can select a default output bin for all print jobs to go to.
Printing From either the Confidential Job or the Held Jobs menu items, you have several choices: • Print All • JobName1 • JobName2 • Delete All Note: Confidential jobs will also be an option if confidential jobs are present. Printing confidential jobs The term held job refers to any type of print job that can be initiated by the user at the printer.
Printing 4 Enter a User Name and PIN. 5 Send your job to the printer. Go to the printer when you are ready to retrieve your confidential print job, and follow the At the printer steps. At the printer 1 Press until Held jobs appears, and then press 2 Press until Confidential jobs appears, and then press 3 Press until the 4 Enter your PIN. . . appears next to your user name, and then press . For more information, see Entering a personal identification number (PIN).
Printing Printing and deleting held jobs Held jobs such as Verify Print, Reserve Print, Repeat Print, Bookmarks, and USB flash memory files differ in function and do not require a PIN to print the job. These jobs are printed or deleted from the printer operator panel. Verify Print If you send a Verify Print job, the printer prints one copy and holds the remaining copies you requested in printer memory.
Printing 3 Press until Print All appears next to the type of action you want to perform: Delete All JobName1 JobName2 • 4 Press 5 Press Confidential jobs will also be an option if confidential jobs are present. . until appears next to the job you want, and then press . The job will print or be deleted according to the type of print job and action you selected.
Printing Tips for successful printing Storing paper Use the following guidelines to avoid paper feeding problems and uneven print quality. • Store paper in an environment where the temperature is approximately 21°C (70°F) and the relative humidity is 40%. • Store cartons of paper on a pallet or shelf rather than directly on the floor. • If you store individual packages of paper out of the original carton, make sure they rest on a flat surface so the edges do not buckle or curl.
Printing Avoiding jams You can avoid most paper jams by correctly loading paper and specialty media in the printer. See the following for loading instructions: • Loading 500-sheet trays • Loading the 2000-sheet tray • Loading the multipurpose feeder The following hints can help you avoid paper jams: • Use only recommended paper. Refer to the Card Stock & Label Guide available on the Lexmark Web site at www.lexmark.
3 Media specifications Media is paper, card stock, transparencies, labels, and envelopes. The last four are sometimes referred to as specialty media. The printer provides high quality printing on a variety of media. A number of things must be considered concerning media before printing. This chapter provides information to help make media selections and how to care for media. Media guidelines Selecting the appropriate media for the printer helps avoid printing problems.
Media specifications Weight The printer can automatically feed paper weights from 60 to 176 g/m2 (16 to 47 lb bond) grain long. Paper lighter than 60 g/m2 (16 lb) might not be stiff enough to feed properly, causing jams. For best performance, use 90 g/m2 (24 lb bond) grain long paper. To use paper narrower than 182 x 257 mm (7.2 x 10.1 in.), it is recommended that the weight be greater than or equal to 90 g/m2 (24 lb bond). Curl Curl is the tendency of media to curve at its edges.
Media specifications Unacceptable paper The following papers are not recommended for use with the printer: • Chemically treated papers used to make copies without carbon paper, also known as carbonless papers, carbonless copy paper (CCP), or no carbon required (NCR) paper • Preprinted papers with chemicals that may contaminate the printer • Preprinted papers that can be affected by the temperature in the printer fuser • Preprinted papers that require a registration (the precise print location on the
Media specifications • Store cartons of paper on a pallet or shelf rather than directly on the floor. • If you store individual packages of paper out of the original carton, make sure they rest on a flat surface so the edges do not buckle or curl. • Do not place anything on top of paper packages. • Store paper in its original wrapper until you load it into the printer.
Media specifications Selecting transparencies The printer can print directly on transparencies designed for use in laser printers. Print quality and durability depend on the transparency used. Always print samples on the transparencies being considered for use before buying large quantities. Lexmark recommends Lexmark Part Number 12A8240 letter size transparency and Lexmark Part Number 12A8241 A4 size transparency. The Paper Type setting should be set to Transparency to help prevent jams.
Media specifications Labels The printer can print on many labels designed for use with laser printers. These labels are supplied in letter size, A4 size, and legal size sheets. Label adhesives, face sheet (printable stock), and topcoats must be able to withstand temperatures of 230°C (446°F) and pressure of 25 pounds per square inch (psi). Try a sample of any labels considered for use with the printer before purchasing a large quantity.
Media specifications Card stock Card stock is single ply, and has a large array of properties, such as the moisture content, thickness, and texture, that can significantly affect print quality. For more information on the preferred weight for the grain direction of media, see Identifying media sources and specifications. Try a sample of any card stock considered for use with the printer before purchasing a large quantity.
Media specifications Offset Staple Optional finisher Standard Optional 5-bin mailbox Optional banner tray Optional envelope drawer Media size Dimensions Optional duplex unit Multi-purpose feeder 500-sheet trays Legend ✓ — supported with size sensing † — supported without size sensing* ✘— unsupported Optional high capacity feeder Media sizes and support A3 297 x 420 mm (11.7 x 16.5 in.) ✘ ✘ ✘ ✘ ✘ ✘ ✘ ✘ ✘ ✘ A4 210 x 297 mm (8.27 x 11.7 in.
Media specifications Offset Staple Optional finisher Standard Optional 5-bin mailbox Optional banner tray Optional envelope drawer Media size Dimensions Optional duplex unit Multi-purpose feeder 500-sheet trays Legend ✓ — supported with size sensing † — supported without size sensing* ✘— unsupported Optional high capacity feeder Media sizes and support (continued) 9 Envelope 98.4 x 225.4 mm (3.875 x 8.9 in.) ✘ † ✘ ✘ † ✘ ✘ ✘ ✘ ✘ 10 Envelope 104.8 x 241.3 mm (4.12 x 9.5 in.
Media specifications Media types and weights (input options) Media weight Media Type 500-sheet trays Multipurpose feeder 2000-sheet drawer Envelope drawer Paper Xerographic or business paper (used for simplex printing)1 60 to 74.9 g/m2 grain long (16 to 19.9 lb bond)2 60 to 74.9 g/m2 grain long (16 to 19.9 lb bond)2 60 to 74.9 g/m2 grain long (16 to 19.
Media specifications Media types and weights (output options) Media weight Media Type Standard output bin and optional output expander Paper Xerographic or business paper (used for simplex printing)1 60 to 74.9 g/m2 grain long (16 to 19.9 lb bond)2 Xerographic or business paper (used for duplex printing) Optional finisher 5-bin mailbox Standard Offset Staple 60 to 74.9 g/ m2 grain long (16 to 19.9 lb bond)2 60 to 74.9 g/ m2 grain long (16 to 19.9 lb bond)2 60 to 74.
Media specifications Media types and weights (output options) (continued) Media weight Media Envelopes2 Standard output bin and optional output expander 5-bin mailbox Standard Offset Staple Dual-web paper 180 g/m2 (48 lb bond) Not supported 180 g/m2 (48 lb bond) 180 g/m2 (48 lb bond) Not supported Polyester 220 g/m2 (59 lb bond) Not supported 220 g/m2 (59 lb bond) 220 g/m2 (59 lb bond) Not supported Vinyl 300 g/m2 (92 lb liner) Not supported 300 g/m2 (92 lb liner) 300 g/m2 (92 lb li
4 Maintaining the printer Periodically, you need to complete certain tasks to maintain optimum print quality. These tasks are covered in this chapter. If several people are using the printer, you may want to designate a key operator to do the setup and maintenance of your printer. Refer printing problems and maintenance tasks to this key operator. In the U.S., contact Lexmark at 1-800-539-6275 for information about Lexmark Authorized Supplies Dealers in your area.
Maintaining the printer Conserving supplies Several settings in your application software or on the display let you conserve toner and paper. For more information on changing these settings, see the Menus and Messages Guide. Supply Menu selection item What the setting does Toner Toner Darkness in the Settings Æ Quality Menu Lets you adjust the level of toner released on a sheet of print media. The values range from 1 (lightest setting) to 5 (darkest setting).
Maintaining the printer The following is a list of cartridges you can order: C770 / C772 • • • • • • • • • • • • • • • • C772 Black print cartridge Cyan print cartridge Magenta print cartridge Yellow print cartridge Black high yield print cartridge Cyan high yield print cartridge Magenta high yield print cartridge Yellow high yield print cartridge Black Return Program print cartridge Cyan Return Program print cartridge Magenta Return Program print cartridge Yellow Return Program print cartridge Black hig
Maintaining the printer Ordering an image transfer unit and transfer roller When the 83.yy ITU life warning message appears on the display, you should order a new image transfer unit. Use part number 40X1680 to order an image transfer unit. For more information about warning messages, see the Menus and Messages Guide on the publications CD Ordering staple cartridges Staple cartridges hold 3,000 staples. Use part number 11K3188 to order a pack of three staple cartridges.
5 Clearing paper jams Identifying jams If the printer jams, the appropriate jam message will be displayed on the printer operator panel. If you select Show areas on the operator panel, you can view one or more images to help you clear the jam. 23.13 Paper jam, 2 pages jammed Continue Show areas Show areas Show duplex Show rear door 1. Open manual feed door. See the diagram on page 63 for an overview of the paper path and areas where jams may occur.
Clearing paper jams Access doors and trays The following illustrations show areas where jams can occur. Area A Multipurpose feeder 250.yy Paper Jam Area B Left access door (beside tray 1) 200.yy Paper Jam 24.yy Paper Jam Area C Paper input options: 500-sheet drawer or 2000-sheet drawer 24.yy Paper Jam Area M Mailbox 27.yy Paper Jam Area D Front access door 201.yy Paper Jam Area L Upper right access door (redrive area) 201.yy Paper Jam 202.yy Paper Jam Area T1 Standard tray (Tray 1) 200.
Clearing paper jams Understanding jam messages Note: Always clear the entire paper path when you receive any jam message. Paper jam messages Message Check Areas What to do 200.yy Paper Jam (tray 1 and left access door beside tray 1) B, T1 Follow the instructions for clearing Area B, and Area T1. If the jam message persists, paper may be caught in the image transfer unit. For instructions, see Clearing image transfer unit jams. 201.
Clearing paper jams Clearing the entire paper path When a paper jam occurs, the printer stops operating and displays 2.yy Paper Jam and a message to clear certain printer areas. After you have cleared the following areas, make sure all printer covers, doors, and trays are closed, and then press Go to resume printing. Note: The printer also displays Pages Jammed. Be sure to remove all the jammed pages before pressing Go.
Clearing paper jams Area C 1 If you have one or more optional 500-sheet drawers: a Open the 500-sheet drawer access door. Hold the door down while removing jams. Note: Make sure the entire paper stack is loaded correctly and pushed all the way down into the tray. b 2 Close the door. If you have an optional 2000-sheet drawer: a Open the 2000-sheet drawer access door. Pull the jam down and out of the rollers. b Close the door. Area D 1 Open the front access door.
Clearing paper jams Area T1 1 If clearing Area B did not clear the jam, then carefully open tray 1. Remove any jams. Note: Make sure the paper is pushed all the way down into the tray. 2 Close tray 1. Area E 1 Pull the duplex tray E completely out. Look inside and remove any paper caught in the rollers. Also, look up inside, as some jams may be above the rollers. 2 Reinstall the duplex mechanism in the printer.
Clearing paper jams Area J 1 Remove the duplex tray J. 2 Remove any jams, and then reinstall the tray. Area K 1 Open the lower right access door. 2 Remove any jams, and then close the door. Area L 1 Open the upper right access door. 2 Remove jams from the rollers, and then close the door.
Clearing paper jams Clearing mailbox, finisher, or output expander jams (Area M) 1 Open the rear door of the 5-bin mailbox or ouput expander. 2 Pull the jam straight out, and then close the door. Clearing fuser jams 1 Clear the paper path. If the jam error message persists, go to step 2. 2 Open both the upper right and the lower right access doors (Areas K and L). CAUTION: The fuser assembly may be hot. Let it cool before continuing.
Clearing paper jams 3 Pull down the latches. They slide toward the center to release the fuser. 4 Pull the fuser out, and set it on a clean, flat surface. 5 Unsnap the housing and set it aside. 6 Lift up the fuser roller cover and remove the jam. 7 Close the fuser roller cover. 8 Snap the housing back onto the fuser. 9 Insert the fuser back into the printer. 10 Slide the latches out, and then pull up to refasten them. 11 Close the doors.
Clearing paper jams Clearing image transfer unit jams 1 Open the front access door and the left access door. 2 While holding down the front access door, insert a folded piece of paper as shown to clear the paper sensors under the image transfer unit. Make sure to clear the entire width of the paper path. 3 Close the left access door and the front access door. If the jam persists, continue with step 4.
Clearing paper jams 4 Turn the printer off. Open the front cover. 5 Remove all the print cartridges. a Pull up slightly on the cartridge handhold. b Pull the cartridge straight out and use the handle to lift it off the guides. c Place the cartridges on a clean, flat surface out of direct light.
Clearing paper jams 6 Release the latches to open the multipurpose feeder (area A) all the way.
Clearing paper jams 7 Remove the image transfer unit. a Raise the lever to unlock the image transfer unit. b Pull down on the handle.
Clearing paper jams c Slide the image transfer unit out and place it on a clean, flat surface. Warning: Do not touch the transfer belt. Touching the belt will damage the image transfer unit. 8 Look inside the printer. Remove all torn paper or other jams.
Clearing paper jams 9 Insert the image transfer unit back into the printer. a Align the guides with the insertion grooves and gently slide the unit in. b Rotate the handle up, and push gently to lock the unit in place.
Clearing paper jams c 10 Lower the lever to lock the image transfer unit into place. Return the multipurpose feeder to its working position. Reinstall all the print cartridges. 11 Close the printer door. 12 Turn the printer on. The printer returns to a Ready state. If you still need help 1 Turn the printer off and then back on. 2 Contact your administrator or Help desk if you need more assistance.
6 Administrative support Adjusting operator panel brightness and contrast The LCD operator panel contrast and brightness can be adjusted through the Utilities menu. For more information, see the Menus and Messages Guide. The LCD Brightness and LCD Contrast settings are adjusted separately. To change the LCD Brightness or LCD Contrast settings: 1 Make sure your printer is on.
Administrative support Enabling operator panel menus 1 Turn the printer off. 2 Press and hold 3 Release both buttons when Performing Self Test appears on the display. and while turning the printer on. The printer performs its power-on sequence, and then Config Menu appears on the first line of the display. 4 Press until Panel Menus appears, and then press 5 Press until Enable appears, and then press . .
Administrative support Adjusting Power Saver To adjust the Power Saver setting: 1 Make sure the printer is on and Ready appears on the display. 2 Press 3 Press until Settings appears, and then press 4 Press until Setup Menu appears, and then press 5 Press until Power Saver appears, and then press 6 Using the right and left arrows on the operator panel, enter the number of minutes for the printer to wait before entering Power Saver. on the operator panel. . . .
Administrative support 5 Press until Disable appears, and then press . Contents will be lost. Continue? appears. 6 Press until Yes appears, and then press . The Encrypting Disk progress bar appears. 7 When disk encryption has finished, press 8 Press until . Exit Config Menu appears, and then press . Setting security using the Embedded Web Server (EWS) You can enhance the security of network communications and device configuration by using the advanced security options.
Administrative support • • • No authentication and no encryption Authentication with no encryption Authentication and encryption Note: Only the selected level and later may be used to communicate. Supporting IPSec (Internet Protocol Security) IP Security protocol provides authentication and encryption of communications at the network layer allowing all application and network communications over the IP protocol to be secure.
Administrative support Using 802.1x Authenticating 802.1x port authentication allows the printer to join networks that require authentication before allowing access. 802.1x port authentication can be used with the WPA (Wi-Fi Protected Access) feature of an optional internal wireless print server to provide WPA-Enterprise security support. Support for 802.1x requires the establishment of credentials for the printer. The printer must be known to the Authentication Server (AS).
Administrative support Printing Lockout Printing Lockout lets you lock or unlock a printer using an assigned PIN. When locked, every job the printer receives will buffer to the hard disk. A user can print jobs only by entering the correct PIN on the operator panel. You can assign a PIN through the Web page of the device. Note: This setting is only available when a hard disk is installed. Note: Back channel data will be processed while the printer is locked.
Administrative support Aligning the image transfer unit For best print quality, make sure you align the image transfer unit after replacement or if colors print too lightly. To align the image transfer unit: 1 Make sure your printer is on. 2 Press 3 Press 4 5 6 on the operator panel. until Settings appears, and then press . Press until Utilities Menu appears, and then press Press until you see Color Alignment, and then press Press to print alignment test pages. . .
Administrative support Using the Coverage Estimator The Coverage Estimator provides you with an estimate of the percent coverage of cyan, magenta, yellow, and black toner on a page. These estimates are printed on the page. To turn on the Coverage Estimator utility: 1 Make sure your printer is on. 2 Press 3 Press until Settings appears, and then press 4 Press until Utilities Menu appears, and then press 5 Press until you see On, and then press on the operator panel. . . .
Administrative support Configuring printer alerts You can configure the printer several ways to let you know when it requires attention. Using the Setup Menu Menu item Function Value Result Alarm Control Lets you establish whether the printer sounds an alarm when it requires operator intervention. Off The alarm does not sound, but printing stops until the messages are cleared.* Single The printer stops printing, displays a message, and activates the selected alarm type.
7 Troubleshooting Online customer support Customer support is available on the Lexmark Web site at www.lexmark.com. Calling for service When you call for printer service, describe the problem you are experiencing, the message on the display, and the troubleshooting steps you have already taken to find a solution. You need to know your printer model type and serial number. See the label on the inside top front cover of the printer for this information.
Troubleshooting Solving printing problems Symptom Cause Solution The operator panel display is blank or displays only diamonds. The printer self test failed. Turn the printer off, wait about 10 seconds, and turn the printer back on. Performing Self Test appears on the display. When the test is completed, the Ready message is displayed. If the messages do not appear, turn the printer off and call for service. The message Error reading USB drive appears when using a USB device.
Troubleshooting Symptom Cause Solution Job prints from the wrong tray or on the wrong paper or specialty media. The operator panel menu settings do not match the media loaded in the tray. Make sure the Paper Size and Paper Type specified in the printer driver match the paper size and type in the tray and what is set on the printers operator panel. Incorrect characters print. You are using an incompatible parallel cable.
Troubleshooting Solving option problems If an option does not operate correctly after it is installed or if it quits working: • Turn the printer off, wait for about 10 seconds, and turn the printer on. If this does not fix the problem, unplug the printer, and check the connection between the option and printer. • Print the menu settings page and check to see if the option is listed in the Installed Options list. If the option is not listed, reinstall it.
Troubleshooting Solving high capacity feeder problems Problem Solution The paper tray does not raise when the loading door is closed, or the paper tray does not lower when the door is opened and the paper tray button is pushed. Check the following: • The printer is properly attached to the high capacity feeder. • The printer is powered on. • The power cord is plugged firmly into the back of the high capacity feeder. • The power cord is plugged into an outlet. • The outlet has power.
Troubleshooting Solving paper feed problems Symptom Cause Solution Paper frequently jams. You are using paper that does not meet the printer specifications. Use recommended paper and other specialty media. See the Card Stock & Label Guide available on the Lexmark Web site at www.lexmark.com for detailed specifications. For information that can help prevent jams from occurring, see Avoiding jams. You have loaded too much paper or too many envelopes.
Troubleshooting The information in the following table may help you solve print quality problems. If these suggestions still do not correct the problem, call for service. You may have a printer part that requires adjustment or replacement. Symptom Cause Solution Repeating defects Either the print cartridges are defective, the image transfer unit and transfer roller are defective, or the fuser is defective.
Troubleshooting Symptom Cause Solution Streaked horizontal lines The print cartridges, the transfer roller, image transfer unit, or fuser may be defective, empty, or worn. Replace the print cartridge, the transfer roller, the image transfer unit, or fuser as needed. From the printers operator panel, print the repetitive defects guide to determine which component needs to be replaced. • Toner is smeared before fusing to the paper. • The print cartridge is defective.
Troubleshooting Symptom Cause Solution Print too light • Paper settings may be incorrect. • The Toner Darkness setting is too light. • You are using paper that does not meet the printer specifications. • The print cartridges are low on toner. • The print cartridges are defective or have been installed in more than one printer. • Make sure the printer paper type, paper texture, and paper weight settings match the type of paper you are using.
Troubleshooting Symptom Cause Solution Uneven print density • The print cartridges are defective. • The transfer roller is worn or defective. • The image transfer unit is worn or defective. • Replace the print cartridges. • Replace the transfer roller. • Replace the image transfer unit. Ghost Images Toner level is low in the print cartridges. Replace the print cartridges. Clipped images (Some of the print is cut off on the sides, top, or bottom of the paper.
Troubleshooting Solving color quality problems This section helps answer some basic color-related questions and describes how some of the features provided in the Quality Menu can be used to solve typical color problems. Note: See the quick reference page entitled “Print quality and troubleshooting guide” which provides solutions for common print quality problems, some of which may affect the color quality of the printed output.
Troubleshooting The printed page appears tinted. Can I slightly adjust the color? Sometimes a user may consider printed pages to appear tinted (for example, everything printed seems to be too red). This can be caused by environmental conditions, paper type, lighting conditions, or user preference. In these instances, Color Balance may be used to create more preferable color. Color Balance provides the user with the ability to make subtle adjustments to the amount of toner being used in each color plane.
Troubleshooting The color combination labeled on the box can then be used for modifying the color of the object in a software application. The software application Help section provides instructions for modifying the color of an object. Manual Color Correction may be necessary to utilize the selected color conversion table for the particular object.
Troubleshooting increment value that defines the difference between the RGB value that each color box differs by. If the user selects Print, a printout generates which consists of the user-specified color and the colors that exist near this color based on the increment value. This process can be duplicated for Cyan (C), Magenta (M), Yellow (Y), and Black (K) color conversion tables, too. Collectively, these values are known as CMYK color.
8 Notices Cautions and warnings Note: A note identifies something that could help you. CAUTION: A caution identifies something that could cause you harm. Warning: A warning identifies something that could damage your product hardware or software.
Notices Radio interference notice Warning: When a network cable is attached, this is a Class A product. In a domestic environment, this product may cause radio interference, in which case, the user may be required to take adequate measures. Taiwan BSMI notice Japanese VCCI notice If this symbol appears on your product, the accompanying statement is applicable. Korean MIC statement If this symbol appears on your product, the accompanying statement is applicable.
Notices • Increase the separation between the equipment and receiver. • Connect the equipment into an outlet on a circuit different from that to which the receiver is connected. • Consult your point of purchase or service representative for additional suggestions. The manufacturer is not responsible for any radio or television interference caused by using other than recommended cables or by unauthorized changes or modifications to this equipment.
Notices Noise emission levels Hinweis zum GS-Zeichen Modell: Lexmark C770, C772 Gerätetyp: 5061-100, 5061-110, 5061-300, 5061-310 Postanschrift Lexmark Deutschland GmbH Postfach 1560 63115 Dietzenbach Adresse Lexmark Deutschland GmbH Max-Planck-Straße 12 63128 Dietzenbach Telefon: 0180 - 564 56 44 (Produktinformationen) Telefon: 01805 - 00 01 15 (Technischer Kundendienst) E-Mail: internet@lexmark.de Die folgenden Messungen wurden gemäß ISO 7779 durchgeführt und gemäß ISO 9296 gemeldet.
Notices The following measurements were made in accordance with ISO 7779 and reported in conformance with ISO 9296. 1-meter average sound pressure, dBA Printing 52 dBA Idling 30 dBA Product energy consumption The following table documents the power consumption characteristics of the product. Mode Description Power consumption Printing The product is generating hard650 W copy output from electronic inputs. Ready The product is waiting for a print job.
Notices Waste from Electrical and Electronic Equipment (WEEE) directive The WEEE logo signifies specific recycling programs and procedures for electronic products in countries of the European Union. We encourage the recycling of our products. If you have further questions about recycling options, visit the Lexmark Web site at www.lexmark.com for your local sales office phone number. ENERGY STAR Laser advisory label A laser notice label may be affixed to this printer.
Notices Statement of Limited Warranty C770, C772 printer Lexmark International, Inc. Lexington, KY This limited warranty applies to the United States and Canada. For customers outside the U.S., refer to the country-specific warranty information that came with your product. This limited warranty applies to this product only if it was originally purchased for your use, and not for resale, from Lexmark or a Lexmark Remarketer, referred to in this statement as “Remarketer.
Notices Your sole remedy under this limited warranty is set forth in this document. For any claim concerning performance or nonperformance of Lexmark or a Remarketer for this product under this limited warranty, you may recover actual damages up to the limit set forth in the following paragraph. Lexmark's liability for actual damages from any cause whatsoever will be limited to the amount you paid for the product that caused the damages.
Index Numerics D 5-bin mailbox 11 disabling operator panel menus 78 disabling size sensing 86 display panel 26 A access doors 63 adjusting Power Saver 80 aligning the image transfer unit 85 areas Area A 65 Area B 65 Area C 66 Area E 67 Area G 66 Area J 68 Area K 68 Area L 68 Area M 69 Area T 67 Area T1 67 attaching option cards 16 print server 16 auto size sensing 38 disabling 86 special sizes 86 automatic tray linking 38 avoiding paper jams 45 E Embedded Web Server 81 enabling operator panel menus
Index O See print server Internet Protocol Security 82 labels guidelines 51 laser notice 107 letterhead 49 guidelines 49 page orientation 49 printing 49 Lexmark Authorized Supplies Dealers 58 linking 38 bins 39 trays 38 loading 2000-sheet tray 33 500-sheet trays 31 multipurpose feeder 35 lock feature, security 83 operator panel 30 disabling menus 78 enabling menus 79 option cards installing 16 internal print server Parallel Interface Card 16 Serial Interface Card 16 options 5-bin mailbox 11 duplex unit
Index USB Direct interface 27 USB flash memory device 27 mailbox 90 frequent jams 90 operator panel 89 blank 89 displays black diamonds 89 paper feed blank pages in output bin 93 frequent jams 93 jammed page does not reprint 93 Paper Jam message remains after clearing jam 93 print time seems long 89 tray linking does not work 90 unexpected page breaks 90 V verify print 42 R removing firmware card 22 flash memory option 19 option cards 19 printer memory option 19 repeat print 42 reserve print 42 S safet