C935 Series User's Guide April 2007 www.lexmark.com Lexmark and Lexmark with diamond design are trademarks of Lexmark International, Inc., registered in the United States and/or other countries. All other trademarks are the property of their respective owners. © 2007 Lexmark International, Inc. All rights reserved.
Safety information Connect the power supply cord to a properly grounded electrical outlet that is near the product and easily accessible. Refer service or repairs, other than those described in the user documentation, to a professional service person. CAUTION: Do not use the fax feature during a lightning storm. Do not set up this product or make any electrical or cabling connections, such as the power supply cord or telephone, during a lightning storm. CAUTION: The printer weighs 201 lbs (91.
Contents Safety information.........................................................................................................2 Learning about the printer............................................................................................9 Printer configurations...........................................................................................................................9 Understanding the control panel................................................................................
Using labels.......................................................................................................................................38 Using card stock................................................................................................................................39 Storing paper.....................................................................................................................................39 Supported paper sizes, types, and weights.........................
283–284 and 287–288 paper jams....................................................................................................63 284–286 paper jams..........................................................................................................................65 289 staple jam...................................................................................................................................66 Understanding printer menus............................................................
Understanding printer messages.............................................................................109 List of status and error messages...................................................................................................109 Maintaining the printer..............................................................................................123 Cleaning the exterior of the printer..................................................................................................
Using Secure mode.........................................................................................................................146 Troubleshooting.........................................................................................................148 Checking an unresponsive printer...................................................................................................148 Door A will not shut properly.................................................................................
Solid color pages ...................................................................................................................................... 160 Toner fog or background shading appears on the page .......................................................................... 160 Toner rubs off ........................................................................................................................................... 161 Toner specks ....................................................
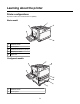
Learning about the printer Printer configurations All printer models have standard network capability.
3 Standard 520-sheet tray (Tray 1) 4–6 The High capacity feeder holds 2520 sheets and includes: • 4—520-sheet tray (Tray 2) • 5—867-sheet tray (Tray 3) • 6—1133-sheet tray (Tray 4) 7 Multipurpose feeder 8 Duplex unit 1 Standard exit bin 2 Control panel 3 Standard 520-sheet tray (Tray 1) 4-6 The Tandem tray module (TTM) holds 1560 sheets and includes: • 4—520-sheet tray (Tray 2) • 5—520-sheet tray (Tray 3) • 6—520-sheet tray (Tray 4) 7 Multipurpose feeder 8 Duplex unit 10
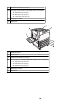
Fully configured model 1 Horizontal transport unit (HTU) 2 Control panel 3 Finisher 4 Finisher standard bin 5 Finisher bin 1 6 Finisher bin 2 (booklet-maker) 7 Standard 520-sheet tray (Tray 1) 8–10 The High capacity feeder includes: • 8—520-sheet tray (Tray 2) • 9—867-sheet tray (Tray 3) • 10—1133-sheet tray (Tray 4) 11 Multipurpose feeder 12 Duplex unit Note: The finisher shown above is the booklet finisher. The standard finisher is not shown.
Understanding the control panel Control panel item Description 1 Display Shows messages and pictures that communicate the status of the printer 2 Indicator light Indicates the printer status: • • • • Off—The power is off. Blinking green—The printer is warming up, processing data, or printing. Solid green—The printer is on, but idle. Solid red—Operator intervention is needed. 3 Keypad Enter numbers or symbols on the display.
Installing options Installing internal options CAUTION: If you are installing memory or option cards sometime after setting up the printer, turn the printer off and unplug the power cord from the wall outlet before continuing. If you have any other devices attached to the printer, turn them off as well and unplug any cables going to the printer. You can customize your printer connectivity and memory capacity by adding optional cards.
Note: This operation requires a #2 Phillips screwdriver. 1 Remove the cover and system board. a Turn the screws on the cover counterclockwise, and then remove them. b Gently pull the cover and system board away from the printer, and then remove it. 2 Use the illustration below to locate the appropriate connector. Warning: System board electrical components are easily damaged by static electricity. Touch something metal on the printer before touching any system board electronic components or connectors.
1 Firmware and flash memory card connectors 2 Memory card connector 3 Internal print server connector 4 Hard disk connector Installing a memory card CAUTION: If you are installing a memory card after setting up the printer, turn the printer off, and unplug the power cord from the wall outlet before continuing. Warning: System board electrical components are easily damaged by static electricity. Touch something metal on the printer before touching any system board electronic components or connectors.
4 Align the notches on the memory card with the ridges on the connector. 1 Notches 2 Ridges 5 Push the memory card straight into the connector until it snaps into place. 6 Reinstall the system board. Installing a flash memory or firmware card The system board has two connections for an optional flash memory or firmware card. Only one of each may be installed, but the connectors are interchangeable.
1 Plastic pins 2 Metal pins 4 Push the card firmly into place. Notes: • The entire length of the connector on the card must touch and be flush against the system board. • Be careful not to damage the connectors. 5 Reinstall the system board. Installing a printer hard disk CAUTION: If installing a printer hard disk after setting up the printer, turn the printer off, and unplug the power cord from the wall outlet before continuing.
Note: A #2 Phillips screwdriver is needed to attach the hard disk to the mounting plate. 1 Access the system board. 2 Remove the mounting plate, hard disk, ribbon cable, and attachment screws from the package. 3 Attach the ribbon cable to the hard disk. 4 Attach the mounting plate to the hard disk with the screws.
5 Press the ribbon cable connector into the hard disk connector on the system board. 6 Flip the hard disk over, and then press the three posts on the mounting plate into the holes on the system board. The hard disk snaps into place. 7 Reinstall the system board. Installing an internal print server or port interface card CAUTION: Turn the printer off, and unplug the power cord from the wall outlet before continuing.
An internal print server allows connection from the printer to the local area network (LAN). An optional port interface card expands the ways the printer can connect to a computer or external print server. 1 Access the system board. 2 Unpack the internal print server or port interface card. 3 Remove the metal plate on the system board tray that covers the connector slot and save the metal plate.
Note: This operation requires a #2 Phillips screwdriver. 1 Gently insert the system board into the printer. 2 Replace the cover screws, and then turn them clockwise. 3 Tighten the screws firmly. Attaching cables Connect the printer to the computer using a USB cable or Ethernet cable. A USB port requires a USB cable. Be sure to match the USB symbol on the cable with the USB symbol on the printer. Match the appropriate Ethernet cable to the Ethernet port.
1 USB port 2 Ethernet port 22
Loading paper and specialty media This section explains how to load the 520-, 867-, and 1133-sheet trays, and the multipurpose feeder. It also includes information about paper orientation, setting the Paper Size and Paper Type, and linking and unlinking trays. Setting the Paper Size and Paper Type The Paper Size setting is determined by the position of the paper guides in the tray for all trays except the multipurpose feeder. The Paper Size setting for the multipurpose feeder must be set manually.
5 Press repeatedly until Units of Measure appears, and then press 6 Press repeatedly until . appears next to the correct unit of measure, and then press . Submitting Selection appears, followed by the Universal Setup menu.
Loading the 520-sheet trays The Size Sensing setting is only available for A5- and statement-size paper. Loading the 520-sheet trays The printer has a standard 520-sheet tray (Tray 1), and it may have one or more optional 520-sheet trays. All 520-sheet trays support the same paper sizes and types. Paper may be loaded in the trays in either the long-edge or short-edge orientation. 1 Grasp the handle, and pull the tray out.
3 Squeeze the length guide tab inward as shown, and slide the guide to the correct position for the paper size being loaded. Note: Use the size indicators on the bottom of the tray to help position the guides. 4 Flex the sheets back and forth to loosen them, and then fan them. Do not fold or crease the paper. Straighten the edges on a level surface. 5 Load the paper stack with the recommended print side faceup.
7 Align the tray, and insert it. 8 If a different type of paper was loaded than the type previously loaded in the tray, change the Paper Type setting for the tray from the control panel. Using A5 or statement paper sizes The printer trays cannot distinguish between A5- (148 x 210 mm) and statement-size (140 x 216 mm) paper when both sizes are loaded in the printer trays. From the Size Sensing menu, specify which size you want the printer to detect.
Loading the 867- and 1133-sheet trays Although the 867-sheet tray and the 1133-sheet tray are different in appearance, they support the same paper sizes and types and require the same process for loading paper. Use these instructions to load paper in either tray: 1 Grasp the handle, and open the tray. 2 Squeeze the length guide tab inward as shown, and slide the guide to the correct position for the paper size being loaded. 3 Flex the sheets back and forth to loosen them, and then fan them.
4 Load the paper stack with the recommended print side faceup. 5 Make sure the paper guides are secure against the edges of the paper. 6 Insert the tray into the printer. 7 If a different type of paper was loaded than the type previously loaded in the tray, change the Paper Type setting for the tray from the control panel.
1 Pull the multipurpose feeder tray down. 2 Grasp the extension, and gently pull it out until it is fully extended. 3 Prepare the paper for loading. • Flex sheets of paper back and forth to loosen them, and then fan them. Do not fold or crease the paper. Straighten the edges on a level surface. • Hold transparencies by the edges, and then fan them. Straighten the edges on a level surface. Note: Avoid touching the print side of the transparencies. Be careful not to scratch them.
4 Load the paper, and then adjust the paper guides so that they lightly touch the edges of the paper stack. • Load letter, A4, and transparencies with the recommended print side facedown and the long edge of the paper entering the printer first. • Load A3, A5, B4, folio, legal, and statement paper with the recommended print side facedown and the short edge of the paper entering the printer first. Notes: – Adjust the additional paper guide to accommodate SRA3 and 12 x 19 paper sizes.
Linking and unlinking trays Linking trays Tray linking is useful for large print jobs or multiple copies. When one linked tray is empty, paper feeds from the next linked tray. When the Paper Size and Paper Type settings are the same for any trays, the trays are automatically linked. The Paper Size setting is automatically sensed according to the position of the paper guides in each tray except the multipurpose feeder.
a From the Paper menu, press repeatedly until Custom Types appears, and then press . b Press repeatedly until appears next to the custom paper type name you selected in step 7 on page 32, and then press . c Press repeatedly until appears next to the Paper Type setting you want, and then press Submitting selection appears. .
Paper and specialty media guide Paper guidelines Paper characteristics The following paper characteristics affect print quality and reliability. Consider these characteristics when evaluating new paper stock. Weight The printer can automatically feed paper weights from 60 to 220 g/m2 (16 to 58 lb bond) grain long. Paper lighter than 60 g/m2 (16 lb) might not be stiff enough to feed properly, causing jams. For best performance, use 75 g/m2 (20 lb bond) grain long paper.
Unacceptable paper The following paper types are not recommended for use with the printer: • Chemically treated papers used to make copies without carbon paper, also known as carbonless papers, carbonless copy paper (CCP), or no carbon required (NCR) paper • Preprinted papers with chemicals that may contaminate the printer • Preprinted papers that can be affected by the temperature in the printer fuser • Preprinted papers that require a registration (the precise print location on the page) greater than ±2
Lexmark consistently tests its printers with recycled paper (20–100% post-consumer waste) and a variety of test paper from around the world, using chamber tests for different temperature and humidity conditions. Lexmark has found no reason to discourage the use of today's recycled office papers, but generally the following property guidelines apply to recycled paper. • • • • Low moisture content (4–5%) Suitable smoothness (100–200 Sheffield units) Suitable sheet-to-sheet coefficient of friction (0.4–0.
Short-edge orientation Without finisher With finisher installed Loading letterhead in the 867-sheet tray Without finisher With finisher installed Loading letterhead in the 1133-sheet tray Without finisher With finisher installed Using transparencies Print samples on the transparencies being considered for use before buying large quantities. When printing on transparencies: • From MarkVision Professional, Print Properties, or the control panel, set the Paper Type to Transparency.
• Use transparencies that are 0.12–0.14 mm (4.8–5.4 mil) in thickness or 161–179 g/m2 in weight. Print quality and durability depend on the transparencies used. • To prevent print quality problems, avoid getting fingerprints on the transparencies. • Before loading transparencies, fan the stack to prevent sheets from sticking together. • We recommend Lexmark part number 12A8240 for letter-size transparencies.
• Use full label sheets. Partial sheets may cause labels to peel off during printing, resulting in a jam. Partial sheets also contaminate the printer and the cartridge with adhesive, and could void the printer and cartridge warranties. • Do not use labels with exposed adhesive. • Do not print within 1 mm (0.04 in.) of the edge of the label, of the perforations, or between die-cuts of the label. • Be sure adhesive backing does not reach to the sheet edge. Zone coating of the adhesive at least 1 mm (0.04 in.
Supported paper sizes, types, and weights The following tables provide information on standard and optional paper sources and the types of paper they support. Note: To use a paper size that is unlisted, configure a Universal Paper Size. For information on card stock and labels, see the Card Stock & Label Guide. Paper sizes supported by the printer Paper size Dimensions 520-sheet trays (standard or optional) High capacity feeder A3 297 x 420 mm (11.7 x 16.5 in.) A4 210 x 297 mm (8.3 x 11.7 in.
Paper size Dimensions 520-sheet trays (standard or optional) High capacity feeder Multipurpose feeder Duplex unit B5 Envelope 176 x 250 mm (6.9 x 9.8 in.) X X X C5 Envelope 162 x 229 mm (6.4 x 9 in.) X X X 9 Envelope 98 x 225 mm (3.9 x 8.9 in.) X X X 10 Envelope 105 x 241 mm (4.1 x 9.5 in.) X X X DL Envelope 110 x 220 mm (4.3 x 8.7 in.) X X X 1 The printer cannot simultaneously sense A5 and statement paper sizes.
Paper types and weights supported by the finisher Use this table to determine the possible output destinations of print jobs which use supported paper types and weights. The paper capacity of each output bin is listed in parentheses. Paper capacity estimations are calculated based on 75 g/m2 (20 lb) paper. The Finisher standard bin and Bin 1 support 60–220 g/m2 (16–60 lb) paper weights.
Supported finishing features 1 Horizontal transport unit 2 Finisher standard bin 3 Finisher bin 1 4 Finisher bin 2 (booklet-maker) Notes: • The finisher shown above, is the booklet finisher. Bin 2 is available only when the booklet finisher is installed. • All paper capacities are based on 75 g/m2 (20 lb) paper. Horizonal transport unit • • • • The paper capacity is 50 sheets. Finishing options are not supported in this bin. Envelopes are routed here.
Bin 1 finishing features Size Punch* Offset Single/double staple Double dual staple X X X A3 A4 A5 Executive Folio X X X X JIS B4 X JIS B5 X Legal X X Letter Statement X X X Tabloid X Universal Envelopes (any size) X X X X * For the Universal paper size, the finishing edge must be at least 9 in. (229 mm) for a 3-hole punch and 10 in. (254 mm) for a 4-hole punch.
Size Bi fold Booklet fold Saddle staple A5 X X X Executive X X X X X X X X X Universal X X X Envelopes (any size) X X X Folio JIS B4 JIS B5 Legal Letter (only SEF) Statement Tabloid SEF—The paper is loaded in the short edge orientation. The short edge of the paper enters the printer first. Bi fold—Each page is individually folded and stacked separately. Booklet fold—A multiple-page job is folded along the center into a single booklet.
Printing This chapter covers printing, printer reports, and job cancellation. The selection and handling of paper and specialty media can affect how reliably documents print. For more information, see "Avoiding jams" and "Storing paper." Installing printer software A printer driver is software that lets the computer communicate with the printer. The printer software is typically installed during the initial printer setup.
Job type Description Confidential When you send a Confidential print job to the printer, you must create a PIN in Print Properties. The PIN must be four digits using the numbers 0–9. The job is held in printer memory until you enter the PIN from the control panel and choose to print or delete the job. Repeat When you send a Repeat print job, the printer prints all requested copies of the job and stores the job in memory so you can print additional copies later.
Printing confidential and other held jobs from a Macintosh computer 1 With a document open, choose File Print. 2 From the Copies & Pages or General pop-up menu, choose Job Routing. a When using Mac OS 9 if Job Routing is not a choice from the pop-up menu, choose Plug-in Preferences Print Time Filters. b Turn down the disclosure triangle to the left of Print Time Filters, and choose Job Routing.
Printing from a USB flash memory device A USB Direct interface is located on the control panel. Insert a USB flash memory device to print supported file types. Supported file types include: .pdf, .gif, .jpeg, .jpg, .bmp, .png, .tiff, .tif, .pcx, and .dcx. Many USB flash memory devices are tested and approved for use with the printer. For more information, visit the Lexmark Web site at www.lexmark.com. Notes: • Hi-Speed USB devices must support the Full-speed standard.
3 Press until appears next to the document you want to print, and then press . Note: Folders found on the flash memory device appear as folders. File names are appended by the extension type (for example, .jpg). 4 Press to print one copy, or enter the number of copies using the keypad, and then press to initiate the print job. Note: Do not remove the USB flash memory device from the USB Direct interface until the document has finished printing.
3 Press repeatedly until Reports appears, and then press 4 Press repeatedly until Print Fonts appears, and then press repeatedly until appears next to PCL Fonts, PostScript Fonts, or PPDS Fonts, and then 5 Press press . . . After the font sample list prints, Ready appears. Printing a directory list A directory list shows the resources stored in flash memory or on the hard disk. 1 Make sure the printer is on and Ready appears. 2 From the control panel, press .
Note: Once a print job is sent, to easily cancel a job, press until Cancel a job appears, and then press . The Stopped screen appears. Press . Canceling a print job from the Windows taskbar When you send a job to print, a small printer icon appears in the right corner of the taskbar. 1 Double-click the printer icon. A list of print jobs appears in the printer window. 2 Select a job to cancel. 3 From the keyboard, press Delete.
3 Press repeatedly until Quality Menu appears, and then press 4 Press repeatedly until Print Mode appears, and then press . 5 Press repeatedly until Black Only appears, and then press . . Submitting selection appears. Using Max Speed and Max Yield The Max Speed and Max Yield settings allow you to choose between a faster print speed or a higher toner yield. Max Speed is the factory default setting. • Max Speed—Prints in a black only mode until it receives a page with color content.
Clearing jams Avoiding jams The following hints can help you avoid jams: • Use only recommended paper or specialty media. For more information, see the Card Stock & Label Guide available on the Lexmark Web site at www.lexmark.com/publications. • • • • • • • Do not load too much paper. Make sure the stack height does not exceed the indicated maximum height. Do not load wrinkled, creased, damp, or curled paper. Flex, fan, and straighten paper before loading it.
Jam numbers Area name Instructions 1 200–203 Door A Open Door A, and then remove the jam. 2 230–231 Door B Open Doors A and B, and then remove any jams. 3 241 Door C Open Door C, and then remove the jam. Open Tray 1, and then remove the jam. 4 242–244 Door D Open Door D, and then remove the jam. Open Trays 2–4, and then remove any jams. 5 250 Multipurpose feeder 1 2 3 4 Remove all paper from the multipurpose feeder. Flex and stack the paper. Reload the multipurpose feeder.
2 Lift the green lever, and then pull the paper up and toward you. Note: Make sure all paper fragments are removed. 3 Push the green lever down. 4 Close Door A. 5 Press . 230–231 paper jams 1 Open Door A by lifting the release latch and lowering the door. CAUTION: The inside of the printer might be hot. To reduce the risk of injury from a hot component, allow the surface to cool before touching it.
2 Lift the green lever, and then pull the paper up and toward you. Note: Make sure all paper fragments are removed. 3 Push the green lever down. 4 Close Door A. 5 Pull the multipurpose feeder down, and then open Door B.
6 Remove the jammed paper. 7 Close Door B. 8 Press . 241 paper jam 1 Open Door C. 2 Pull the paper down and toward you. Note: Make sure all paper fragments are removed. 3 Close Door C.
4 Open Tray 1, and then remove any crumpled paper from the tray. 5 Close the tray. 6 Press . 242–244 paper jams 1 Open Door D. 2 Pull the paper down and away from the printer.
Note: Make sure all paper fragments are removed. 3 Close Door D. 4 Clear any crumpled paper from Trays 2–4. a Open Tray 2, and then remove any crumpled paper. b Close Tray 2. c Open Tray 3, and then remove any crumpled paper. d Close Tray 3.
e Open Tray 4, and then remove any crumpled paper. f Open the inside cover, and then remove any jammed paper. g Close the inside cover, and then close Tray 4. 5 Press . 250 paper jam 1 Remove the paper from the multipurpose feeder. 2 Flex the sheets of paper back and forth to loosen them, and then fan them. Do not fold or crease the paper. Straighten the edges on a level surface.
3 Load the paper into the multipurpose feeder. 4 Slide the paper guide toward the inside of the tray until it lightly rests against the edge of the paper. 5 Press . 280–282 paper jams 1 Open Cover F. 2 Remove the jammed paper. 3 Close Cover F. 4 Press . Note: If the paper jam on the right is difficult to remove, rotate the knob clockwise.
283–284 and 287–288 paper jams Covers, knobs, and handles located behind finisher Door G Cover, knob, or handle name 1 Cover G1 2 Cover G2 3 Knob G3 4 Cover G4 5 Cover G7 6 Knob G8 7 Handle G9 63
1 Open Door G. 2 Lift both Cover G1 levers, and then remove any jammed paper. 3 Move Cover G2 to the right, and then remove any jammed paper. Note: If the paper is jammed in the rollers, rotate Knob G3 counterclockwise. 4 Move Cover G4 down, and then remove any jammed paper. 5 Move Cover G7 to the left, and then remove any jammed paper. 6 Pull Handle G9 until the tray is completely open.
7 Lift the inside cover. If the paper is jammed in the rollers, rotate Knob G8 clockwise, and then remove the jammed paper. 8 Close Door G. 9 Press . 284–286 paper jams 1 Open Door H. 2 Remove the jammed paper. 3 Close Door H. 4 Press .
289 staple jam 1 Open Door G. 2 Slide the G5 stapler toward the front of the finisher. 3 Lift the lever, and then remove the staple cartridge.
4 Open the staple cover. 5 Remove the jammed staple, and then close the cover. 6 Place the staple cartridge into the upper stapler.
7 Open the lower staple drawer. 8 Remove the staple cartridge identified on the display. 9 Remove the jammed staples, and then place the staple cartridge into the stapler.
10 Close the staple drawer. 11 Close Door G. 12 Press .
Understanding printer menus Menus list Menu Supplies Menu Paper Menu Reports A number of menus are available to make it easy for you to change printer settings: Supplies Menu Paper Menu Reports Settings Cyan Toner Magenta Toner Yellow Toner Black Toner Color PC Units Black PC Unit Waste Toner Box Staples G5 Staples G11 Staples G12 Hole Punch Box Default Source Paper Size/Type Configure MP Substitute Size Paper Texture Paper Loading Custom Types Universal Setup Bin Setup Menu Settings Page Device Stat
Supplies menu Menu item Description Cyan, Magenta, Yellow, or Black Toner Low Replace Missing or Defective OK Unsupported Shows the status of the toner cartridges Color PC Units Life Warning Replace Missing OK Normal Shows the status of the cyan, yellow, and magenta photoconductor units Black PC Unit Life Warning Replace Missing OK Normal Shows the status of the black photoconductor unit Waste Toner Box Near Full Replace Missing OK Shows the status of the waste toner bottle Staples G5, Staples G11
Paper menu Default Source menu Menu item Description Default Source Tray MP Feeder Manual Paper Manual Env Sets a default paper source for all print jobs Notes: • From the Paper menu, Configure MP must be set to Cassette in order for MP Feeder to appear as a menu setting. • Tray 1 (standard tray) is the factory default setting. • Only an installed paper source will appear as a menu setting.
Menu item Description MP Feeder Size 11 x 17 A3 A4 A5 Executive Folio JIS B4 JIS B5 Legal Letter Statement Universal 7 3/4 Envelope 10 Envelope DL Envelope C5 Envelope B5 Envelope Specifies the paper size loaded in the multipurpose feeder MP Feeder Type Plain Paper Card Stock Transparency Glossy Labels Bond Envelope Letterhead Preprinted Colored Paper Custom Type Specifies the type of paper loaded in the multipurpose feeder Manual Paper Size 11 x 17 A3 A4 A5 Executive Folio JIS B4 JIS B5 Legal Let
Menu item Description Manual Paper Type Plain Paper Card Stock Transparency Glossy Labels Bond Letterhead Preprinted Colored Paper Custom Type Specifies the type of paper being manually loaded Manual Envelope Size 7 3/4 Envelope 10 Envelope C5 Envelope B5 Envelope DL Envelope Specifies the size of the envelope being manually loaded Manual Envelope Type Envelope Custom Type Specifies the type of envelope being manually loaded Note: Plain Paper is the factory default setting.
Substitute Size menu Menu item Description Substitute Size Off Statement/A5 Letter/A4 11 x 17/A3 All Listed Substitutes a specified paper size if the requested paper size is not available Notes: • All Listed is the factory default setting. All available substitutions are allowed. • The Off setting indicates no size substitutions are allowed. • Setting a substitution lets the job print without a Change Paper message appearing.
Menu item Description Envelope Texture Smooth Normal Rough Specifies the relative texture of the envelopes loaded in a specific tray Letterhead Texture Smooth Normal Rough Specifies the relative texture of the paper loaded in a specific tray Preprinted Texture Smooth Normal Rough Specifies the relative texture of the paper loaded in a specific tray Colored Texture Smooth Normal Rough Specifies the relative texture of the paper loaded in a specific tray Custom Texture Smooth Normal Rough Speci
Menu item Description Preprinted Loading Duplex Off Determines whether 2-sided printing occurs for all jobs that specify Preprinted as the paper type Colored Loading Duplex Off Determines whether 2-sided printing occurs for all jobs that specify Colored as the paper type Glossy Loading Duplex Off Determines whether 2-sided printing occurs for all jobs that Glossy as the paper type Custom Loading Duplex Off Determines whether 2-sided printing occurs for all jobs that specify Custom as the pa
Universal Setup menu These menu items are used to specify the height, width, and feed direction of the Universal Paper Size. The Universal Paper Size is a user-defined paper size setting. It is listed with the other paper size settings and includes similar options, such as support for duplex printing and printing multiple pages on one sheet.
Menu Item Description Configure Bins Mailbox Link Link Optional Type Assignment Specifies configuration options for output bins Notes: • Mailbox is the factory default setting. • The booklet-maker bin (Bin 2) cannot be linked to another bin. Bin 2 folds all print jobs. • The Mailbox setting treats each bin as a separate mailbox. • The Link setting links together all available output bins. • The Link Optional setting links together all available output bins except the standard bin.
Menu item Description Network Setup Page Prints a report containing information about the network printer settings, such as the TCP/IP address information Notes: • This menu item appears only for network printers or printers connected to print servers. • The page prints when this item is selected.
Settings menu Setup menu Menu item Description Display Language English Francais Deutsch Italiano Espanol Dansk Norsk Nederlands Svenska Portuguese Suomi Russian Polski Magyar Turkce Cesky Simplified Chinese Traditional Chinese Korean Japanese Sets the language of the text appearing on the display Power Saver Disabled 2–240 Sets the amount of time in minutes the printer waits after a job is printed before it goes into a reduced power state Note: All languages may not be available for all printers.
Menu item Description Standby Mode Disabled 1–240 Sets the amount of time in minutes the printer waits—in a ready-to-print state, after a job is printed—before passing into Power Saver mode Notes: • Disabled is the factory default setting. • This setting must be less than or equal to the Power Saver mode setting.
Menu item Description Timeouts Network Job Timeout 0–255 Sets the amount of time in seconds that a network print job can take before it is canceled Notes: • 90 seconds is the factory default setting. • A setting value of 0 disables the timeout. • If a value of 1–9 is selected, the setting will be saved as 10.
Menu item Description Print Area Normal Whole Page Sets the logical and physical printable area Notes: • Normal is the factory default setting. When attempting to print data in the non-printable area defined by the Normal setting, the printer clips the image at the boundary. • The Whole Page setting allows the image to be moved into the non-printable area defined by the Normal setting, but the printer will clip the image at the Normal setting boundary.
Menu item Description Factory Defaults Do Not Restore Restore Returns the printer settings to the factory default settings Notes: • Do Not Restore is the factory default setting. Do Not Restore keeps the user-defined settings. • Restore returns all printer settings to the factory default settings except Network/Ports menu settings. All downloads stored in RAM are deleted. Downloads stored in flash memory or on a printer hard disk are not affected.
Menu item Description Separator Sheets None Between Copies Between Jobs Between Pages Specifies whether blank separator sheets are inserted Notes: • None is the factory default setting. • Between Copies inserts a blank sheet between each copy of a print job if Collation is set to On. If Collation is set to Off, a blank page is inserted between each set of printed pages, such as after all page 1's, all page 2's, and so on. • Between Jobs inserts a blank sheet between print jobs.
Menu item Description Staple Job Off Auto Front Back 2 Staples 4 Staples Specifies the number and position of staples on a print job Hole Punch On Off Specifies whether a print job receives hole-punch finishing Hole Punch Mode 2 holes 3 holes 4 holes Specifies the number of holes punched Notes: • • • • This menu is available only when the finisher is installed. Off is the factory default setting. Print jobs are not stapled. Auto corner staples every print job. Envelopes are not stapled.
Menu item Description Print Resolution 2400 IQ Specifies the printed output resolution Toner Darkness 1–5 Lightens or darkens the printed output Note: 2400 IQ is the factory default setting. Notes: • 4 is the factory default setting. • Selecting a smaller number can help conserve toner. • If Print Mode is set to Black Only, a setting of 5 increases toner density and darkness to all print jobs. • If Print Mode is set to Color, a setting of 5 is the same as a setting of 4.
Menu item Description Color Samples sRGB Display sRGB Vivid Display—True Black Vivid Off—RGB US CMYK Euro CMYK Vivid CMYK Off—CMYK Prints sample pages for each of the RGB and CMYK color conversion tables used in the printer Manual Color RGB Image Vivid sRGB Display Display—True Black sRGB Vivid Off RGB Text Vivid sRGB Display Display—True Black sRGB Vivid Off RGB Graphics Vivid sRGB Display Display—True Black sRGB Vivid Off Customizes the RGB color conversions Notes: • Selecting any setting prints th
Menu item Description Manual Color CMYK Image US CMYK Euro CMYK Vivid CMYK Off CMYK Text US CMYK Euro CMYK Vivid CMYK Off CMYK Graphics US CMYK Euro CMYK Vivid CMYK Off Customizes the CMYK color conversions Enhance Fine Lines Enables a print mode preferable for files such as architectural drawings, maps, electrical circuit diagrams, and flow charts Notes: • US CMYK is the US factory default setting.
Menu item Description Remove Held Jobs Confidential Held Not Restored All Removes confidential and held jobs from the printer hard disk Notes: • Selecting a setting affects only print jobs that are resident in the printer. Bookmarks, jobs on USB flash memory devices, and other types of held jobs are not affected • Selecting Not Restored removes all Print and Hold jobs that were not restored from the disk. Format Flash No Yes Formats the flash memory.
Menu item Description Job Acct Stat Print Clear Prints a list of all stored job statistics or deletes the information from the printer hard disk Notes: • A printer hard disk must be installed in the printer and operating properly for this menu item to be available. • Selecting Print prints a list of statistics. • Clear deletes all job statistics stored on the printer hard disk. Clearing job account statistics appears on the display.
PostScript menu Menu item Description Print PS Error On Off Prints a page containing the PostScript error Font Priority Resident Flash/Disk Establishes the font search order Note: Off is the factory default setting. Notes: • Resident is the factory default setting. • A formatted flash memory option card or printer hard disk must be installed in the printer and operating properly for this menu item to be available.
Menu item Description Symbol Set 10U PC-8 12U PC-850 Specifies the symbol set for each font name Notes: • 10U PC-8 is the US factory default setting. • 12U PC-850 is the international factory default setting. • A symbol set is a set of alphabetic and numeric characters, punctuation, and special symbols. Symbol sets support the different languages or specific programs such as math symbols for scientific text. Only the supported symbol sets are shown. PCL Emulation Settings Point Size 1.00–1008.
Menu item Description PCL Emulation Settings Auto CR after LF On Off Specifies whether the printer automatically performs a carriage return (CR) after a line feed (LF) control command PCL Emulation Settings Auto LF after CR On Off Specifies whether the printer automatically performs a line feed (LF) after a carriage return (CR) control command Tray Renumber Assign MP Feeder Off None 0–199 Assign Tray Off None 0–199 Assign Manual Paper Off None 0–199 Assign Man Env Off None 0–199 Configures the pr
PPDS menu Menu item Description Orientation Portrait Landscape Sets the orientation of the text and graphics on the page Lines per Page 1–255 Sets the number of lines that print on each page Notes: • Portrait is the factory default setting. • Settings are duplicated in the PCL Emulation menu. Notes: • 64 is the factory default setting. • The printer sets the amount of space between each line based on the Lines per Page, Paper Size, and Orientation settings.
Menu item Description Auto CR after LF On Off Specifies whether the printer automatically performs a carriage return (CR) after a line feed (LF) control command Notes: • Off is the factory default setting. • Settings are duplicated in the PCL Emulation menu. Auto LF after CR On Off Specifies whether the printer automatically performs a line feed (LF) after a carriage return (CR) control command Notes: • Off is the factory default setting. • Settings are duplicated in the PCL Emulation menu.
Menu item Description Scale 1–400% Scales the default font for HTML documents Notes: • 100% is the factory default setting. • Scaling can be increased in 1% increments. Orientation Portrait Landscape Sets the page orientation for HTML documents Margin Size 8–255 mm Sets the page margin for HTML documents Note: Portrait is the factory default setting. Notes: • 19 mm is the factory default setting. • Margin size can be increased in 1-mm increments.
Security menu Menu item Description Max Invalid PIN Off 2–10 Limits the number of times an invalid PIN can be entered Notes: • Off is the factory default setting. • This menu item appears only if a printer hard disk is installed. • Once the limit is reached, the confidential print jobs for that user name are deleted. Job Expiration Off 1 hour 4 hours 24 hours 1 week Limits the amount of time a confidential job stays in the printer before it is deleted Note: Off is the factory default setting.
Menu item Description TCP/IP Enable DHCP On Off Enable RARP On Off Enable BOOTP On Off AutoIP On Off Enable FTP/TFTP On Off HTTP Server Enabled On Off Lets you view or change the setting TCP/IP WINS Server Address DNS Server Address Lets you view or change the setting Note: On is the factory default setting. Note: This is a four-field IP address. IPv6 menu Use the following menu items to view or set the Internet Protocol version 6 (IPv6) information.
Menu item Description IPv6 Enable DHCPv6 Off On Enables DHCPv6 in the printer Note: Off is the factory default setting. Wireless menu Use the following menu items to view or configure the wireless internal print server settings. Note: This menu is available only for network models or printers attached to print servers when an optional wireless internal print server is installed in the printer.
Menu item Description NPA Mode Off Auto Sets the printer to perform the special processing required for bidirectional communication following the conventions defined by the NPA protocol Notes: • Auto is the factory default setting. • Changing this setting from the control panel and then exiting the menus causes the printer to restart. The menu selection is updated. Sets the size of the network input buffer Network Buffer Auto Notes: 3k to • Auto is the factory default setting.
Standard USB and USB menus Menu item Description PCL SmartSwitch On Off Sets the printer to automatically switch to PCL emulation when a print job received through a USB port requires it, regardless of the default printer language Notes: • On is the factory default setting. • When the Off setting is used, the printer does not examine incoming data. • When the Off setting is used, the printer uses PostScript emulation if the PS Smartswitch setting is On.
Menu item Description Job Buffering On Off Auto Temporarily stores jobs on the printer hard disk before printing Notes: • Off is the factory default setting. • The On setting buffers jobs on the printer hard disk. • The Auto setting buffers print jobs only if the printer is busy processing data from another input port. • Changing this setting from the control panel and then exiting the menus causes the printer to restart. The menu selection is updated.
Menu item Description PS SmartSwitch On Off Sets the printer to automatically switch to PS emulation when a print job received through a serial port requires it, regardless of the default printer language Notes: • On is the factory default setting. • When the Off setting is used, the printer does not examine incoming data. • When the Off setting is used, the printer uses PCL emulation if PCL SmartSwitch is set to On.
Menu item Description Serial Protocol DTR DTR/DSR XON/XOFF XON/XOFF/DTR XONXOFF/DTRDSR Selects the hardware and software handshaking settings for the serial port Robust XON On Off Notes: • • • • DTR is the factory default setting. DTR/DSR is a hardware handshaking setting. XON/XOFF is a software handshaking setting. XON/XOFF/DTR and XON/XOFF/DTR/DSR are combined hardware and software handshaking settings.
NetWare menu Menu item Description View Login Name Shows the assigned NetWare login name View Print Mode Shows the assigned NetWare print mode View Network Number Shows the assigned NetWare network number Activate On Off Activates or deactivates NetWare support Ethernet 802.2 On Off Enables the Ethernet 802.2 frame type setting Ethernet 802.3 On Off Enables the Ethernet 802.
Menu item Description Set Zone Provides a list of AppleTalk zones available on the network Note: The default setting is the default zone for the network. If no default zone exists, the zone marked with an * is the default setting. LexLink menu Menu item Description View Nickname Shows the assigned LexLink nickname Activate On Off Activates or deactivates LexLink support Note: On is the factory default setting.
Understanding printer messages List of status and error messages Activating Menu Changes Wait for the message to clear. Activating PPDS Mode The PPDS emulator has been activated. Wait for the message to clear. Bin Full Remove the stack of paper from the specified exit bin to clear the message. Busy Wait for the message to clear. Calibrating Wait for the message to clear. Cancel not available Wait for the message to clear. Canceling Wait for the message to clear.
Close cover 1 Press until Show me appears, and then press . An image of the cover appears. 2 Close the specified cover to clear the message. Close door 1 Press until Show me appears, and then press . An image of the open door appears. 2 Close the specified door. Copies Enter the desired number of copies. Deactivating PPDS Mode The PPDS emulator has been deactivated. Wait for the message to clear. Defragmenting Flash DO NOT POWER OFF Wait for the message to clear.
Disk recovery takes place in several phases. The percentage completed during each phase appears on the display. Empty hole punch box Empty the hole punch box, and then reinsert it into the finisher. Wait for the message to clear. repeatedly until Show Me appears, and then press Note: To learn how to empty the hole punch box, press . Enabling Menus Wait for the message to clear. Encrypting disk x/y XX% DO NOT POWER OFF Wait for the message to clear.
Internal System Error, Reload Bookmarks 1 Press until Continue appears, and then press to clear the message and continue printing. 2 Reload the bookmarks. Internal System Error, Reload Security Certificates • Reload the security certificates. • Press until Continue appears, and then press to clear the message and continue printing. Invalid Engine Code You need to download valid engine code for the printer.
Load staples • Replace the specified staple cartridge in the finisher. Note: To learn how to replace the specified staple cartridge, press for the specified staple cartridge appears, and then press . • Press repeatedly until • Cancel the print job. Continue appears, and then press repeatedly until the Show Me message to clear the message and continue printing. Menus are disabled The printer menus are disabled. The printer settings cannot be changed from the control panel.
Warning: Do not turn the printer power off while Programming flash appears on the display. Programming System Code DO NOT POWER OFF Wait for the message to clear. Warning: Do not turn the printer power off while Programming System Code appears on the display. Reading USB drive DO NOT REMOVE Wait for the message to clear. Ready The printer is ready to receive print jobs. Remote Management Active DO NOT POWER OFF The printer settings are being configured. Wait for the message to clear.
Note: x represents the number of jobs being restored. y represents the total number of jobs to be restored. Serial The printer is using a serial cable connection. The serial port is the active communication link. Some held jobs were not restored Press until Continue appears, and then press to delete the specified job. Some held jobs will not be restored • Press until Continue appears, and then press • Cancel the current job. to clear the message and resume printing.
31 Missing or defective cartridge The specified toner cartridge is either missing or not functioning properly. • Remove the specified toner cartridge, and then reinstall it. Note: To learn how to install a toner cartridge, press press . repeatedly until Show Me appears, and then • Remove the specified toner cartridge, and then install a new one. 32 Replace unsupported cartridge Remove the specified toner cartridge, and then install a supported one.
37 Insufficient memory to collate job • Press until Continue appears, and then press collating the rest of the print job. to print the portion of the job already stored and begin • Cancel the current print job. 37 Insufficient memory, some held jobs will not be restored The printer was unable to restore some or all of the confidential or held jobs on the printer hard disk. Press until Continue appears, and then press to clear the message.
54 Serial option error • Check that the serial cable is connected correctly and is the proper one for the serial port. • Check that the serial interface parameters (protocol, baud, parity, and data bits) are set correctly on the printer and host computer. • Press until Continue appears, and then press to continue printing. • Turn the printer power off and then back on to reset the printer. 54 Standard network software error • Press until Continue appears, and then press to continue printing.
56 USB port disabled • Press until Continue appears, and then press to clear the message. The printer discards any data received through the USB port. • Make sure the USB Buffer menu item is not set to Disabled. 57 Configuration change, held jobs were not restored Press until Continue appears, and then press to clear the message. 58 Too many disks installed 1 Turn the printer power off. 2 Unplug the power cord from the wall outlet. 3 Remove the extra disks.
63 Unformatted disk • Press until Continue appears, and then press • Format the disk. to clear the message and continue printing. If the error message remains, the hard disk may be defective and require replacing. 80 Scheduled maintenance Contact Customer Support, and report the message. The printer needs to have scheduled maintenance done. 82 Replace waste toner box The waste toner box is full. 1 Replace the waste toner box. Note: To learn how to replace the waste toner box, press press .
84 Replace black pc unit The black photoconductor is exhausted. Install a new photoconductor. Note: To learn how to replace the black photoconductor, press until Show Me appears, and then press . 84 Replace color pc units One or more of the color photoconductors are exhausted. Install new cyan, magenta, and yellow photoconductors. until Note: To learn how to replace the photoconductors, press Show Me appears, and then press . 84 Unsupported pc unit Replace the specified photoconductor(s).
1565 Emul Error Load Emul Option The printer automatically clears the message in 30 seconds and then disables the download emulator on the firmware card. To fix this, download the correct download emulator version from the Lexmark Web site at www.lexmark.com.
Maintaining the printer Periodically, certain tasks are required to maintain optimum print quality. Cleaning the exterior of the printer 1 Make sure that the printer is turned off and unplugged from the wall outlet. CAUTION: To avoid the risk of electric shock, unplug the power cord from the wall outlet and disconnect all cables to the printer before proceeding. 2 Remove paper from the paper support and paper exit tray. 3 Dampen a clean, lint-free cloth with water.
3 Press until View supplies appears, and then press . The status of each supply appears. Printing a menu settings page Print a menu settings page to review the status of the supplies. 1 Make sure the printer is on and Ready appears. 2 From the control panel, press . 3 Press repeatedly until Reports appears, and then press 4 Press repeatedly until Menu Settings Page appears, and then press . . Printing Menu Settings appears. After the menu settings page prints, Ready appears.
Ordering photoconductors When 84 Black pc unit life warning or 84 color pc unit life warning appears, order replacement photoconductor(s). Part name Part number Single PC Unit C930X72G 3 Pack of PC Units C930X73G Ordering staple cartridges When Staples low or missing appears, order the specified staple cartridge. When Staples empty or misfed or Load staples appears, replace the specified staple cartridge. See the illustrations inside the stapler finisher door for more information.
1 Waste toner box 2 Door E6 3 Door E 4 Printhead lens cleaner 5 E6 Door tab 1 Unpack the replacement waste toner box and accessories.
2 Open Door E (front printer door). Warning: To avoid overexposing the photoconductors, do not leave the door open for more than 10 minutes. 3 Grasp the E6 Door tab, and then push the door down. 4 Remove the old printhead lens cleaner from Door E, and then discard it.
5 Remove the waste toner box. 6 Place the plastic cover over the waste toner box. 7 Place the waste toner box in the recycling bag.
8 Use the new printhead lens cleaner to clean the printhead lenses. 9 Insert the new waste toner box. 10 Place the new printhead lens cleaner in the notches of Door E.
11 Close Door E6. 12 Close Door E. 13 Remove all paper from the printer paper path. Visit www.lexmark.com/recycling to learn how to recycle the waste toner box. Cleaning the printhead lenses Clean the printhead lenses when you replace the waste toner box or when you encounter print quality problems.
1 Waste toner box 2 Door E6 3 Door E (front door) 4 Printhead lens cleaner 5 E6 Door tab 1 Open Door E (front door). Warning: To avoid overexposing the photoconductors, do not leave the door open for more than 10 minutes.
2 Grasp the E6 Door tab, and then push the door down. 3 Remove the waste toner box. 4 Locate and remove the printhead lens cleaner from Door E. Note: If you are replacing the waste toner box, use the printhead lens cleaner that shipped with it.
5 Insert the padded tip of the printhead lens cleaner into the first printhead lens opening. 6 Push the printhead lens cleaner all the way to the back of the lens, and then pull it out. 7 Clean the remaining three printhead lenses. 8 Insert the waste toner box.
9 Place the printhead lens cleaner in the notches of Door E. 10 Close Door E6. 11 Close Door E.
Replacing a photoconductor Replace the black photoconductor when 84 Replace black pc unit appears. Replace the cyan, magenta, and yellow photoconductors when 84 Replace color pc units appears. 1 Open Door E (front printer door). Warning: To avoid overexposing the photoconductors, do not leave the door open for more than 10 minutes. 2 Release the bar by pressing the E5 button located on the bottom of the E5 latch, lift the E5 latch, and then press the bar down.
4 Unpack the replacement photoconductor. 5 Align and insert the end of the photoconductor. 6 Remove the tape from the top of the photoconductor.
7 Press the button forward to insert the photoconductor while removing the casing. 8 Lift the bar up, and then press latch E5 down so that it holds the bar in position. 9 Close Door E. Replacing a toner cartridge Replace the specified toner cartridge (cyan, magenta, yellow, or black) when 88 Replace toner appears. The printer will not continue printing until the specified cartridge is replaced. 1 Make sure the printer is on and Ready or 88 Replace toner appears.
3 Open Door E (front printer door). 4 Unlock the specified cartridge by turning the cartridge counterclockwise until the arrow-shaped handle points toward the unlock symbol. 5 Remove the cartridge by gently pulling it away from the printer.
6 Align the arrow-shaped handle with the unlock symbol, and then insert the toner cartridge all the way into the opening. 7 Lock the cartridge by turning the arrow-shaped cartridge handle clockwise until it points toward the lock symbol. 8 Close Door E. Recycling Lexmark products To return Lexmark products to Lexmark for recycling: 1 Visit our Web site at www.lexmark.com/recycle. 2 Find the product type you want to recycle, and then select your country from the list.
Moving the printer Before moving the printer CAUTION: The printer weighs 201 lb (91.2 kg); therefore, it requires at least four people or a properly rated mechanical handling system to lift it safely. Use the handholds on the sides of the printer to lift it, and make sure your fingers are not under the printer when you set it down. Disconnect all cords and cables from the printer before moving it.
1 2 in. (50 mm) 2 2.7 ft (825 mm) 3 1.4 ft (418 mm) 4 4 in. (100 mm) 5 2.3 ft (693 mm) Shipping the printer When shipping the printer, use the original packaging or call the place of purchase for a relocation kit.
Administrative support Adjusting the brightness or contrast of the display 1 Make sure the printer is on and Ready appears. 2 From the control panel, press . 3 Press repeatedly until Settings appears, and then press 4 Press repeatedly until Utilities Menu appears, and then press 5 Press repeatedly until appears next to LCD Brightness or LCD Contrast, and then press . . . Note: Select LCD Brightness to adjust the brightness setting or LCD Contrast to adjust the contrast setting.
5 Press repeatedly until Power Saver appears, and then press 6 Press repeatedly to decrease or Power Saver mode, and then press . repeatedly to increase the number of minutes before the printer enters . Available settings range from 2–240 minutes. Note: Power Saver settings can also be adjusted by issuing a Printer Job Language (PJL) command. For more information, see the Technical Reference available on the Lexmark Web site at www.lexmark.com/publications.
Locking the control panel menus using the Embedded Web Server You can use the control panel lockout functionality to create a PIN and choose specific menus to lock. Each time a locked menu is selected, the user will be prompted to enter the correct PIN. The PIN does not affect access through the Embedded Web Server. To lock control panel menus: 1 Open a Web browser. In the address bar, type the IP address of the printer or print server to be protected using the format: http://ip_address/.
Supporting IPSec Internet Protocol Security (IPSec) provides authentication and encryption at the network layer allowing all application and network connections over the IP protocol to be secure. IPSec can be set up between the printer and up to five hosts, using both IPv4 and IPv6. To configure IPSec using the Embedded Web Server: 1 Open a Web browser. In the address bar, type the IP address of the printer or print server to be protected using the format: http://ip_address. 2 Click Configuration.
To install and use certificates as part of the credentials: 1 Open a Web browser. In the address bar, type the IP address of the printer or print server to be protected using the format: http://ip_address/. 2 Click Configuration. 3 Under Other Settings, click Network/Ports. 4 Click Certificate Management. To enable and configure 802.1x after installing the required certificates: 1 Open a Web browser.
5 Click TCP/IP Port Access. 6 Click the box to the right of Secure Mode Active. Note: If Secure Mode Active is gray or not selectable, create an administrative password and try again. 7 Select a setting for each listed port, and then click Submit.
Troubleshooting Checking an unresponsive printer If your printer is not responding, make sure: • The power cord is plugged into the printer and a properly grounded electrical outlet. • The electrical outlet is not turned off by any switch or breaker. • The Ground Fault Circuit Interrupter (GFCI) has not tripped. From the back of the printer, press the GFCI Reset button located above the printer power cord.
2 Press the A1 green lever down to its normal position. 3 Close Door A. Solving printing problems Multiple-language PDFs do not print The documents contain unavailable fonts. 1 Open the document you want to print in Adobe Acrobat. 2 Click the printer icon. The Print dialog appears. 3 Select Print as image. 4 Click OK. Control panel display is blank or displays only diamonds The printer self test failed. Turn the printer off, wait about 10 seconds, and then turn the printer back on.
Make sure the correct printer software is installed • Verify that you are using the correct printer software. • If you are using a USB port, make sure you are running Windows Vista, Windows XP, Windows Server 2003, Windows 2000/98/Me and using compatible printer software. Make sure the internal print server is installed properly and working • Make sure the internal print server is properly installed and that the printer is connected to the network.
5 Press until Page Protect appears, and then press 6 Press until Off appears, and then press . . Job prints from the wrong tray or on the wrong paper Check the Paper Type setting Make sure the Paper Type setting matches the paper loaded in the tray. Incorrect characters print Make sure the printer is not in Hex Trace mode. If Ready Hex appears on the display, you must exit Hex Trace mode before you can print your job. Turn the printer off and back on to exit Hex Trace mode.
4 Press until Timeouts appears, and then press 5 Press until Print Timeout appears, and then press 6 Press until the desired value appears, and then press . . . Solving option problems Option does not operate correctly or quits after it is installed These are possible solutions. Try one or more of the following: Reset the printer Turn the printer off, wait for about 10 seconds, and then turn the printer on. Check to see if the option is connected to the printer 1 Turn the printer off.
Finisher If the finisher does not operate correctly, these are possible solutions. Try one or more of the following: Make sure the connection between the finisher and the printer is secure If the finisher is listed on the menu settings page, but paper jams when it exits the printer and enters the finisher, it may not be properly installed. Reinstall the finisher. For more information, see the hardware setup documentation that shipped with the finisher.
Make sure there is not too much paper in the paper tray Make sure the stack of paper you load does not exceed the maximum stack height indicated in the tray or on the multipurpose feeder. Check the paper guides Move the guides in the tray to the correct positions for the paper size loaded. Has the paper absorbed moisture due to high humidity? • Load paper from a fresh package. • Store paper in its original wrapper until you use it.
5 Press until Jam Recovery appears, and then press 6 Press until On or Auto appears, and then press . . Solving print quality problems The information in the following topics may help you solve print quality problems. If these suggestions do not correct the problem, contact Customer Support. You may have a printer part that requires adjustment or replacement. Isolating print quality problems To help isolate print quality problems, print the print quality test pages: 1 Turn the printer off.
Characters have jagged or uneven edges If you are using downloaded fonts, verify that the fonts are supported by the printer, the host computer, and the software program. Clipped images These are possible solutions. Try one or more of the following: Check the paper guides Move the guides in the tray to the correct positions for the paper size loaded. Check the Paper Size setting Make sure the Paper Size setting matches the paper loaded in the tray.
Incorrect margins Check the paper guides Move the guides in the tray to the correct positions for the paper size loaded. Check the Paper Size setting Make sure the Paper Size setting matches the paper loaded in the tray. Check the Page size setting Before sending the job to print, specify the correct page size in Print Properties or the software program. Light colored line, white line, or incorrectly colored line These are possible solutions.
Has the paper absorbed moisture due to high humidity? • Load paper from a fresh package. • Store paper in its original wrapper until you use it. Print irregularities These are possible solutions. Try one or more of the following: Has paper absorbed moisture due to high humidity? • Load paper from a fresh package. • Store paper in its original wrapper until you use it. Check the Paper Type setting Make sure the Paper Type setting matches the paper loaded in the tray.
A toner cartridge may be defective Replace the toner cartridge. Print is too light These are possible solutions. Try one or more of the following: Check the darkness, brightness, and contrast settings The Toner Darkness setting is too dark, the RGB Brightness setting is too dark, or the RGB Contrast setting is too high. • From Print Properties, change these settings. Note: This solution applies to Windows users only. • From the Quality menu, change these settings.
Repeating defects Do marks occur repeatedly only in one color and multiple times on a page? Replace the photoconductor(s) if the defects occur every: • 44 mm (1.7 in.) • 94 mm (3.7 in.) Note: The printer has four photoconductors: cyan, magenta, yellow, and black. The cyan, magenta, and yellow photoconductors must all be replaced at the same time. The black photoconductor can be replaced separately.
Toner rubs off These are possible solutions. Try one or more of the following: Check the Paper Type setting Make sure the Paper Type setting matches the paper loaded in the tray. Check the Paper Texture setting Make sure the Paper Texture setting matches the paper loaded in the tray. Toner specks These are possible solutions. Try one or more of the following: A toner cartridge may be defective Replace the toner cartridge. Is there toner in the paper path? Contact Customer Support.
Uneven print density ABCDE ABCDE ABCDE Replace the photoconductor(s). Note: The printer has four photoconductors: cyan, magenta, yellow, and black. The cyan, magenta, and yellow photoconductors must all be replaced at the same time. The black photoconductor can be replaced separately. Solving color quality problems This section helps answer some basic color-related questions and describes how some of the features provided in the Quality Menu can be used to solve typical color problems.
Why doesn't the printed color match the color I see on the computer screen? The color conversion tables used in Auto Color Correction mode generally approximate the colors of a standard computer monitor. However, because of technology differences that exist between printers and monitors, there are many colors that can also be affected by monitor variations and lighting conditions.
Manual Color menu Object type RGB Image RGB Text RGB Graphics Color conversion tables • Vivid—Produces brighter, more saturated colors and may be applied to all incoming color formats. • sRGB Display—Produces an output that approximates the colors displayed on a computer monitor. Black toner usage is optimized for printing photographs. • Display—True Black—Produces an output that approximates the colors displayed on a computer monitor. Uses only black toner to create all levels of neutral gray.
To access a detailed Color Samples set from the Embedded Web Server: 1 Open a Web browser. 2 In the address bar, type the network printer IP address. 3 Click Configuration. 4 Click Color Samples. 5 Click Detailed Options to narrow the set to one color range. 6 When the Detailed Options page appears, select a color conversion table. 7 Enter the RGB or CMYK color number. 8 Enter an Increment value from 1–255. Note: The closer the value is to 1, the narrower the color sample range will appear.
Notices Product name: Lexmark C930 Machine type: 5057 Model(s): 030 Edition notice April 2007 The following paragraph does not apply to any country where such provisions are inconsistent with local law: LEXMARK INTERNATIONAL, INC., PROVIDES THIS PUBLICATION “AS IS” WITHOUT WARRANTY OF ANY KIND, EITHER EXPRESS OR IMPLIED, INCLUDING, BUT NOT LIMITED TO, THE IMPLIED WARRANTIES OF MERCHANTABILITY OR FITNESS FOR A PARTICULAR PURPOSE.
Conventions Note: A Note identifies something that could help you. Warning: A Warning identifies something that could damage your product hardware or software. CAUTION: A CAUTION identifies something that could cause you harm. CAUTION: This type of CAUTION indicates that you should not touch the marked area. CAUTION: This type of CAUTION indicates a hot surface. CAUTION: This type of CAUTION indicates a shock hazard. CAUTION: This type of CAUTION indicates a tipping hazard.
This device has been designed to operate only with the antenna provided. Use of any other antenna is strictly prohibited per regulations of Industry Canada. To prevent radio interference to the licensed service, this device is intended to be operated indoors and away from windows to provide maximum shielding. Equipment (or its transmit antenna) that is installed outdoors is subject to licensing.
English Hereby, Lexmark International, Inc., declares that this type of equipment is in compliance with the essential requirements and other relevant provisions of Directive 1999/5/EC. Español Por medio de la presente, Lexmark International, Inc. declara que este producto cumple con los requisitos esenciales y cualesquiera otras disposiciones aplicables o exigibles de la Directiva 1999/5/CE. Eesti Käesolevaga kinnitab Lexmark International, Inc.
Note: Some modes may not apply to your product. 1-meter average sound pressure, dBA Printing 55 dBA Ready 32 dBA Values are subject to change. See www.lexmark.com for current values. Temperature information Ambient temperature 15.6C° – 32.2C° Shipping and storage temperature -40.0C° – 60.0C° Waste from Electrical and Electronic Equipment (WEEE) directive The WEEE logo signifies specific recycling programs and procedures for electronic products in countries of the European Union.
If you experience trouble with this equipment, for repair or warranty information, contact Lexmark International, Inc. at www.lexmark.com or your Lexmark representative. If the equipment is causing harm to the telephone network, the telephone company may request that you disconnect the equipment until the problem is resolved. This equipment contains no user serviceable parts. For repair and warranty information, contact Lexmark International, Inc. See the previous paragraph for contact information.
This equipment shall not be set up to make automatic calls to the Telecom's 111 Emergency Service. This equipment may not provide for the effective hand-over of a call to another device connected to the same line. This equipment should not be used under any circumstances that may constitute a nuisance to other Telecom customers. Some parameters required for compliance with Telecom's telepermit requirements are dependent on the equipment associated with this device.
Laser advisory label A laser notice label may be affixed to this printer as shown: Power consumption Product power consumption The following table documents the power consumption characteristics of the product. Note: Some modes may not apply to your product. Mode Description Power consumption (Watts) Printing The product is generating hard-copy output from electronic inputs. 800 W Copying The product is generating hard-copy output from hard-copy original documents.
Lexmark International, Inc., Lexington, KY This limited warranty applies to the United States and Canada. For customers outside the U.S., refer to the country-specific warranty information that came with your product. This limited warranty applies to this product only if it was originally purchased for your use, and not for resale, from Lexmark or a Lexmark Remarketer, referred to in this statement as “Remarketer.
TO THE EXTENT PERMITTED BY APPLICABLE LAW, NEITHER LEXMARK NOR ITS THIRD PARTY SUPPLIERS OR REMARKETERS MAKE ANY OTHER WARRANTY OR CONDITION OF ANY KIND, WHETHER EXPRESS OR IMPLIED, WITH RESPECT TO THIS PRODUCT, AND SPECIFICALLY DISCLAIM THE IMPLIED WARRANTIES OR CONDITIONS OF MERCHANTABILITY, FITNESS FOR A PARTICULAR PURPOSE, AND SATISFACTORY QUALITY. ANY WARRANTIES THAT MAY NOT BE DISCLAIMED UNDER APPLICABLE LAW ARE LIMITED IN DURATION TO THE WARRANTY PERIOD.
Index Numerics 1133-sheet tray loading 28 1565 Emul Error Load Emul Option 122 200–285.
disabling control panel menus 142 Disabling DLEs 110 Disabling Menus 110 Disk Corrupted.
Custom Types 77 Default Source 72 diagram of 70 Finishing 85 Help 108 HTML 97 Image 98 IPv6 100 LexLink 108 NetWare 107 Network 101 Paper Loading 76 Paper Size/Type 72 Paper Texture 75 PCL Emul 93 PDF 92 PostScript 93 PPDS 96 Quality 87 Reports 79 Security 99 Serial 104 Settings 81 Standard Network 101 Standard USB 103 Standard USB 103 Substitute Size 75 Supplies 71 TCP/IP 99 USB Direct 108 Utilities 90 Wireless 101 Menus are disabled 113 moving the printer 140 multipurpose feeder loading 29 N Net
printer configurations 9 models 9 moving 140 setting up in new location 140 shipping 141 Printer locked, enter PIN 113 printer messages 1565 Emul Error Load Emul Option 122 200–285.
printer options troubleshooting drawers 152 finisher 153 flash memory card 153 hard disk with adapter 153 internal print server 153 memory card 153 option not working 152 USB/parallel interface card 153 printhead lenses cleaning 130 Printing 113 printing A5 paper 27 black-and-white 52 directory list 51 font sample list 50 from Macintosh 46 from USB flash memory device 49 from Windows 46 installing printer software 46 max speed and max yield 53 menu settings page 50, 124 network setup page 50 print quality t
jobs do not print 149 Large jobs do not collate 151 multiple-language PDFs do not print 149 paper curl 157 paper frequently jams 153 tray linking does not work 151 unexpected page breaks occur 151 troubleshooting, print quality blank pages 155 characters have jagged edges 156 clipped images 156 dark lines 156 gray background 156 light colored line, white line, or incorrectly colored line 157 poor transparency quality 161 print irregularities 158 print is too dark 158 print is too light 159 print quality tes