E450dn User’s Guide June 2006 Lexmark and Lexmark with diamond design are trademarks of Lexmark International, Inc., registered in the United States and/or other countries. © 2006 Lexmark International, Inc. All rights reserved. 740 West New Circle Road Lexington, Kentucky 40550 www.lexmark.
Edition: June 2006 The following paragraph does not apply to any country where such provisions are inconsistent with local law: LEXMARK INTERNATIONAL, INC., PROVIDES THIS PUBLICATION “AS IS” WITHOUT WARRANTY OF ANY KIND, EITHER EXPRESS OR IMPLIED, INCLUDING, BUT NOT LIMITED TO, THE IMPLIED WARRANTIES OF MERCHANTABILITY OR FITNESS FOR A PARTICULAR PURPOSE. Some states do not allow disclaimer of express or implied warranties in certain transactions; therefore, this statement may not apply to you.
Contents Chapter 1: Learning about the printer .............................................................................. 5 Printer overview ............................................................................................................................................... 5 Understanding the control panel ...................................................................................................................... 9 Chapter 2: Understanding print media guidelines ...................
Contents Chapter 7: Troubleshooting ............................................................................................. 51 Online customer support ................................................................................................................................ 51 Calling for service .......................................................................................................................................... 51 Checking an unresponsive printer ...........................
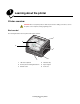
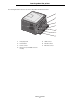
1 Learning about the printer Printer overview CAUTION: Do not set up this product or make any electrical or cabling connections, such as the power cord or telephone, during a lightning storm. Basic model The following illustration shows a printer with its base features.
Learning about the printer The following illustration shows a rear view of the printer with its base features.
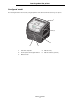
Learning about the printer Configured model The following illustration shows a fully configured printer. Items denoted with an asterisk (*) are options.
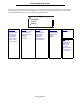
Learning about the printer A number of menus are available to make it easy for you to change printer settings. The diagram shows the menu index on the control panel and the menus and items available under each menu. For more information about menus and menu items, see the Menus and Messages book on the Software and Documentation CD.
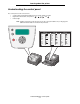
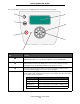
Learning about the printer Understanding the control panel The control panel consists of these items: • • • A 4-line, liquid crystal display (LCD) that can show both graphics and text Eight buttons: Back, Menu, Stop, Select ( ), , , , and Indicator light Note: A label located on the inside front door shows the control panel buttons in your language. An additional translated label is included in the printer box.
Learning about the printer The use of the buttons and the layout of the display panel are described in the following table. 1 7 2 6 3 5 4 Button or control panel item Function 1 Back Press the Back button to return to the last screen you viewed. Note: Changes made on a screen will not be applied if you press the Back button. 2 Menu Press the Menu button to open the menu index. Note: The printer must be in the Ready state to access the menu index.
Learning about the printer Button or control panel item 5 and 6 Navigation buttons Function The Up and Down buttons are used to move up or down lists. When navigating through a list using the Up or Down button, the cursor moves one line at a time. Pressing the Down button at the bottom of the screen changes the screen to the next whole page. The Left or Right buttons are used to move within a screen such as moving from one menu index item to another.
2 Understanding print media guidelines Print media is paper, card stock, transparencies, labels, and envelopes. The last four are sometimes referred to as specialty media. The printer provides high-quality printing on a variety of media. A number of things must be considered concerning media before printing. This chapter provides information on making media selections and caring for media.
Understanding print media guidelines Tips on choosing the right print media Selecting the right paper or other print media reduces printing problems. For best print quality, try a sample of the paper or other print media you are considering before buying large quantities. Note: Certain paper types will not print at maximum speed. See the Card Stock & Label Guide available on our Lexmark Web site at www.lexmark.
Understanding print media guidelines Condition paper while it is still in the original wrapper. To condition it, store it in the same environment as the printer for 24 to 48 hours before printing to let the paper stabilize in the new conditions. Extend the time several days if the storage or transportation environment is very different from the printer environment. Thick paper may also require a longer conditioning period because of the mass of material.
Understanding print media guidelines • • • Make sure the Paper Type, Paper Texture, and Paper Weight settings are correct. (See “Paper Menu” in the Menus and Messages Guide located on the Software and Documentation CD for detailed information about these settings.) Make sure the paper is properly loaded in the source. Flex paper back and forth, and then fan. Do not fold or crease the paper. Straighten the edges on a level surface.
Understanding print media guidelines • Be sure to set the Paper Type to Transparency from the printer driver or from MarkVision™ Professional to avoid damaging the printer. • Use transparencies designed specifically for laser printers. Transparencies must be able to withstand temperatures of 175°C (350°F) without melting, discoloring, offsetting or releasing hazardous emissions. • To prevent print quality problems, avoid getting fingerprints on the transparencies.
Understanding print media guidelines Labels The printer can print on many labels designed for use with laser printers, except for vinyl labels. These labels are supplied in letter size, A4 size, and legal size sheets. Label adhesives, face sheet (printable stock), and topcoats must be able to withstand temperatures of 210°C (410°F) and pressure of 25 pounds per square inch (psi). Try a sample of any label you are considering using with the printer before purchasing a large quantity.
Understanding print media guidelines • • Do not use preprinted card stock manufactured with chemicals that may contaminate the printer. Preprinting introduces semi-liquid and volatile components into the printer. The use of grain short card stock is recommended. Storing print media Use the following guidelines to avoid paper feeding problems and uneven print quality. • For best results, store media in an environment where the temperature is approximately 21°C (70°F) and the relative humidity is 40%.
3 Printing This chapter covers information about loading print media, sending a job to print, canceling a print job, printing a menu settings page, and printing a font list. For tips on paper jam prevention and print media storage, see Avoiding jams on page 18 or Storing print media on page 18. Loading the 250-sheet tray Your printer has a 250-sheet tray. You may have also purchased an optional 550-sheet drawer. Print media is loaded into both components the same way.
Printing 2 Squeeze the side guide tab, and slide the guide to the outside of the tray. 3 Squeeze the rear guide tab, and slide the guide to the correct position for the size media you are loading. 4 Flex the sheets back and forth to loosen them, then fan them. Do not fold or crease the print media. Straighten the edges on a level surface. 5 Load print media in the tray. Note: Load letterhead paper with the design side facing down.
Printing 6 Pinch the side guide tab, and slide the guide until it lightly rests against the edge of the media. 7 Insert the tray. 8 Extend the paper support on the output bin.
Printing Extending the tray for legal or folio size paper To load legal or folio size paper, extend the paper tray. You may also attach a dust cover (not available for all models) on the back of the printer to protect the tray while it is extended. 1 Press down on the latch at the back of the tray. 2 Expand the tray until the extender locks into place. Attaching the dust cover The dust cover helps protect the paper tray from the environment.
Printing Loading the manual feeder The manual feeder can feed different types of print media, such as a transparency, postcard, note card, or envelope. It can be used for single-page printing only. To load print media: Note: Do not add or remove print media when the printer is printing from the manual feeder or when the control panel indicator light is blinking. Doing so may cause a jam. 1 Slide the width guides to the outside of the feeder.
Printing 3 Slide the width guides until they lightly rest against the edge of the media. 4 Hold both sides of the print media close to the manual feeder, and push it into the printer until it automatically engages. There is a brief pause between the time the printer engages the print media and when it feeds into the printer. Warning: Do not force the print media into the feeder. Forcing the media causes jams.
Printing Linking trays Tray linking enables the automatic linking feature for trays when you load the same size and type of print media in multiple sources. For example, if you have the same size and type of print media loaded in the paper tray and the optional paper drawer, the printer selects print media from the paper tray until it becomes empty, and then the printer automatically feeds print media from the next linked source—the optional drawer.
Printing Canceling a print job There are several methods for canceling a print job. • Canceling a job from the printer control panel • Canceling a job from a computer running Windows – – • Canceling a job from the taskbar Canceling a job from the desktop Canceling a job from a Macintosh computer – – Canceling a job from a Macintosh computer running Mac OS 9.
Printing Canceling a job from a Macintosh computer Canceling a job from a Macintosh computer running Mac OS 9.x When you send a job to print, the printer icon for your selected printer appears on the desktop. 1 Double-click the printer icon on your desktop. A list of print jobs appears in the printer window. 2 Select the print job you want to cancel. 3 Click the trash can icon.
Printing Printing a font sample list To print samples of the fonts currently available for your printer: 1 Make sure the printer is on and the Ready message appears. 2 Press on the control panel. 3 Press until Reports appears, and then press 4 Press until Print Fonts appears, and then press 5 Press until the . . appears next to PCL Fonts, or PostScript Fonts, and then press .
Printing Macintosh 1 From a word processor, spreadsheet, browser, or other application, select File Æ Print. 2 In the Copies & Pages or General pop-up menu, select Job Routing. 3 a When using Mac OS 9, if Job Routing is not a choice on the pop-up menu, select Plug-in Preferences Æ Print Time Filters. b Turn down the disclosure triangle to the left of Print Time Filters, and select Job Routing. c In the pop-up menu, select Job Routing.
4 Installing options Accessing the system board CAUTION: To install memory, you must access the printer system board. Turn the printer off, and unplug the power cord from the wall outlet before continuing. 1 Remove the paper tray.
Installing options 2 Press button on the left side of the printer to release and lower the front door. 3 Open the rear exit.
Installing options 4 Press both buttons on the front right side of the machine to release the side access door. 5 Loosen the four screws of the cover to gain access to the system board.
Installing options Adding a memory card The system board has one connector for an optional memory card. CAUTION: If you are installing a memory card after setting up the printer, turn the printer off, and unplug the power cord from the wall outlet before continuing. Note: Memory options designed for other Lexmark printers may not work with your printer. 1 Access the system board (see Accessing the system board on page 30). 2 Push open the latches on both ends of the memory connector.
Installing options 3 Squeeze the retainers, and align the plastic pins on the flash memory card with the holes on the system board. 4 Push the flash memory card firmly into the holes of the system board until it snaps into place. Note: The flash card can be installed in the top or the bottom set of connector pin holes. 5 Close the side access door. 6 Close the rear exit door. 7 Close the front door. 8 Plug the power cord into the wall outlet and turn the printer on to continue print functions.
Installing options Installing an optional 550-sheet drawer CAUTION: Turn the printer off, and unplug the power cord from the wall outlet before continuing. Place the printer unit directly on top of the 550-sheet drawer. Recognizing installed options The printer driver should automatically recognize the newly-installed option when the printer is turned on. If it does not, you can add the appropriate option manually. 1 Click Start Æ Settings Æ Printers. 2 Select the printer icon.
5 Maintaining the printer Periodically, you need to complete certain tasks to maintain optimum print quality. These tasks are covered in this chapter. If several people are using the printer, you may want to designate a key operator to do the setup and maintenance of your printer. Refer printing problems and maintenance tasks to this key operator. In the U.S., contact Lexmark at 1-800-539-6275 for information about Lexmark Authorized Supplies Dealers in your area.
Maintaining the printer Conserving supplies Several settings in your application software or on the display let you conserve toner and paper. For more information on changing these settings, see the Menus and Messages Guide. Supply Menu selection item What the setting does Toner Toner Darkness in the Defaults Æ Quality Menu Lets you adjust the level of toner released on a sheet of print media. The values range from 1 (lightest setting) to 10 (darkest setting).
Maintaining the printer Ordering a toner cartridge Part number Description Average cartridge yield Photoconductor kit Up to 30,000 standard pages1 World Wide E250X22G For the USA and Canada3 E450A21A Toner Cartridge 6,000 standard pages2 E450H21A High Yield Toner Cartridge 11,000 standard pages2 E450A11A Return Program Toner Cartridge 6,000 standard pages2 E450H11A High Yield Return Program Toner Cartridge 11,000 standard pages2 For Europe, the Middle East, and Africa4 E450A21E Toner Car
Maintaining the printer Changing a toner cartridge 1 Turn the printer off. 2 Press the button on the left side of the printer to release and lower the front door. 3 Remove the toner cartridge. a Press the release button on the base of the print cartridge assembly. b Grasp the handle, pulling up and out to remove the toner cartridge.
Maintaining the printer 4 Unpack the new toner cartridge. Note: You can use the packing material from the new toner cartridge to ship the old toner cartridge back to Lexmark for recycling. For more information, see Recycling Lexmark products on page 44. 5 Firmly shake the toner cartridge in all directions to distribute the toner.
Maintaining the printer Changing a photoconductor kit Warning: When replacing a photoconductor kit, do not leave the new photoconductor kit exposed to direct light for an extended period of time. Extended light exposure can cause print quality problems. 1 Turn the printer offc 2 Remove the print cartridge assembly. a Press the button on the left side of the printer to release the front door. b Lower the front door. c Grasp the toner cartridge handle, and pull up and out.
Maintaining the printer 3 Remove the toner cartridge: a Press the button on the base of the print cartridge assembly. b Grasp the toner cartridge handle, and pull up and out. 1 2 4 Unpack the new photoconductor kit. 5 Install the toner cartridge into the new print cartridge assembly by aligning the white rollers on the toner cartridge with the white arrows on the tracks of the photoconductor and pushing the toner cartridge in as far as it will go.
Maintaining the printer 6 Install the print cartridge assembly into the printer by aligning the green arrows on the guides of the print cartridge assembly with the green arrows on the tracks in the printer and pushing the print cartridge assembly in as far as it will go. 7 Close the front door. 8 Turn the printer back on. 9 Reset the photoconductor counter (see the instruction sheet that shipped with the new photoconductor kit). Note: Print your printer menu settings pages.
Maintaining the printer Recycling Lexmark products To return Lexmark products to Lexmark for recycling: 1 Visit our Web site: www.lexmark.com/recycle Follow the instructions on the computer screen.
6 Clearing jams By carefully selecting print media and loading it properly, you should be able to avoid most paper jams. For more information on avoiding paper jams, see Avoiding jams on page 18. If jams do occur, follow the steps outlined in this section. To resolve the paper jam messages, you must clear the entire paper path, and then press to clear the message and resume printing.
Clearing jams Clearing printer jams Clearing a jam We recommend clearing the entire paper path when a paper jam occurs. To clear the jam: 1 Open the paper tray. If necessary, remove the tray from the printer. 2 Remove the jammed media.
Clearing jams 3 Press down on the green duplex flap to release jammed pages from the duplex area. 4 Remove any crumpled paper from the tray. CAUTION: Fuser or fuser area may be hot. 5 Open the front door, and remove the print cartridge assembly.
Clearing jams 6 Lift the flap at the front of the printer, and remove the jammed pages beneath the flap. CAUTION: Fuser or fuser area may be hot. 7 Open the rear exit, and remove the jammed pages. 8 After you have cleared the jams, reinstall the print cartridge assembly, and make sure all printer doors and trays are closed. 9 Press . Note: Jam recovery is set to Auto by default.
Clearing jams Clearing a jam in the manual feeder 1 Remove the paper from the manual feeder. 2 Open the front door, and remove the print cartridge assembly.
Clearing jams 3 Lift the flap at the front of the printer, and remove the jammed pages beneath the flap. 4 Open the rear exit, and remove the jammed pages. CAUTION: Fuser or fuser area may be hot. 5 After you have cleared the jams, reinstall the print cartridge assembly, and make sure all printer doors and trays are closed. 6 Press . Note: Jam recovery is set to Auto by default.
7 Troubleshooting Online customer support Customer support is available on our Lexmark Web site at www.lexmark.com. Calling for service When you call for printer service, describe the problem you are experiencing, the message on the display, and the troubleshooting steps you have already taken to find a solution. You need to know your printer model type and serial number. See the label on the printer for this information. The serial number is also listed on the menu settings page.
Troubleshooting Printing multiple-language PDFs Symptom Cause Solution Some documents do not print. The documents contain unavailable fonts. 1 Open the document you want to print in Adobe Reader. 2 Click the printer icon. The Print dialog appears. 3 Check the Print as image box. 4 Click OK. Solving printing problems Symptom Cause Solution The control panel display is blank or displays only diamonds. The printer self test failed.
Troubleshooting Symptom Cause Solution Job takes longer than expected to print. The job is too complex. Reduce the complexity of your print job by eliminating the number and size of fonts, the number and complexity of images, and the number of pages in the job. Page Protect is set to On. Set Page Protect to Off from the Setup Menu. For more information, see the Menus and Messages Guide. The printer Operating Mode is set to Quiet mode or Eco-mode. Set the Operating Mode to Normal.
Troubleshooting Turning on Reduced Curl mode If the print media is curled once it exits the printer, Reduced Curl mode can be turned on to help reduce the problem. However, before turning this mode on, you should try the possible solutions offered in Troubleshooting. For more information, see The paper is curled once it exits the printer. Note: Print speed is significantly slower in Reduced Curl mode. 1 Turn the printer off.
Troubleshooting Problem Solution Service messages A service message indicates printer failure that may require service. Turn the printer off, wait about 10 seconds, and then turn the printer on. If the error recurs, write down the error number, the problem, and a detailed description. Call for service. Solving paper feed problems Symptom Cause Solution Paper frequently jams. You are using paper that does not meet the printer specifications. Try the following: • Flex the paper.
Troubleshooting Solving print quality problems The information in the following table may help you solve print quality problems. If these suggestions still do not correct the problem, call for service. You may have a printer part that requires adjustment or replacement. Problem Action Print is too light. • • • • • Toner smears, or print comes off the page. • If you are printing on an uneven print surface, change the Paper Weight and Paper Texture settings in the Paper menu.
Troubleshooting Problem Action Entire page is white. • Make sure the packaging material is removed from the photoconductor kit. • Check the photoconductor kit and toner cartridge to be sure they are installed correctly. • Replace the photoconductor kit. Streaks appear on the page. • If you are using preprinted forms, make sure the ink can withstand temperatures of 210°C (410°F). • Replace the photoconductor kit or toner cartridge. Printing is too dark.
Troubleshooting Problem Action Part or all of the page is printed in black. Check the photoconductor kit to see if it is installed correctly. The job prints, but the top and side margins are incorrect. • Make sure the Paper Size setting in the Paper menu is correct. • Make sure the margins are set correctly in your software application. Ghost images appear. • Make sure the Paper Type setting in the Paper menu is correct. • Replace the photoconductor kit. Gray background prints.
Troubleshooting The Quality menu control panel options can be adjusted to help improve print quality. Menu selection Purpose Values Print Resolution To select printed output resolution 600 dpi 1200 dpi 2400 Image Quality* Toner Darkness Lightens or darkens printed output and conserves toner 1–10 Small Font Enhancer Enhances the quality of small fonts Off* Fonts Only Fonts/Images 8* is the default setting. Select a lower number to lighten the printed output or save toner.
8 Administrative support Adjusting control panel brightness and contrast The LCD control panel contrast and brightness can be adjusted through the Utilities menu. For more information, see the Menus and Messages Guide. The LCD Brightness and LCD Contrast settings are adjusted separately. To change the LCD Brightness or LCD Contrast settings: 1 Make sure your printer is on.
Administrative support Enabling control panel menus 1 Turn the printer off. 2 Press and hold 3 Release both buttons when Performing Self Test appears on the display. and while turning the printer on. The printer performs its power-on sequence, and then Config Menu appears on the first line of the display. 4 Press until Panel Menus appears, and then press 5 Press until Enable appears, and then press . .
Administrative support Adjusting Power Saver To adjust the Power Saver setting: 1 Make sure the printer is on and Ready appears on the display. 2 Press on the control panel. 3 Press until Settings appears, and then press 4 Press until Setup Menu appears, and then press 5 Press until Power Saver appears, and then press 6 Using the numeric pad or the right and left arrows on the control panel, enter the number of minutes for the printer to wait before entering Power Saver. . . .
Administrative support Selecting printer operating mode You can select the printer operating mode that best suits your needs. For more information, see the Menus and Messages guide on the Software and Documentation CD Note: Quiet Mode and Eco-Mode can be on at the same time. Operating mode Printer performance Normal The printer provides optimum performance. Quiet Mode The printer operates quietly by printing output at a slower speed.
Administrative support Supporting SNMPv3 (Simple Network Management Protocol version 3) SNMPv3 protocol allows for encrypted and authenticated network communications. It also lets the administrator select a desired level of security. Prior to use, at least one user name and password must be established from the settings page. To configure for SNMPv3 through the Embedded Web Server of the printer: 1 Open your Web browser.
Notices Conventions Avis de conformité aux normes de l’industrie du Canada Note: A note identifies something that could help you. Cet appareil numérique de classe B est conforme aux exigences de la norme canadienne relative aux équipements pouvant causer des interférences NMB-003. Warning: A warning identifies something that could damage your product hardware or software. European Community (EC) directives conformity CAUTION: A caution identifies something that could cause you harm.
Notices Hot surface notice Power regulation notice Warning: Electrical surges can be very destructive to equipment connected to AC power sources. If you plan to operate your printer at a voltage exceeding the voltage range(s) in the following table, you must attach a suitably rated and certified power-regulating device (such as a voltage stabilizer or UPS device) to the printer power supply.
Notices VARNING! Om apparaten används på annat sätt än i denna bruksanvisning specificerats, kan avnändaren utsättas för osynlig laserstrålning, som överskrider gränsen för laserklass 1. Laser notice The printer is certified in the U.S. to conform to the requirements of DHHS 21 CFR Subchapter J for Class I (1) laser products, and elsewhere is certified as a Class I laser product conforming to the requirements of IEC 60825-1. Class I laser products are not considered to be hazardous.
Notices Limitation of liability Your sole remedy under this limited warranty is set forth in this document. For any claim concerning performance or nonperformance of Lexmark or a Remarketer for this product under this limited warranty, you may recover actual damages up to the limit set forth in the following paragraph. Lexmark's liability for actual damages from any cause whatsoever will be limited to the amount you paid for the product that caused the damages.
Index A I adjust paper tray 20 adjusting Power Saver 62 Authorized Supplies Dealers 36 automatic tray sensing 25 Identifying printers 5 Indicator light 10 J jams avoiding 18 clearing 46 C cancelling jobs 26 card stock guidelines 17 loading 19 characteristics, media letterhead 15 control panel 9, 27 disabling menus 60 enabling menus 61 L labels guidelines 17 printer maintenance 17 letterhead 15 guidelines 15 page orientation 15 printing 15 loading print media card stock 19 paper input tray 19 multipurp
Index security 63 sending a job to print 25 Simple Network Management Protocol 64 supplies maintenance kit 43 recycling 44 toner cartridge 38 operating modes 63 options memory card 33 ordering, toner cartridge 38 P panel, control 9 paper 13 choosing 13 letterhead 15 preprinted forms 15 unsatisfactory types 14 paper tray adjustment 20 photoconductor ordering 40 photoconductor kit changing 41 recycling 44 Power Saver, adjusting 62 preprinted forms 15 print cartridge See toner cartridge Print media guidelin