E352dn User’s Guide June 2006 Lexmark and Lexmark with diamond design are trademarks of Lexmark International, Inc., registered in the United States and/or other countries. © 2006 Lexmark International, Inc. All rights reserved. 740 West New Circle Road Lexington, Kentucky 40550 www.lexmark.
Edition: June 2006 Safety information The following paragraph does not apply to any country where such provisions are inconsistent with local law: LEXMARK INTERNATIONAL, INC., PROVIDES THIS PUBLICATION “AS IS” WITHOUT WARRANTY OF ANY KIND, EITHER EXPRESS OR IMPLIED, INCLUDING, BUT NOT LIMITED TO, THE IMPLIED WARRANTIES OF MERCHANTABILITY OR FITNESS FOR A PARTICULAR PURPOSE.
Contents Chapter 1: Learning about the printer .............................................................................. 5 Printer overview ............................................................................................................................................... 5 Understanding the control panel ...................................................................................................................... 8 Chapter 2: Understanding print media guidelines ...................
Contents Chapter 7: Troubleshooting ............................................................................................. 50 Online customer support ................................................................................................................................ 50 Calling for service .......................................................................................................................................... 50 Checking an unresponsive printer ...........................
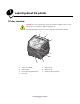
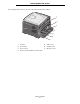
1 Learning about the printer Printer overview CAUTION: Do not set up this product or make any electrical or cabling connections, such as the power cord or telephone, during a lightning storm. The following illustration shows a front view of the printer with its features labeled.
Learning about the printer The following illustration shows a rear view of the printer with its features labeled.
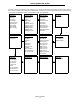
Learning about the printer A number of menus are available to make it easy for you to change printer settings. The diagram shows the menu index on the control panel and the menus and items available under each menu. For more information about menus and menu items, see the Menus and Messages guide on the Software and Documentation CD.
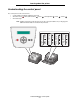
Learning about the printer Understanding the control panel The control panel consists of these items: • • • A 2-line liquid crystal display (LCD) that shows text Six buttons: Stop , Menu (with Left Menu , Select An indicator light , and Right Menu ), Back , and Go Note: A label located on the inside front door shows the control panel buttons in your language. An additional translated label is included in the printer box.
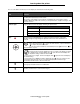
Learning about the printer The use of the buttons and the layout of the display are described in the following table. Button or control panel item Function Display The display shows messages describing the current state of the printer and indicating possible printer problems you must resolve. The top line of the display is the header line. It will display the current status and the Supplies (Warnings) status. This is where you view printer status, supplies messages, and show-me screens.
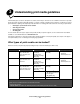
2 Understanding print media guidelines Print media is paper, card stock, transparencies, labels, and envelopes. The last four are sometimes referred to as specialty media. The printer provides high-quality printing on a variety of media. A number of things must be considered concerning print media before printing. This chapter provides information on making print media selections and caring for print media.
Understanding print media guidelines Selecting print media Selecting the appropriate print media for the printer helps you avoid printing problems. The following sections contain guidelines for choosing the correct print media for the printer: • • • • • Paper Transparencies Envelopes Labels Card stock Paper To ensure the best print quality and feed reliability, use 75 g/m2 (20 lb) xerographic, grain long paper. Business papers designed for general business use may also provide acceptable print quality.
Understanding print media guidelines Smoothness The degree of smoothness of paper directly affects print quality. If the paper is too rough, the toner does not fuse to the paper properly, resulting in poor print quality. If the paper is too smooth, it can cause paper feeding or print quality issues. Smoothness needs to be between 100 and 300 Sheffield points; however, smoothness between 150 and 250 Sheffield points produces the best print quality.
Understanding print media guidelines Selecting paper Proper paper loading helps prevent jams and ensures trouble-free printing. To help avoid jams or poor print quality: • • Always use new, undamaged paper. Flex the paper stack back and forth. Do not fold or crease the paper. Straighten the edges on a level surface. • Before loading paper, know the recommended print side of the paper. This information is usually indicated on the paper package.
Understanding print media guidelines Printing on letterhead Check with the manufacturer or vendor to determine whether the chosen preprinted letterhead is acceptable for laser printers. Page orientation is important when printing on letterhead. Use the following table for help when loading letterhead in the media sources.
Understanding print media guidelines Envelopes Try a sample of any envelope you are considering using with the printer before buying large quantities. For instructions on loading envelopes, see Loading the manual feeder on page 23. When printing on envelopes: • • • • • • • • • To achieve the best possible print quality, use only high-quality envelopes that are designed for use in laser printers.
Understanding print media guidelines • Do not use label sheets that have adhesive to the edge of the sheet. Zone coating of the adhesive at least 1 mm (0.04 in.) away from edges is recommended. Adhesive material contaminates the printer and could void the warranty. • If zone coating of the adhesive is not possible, remove a 3 mm (0.125 in.) strip on the leading and driver edge, and use a non-oozing adhesive. • Remove a 3 mm (0.125 in.
Understanding print media guidelines Avoiding jams Use appropriate print media (paper, transparencies, labels, and card stock) to help ensure trouble-free printing. For more information, see What types of print media can be loaded? on page 10. Note: Try a limited sample of any print media you are considering using with the printer before purchasing large quantities. By selecting the appropriate print media and loading it properly, you can avoid most jams.
3 Printing This chapter covers information about loading print media, sending a job to print, printing confidential jobs, canceling a print job, printing a menu settings page, and printing a font list. For tips on paper jam prevention and print media storage, see Avoiding jams on page 17 or Storing print media on page 16. Loading the 250-sheet tray Your printer has a 250-sheet tray. You may have also purchased an optional 550-sheet drawer. Print media is loaded into both components in the same way.
Printing 2 Adjust the rear paper guide, to the correct position for the size print media you are loading. Note: There should be a slight gap between the rear paper guide and the paper stack. 3 Flex the sheets back and forth to loosen them, then fan them. Do not fold or crease the print media. Straighten the edges of the paper stack on a level surface. 4 Insert the paper stack. Note: Make sure the paper stack is laying flat in the tray and is not above the maximum paper fill indicators.
Printing 5 Adjust the two side paper guides to touch lightly against the sides of the paper stack. 6 Insert the 250-sheet tray.
Printing 7 Extend the paper support on the output bin. Extending the tray for legal-size or folio-size paper To load legal-size or folio-size paper, extend the paper tray. You may also attach a dust cover (if available) on the back of the printer to protect the tray while it is extended. 1 Press down on the latch at the back of the tray. 2 Expand the tray until the extender locks into place.
Printing Attaching the dust cover The dust cover helps protect the tray from the environment. It also keeps the tray from being knocked out of position while it is extended. Attach the dust cover to the back of the printer by aligning the tabs on the cover to the holes on the printer, then snap the cover into place. Note: This feature may not be available for some models.
Printing Loading the manual feeder The manual feeder is located at the front of the printer and can only feed one sheet of print media at a time. For information on acceptable print media to use in the manual feeder, see What types of print media can be loaded? on page 10. To load the manual feeder: 1 Place a sheet of the selected print media, print side facing up, at the center of the manual feeder, but only to the point where its leading edge can contact the paper guides.
Printing Linking trays Tray linking enables the automatic linking feature for trays when you load the same size and type of print media in multiple sources. The printer automatically links the trays; when one tray is empty, print media feeds from the next linked tray.
Printing Canceling a print job There are several methods for canceling a print job. • Canceling a job from the printer control panel • Canceling a job from a computer running Windows – – • Canceling a job from the taskbar Canceling a job from the desktop Canceling a job from a Macintosh computer – – Canceling a job from a Macintosh computer running Mac OS 9.
Printing Canceling a job from a Macintosh computer Canceling a job from a Macintosh computer running Mac OS 9.x When you send a job to print, the printer icon for your selected printer appears on the desktop. 1 Double-click the printer icon on your desktop. A list of print jobs appears in the printer window. 2 Select the print job you want to cancel. 3 Click the trash can icon.
Printing Printing a network setup page If the printer is attached to a network, print a network setup page on the printer to verify the network connection. This page also provides important information that helps in configuring for network printing. 1 Make sure the printer is on and Ready appears. 2 From the control panel, press until Network Menu appears, and then press . Standard Network appears. 3 Press , and then press 4 Press until Reports appears.
4 Installing options Accessing the system board CAUTION: To install memory, you must access the printer system board. Turn the printer off, and unplug the power cord from the wall outlet before continuing. 1 Remove the 250-sheet paper tray.
Installing options 2 Press the button on the left side of the printer to release and lower the front door. 3 Open the rear exit door.
Installing options 4 Press both buttons on the front right side of the machine to release the side access door. 5 Loosen the four screws on the cover, but do not remove them completely. 6 Slide the cover to the left until the screws fit into the keyholes on the cover. 7 Remove the cover and set it aside.
Installing options Adding a memory card The system board has one connector for an optional memory card. CAUTION: If you are installing a memory card after setting up the printer, turn the printer off, and unplug the power cord from the wall outlet before continuing. Note: Memory options designed for other Lexmark printers may not work with your printer. 1 Access the system board (see Accessing the system board on page 28). 2 Push open the latches on both ends of the memory connector.
Installing options Adding a flash memory card CAUTION: If you are installing a flash memory card after setting up the printer, turn the printer off, and unplug the power cord from the wall outlet before continuing. Note: Flash memory card options designed for other Lexmark printers may not work with your printer. 1 Access the system board (see Accessing the system board on page 28). 2 Unpack the flash memory card.
Installing options Installing an optional 550-sheet drawer CAUTION: Turn the printer off, and unplug the power cord from the wall outlet before continuing. Place the printer unit directly on top of the 550-sheet drawer.
Installing options Recognizing installed options The printer driver should automatically recognize the newly-installed option when the printer is turned on. If it does not, you can add the appropriate option manually. Note: If you have not installed your printer driver yet, follow the appropriate instructions on the Setup sheet supplied with your printer. After you have installed a printer driver, return here to complete these instructions. 1 Click Start Æ Settings Æ Printers.
5 Maintaining the printer Periodically, you need to complete certain tasks to maintain optimum print quality. These tasks are covered in this chapter. If several people are using the printer, you may want to designate a key operator to do the setup and maintenance of your printer. Refer printing problems and maintenance tasks to this key operator. In the U.S., contact Lexmark at 1-800-539-6275 for information about Lexmark Authorized Supplies Dealers in your area.
Maintaining the printer The recommended supplies specifically designed for the printer are: Part number Description Average cartridge yield* Photoconductor kit 30,000 standard pages† World Wide E250X22G For the USA and Canada1 E250A21A Toner Cartridge 3,500 standard pages1 E250A11A Return Program Toner Cartridge 3,500 standard pages1 E352H21A High Yield Toner Cartridge 9,000 standard pages1 E352H11A High Yield Return Program Toner Cartridge 9,000 standard pages1 For Europe, the Middle Eas
Maintaining the printer Ordering a toner cartridge When the 88 Toner low message appears, you should order a new toner cartridge. You can print a few hundred pages after the 88 Toner low message appears. You need to have a new toner cartridge available when the current one no longer prints satisfactorily. Changing a toner cartridge 1 Turn the printer off. 2 Press the button on the left side of the printer to release and lower the front door.
Maintaining the printer 3 Remove the toner cartridge. a Press the release button on the base of the print cartridge assembly. b Grasp the handle, pulling up and out to remove the toner cartridge. 1 2 4 Unpack the new toner cartridge. Note: You can use the packing material from the new toner cartridge to ship the old toner cartridge back to Lexmark for recycling. For more information, see Recycling Lexmark products on page 42.
Maintaining the printer 6 Install the new toner cartridge by aligning the white rollers on the toner cartridge with the white arrows on the tracks of the photoconductor and pushing the toner cartridge in as far as it will go. The toner cartridge clicks into place when correctly installed. 7 Close the front door. 8 Turn the printer back on.
Maintaining the printer Changing a photoconductor kit Warning: When replacing a photoconductor kit, do not leave the new photoconductor kit exposed to direct light for an extended period of time. Extended light exposure can cause print quality problems. 1 Turn the printer off. 2 Remove the print cartridge assembly. a Press the button on the left side of the printer to release the front door. b Lower the front door. c Grasp the toner cartridge handle, and pull up and out.
Maintaining the printer 5 Install the toner cartridge into the new print cartridge assembly by aligning the white rollers on the toner cartridge with the white arrows on the tracks of the photoconductor and pushing the toner cartridge in as far as it will go. The cartridge clicks into place when correctly installed.
Maintaining the printer Maintenance kit 80 Scheduled maintenance appears on the display after 120,000 pages have printed to let you know it is time to replace printer maintenance items. Order a maintenance kit when 80 Scheduled maintenance first appears on the display. The maintenance kit contains a media exit guide and all the items necessary to replace the pick rollers, the fuser, and the transfer roller. Note: The maintenance kit may not be available in all geographies.
6 Clearing jams By carefully selecting print media and loading it properly, you should be able to avoid most paper jams. For more information on avoiding paper jams, see Avoiding jams on page 17. If jams do occur, follow the steps outlined in this section. To resolve the paper jam messages, you must clear the entire paper path, and then press to clear the message and resume printing.
Clearing jams Clearing a jam We recommend clearing the entire paper path when a paper jam occurs. 1 Open the 250-sheet tray. If necessary, remove the tray from the printer. 2 Remove the jammed media.
Clearing jams 3 Press down on the green duplex flap to release jammed pages from the duplex area, and then remove any crumpled paper. 4 Install the 250-sheet tray.
Clearing jams 5 Open the front door, and remove the print cartridge assembly. 1 2 3 CAUTION:The fuser or fuser area may be hot. 6 Lift the green flap at the front of the printer, and then remove the jammed pages beneath it.
Clearing jams 7 Open the rear exit, and remove the jammed pages. 8 After you have cleared the jams, reinstall the print cartridge assembly, and make sure all printer doors are closed. 9 Press . Note: Jam recovery is set to Auto by default. When jam recovery is set to Auto, the memory that holds the image of a page may be reused after the page is printed but before it has successfully exited the printer if that memory is needed for another use.
Clearing jams Clearing a jam in the manual feeder 1 Remove the paper from the manual feeder. 2 Open the front door, and remove the print cartridge assembly.
Clearing jams 3 Lift the green flap at the front of the printer, and then remove the jammed pages beneath the flap. CAUTION:The fuser or fuser area may be hot. 4 Open the rear exit door, and remove the jammed pages. 5 After you have cleared the jams, reinstall the print cartridge assembly, and make sure all printer doors are closed. 6 Press . Note: Jam recovery is set to Auto by default.
7 Troubleshooting Online customer support Customer support is available on the Lexmark Web site at www.lexmark.com. Calling for service When you call for printer service, describe the problem you are experiencing, the message on the display, and the troubleshooting steps you have already taken to find a solution. You need to know your printer model type and serial number. See the label on the printer for this information. The serial number is also listed on the menu settings page.
Troubleshooting Printing multiple-language PDFs Symptom Cause Solution Some documents do not print. The documents contain unavailable fonts. 1 Open the document you want to print in Adobe Reader. 2 Click the printer icon. The Print dialog appears. 3 Select the Print as image check box. 4 Click OK. Solving printing problems Symptom Cause Solution The control panel display is blank or displays only diamonds. The printer self test failed.
Troubleshooting Symptom Cause Solution Incorrect characters print. You are using an incompatible parallel cable. If you are using a parallel interface, make sure you are using an IEEE 1284-compliant parallel cable. We recommend Lexmark part number 1021231 for the standard parallel port. The printer is in Hex Trace mode. If Ready Hex appears on the display, you must exit Hex Trace mode before you can print your job. Turn the printer off and back on to exit Hex Trace mode. Collate is not set to On.
Troubleshooting 6 Press to save. The control panel returns to Config Menu / Reduced Curl. 7 Press until Exit Config Menu appears, and then press . Activating Menu Changes appears. Reduced Curl mode is turned on. Resetting the Printer appears briefly followed by Performing Self Test, and the printer returns to Ready.
Troubleshooting Solving service message issues Problem Solution Service messages A service message indicates printer failure that may require service. Turn the printer off, wait about 10 seconds, and then turn the printer on. If the error recurs, write down the error number, the problem, and a detailed description. Call for service. Solving paper feed problems Symptom Cause Solution Paper frequently jams. You are using print media that does not meet the printer specifications.
Troubleshooting Solving print quality problems The information in the following table may help you solve print quality problems. If these suggestions do not correct the problem, call for service. You may have a printer part that requires adjustment or replacement. Problem Action Print is too light. • • • • • Toner smears, or print comes off the page. • If you are printing on an uneven print surface, change the Paper Weight and Paper Texture settings in the Paper menu.
Troubleshooting Problem Action Entire page is white. • Make sure the packaging material is removed from the photoconductor kit. • Check the photoconductor kit and toner cartridge to be sure they are installed correctly. • Replace the photoconductor kit. Streaks appear on the page. • If you are using preprinted forms, make sure the ink can withstand temperatures of 210°C (410°F). • Replace the photoconductor kit or toner cartridge. Printing is too dark.
Troubleshooting Problem Action Part or all of the page is printed in black. Check the photoconductor kit to see if it is installed correctly. The job prints, but the top and side margins are incorrect. • Make sure the Paper Size setting in the Paper menu is correct. • Make sure the margins are set correctly in your program. Ghost images appear. • Make sure the Paper Type setting in the Paper menu is correct. • Replace the photoconductor kit. Gray background prints.
Troubleshooting The Quality menu control panel options can be adjusted to help improve print quality. Menu selection Purpose Values Print Resolution Select printed output resolution. 600 dpi 1200 dpi 2400 Image Quality* Toner Darkness Lighten or darken printed output and conserve toner. 1–10 8* is the default setting. Select a lower number to lighten the printed output or save toner. Brightness Adjust the gray value of printed objects. -6 – +6 0* is the default setting.
Troubleshooting Cleaning the printhead lens Some print quality problems can be solved by cleaning the printhead lens. 1 Turn the printer off. 2 Press the button on the left side of the printer to release and lower the front door. 3 Remove the print cartridge assembly by pulling on the toner cartridge handle. Note: Do not press the button on the print cartridge assembly. 1 2 3 Place the print cartridge assembly on a flat, clean surface.
Troubleshooting 5 Gently wipe the printhead lens with a clean, dry, lint-free cloth. Warning: Not using a clean, dry, lint-free cloth may result in damage to the printhead lens. 6 Install the print cartridge assembly into the printer by aligning the arrows on the guides of the print cartridge assembly with the arrows on the tracks in the printer and pushing the print cartridge assembly in as far as it will go. 7 Close the front door. 8 Turn the printer on.
8 Administrative support Disabling control panel menus Since many people could be using the printer, an administrator may choose to lock the control panel menus to keep others from changing menu settings from the control panel. Note: Disabling the control panel menus does not prevent access to Print and Hold functionality. To disable the control panel menus so that changes cannot be made to the printer default settings: 1 Turn the printer off.
Administrative support Restoring factory default settings When you first enter the printer menus from the control panel, you may notice an asterisk (*) to the left of a value in the menus. This asterisk indicates the factory default setting. These settings are the original printer settings. (Factory defaults may vary for different regions.) When you select a new setting from the control panel, Submitting Selection appears.
Administrative support Setting the system password Setting the system password protects configuration of the Embedded Web Server. A system password is also required for Secure mode and confidential communication with MVP. To set the system password: 1 Open your Web browser. In the address line, enter the IP address of the printer you want to configure using the format: http: //ip_address/. 2 Click Configuration. 3 Under Other Settings, click Security.
Administrative support Locking the control panel menus Control panel Menu Lockout lets you create a PIN number and choose specific menus to lock. Each time a locked menu is selected, the user will be prompted to enter the correct PIN at the control panel. The PIN does not affect any access through the EWS. To lock control panel menus: 1 Open your Web browser. In the address line, enter the IP address of the printer you want to configure using the format: http://ip_address/. 2 Click Configuration.
Notices Conventions Note: A note identifies something that could help you. CAUTION: A caution identifies something that could cause you harm. Warning: A warning identifies something that could damage your product hardware or software. Electronic emission notices Federal Communications Commission (FCC) compliance information statement The Lexmark E352dn (4512-430) has been tested and found to comply with the limits for a Class B digital device, pursuant to Part 15 of the FCC Rules.
Notices European Community (EC) directives conformity This product is in conformity with the protection requirements of EC Council directives 89/336/EEC and 73/23/EEC on the approximation and harmonization of the laws of the Member States relating to electromagnetic compatibility and safety of electrical equipment designed for use within certain voltage limits.
Notices Noise emission levels The following measurements were made in accordance with ISO 7779 and reported in conformance with ISO 9296. 1-meter average sound pressure, dBA Printing 52 Idling inaudible Quiet Mode 49 Sleep / Power Saver Mode inaudible Product energy consumption The following table documents the power consumption characteristics of the product Mode Description Power consumption Ready The product is on, but idle.
Notices Waste from Electrical and Electronic Equipment (WEEE) directive The WEEE logo signifies specific recycling programs and procedures for electronic products in countries of the European Union. We encourage the recycling of our products. If you have further questions about recycling options, visit the Lexmark Web site at www.lexmark.com for your local sales office phone number. Laser advisory label A laser notice label may be affixed to this printer.
Notices If this product does not function as warranted during the warranty period, contact a Remarketer or Lexmark for repair or replacement (at Lexmark's option). If this product is a feature or option, this statement applies only when that feature or option is used with the product for which it was intended. To obtain warranty service, you may be required to present the feature or option with the product.
Notices Additional rights Some states do not allow limitations on how long an implied warranty lasts, or do not allow the exclusion or limitation of incidental or consequential damages, so the limitations or exclusions contained above may not apply to you. This limited warranty gives you specific legal rights. You may also have other rights that vary from state to state.
Index Numerics labels 16 paper 12 150-sheet output bin 5 250-sheet tray 5, 14 550-sheet drawer 5, 14, 33 installing 33 I identifying printers 5 indicator light 9 installed options recognizing 34 A adjusting paper tray 19 automatic tray linking 24 J jams avoiding 17 clearing 44 identifying 43 C canceling jobs from a computer running Windows 25 from a Macintosh computer 26 card stock 16 guidelines 10 cleaning the printhead lens 59 control panel 8, 27 disabling menus 61 enabling menus 61 L labels 15 gui
Index P storing 35 supplies ordering maintenance kit 42 photoconductor kit 39 toner cartridge 37 system board accessing 28 system password setting 63 panel, control 8 paper letterhead 13 preprinted forms 13 recommended types 11 unsatisfactory types 12 paper guide 19 paper support 5 paper tray adjustment 19 photoconductor kit changing 40 end-of-life 39 ordering 39 recycling 42 preprinted forms 13 print cartridge See toner cartridge print media jams avoiding 17 print media specifications 11 printer setting