Lexmark E360d and E360dn Series User's Guide May 2008 www.lexmark.com Lexmark and Lexmark with diamond design are trademarks of Lexmark International, Inc., registered in the United States and/or other countries. All other trademarks are the property of their respective owners. © 2008 Lexmark International, Inc. All rights reserved.
Contents Safety information.............................................................................7 Learning about the printer...............................................................9 Finding information about the printer...........................................................................................................................9 Printer configurations...................................................................................................................................
Paper characteristics...................................................................................................................................................................... 39 Unacceptable paper ...................................................................................................................................................................... 40 Selecting paper.....................................................................................................................
Understanding printer menus.......................................................64 Menus list................................................................................................................................................................................64 Paper menu...........................................................................................................................................................................65 Default Source menu...................................
Replacing supplies............................................................................................................................................................100 Replacing the toner cartridge ..................................................................................................................................................100 Replacing the photoconductor kit .........................................................................................................................
Paper frequently jams .................................................................................................................................................................115 Paper jam message remains after jam is cleared ...........................................................................115 Page that jammed does not reprint after you clear the jam.........................................................................................116 Solving print quality problems..................
Safety information Connect the power supply cord to a properly grounded electrical outlet that is near the product and easily accessible. CAUTION—SHOCK HAZARD: Do not set up this product or make any electrical or cabling connections, such as the power supply cord or telephone, during a lightning storm. Refer service or repairs, other than those described in the user documentation, to a professional service person.
• Lift the printer off of the optional drawer and set it aside instead of trying to lift the drawer and printer at the same time. Note: Use the handholds located on both sides of the printer to lift it off the optional drawer.
Learning about the printer Finding information about the printer Setup information Description Where to find The Setup information gives you instructions for setting You can find the Setup information on the side of the printer box up the printer. Follow the set of instructions for local, or on the Lexmark Web site at www.lexmark.com. network, or wireless, depending on what you need. Help Description Where to find The Help gives you instructions for using the software.
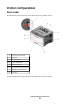
Printer configurations Basic model The following illustration shows the printer front with its basic features or parts: 1 Front door release button 2 Paper stop 3 Standard exit bin 4 Printer control panel 5 System board door 6 Standard 250-sheet tray (Tray 1) 7 Multipurpose feeder door 8 Front door The following illustration shows the printer back with its basic features or parts: Learning about the printer 10
1 Rear door 2 Ethernet port Note: The Ethernet port is a feature on network models only.
Configured models The following illustration shows the printer configured with an optional 250-sheet drawer: 1 Front door release button 2 Paper stop 3 Standard exit bin 4 Printer control panel 5 System board door 6 Standard 250-sheet tray (Tray 1) 7 Optional 250-sheet drawer (Tray 2) 8 Multipurpose feeder door 9 Front door Learning about the printer 12
The following illustration shows the printer configured with an optional 550-sheet drawer: 1 Front door release button 2 Paper stop 3 Standard exit bin 4 Printer control panel 5 System board door 6 Standard 250-sheet tray (Tray 1) 7 Optional 550-sheet drawer (Tray 2) 8 Multipurpose feeder door 9 Front door Learning about the printer 13
Understanding the printer control panel Item 1 Description Menus button ( ) • Opens the menus. Note: The menus are available only when the printer is in the Ready state. • Returns the printer control panel to the top level menu screen if pressed while in a menu. 2 Display Shows messages that communicate the status of the printer or indicates possible printer problems that must be resolved 3 Indicator light Indicates the printer status: • • • • 4 Stop button ( Off—The power is off.
Item Description 7 Left arrow button Performs the same functions as the right arrow button. See the description for the right arrow button. 8 Back button ( Returns the display to the previous screen ) Using the standard exit bin and paper stop The standard exit bin holds up to 150 sheets of 20 lb paper. It collects print jobs facedown. The standard exit bin includes a paper stop that keeps paper from sliding out the front of the bin as it stacks.
Additional printer setup After completing any additional printer setup, print a menu settings page to verify that all printer options are installed correctly. See “Printing a menu settings page” on page 24 for more information. The option names appear on this page if they are installed correctly. Since you have not made any setting changes yet, if you print the page now it lists all the factory default settings.
Accessing the system board to install internal options CAUTION—SHOCK HAZARD: When accessing the system board, turn the printer off, and then unplug the power cord from the wall outlet before continuing. If you have other devices attached to the printer, then turn them off as well and unplug any cables going to the printer. 1 As you face the printer, the system board door is on the right side. Open the system board door. 2 Use the following illustration to locate the appropriate connector.
Installing a memory card CAUTION—SHOCK HAZARD: If you are accessing the system board or installing optional hardware or memory devices sometime after setting up the printer, then turn the printer off, and unplug the power cord from the wall outlet before continuing. If you have any other devices attached to the printer, then turn them off as well, and unplug any cables going into the printer. Warning—Potential Damage: System board electronic components are easily damaged by static electricity.
4 Push the memory card into the connector until the latches snap into place. 5 Close the system board door. Installing a flash memory or firmware card The system board has two connections for an optional flash memory or firmware card. Only one of each may be installed, but the connectors are interchangeable.
2 Unpack the card. Note: Avoid touching the connection points along the edge of the card. 3 Holding the card by its sides, align the card with the connector on the system board. 4 Push the card firmly into place. Notes: • The entire length of the connector on the card must touch and be flush against the system board. • Be careful not to damage the connectors. 5 Close the system board door.
Installing hardware options Installing a 250- or 550-sheet drawer The printer supports one optional drawer; you can install a 250- or 550-sheet drawer. CAUTION—SHOCK HAZARD: If you are installing an optional drawer after setting up the printer, then turn the printer off and unplug the power cord from the wall outlet before continuing 1 Unpack the drawer, and then remove any packing material from the outside of the drawer. 2 Remove the tray from the support unit.
6 Align the printer with the drawer, and then lower the printer into place. Attaching cables 1 Connect the printer to a computer or a network. • For a local connection, use a USB or parallel cable. • For a network connection, use an Ethernet cable. 2 Connect the power cord to the printer first and then to a wall outlet.
1 Ethernet port Note: The Ethernet port is a feature on network models only. 2 USB port 3 Parallel port 4 Printer power cord socket Installing printer software A printer driver is software that lets the computer communicate with the printer. The printer software is typically installed during the initial printer setup. If you need to install the software after setup, follow these instructions: For Windows users 1 Close all open software programs. 2 Insert the Software and Documentation CD.
3 From the Finder desktop, double-click the printer CD icon that automatically appears. 4 Double-click the Install icon. 5 Follow the instructions on the screen. Using the World Wide Web 1 Go to the Lexmark Web site at www.lexmark.com. 2 From the Drivers & Downloads menu, click Driver Finder. 3 Select your printer, and then select your operating system. 4 Download the driver and install the printer software.
Loading paper and specialty media This section explains how to load the 250- and 550-sheet trays and the multipurpose feeder. It also includes information about paper orientation, setting the Paper Size and Paper Type, and linking and unlinking trays. Setting the Paper Size and Paper Type After you set the Paper Size and Paper Type to the correct settings for the size and type used in the trays, then any trays containing the same size and type are automatically linked by the printer.
Specify a unit of measurement 1 Make sure the printer is on and Ready appears. 2 From the printer control panel, press . Paper Menu appears. 3 Press . 4 Press the arrow buttons until Universal Setup appears, and then press 5 Press the arrow buttons until Units of Measure appears, and then press . . 6 Press the arrow buttons until the correct unit of measure appears, and then press . Submitting Changes appears, followed by the Universal Setup menu.
Loading the standard 250-sheet tray The printer has two trays to select from: the standard tray (Tray 1), also known as the 250-sheet tray, and either the optional 250-sheet tray or the optional 550-sheet tray (Tray 2). Only one optional drawer (which includes an optional tray) may be attached to the printer at one time. Notes: • Proper paper loading prevents jams and facilitates trouble-free printing. • Do not remove trays while a job prints or while Busy appears on the display. Doing so may cause a jam.
If you are loading a longer size of paper like A4 or legal, squeeze the length guide tab and slide the length guide backwards to the position for the length of paper you are loading. The tray extends backwards as shown. If you are loading A6-size paper: a Squeeze the length guide tab shown as follows, and slide the length guide toward the center of the tray to the A5 size position. b Raise the A6 backstop. Note: The standard tray only accommodates 150 sheets of A6 paper.
4 Flex the sheets back and forth to loosen them, and then fan them. Do not fold or crease the paper. Straighten the edges on a level surface. 5 Load the paper stack toward the back of the tray as shown with the recommended print side facedown. Note: Notice the maximum fill line on the side of the width guide which indicates the maximum height for loading paper. Do not try to overload the tray. Do not load A6 paper to the maximum fill line; the tray only holds 150 sheets of A6 paper.
6 Squeeze the width guide tabs on the right guide, and slide the width guides to lightly touch the side of the stack. 7 Insert the tray. 8 If a different type of paper was loaded than the type previously loaded in the tray, change the Paper Type setting for the tray from the printer control panel. For more information, see “Setting the Paper Size and Paper Type” on page 25.
Loading the optional 250- or 550-sheet tray Only one optional drawer, which includes either a 250- or 550-sheet tray, may be attached to the printer at a time. Regardless of the number of sheets in the optional tray, it is referred to as Tray 2. 1 Pull the tray completely out. 2 See “Loading the standard 250-sheet tray” on page 27 to complete the steps for loading a tray. An optional tray is loaded in the same way that the standard tray is loaded. 3 Insert the tray.
Using the multipurpose feeder You may want to use the multipurpose feeder when you print on different sizes and types of papers or specialty media, such as card stock, transparencies, paper labels, and envelopes. You may also want to use the multipurpose feeder for single-page print jobs on letterhead or on other specialty media you do not keep in a tray. Opening the multipurpose feeder 1 Grasp the handle, and pull the multipurpose feeder door down.
4 Guide the extension down gently so the multipurpose feeder is extended fully and open. Loading the multipurpose feeder 1 Squeeze the tab located on the right width guide, and move the guides out fully. 2 Prepare the paper or specialty media for loading. • Flex sheets of paper or paper labels back and forth to loosen them, and then fan them. Do not fold or crease the paper or labels. Straighten the edges on a level surface. • Hold transparencies by the edges, and then fan them.
• Flex a stack of envelopes back and forth to loosen them, and then fan them. Straighten the edges on a level surface. Note: Fanning prevents the edges of envelopes from sticking together. It also helps them feed properly to avoid jams. Do not fold or crease envelopes. 3 Load the paper or specialty media. Notes: • Do not force any paper into the multipurpose feeder. Overfilling may cause jams.
• Load paper, transparencies, and card stock with the recommended print side faceup and the top edge entering the printer first. For more information on loading transparencies, see the packaging the transparencies came in. • Load letterhead with the logo faceup and the top edge entering the printer first. • Load envelopes with the flap side down and the stamp location in the position shown. The stamp and address are shown to illustrate the proper orientation for loading envelopes.
4 Squeeze the tab located on the right width guide to adjust the guides to lightly touch the sides of the stack. 5 Slide the paper gently into the multipurpose feeder until it comes to a stop. Paper should lie flat in the multipurpose feeder. Make sure the paper fits loosely in the multipurpose feeder and is not bent or wrinkled. 6 From the printer control panel, set the Paper Size and Paper Type. Paper capacities The capacities of the trays and the multipurpose feeder are based on 75 g/m2 (20 lb) paper.
Load up to Notes Multipurpose feeder 50 sheets of paper 15 paper labels 10 transparencies 10 sheets of card stock 7 envelopes Note: Feed paper into the multipurpose feeder only to the point where its leading edge can contact the paper guides. Do not force the paper into the feeder. Linking and unlinking trays Linking trays Tray linking is useful for large print jobs or multiple copies. When one linked tray is empty, paper feeds from the next linked tray.
7 Press the arrow buttons until the size you want appears, and then press . The Paper Menu appears. 8 Press the arrow buttons until Custom Types appears, and then press . 9 Press the arrow buttons until Custom Type or another custom name appears, and then press . Submitting Changes appears, followed by Paper Menu. 10 Verify that the correct Paper Type is associated with the custom name.
Paper and specialty media guidelines Paper guidelines Selecting the correct paper or specialty media reduces printing problems. For the best print quality, try a sample of the paper or specialty media before buying large quantities. Paper characteristics The following paper characteristics affect print quality and reliability. Consider these characteristics when evaluating new paper stock. Weight The printer trays can automatically feed paper weights up to 90 g/m2 (24 lb bond) grain long paper.
Fiber content Most high-quality xerographic paper is made from 100% chemically treated pulped wood. This content provides the paper with a high degree of stability resulting in fewer paper feeding problems and better print quality. Paper containing fibers such as cotton can negatively affect paper handling.
Using recycled paper and other office papers As an environmentally conscious company, Lexmark supports the use of recycled office paper produced specifically for use in laser (electrophotographic) printers. In 1998, Lexmark presented to the US government a study demonstrating that recycled paper produced by major mills in the US fed as well as non-recycled paper. However, no blanket statement can be made that all recycled paper will feed well.
Supported paper sizes, types, and weights The following tables provide information on standard and optional paper sources and the types of paper they support. Note: For an unlisted paper size, select the closest larger listed size. For information on card stock and labels, see the Card Stock & Label Guide. Paper types and weights supported by the printer The printer engine and the duplex path support 60–90 g/m2 (16–24 lb) paper weights. The multipurpose feeder supports 60–163 g/m2 (16–43 lb) paper weights.
Paper sizes supported by the printer Paper size Dimensions A4 210 x 297 mm (8.3 x 11.7 in.) A5 148 x 210 mm (5.8 x 8.3 in.) A61 105 x 148 mm (4.1 x 5.8 in.) Executive 184 x 267 mm (7.3 x 10.5 in.) Folio 216 x 330 mm (8.5 x 13 in.) JIS B5 182 x 257 mm (7.2 x 10.1 in.) Legal 216 x 356 mm (8.5 x 14 in.) Letter 216 x 279 mm (8.5 x 11 in.) Oficio (Mexico) 216 x 340 mm (8.5 x 13.4 in.) Statement 140 x 216 mm (5.5 x 8.5 in.) X Universal2 76.2 x 127 mm (3 x 5 in.) up to 216 x 356 mm (8.
Paper size Dimensions Standard 250-sheet tray Optional 250or 550-sheet tray 10 Envelope 105 x 241 mm (4.1 x 9.5 in.) X X X Other Envelope 229 x 356 mm (9 x 14 in.) X X X 1 Multipurpose feeder Duplex path A6 is supported only for grain long papers. 2 If a paper size you want to use is not listed, configure a Universal paper size. For more information, see “Configuring Universal paper settings” on page 25.
Printing This chapter covers printing, printer reports, and job cancelation. Selection and handling of paper and specialty media can affect how reliably documents print. For more information, see “Avoiding jams” on page 52 and “Storing paper” on page 41. Printing a document 1 Load paper into a tray or feeder. 2 From the Paper menu, set the Paper Type and Paper Size based on the paper that is loaded. 3 Do one of the following: For Windows users a b c d e f With a document open, click File Print.
b Customize the settings as needed in the Print dialog: 1 With a document open, choose File > Print. 2 Select a Paper Source option, and then choose the tray loaded with the appropriate paper. 3 Click Print. Printing specialty documents Tips on using letterhead Page orientation is important when printing on letterhead.
Source or process Print side Paper orientation Multipurpose feeder (simplex printing) Preprinted letterhead design is placed faceup. The top edge of the sheet with the logo should enter the multipurpose feeder first. Multipurpose feeder (duplex printing) Preprinted letterhead design is placed facedown. The top edge of the sheet with the logo should enter the multipurpose feeder last.
When printing on envelopes: • Use envelopes designed specifically for laser printers. Check with the manufacturer or vendor to ensure the envelopes can withstand temperatures up to 210°C (410°F) without sealing, wrinkling, curling excessively, or releasing hazardous emissions. • For the best performance, use envelopes made from 90 g/m2 (24 lb bond) paper. Use up to 105 g/m2 (28 lb bond) weight for envelopes as long as the cotton content is 25% or less.
• If zone coating of the adhesive is not possible, remove a 1.6 mm (0.06 in.) strip on the leading and driver edge, and use a non-oozing adhesive. • Portrait orientation works best, especially when printing bar codes. Tips on using card stock Card stock is heavy, single-ply specialty media. Many of its variable characteristics, such as moisture content, thickness, and texture, can significantly impact print quality. Print samples on the card stock being considered for use before buying large quantities.
3 Press the arrow buttons until Reports appears, and then press . 4 Press the arrow buttons until Print Directory appears, and then press . After the directory list prints, Ready appears. Printing the print quality test pages Print the print quality test pages to isolate print quality problems. 1 Turn the printer off. 2 Hold down and while turning the printer on. 3 Release the buttons when the clock appears, and wait for CONFIG MENU to appear.
6 Select the job to cancel. 7 From the keyboard, press Delete. In Windows XP: 1 Click Start. 2 From Printers and Faxes, double-click the printer icon. 3 Select the job to cancel. 4 From the keyboard, press Delete. From the Windows taskbar: When you send a job to print, a small printer icon appears in the right corner of the taskbar. 1 Double-click the printer icon. A list of print jobs appears in the printer window. 2 Select a job to cancel. 3 From the keyboard, press Delete.
Clearing jams By carefully selecting papers and specialty media and loading it properly, you should be able to avoid most jams. For more information, see “Avoiding jams” on page 52. If jams do occur, follow the steps outlined in this chapter. to clear the message and resume To resolve the jam messages, you must clear the entire paper path and press printing.
Identifying jams in the paper path The following illustration shows the path that paper travels through the printer. The path varies depending on the input source (tray or feeder) and depending on whether a duplex (two-sided) print job is being sent. When a jam occurs, a jam message appears, indicating the region of the jam or the number of jammed sheets. The three-digit jam prefix numbers are given in the following illustration to show where each jam occurs.
1 Standard exit bin 2 Front door 3 Multipurpose feeder door 4 Tray 1 5 Optional 250- or 550-sheet tray (Tray 2) 6 Rear door Jam message numbers and how to access each jam Jam number To access the jam 200 Try one or more of the following: • Remove Tray 1. • Open the front door, and then remove the photoconductor kit. 201 Open the front door, and then remove the photoconductor kit. 202 Open the front door, and then open the rear door. 231 Open the front door, and then open the rear door.
Jam number To access the jam 235 Remove the jam from the standard exit bin. 242 Remove Tray 2. 251 Open the multipurpose feeder door. 200 paper jam 1 Remove the tray from the printer. 2 Remove the jam if you see it here. 3 If you do not see it, open the front door, and then remove the photoconductor kit and toner cartridge (unit). Note: When the photoconductor kit and toner cartridge are together, they are called a unit.
4 Lift the flap in front of the printer, and remove any jammed sheets. 5 Align and insert the unit. 6 Close the front door. 7 Insert the tray. 8 Press . 201 paper jam CAUTION—HOT SURFACE: The fuser and the inside of the printer near the fuser may be hot. To reduce the risk of injury from a hot component, allow the surface to cool before removing paper from this area. 1 Open the front door, and then remove the unit.
2 Lift the flap in front of the printer, and then remove any jammed sheets. 3 Align and insert the unit. 4 Close the front door. 5 Press . 202 paper jam CAUTION—HOT SURFACE: The fuser and the inside of the printer near the fuser may be hot. To reduce the risk of injury from a hot component, allow the surface to cool before removing paper from this area. 1 Open the front door, and then remove the unit. 2 Lift the flap in front of the printer, and then remove any jammed sheets.
3 Open the rear door. 4 Remove the jam. 5 Close the rear door. 6 Close the front door. 7 Press .
231 paper jam CAUTION—HOT SURFACE: The fuser and the inside of the printer near the fuser may be hot. To reduce the risk of injury from a hot component, allow the surface to cool before removing paper from this area. 1 Open the front door. 2 Open the rear door. 3 Remove the jam. 4 Close the rear door. 5 Close the front door. 6 Press .
233 paper jam 1 Remove the tray from the printer. 2 Locate the lever shown. Pull the level down to release the jam. 3 Pull the jammed sheets from the duplex area. 4 Insert the tray. 5 Press . If this does not clear the jam, complete the steps in “231 paper jam” on page 59. 234 paper jam A single jam or multiple jams are in the duplex area of the printer when the printer is turned on.
235 paper jam A duplex print job was sent to the printer using a size of paper not supported for duplex printing. A sheet is jammed in the standard exit bin. 1 To remove the jam, gently pull the jammed sheet out of the standard exit bin. 2 Press . 242 paper jam 1 Remove the optional tray from the printer.
2 Remove the jam. 3 Insert the optional tray. 4 Press . 251 paper jam A sheet of paper or specialty media failed to feed completely from the multipurpose feeder. Part of it may be still visible. If it is visible, gently pull the jammed sheet from the front of the multipurpose feeder.
If the sheet is not visible, complete the following steps: 1 Open the front door, and then remove the unit. 2 Lift the flap at the front of the printer, and then remove any jammed sheets of paper that are short lengths of paper. 3 Align and insert the unit. 4 Close the front door. 5 Press .
Understanding printer menus Menus list A number of menus are available to make it easy for you to change printer settings: Paper Menu Reports Default Source Menu Settings Page Paper Size/Type Device Statistics Configure MP Network Setup Page Paper Texture Paper Weight Network Setup Page Print Fonts Paper Loading Print Directory Custom Types Asset Report Universal Setup Settings Network/Ports General Settings Network Card Setup Menu TCP/IP Finishing Menu IPv6 Quality Menu Network M
Paper menu Default Source menu Menu item Description Default Source Tray MP Feeder Manual Paper Manual Env Sets a default paper source for all print jobs Notes: • From the Paper menu, Configure MP must be set to Cassette in order for MP Feeder to appear as a menu setting. • Tray 1 (standard tray) is the factory default setting. • Only an installed paper source will appear as a menu setting.
Menu item Description Set Size menu for Manual Paper A4 A5 Executive Folio JIS B5 Legal Letter Oficio (Mexico) Statement Universal Lets you specify the size of the paper being loaded in the manual feeder Set Size menu for Manual Env 7 3/4 Envelope 9 Envelope 10 Envelope C5 Envelope B5 Envelope DL Envelope Other Envelope Lets you specify the size of the envelope being manually loaded Set Type menu for Tray 1 Plain Paper Card Stock Transparency Recycled Labels Bond Letterhead Preprinted Colored Paper Li
Menu item Description Set Type menu for Tray 2 Plain Paper Card Stock Recycled Labels Bond Letterhead Preprinted Colored Paper Light Paper Heavy Paper Rough/Cotton Custom Type Lets you specify the type of paper loaded in Tray 2 Set Type menu for Manual Paper Plain Paper Card Stock Transparency Labels Bond Letterhead Preprinted Colored Paper Light Paper Heavy Paper Rough/Cotton Custom Type Lets you specify the type of paper being manually loaded Set Type menu for Manual Env Envelope Custom Type
Paper Texture menu In the Paper Texture menu, the Select Type and Select Texture features work together to enable you to select the texture for a specific type of paper.
Paper Weight menu In the Paper Weight menu, the Select Type and Select Weight features work together to enable you to select the weight for a specific type of paper.
Menu item Description Set Loading Specifies whether duplex (2-sided) printing is turned on • Duplex • Off Note: Off is the factory default setting. Custom Types menu Menu item Description Custom Type Paper Card Stock Transparency Labels Envelope Rough/Cotton Name a Custom Type , and this user-defined name displays instead of Custom Type .
Menu item Description Portrait Height 3–14.17 inches 76–360 mm Sets the portrait height Notes: • If the height exceeds the maximum, then the printer uses the maximum height allowed. • 14 inches is the US factory default setting. Inches can be increased in 0.01-inch increments. • 356 mm is the international factory default setting. Millimeters can be increased in 1-mm increments. Feed Direction Short Edge Long Edge Specifies the feed direction Notes: • Short Edge is the factory default setting.
Menu item Description Print Directory Prints a list of all the resources stored on an optional flash memory card Notes: • Job Buffer Size must be set to 100%. • The optional flash memory must be installed correctly and working properly. Asset Report Prints a report containing asset information including the printer serial number and model name. The report contains text and UPC barcodes that can be scanned into an asset database.
Menu item Description Quiet Mode Off On Note: Off is the factory default setting. Run Initial Setup Yes No Before running the Setup Wizard, the default setting is Yes, but after running the wizard, the default setting is No. Alarm Cartridge Alarm Off Single The display shows a message when the toner is low Notes: • Off is the factory default setting. The Toner is low message will appear as a warning. • Single means the Toner is low message will appear and the indicator light will blink red.
Menu item Description Print Recovery Jam Recovery On Off Auto Specifies whether the printer reprints jammed pages Notes: • Auto is the factory default setting. The printer reprints jammed pages unless the memory required to hold the pages is needed for other printer tasks. • On sets the printer to always reprint jammed pages. • Off sets the printer to never reprint jammed pages.
Menu item Description Print Area Normal Whole Page Sets the logical and physical printable area Notes: • Normal is the factory default setting. When attempting to print data in the non-printable area defined by the Normal setting, the printer clips the image at the boundary. • The Whole Page setting allows the image to be moved into the non-printable area defined by the Normal setting, but the printer will clip the image at the Normal setting boundary.
Menu item Description Duplex Binding Long Edge Short Edge Defines the way duplexed pages are bound and how the printing on the back of the page is oriented in relation to the printing on the front of the page Notes: • Long Edge is the factory default setting. • Long Edge specifies that binding be placed on the left edge of portrait pages and the top edge of landscape pages. • Short Edge specifies that binding be placed on the top edge of portrait pages and the left edge of landscape pages.
Menu item Description N-up Ordering Horizontal Reverse Horizontal Reverse Vertical Vertical Specifies the positioning of multiple-page images when using N-up (pages-sides) Orientation Auto Landscape Portrait Specifies the orientation of a multiple-page sheet Notes: • Horizontal is the factory default setting. • Positioning depends on the number of images and whether the images are in portrait or landscape orientation. Notes: • Auto is the factory default setting.
Menu item Description Pixel Boost Off Fonts Horizontally Vertically Both directions Choose whether to make characters more distinct and definite. Pixel Boost may be needed when using certain fonts. Brightness -6–6 Adjusts or darkens printed output and conserves toner Contrast 0–5 Adjusts the contrast of printed objects Note: Off is the factory default setting. Note: 0 is the factory default setting. Note: 0 is the factory default setting.
Menu item Description Coverage Estimator Off On Provides an estimate of the percentage coverage of black on a page. The estimate is printed on a separator page. Note: Off is the factory default setting. PostScript menu Menu item Description Print PS Error On Off Prints a page containing the PostScript error Font Priority Resident Flash/Disk Establishes the font search order Note: Off is the factory default setting. Notes: • Resident is the factory default setting.
Menu item Description PCL Emulation Settings Point Size 1.00–1008.00 Changes the point size for scalable typographic fonts Notes: • 12 is the factory default setting. • Point Size refers to the height of the characters in the font. One point equals approximately 1/72 of an inch. • Point sizes can be increased or decreased in 0.25-point increments. PCL Emulation Settings Pitch 0.08–100 Specifies the font pitch for scalable monospaced fonts Notes: • • • • 10 is the factory default setting.
Menu item Description Tray Renumber Assign MP Feeder Off None 0–199 Assign Tray Off None 0–199 Assign Manual Paper Off None 0–199 Assign Man Env Off None 0–199 Configures the printer to work with printer software or programs that use different source assignments for trays, drawers, and feeders Tray Renumber View Factory Def None Displays the factory default setting assigned to each tray, drawer, or feeder Tray Renumber Restore Defaults Yes No Returns all tray, drawer, and feeder assignments to th
Menu item Description Job Timeout 0-225 seconds Sets the amount of time in seconds that a network print job can take before it is canceled. Notes: • 90 seconds is the factory default setting. • A setting value of 0 disables the timeout. • If a value of 1–9 is selected, the setting is saved as 10. Banner Page On Off Allows the printer to print a banner page. Note: Off is the factory default setting. TCP/IP menu Use the following menu items to view or set the TCP/IP information.
Menu item Description TCP/IP Enable HTTP Server Yes No Lets you view or change the setting TCP/IP WINS Server Address DNS Server Address Lets you view or change the setting Note: Yes is the factory default setting. Note: This is a four-field IP address. IPv6 menu Use the following menu items to view or set the Internet Protocol version 6 (IPv6) information. Note: This menu is available only for network models or printers attached to print servers.
Menu item Description PS SmartSwitch On Off Sets the printer to automatically switch to PS emulation when a print job requires it, regardless of the default printer language Notes: • On is the factory default setting. • When the Off setting is used, the printer does not examine incoming data. • When the Off setting is used, the printer uses PCL emulation if PCL SmartSwitch is set to On. It uses the default printer language specified in the Setup menu if PCL SmartSwitch is set to Off.
Menu item Description View Address Shows the assigned AppleTalk address Set Zone Provides a list of AppleTalk zones available on the network Note: The factory default setting is the default zone for the network. If no default zone exists, the zone marked with an * is the factory default setting.
Menu item Description Sets the size of the USB input buffer USB Buffer Disabled Notes: Auto 3K to • Auto is the factory default setting. • The Disabled setting turns off job buffering. Any jobs already buffered are printed before normal processing is resumed. • The USB buffer size value can be changed in 1K increments. • The maximum size allowed depends on the amount of memory in the printer, the size of the other link buffers, and whether the Resource Save setting is On or Off.
Menu item Description NPA Mode Off Auto Sets the printer to perform the special processing required for bidirectional communication following the conventions defined by the NPA protocol Notes: • Auto is the factory default setting. • Changing this setting automatically resets the printer. Parallel Buffer Disabled Auto 3K to Sets the size of the parallel input buffer Notes: • Auto is the factory default setting. • The Disabled setting turns off job buffering.
Menu item Description Mac Binary PS On Off Auto Sets the printer to process Macintosh binary PostScript print jobs Parallel with ENA ENA Address ENA Netmask ENA Gateway Sets the network address, netmask, and gateway information for an external print server that is attached to the printer using a parallel cable. Notes: • Auto is the factory default setting. • The Off setting filters print jobs using the standard protocol. • The On setting processes raw binary PostScript print jobs.
Understanding printer messages When Manual Feeder appears on the display, it refers to the multipurpose feeder. List of status and error messages Busy Wait for the message to clear. Canceling Wait for the message to clear. Close front door Close the front door of the printer. Defragmenting Flash DO NOT POWER OFF Wait for the message to clear. Warning—Potential Damage: Do not turn the printer off while this message appears on the display.
Invalid Engine Code You need to download valid engine code for the printer. Note: Engine code may be downloaded while this message appears on the display. Invalid Network Code You need to download valid network printing code for the internal print server. The internal print server is a hardware option installed inside the printer. Note: Network code may be downloaded while this message appears on the display.
Programming System Code DO NOT POWER OFF Wait for the message to clear. Warning—Potential Damage: Do not turn the printer power off while Programming System Code appears on the display. Ready The printer is ready to receive print jobs. Remove paper from standard output bin Remove the stack of paper from the standard exit bin. Toner is low Try one or more of the following: • Replace the toner cartridge. • Press to clear the message and continue printing.
• Check tray length and width guides and make sure the paper is properly loaded in the tray. • Check the Print Properties settings to make sure the print job is requesting the correct paper size and type. • Check that the paper size is correctly set. For example, if the MP Feeder Size is set to Universal, make sure the paper is large enough for the data being printed. • Cancel the current print job.
52 Not enough free space in flash memory for resources Try one or more of the following: • Press the arrow buttons until Continue appears, and then press to stop the defragment operation and continue printing. Downloaded fonts and macros not previously stored in flash memory are deleted. • Delete fonts, macros, and other data stored in flash memory. • Upgrade to a larger capacity flash memory card.
84 PC Kit life warning The photoconductor kit is near exhaustion. Try one or more of the following: • Replace the photoconductor kit. • Press to clear the message and continue printing. 84 Replace PC Kit The photoconductor kit is exhausted. Install a new photoconductor kit. 42.xy Cartridge region mismatch Replace the toner cartridge with one that is correct for the region where you purchased your printer.
202.yy Paper jam The message indicates either where the paper is jammed or the number of pages jammed. 1 Open the front door. 2 Open the rear door. 3 Remove the jam. 4 Close both doors. 5 Press to continue printing. 231.yy Paper jam The message indicates either where the paper is jammed or the number of pages jammed. 1 Open the front door. 2 Open the rear door. 3 Remove the jam. 4 Close both doors. 5 Press to continue printing. 233.
235.yy Paper jam The message indicates either where the paper is jammed or the number of pages jammed. 1 Remove the jam from the standard exit bin. 2 Check the paper size to ensure that it is supported by the printer. 3 Press to continue printing. 24x.yy Paper jam The message indicates either where the paper is jammed or the number of pages jammed. 1 To access the jam, try one or more of the following: • Remove Tray 1.
Maintaining the printer Periodically, certain tasks are required to maintain optimum print quality. Cleaning the exterior of the printer 1 Make sure that the printer is turned off and unplugged from the wall outlet. CAUTION—SHOCK HAZARD: To avoid the risk of electric shock when cleaning the exterior of the printer, unplug the power cord from the wall outlet and disconnect all cables to the printer before proceeding. 2 Remove all paper from the printer. 3 Dampen a clean, lint-free cloth with water.
Conserving supplies Conserving supplies using the printer control panel There are some settings you can change from the printer control panel that will help you conserve toner and paper. For more information, see the following table: Supply Path to menu item Purpose of menu item Toner Settings Quality Menu Toner Darkness Lets you adjust the level of toner released on a sheet of paper or specialty media.
Ordering supplies To order supplies in the U.S., contact Lexmark at 1-800-539-6275 for information about Lexmark authorized supplies dealers in your area. In other countries or regions, visit the Lexmark Web Site at www.lexmark.com or contact the place where you purchased the printer. Note: All life estimates for printer supplies assume printing on letter- or A4-size plain paper.
Ordering a photoconductor kit Depending on your printer model, the printer issues a message or a light sequence to let you know the photoconductor kit is near its end of life. At this time, order a photoconductor kit. You can also see the status of the photoconductor kit by printing a network setup page. Part name Part number Photoconductor kit E260X22G Replacing supplies Replacing the toner cartridge When 88 Cartridge is low appears, or when you experience faded print, remove the toner cartridge.
3 Unpack the new toner cartridge. Warning—Potential Damage: When replacing a toner cartridge, do not leave the new cartridge exposed to direct light for an extended period of time. Extended light exposure can cause print quality problems. 4 Rotate the cartridge in all directions to distribute the toner. 5 Install the new toner cartridge by aligning the rollers on the toner cartridge with the arrows on the tracks of the photoconductor kit. Push the toner cartridge in as far as it will go.
1 Open the front door by pressing the button on the left side of the printer and lowering the front door. 2 Pull the photoconductor kit and toner cartridge out of the printer as a unit by pulling on the toner cartridge handle. Note: The photoconductor kit and toner cartridge form a unit. Place the unit on a flat, clean surface. 3 Press the button on the base of the photoconductor kit. Pull the toner cartridge up and out using the handle.
4 Unpack the new photoconductor kit. Be careful not to touch the photoconductor drum. 5 Insert the toner cartridge into the photoconductor kit by aligning the rollers on the toner cartridge with the tracks. Push the toner cartridge until it clicks into place. 6 Install the unit into the printer by aligning the arrows on the guides of the unit with the arrows in the printer. Push the unit as far as it will go. 7 After you replace the photoconductor kit, reset the photoconductor counter.
Recycling Lexmark products To return Lexmark products to Lexmark for recycling: 1 Visit our Web site at www.lexmark.com/recycle. 2 Find the product type you want to recycle, and then select your country from the list. 3 Follow the instructions on the computer screen. Moving the printer Before moving the printer CAUTION—POTENTIAL INJURY: Follow these guidelines to avoid personal injury or printer damage: • Turn the printer off using the power switch, and then unplug the power cord from the wall outlet.
Setting the printer up in a new location When the printer is set up, allow clearance around it as shown. 1 300 mm (12.0 in.) 2 300 mm (12.0 in.) 3 200 mm (8.0 in.) 4 12.7 mm (0.5 in.) 5 300 mm (12.0 in.) Shipping the printer When shipping the printer, use the original packaging or call the place of purchase for a relocation kit.
Administrative support Finding advanced networking and administrator information This chapter covers basic administrative support tasks. For more advanced system support tasks, see the Networking Guide on the Software and Documentation CD and the Embedded Web Server Administrator's Guide on the Lexmark Web site at www.lexmark.com. Adjusting Power Saver 1 Make sure the printer is on and Ready appears. 2 From the printer control panel, press .
Using the Embedded Web Server If the printer is installed on a network, the Embedded Web Server is available for a range of functions including: • • • • • Viewing a virtual display of the printer control panel Checking the status of the printer supplies Configuring printer settings Configuring network settings Viewing reports To access the Embedded Web Server, type the printer IP address into the address field of your Web browser.
The reports have the following subcategories: Device Statistics Device Settings Device Information Printer Server Setup Page Job Information Paper Menu Page Count Ethernet10/100 Jobs by Document Length Reports Installed Memory Standard Network Card Other Job Data Settings Processor Speed Media Sheet Count Network/Ports Serial Number Integrated Network Option Settings Reports Engine ID TCP/IP Network Card Loader IPv6 TCP/IP Kernel IPv6 Base USB Menu Warnings Network Network Driv
To protect printer menus using the Embedded Web Server: 1 Type the printer IP address into the address field of your Web browser. Note: If you do not know the IP address of the printer, then print a network setup page and locate the IP address in the TCP/IP section. 2 Click Settings. 3 Under Other Settings, click Security. 4 Click Web Page Password Protect. It is possible to protect entry to the Paper, Reports, Settings, and Network/Ports menus.
4 Click Supply Notifications. 5 From the drop-down box for each supply, select among the options for notification. Explanations for each option are provided. 6 Click Submit to save your selections. Copying printer settings to other printers Using the Embedded Web Server, you can copy printer settings to up to 15 other network printers. To copy printer settings: 1 Type the printer IP address into the address field of your Web browser.
Troubleshooting Solving basic printer problems If there are basic printer problems, or the printer is unresponsive, make sure: • • • • • • • The power cord is plugged into the printer and a properly grounded electrical outlet. The electrical outlet is not turned off by any switch or breaker. The Ground Fault Circuit Interrupter (GFCI) has not tripped. The printer is not plugged into any surge protectors, uninterrupted power supplies, or extension cords.
MAKE SURE THE CORRECT PRINTER SOFTWARE IS INSTALLED Verify that you installed the correct printer software for your printer model. Open the Software and Documentation CD to check which software is installed. For more information, see “Installing printer software” on page 23. Make sure the model number of the software matches the model number of your printer. To verify that the printer software is the most current, check the Lexmark Web site at www.lexmark.com.
5 Press the arrow buttons until Page Protect appears, and then press 6 Press the arrow buttons until Off appears, and then press . . Job prints from the wrong tray or on the wrong paper CHECK THE PAPER TYPE SETTING Make sure the Paper Type setting matches the paper loaded in the tray. Incorrect characters print Make sure the printer is not in Hex Trace mode. If Ready Hex appears on the display, you must exit Hex Trace mode before you can print your job.
Unexpected page breaks occur Increase the Print Timeout value: 1 From the printer control panel, press . 2 Press the arrow buttons until Settings appears, and then press . 3 Press the arrow buttons until General Settings appears, and then press 4 Press the arrow buttons until Timeouts appears, and then press . . 5 Press the arrow buttons until Print Timeout appears, and then press . 6 Press the arrow buttons until the value you want appears, and then press .
3 Make sure the guides are aligned against the edges of the paper. 4 Insert the tray. RESET THE PRINTER Turn the printer off, wait about 10 seconds, and then turn the printer on. Flash memory card Make sure the flash memory card is securely connected to the printer system board. Memory card Make sure the memory card is securely connected to the printer system board. Solving paper feed problems Paper frequently jams These are possible solutions.
Page that jammed does not reprint after you clear the jam In the Settings menu, Jam Recovery is set to Off. Set Jam Recovery to Auto or On: 1 Press . 2 Press the arrow buttons until Settings appears, and then press . 3 Press the arrow buttons until General Settings appears, and then press 4 Press the arrow buttons until Print Recovery appears, and then press 5 Press the arrow buttons until Jam Recovery appears, and then press 6 Press the arrow buttons until On or Auto appears, and then press . . . .
4 Press the arrow buttons until Prt Quality Pgs appears, and then press . The print quality test pages print. 5 Press the arrow buttons until Exit Config Menu appears, and then press . Resetting the Printer appears briefly, and then Ready appears. Blank pages Try one or more of the following: • Remove and reinstall the toner cartridge. • Remove and reinstall the photoconductor kit. If the printer still prints blank pages, it may need to be serviced. For more information, contact Customer Support.
Gray background • For Windows users: From Print Properties, select a different Toner Darkness setting before sending the job to print. • For Macintosh users: From the print options, Copies & Pages, or General pop-up menu, choose Printer Features, and then choose the setting needed from the Toner Darkness pop-up menu. • From the printer control panel Quality menu, select a different Toner Darkness setting before sending the job to print. Ghost images These are possible solutions.
Incorrect margins These are possible solutions. Try one or more of the following: CHECK THE GUIDES Move the width and length guides in the tray to the correct positions for the paper size loaded. CHECK THE PAPER SIZE SETTING Make sure the Paper Size setting matches the paper loaded in the tray. CHECK THE PAGE SIZE SETTING Before sending the job to print, specify the correct page size in Print Properties, the Print dialog, or the software program. Paper curl These are possible solutions.
Print is too dark These are possible solutions. Try one or more of the following: CHECK THE DARKNESS, BRIGHTNESS, AND CONTRAST SETTINGS The Toner Darkness setting is too dark, the Brightness setting is too dark, or the Contrast setting is too high. • For Windows users: From Print Properties, change these settings. • For Macintosh users: 1 Choose File > Print. 2 Locate the drop-down box under the Orientation pictures, and then click the down button. 3 Click Printer Features.
Print is too light These are possible solutions. Try one or more of the following: CHECK THE DARKNESS, BRIGHTNESS, AND CONTRAST SETTINGS The Toner Darkness setting is too light, the Brightness setting is too light, or the Contrast setting is too low. • For Windows users: From Print Properties, change these settings. • For Macintosh users: 1 Choose File > Print. 2 Locate the drop-down box under the Orientation pictures, and then click the down button. 3 Click Printer Features.
Skewed print CHECK THE PAPER GUIDES Move the guides in the tray to the correct positions for the paper size loaded. CHECK THE PAPER Make sure you are using paper that meets the printer specifications. Toner fog or background shading appears on the page These are possible solutions. Try one or more of the following: THE TONER CARTRIDGE MAY BE DEFECTIVE Replace the toner cartridge. THERE IS TONER IN THE PAPER PATH Contact Customer Support. Toner rubs off These are possible solutions.
Toner specks These are possible solutions. Try one or more of the following: THE TONER CARTRIDGE MAY BE DEFECTIVE Replace the toner cartridge. THERE IS TONER IN THE PAPER PATH Contact Customer Support. Transparency print quality is poor CHECK THE TRANSPARENCIES Use only transparencies recommended by the printer manufacturer. CHECK THE PAPER TYPE SETTING Load transparencies, and make sure the Paper Type setting is set to Transparency. Streaked horizontal lines These are possible solutions.
MAKE SURE THE PAPER PATH IS CLEAR Paper could be caught between the photoconductor kit and the fuser. Check the paper path around the fuser area. CAUTION—HOT SURFACE: The inside of the printer might be hot. To reduce the risk of injury from a hot component, allow the surface to cool before touching. Clear any paper you see. THERE MAY BE EXCESS TONER IN THE PAPER PATH Contact Customer Support. Streaked vertical lines These are possible solutions.
Solid black or white streaks appear on transparencies or paper These are possible solutions. Try one or more of the following: MAKE SURE THE FILL PATTERN IS CORRECT If the fill pattern is incorrect, choose a different fill pattern from your software program. CHECK THE PAPER TYPE • • • • Try a different type of paper. For transparencies, use only ones recommended by the printer manufacturer. Make sure the Paper Type setting matches what is loaded in the tray or feeder.
Contacting Customer Support When you call Customer Support, describe the problem you are experiencing, the message on the display, and the troubleshooting steps you have already taken to find a solution. You need to know your printer model type and serial number. For more information, see the label on the inside top front cover of the printer. The serial number is also listed on the menu settings page. In the U.S. or Canada, call (1-800-539-6275).
Notices Product information Product name: Lexmark E360d and E360dn Machine type: 4513 Model(s): 420, 430 Machine type: 4549 d01, d02, gd1, gd2 Machine type: 4564 dn1, dn2, gd1, gd2 Edition notice May 2008 The following paragraph does not apply to any country where such provisions are inconsistent with local law: LEXMARK INTERNATIONAL, INC.
If you don't have access to the Internet, you can contact Lexmark by mail: Lexmark International, Inc. Bldg 004-2/CSC 740 New Circle Road NW Lexington, KY 40550 USA © 2008 Lexmark International, Inc. All rights reserved. UNITED STATES GOVERNMENT RIGHTS This software and any accompanying documentation provided under this agreement are commercial computer software and documentation developed exclusively at private expense.
The manufacturer is not responsible for radio or television interference caused by using other than recommended cables or by unauthorized changes or modifications to this equipment. Unauthorized changes or modifications could void the user's authority to operate this equipment.
Industry Canada (Canada) This device complies with Industry Canada specification RSS-210. Operation is subject to the following two conditions: (1) this device may not cause interference, and (2) this device must accept any interference, including interference that may cause undesired operation of the device. This device has been designed to operate only with the antenna provided. Use of any other antenna is strictly prohibited per regulations of Industry Canada.
Compliance is indicated by the CE marking. Operation is allowed in all EU and EFTA countries, but is restricted to indoor use only. A declaration of conformity with the requirements of the directives is available from the Director of Manufacturing and Technical Support, Lexmark International, S. A., Boigny, France.
Norsk Lexmark International, Inc. erklærer herved at dette produktet er i samsvar med de grunnleggende krav og øvrige relevante krav i direktiv 1999/5/EF. Polski Niniejszym Lexmark International, Inc. oświadcza, że niniejszy produkt jest zgodny z zasadniczymi wymogami oraz pozostałymi stosownymi postanowieniami Dyrektywy 1999/5/EC. Português A Lexmark International Inc. declara que este este produto está conforme com os requisitos essenciais e outras disposições da Diretiva 1999/5/CE.
Static sensitivity notice This symbol identifies static-sensitive parts. Do not touch in the areas near these symbols without first touching the metal frame of the printer. ENERGY STAR Laser notice The printer is certified in the U.S. to conform to the requirements of DHHS 21 CFR Subchapter J for Class I (1) laser products, and elsewhere is certified as a Class I laser product conforming to the requirements of IEC 60825-1. Class I laser products are not considered to be hazardous.
Mode Description Power consumption (Watts) Printing The product is generating hard-copy output from electronic inputs. 500 Copying The product is generating hard-copy output from hard-copy original documents. NA Scanning The product is scanning hard-copy documents. NA Ready The product is waiting for a print job. 70 Power Saver The product is in energy-saving mode. 20 Off NA The product is plugged into a wall outlet, but the power switch is turned off.
Limited warranty Lexmark warrants that this product: —Is manufactured from new parts, or new and serviceable used parts, which perform like new parts —Is, during normal use, free from defects in material and workmanship If this product does not function as warranted during the warranty period, contact a Remarketer or Lexmark for repair or replacement (at Lexmark's option).
—Maintenance by anyone other than Lexmark or a Lexmark authorized servicer —Operation of a product beyond the limit of its duty cycle —Use of printing media outside of Lexmark specifications —Refurbishment, repair, refilling or remanufacture by a third party of products, supplies or parts —Products, supplies, parts, materials (such as toners and inks), software, or interfaces not furnished by Lexmark TO THE EXTENT PERMITTED BY APPLICABLE LAW, NEITHER LEXMARK NOR ITS THIRD PARTY SUPPLIERS OR REMARKETERS MAKE
BY USING THIS PRODUCT, YOU AGREE TO BE BOUND BY ALL THE TERMS AND CONDITIONS OF THIS SOFTWARE LIMITED WARRANTY AND LICENSE AGREEMENT. IF YOU DO NOT AGREE WITH THE TERMS OF THIS SOFTWARE LIMITED WARRANTY AND LICENSE AGREEMENT, PROMPTLY RETURN THE PRODUCT UNUSED AND REQUEST A REFUND OF THE AMOUNT YOU PAID. IF YOU ARE INSTALLING THIS PRODUCT FOR USE BY OTHER PARTIES, YOU AGREE TO INFORM THE USERS THAT USE OF THE PRODUCT INDICATES ACCEPTANCE OF THESE TERMS. 1 STATEMENT OF SOFTWARE LIMITED WARRANTY.
5 LICENSE GRANT. Lexmark grants you the following rights provided you comply with all terms and conditions of this Software License Agreement: a Use. You may Use one (1) copy of the Software Program. The term “Use” means storing, loading, installing, executing, or displaying the Software Program. If Lexmark has licensed the Software Program to you for concurrent use, you must limit the number of authorized users to the number specified in your agreement with Lexmark.
11 TAXES. You agree that you are responsible for payment of any taxes including, without limitation, any goods and services and personal property taxes, resulting from this Software License Agreement or your Use of the Software Program. 12 LIMITATION ON ACTIONS. No action, regardless of form, arising out of this Software License Agreement may be brought by either party more than two years after the cause of action has arisen, except as provided under applicable law. 13 APPLICABLE LAW.
Index Numerics B D 200.yy Paper jam 94 201.yy Paper jam 94 202.yy Paper jam 95 231.yy Paper jam 95 233.yy Paper jam 95 234.yy Paper jam 95 235.yy Paper jam 96 24x.yy Paper jam 96 250-sheet drawer installing 21 251.yy Paper jam 96 31.yy Replace defective or missing cartridge 91 32.
finding information customer support 9 publications 9 Finishing menu 75 firmware card installing 19 flash memory card installing 19 troubleshooting 115 Flushing buffer 89 font sample list printing 49 Formatting Flash 89 G L N labels, paper tips 48 letterhead loading 32 tips 46 linking trays 37 Load with 90 Load manual feeder with 90 loading multipurpose feeder 32 optional 250-sheet tray 31 optional 550-sheet tray 31 standard 250-sheet tray 27 Network 90 Network 90 Network Card menu 81
paper jams, clearing 200 55 201 56 202 57 231 59 233 60 234 60 235 61 242 61 251 62 paper labels loading 32 Paper Loading menu 69 paper sizes supported by the printer 43 paper stop, using 15 Paper Texture menu 68 paper types duplex support 42 supported by printer 42 where to load 42 Paper Weight menu 69 Parallel menu 86 parallel port 22 PCL Emul menu 79 photoconductor kit ordering 100 replacing 101 PostScript menu 79 Power Saver 90 adjusting 106 print job canceling from Macintosh 50 canceling from printer c
Toner is low 91 USB/USB 91 Waiting 91 printer options troubleshooting drawers 114 flash memory card 115 memory card 115 option not working 114 printer problems, solving basic 111 printing directory list 49 font sample list 49 from Macintosh 45 from Windows 45 installing printer software 23 menu settings page 24 network setup page 24 print quality test pages 50 Programming Engine Code 90 Programming flash 90 Programming System Code 91 Q Quality menu 77 R Ready 91 recommended print side 40 recycled pape
memory card 115 option not working 114 U Universal Paper Size 70 setting 25 Universal Setup menu 70 unlinking trays 37 USB menu 85 USB port 22 USB/USB 91 Utilities menu 78 V viewing reports 107 W Waiting 91 Index 144