Lexmark Interpret S400 Series Quick Reference Guide April 2009 www.lexmark.
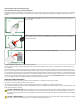
Important Message About Cartridge Recycling! Please Read Before Opening Your Inkjet Cartridge Box At Lexmark, we take our commitment to the environment seriously, and we encourage our customers to participate in our easy, no-cost method for returning empty Lexmark cartridges to Lexmark for proper recycling. We will insure that cartridges are properly handled with zero waste to landfills. Go to www.lexmark.com/recycle. Follow instructions to request postage-paid bags. Bags usually arrive within 7–10 days.
Contents Important safety information.........................................................2 About your printer.............................................................................5 Finding information about the printer...........................................................................................................................5 Minimizing your printer's environmental impact......................................................................................................
Scanning.............................................................................................29 Tips for scanning..................................................................................................................................................................29 Scanning to a local or network computer..................................................................................................................29 Scanning to a flash drive or memory card..............................
About your printer Finding information about the printer The Quick Reference Guide contains basic instructions on how to accomplish common printer tasks like printing, copying, and scanning. It also includes information on troubleshooting common printer setup problems.
Conserving energy • Eco-Mode. This feature sets the screen brightness to low and sets the printer to change to Power Saver mode after the printer is left idle for 10 minutes. Eco-Mode is enabled by default in your printer. • Select the lowest Power Saver timeout. The Power Saver feature puts the printer in a minimum-power standby mode after the printer has been idle for a set amount of time (the Power Saver timeout). • Share your printer.
Printer features Your printer comes with full features that will help you manage and accomplish printing and imaging tasks: • Wireless. Print and scan from virtually anywhere in your home or office over a secure wireless network, as well as share the printer among multiple computers. • Print. Print high quality documents and PDFs faster from a computer, from a USB flash drive, or from a Bluetooth device. • Copy. Copy documents and photos with one-touch, computer-free black or color copying. • Scan.
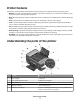
Use the To 6 Card reader light Check card reader status. The light blinks to indicate that a memory card is being accessed. 7 Paper exit tray Hold paper as it exits. 8 Printer control panel Operate the printer. 9 Automatic Document Feeder (ADF) paper guide Keep paper straight when feeding it into the ADF. Note: Adjust the paper guide on the ADF tray to the width of the original document. 10 ADF output tray Hold documents as they exit from the ADF.
4 Use the To EXT Port Connect additional devices (telephone or answering machine) to the printer and the telephone line. Use this port if you do not have a dedicated fax line for the printer, and if this connection method is supported in your country or region. Note: Remove the plug to access the port. 5 LINE Port Connect the printer to an active telephone line (through a standard wall jack, DSL filter, or VoIP adapter) to send and receive faxes.
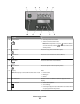
Use the: 1 To Power button • Turn the printer on and off. • Switch to Power Saver mode. Note: When the printer is on, press to switch to Power Saver mode. Press and hold for three seconds to turn off the printer. 2 Copy button Access the copy menu and make copies. 3 Scan button Access the scan menu and scan documents. 4 Fax button Access the fax menu and send faxes. 5 Photo button Access the photo menu and print photos. 6 Display View: Note: The display is turned off in Power Saver mode.
Use the: 9 Back button 10 Setup button To • Return to the previous screen. • Exit from one menu level to a higher one. Access the setup menu and change printer settings. Note: The Copy, Scan, Fax, and Photo button lights are off when this button is selected. Use the: To 1 Address Book Access fax numbers from a saved list of numbers. 2 Redial/Pause In Fax mode: • Insert a three-second pause in a fax number to wait for an outside line or get through an automated answering system.
7 Use the: To Keypad In Copy mode or Photo mode: enter the number of copies or prints you want to make. In Fax mode: • • • • Enter fax numbers. Navigate an automated answering system. Select letters when creating a Speed Dial list. Type numbers to enter or edit the date and time shown on the display. Using memory cards and flash drives Using a memory card or flash drive with the printer Memory cards and flash drives are storage devices frequently used with cameras and computers.
Warning—Potential Damage: Do not touch any cables, any network adapter, any connector, the memory device, or the printer in the areas shown while actively printing, reading, or writing from the memory device. A loss of data can occur. 2 Look for Memory Card Detected or Storage Device Detected on the display. Notes: • If the printer does not recognize the memory device, then remove and reinsert it.
Installing the printhead without the CD 1 Open the printer, and then remove the packaged printhead from the printer. 2 Raise the printer control panel, and then remove the ink cartridges from the paper exit tray. 3 Connect the power cord, and then turn on the printer. Warning—Potential Damage: Read the safety information included with this product before connecting power or making any cabling connections.
4 Open the printer, and then remove any tape from the latch. 5 Lift the latch. 6 Remove the printhead from the disposable container. 7 Insert the printhead, and then close the latch until it clicks. 8 Close the printer. 9 Install the ink cartridges. For more information, see “Replacing ink cartridges” on page 17.
Ordering and replacing ink cartridges Ordering ink cartridges Page yields available at www.lexmark.com/pageyields. For best results, use only Lexmark ink cartridges.
Replacing ink cartridges Make sure you have a new ink cartridge or cartridges before you begin. You must install new cartridges immediately after removing the old ones or the ink remaining in the printhead nozzles may dry out. 1 Turn on your printer. 2 Open the printer. Note: The printhead moves to the cartridge installation position. 3 Press the release tab, and then remove the used ink cartridge or cartridges. 4 Install each ink cartridge. Use two hands to install the black cartridge.
Maintaining ink cartridges In addition to the following tasks that you can perform, your printer performs an automatic maintenance cycle every week if it is plugged into an electrical outlet. It will briefly come out of Power Saver mode or will temporarily power on if it is turned off. Aligning the printhead If the characters or lines on your printer image appear jagged or wavy, then you may need to align the printhead. Using the printer control panel 1 Load plain paper.
Cleaning the printhead nozzles Poor print quality is sometimes due to clogged printhead nozzles. Clean the printhead nozzles to improve the quality of your prints. Notes: • Cleaning the printhead nozzles uses ink, so clean them only when necessary. • Deep cleaning uses more ink, so try the Clean Printhead option first to save ink. • If the ink levels are too low, you must replace the ink cartridges before you can clean the printhead nozzles.
Using the printer software Minimum system requirements The printer software requires up to 500 MB of free disk space. Supported operating systems • • • • • • • • • Microsoft Windows 7 (Web only) Microsoft Windows Vista Microsoft Windows XP Microsoft Windows 2000 (SP4 or greater) Macintosh PowerPC OS X v10.3.9 or later Macintosh Intel OS X v10.4.4 or later Linux Ubuntu 8.04 LTS and 8.10 (Web only) Linux OpenSUSE 11.0 and 11.
Using the World Wide Web 1 Go to the Lexmark Web site at www.lexmark.com. 2 From the Drivers & Downloads menu, click Driver Finder. 3 Select your printer, and then select your operating system. 4 Download the driver and install the printer software. Using the Windows printer software Software installed during printer installation When you set up the printer using the installation software CD, all the necessary software was installed. You may have chosen to install some additional programs.
Use the Lexmark Fax Solutions (referred to as Fax Solutions) Abbyy Sprint OCR Lexmark Wireless Setup Utility (referred to as Wireless Setup Utility) To • • • • Send a fax. Receive a fax in three-in-one printers. Add, edit, or delete contacts in the built-in phone book. Access the Lexmark Fax Setup Utility in four-in-one printers. Use the Fax Setup Utility to set the Speed Dial and Group Dial numbers, set Ringing and Answering, and print fax history and status reports.
Using the Macintosh printer software Software installed during printer installation Software resident in the Macintosh OS Use the To Print dialog Adjust the print settings and schedule print jobs. Printer Services dialog (not available in Mac OS X v10.5 or later) • • • • • Access the printer utility. Troubleshoot. Order ink or supplies. Contact Lexmark. Check the printer software version installed on the computer.
Printing Printing a document 1 Load the paper in the printer. 2 Send the print job: For Windows users a With a document open, click File Print. b Click Properties, Preferences, Options, or Setup. c Select the print quality, the number of copies to print, the type of paper to use, and how the pages should print. d Click OK to close any printer software dialogs. e Click OK or Print. For Macintosh users a b c d With a document open, choose File > Print. From the Printer pop-up menu, choose the printer.
5 Press the arrow buttons to select a photo printing option, and then press . Note: You can choose to print the most recent photo, print all the photos, print photos that fall within a date range, print photos by selecting the photo numbers on a proof sheet, or print pre-selected photos from a digital camera using Digital Print Order Format (DPOF). The DPOF option appears only when there is a valid DPOF file in your memory device.
If the printer is using a Wireless connection (selected models only) a Press the arrow buttons to select the file name of the document that you want to print. b Press , and then wait for the printer to connect to the network computer or to finish searching the network for available computers. c When prompted, press the arrow buttons to select the name of the network computer, and then press to start printing the document. Notes: • You may be prompted to enter a PIN if the computer requires it.
Copying ADF Scanner glass Use the ADF for multiple-page documents. Note: The ADF is available only on selected models. If you purchased a printer without an ADF, then load original documents or photos on the scanner glass. Use the scanner glass for single pages, small items (such as postcards or photos), transparencies, photo paper, or thin media (such as magazine clippings). Tips for copying • When using the ADF, adjust the paper guide on the ADF to the width of the original document.
3 From the printer control panel, press 4 Press . until Photo Reprint appears. 5 Press the arrow buttons to scroll to Yes, and then press . 6 Press the arrow buttons to select the desired photo size, and then press 7 Press . . Note: For best results, allow the prints to dry at least 24 hours before stacking, displaying, or storing. Canceling copy jobs To cancel a copy job, press . Scanning stops and the printer returns to the previous menu.
Scanning ADF Scanner glass Use the ADF for multiple-page documents. Note: The ADF is available only on selected models. If you purchased a printer without an ADF, then load original documents or photos on the scanner glass. Use the scanner glass for single pages, small items (such as postcards or photos), transparencies, photo paper, or thin media (such as magazine clippings). Tips for scanning • When using an ADF, adjust the paper guide on the ADF to the width of the original document.
7 Press the arrow buttons to select the resolution quality and the original image size. Press each time you make a selection. 8 Press to start scanning. The scan is complete when the application you selected in step 6 opens on the destination computer, and the scan appears within the application as a new file. Scanning to a flash drive or memory card Before you begin, make sure your flash drive or memory card is not write protected.
For Macintosh users 1 Load an original document faceup into the ADF or facedown on the scanner glass. 2 From the Finder desktop, double-click the printer program folder. 3 Double-click the printer Center to open the All-In-One Center. 4 From the “What is being scanned?” menu on the main screen, select a document type. 5 From the “How will the scanned image be used?” menu, choose To be viewed on monitor/web page. 6 From the “Send scanned image to” menu, choose an application. 7 Click Scan.
Troubleshooting Before you troubleshoot Use this checklist to solve most printer problems: • • • • • • • • • Make sure the power cord is plugged into the printer and into a properly grounded electrical outlet. Make sure the printer is not plugged into any surge protectors, uninterrupted power supplies, or extension cords. Make sure the printer is turned on. Make sure the printer is securely connected to the host computer, print server, or other network access point.
• • • • • “Print job does not print or is missing pages” on page 35 “Printer is printing blank pages” on page 36 “Printer is busy or does not respond” on page 36 “Cannot delete documents from the print queue” on page 37 “Cannot print through USB” on page 37 Incorrect language appears on the display If the "Before you troubleshoot" checklist does not solve the problem, then try one or more of the following: CHANGE THE LANGUAGE USING THE PRINTER MENUS 1 From the printer control panel, press .
REMOVE AND REINSERT THE PRINTHEAD 1 Open the printer and lift the latch. 2 Remove the printhead. 3 Wipe the printhead contacts using a clean, lint-free cloth. 4 Reinsert the printhead. Note: If removing and reinserting the printhead does not resolve the error, then contact technical support.
Software did not install If you encountered problems while installing, or if your printer does not appear in the list in the Printers folder or as a printer option when sending a print job, then try removing and reinstalling the software.
RECONNECT THE PRINTER POWER SUPPLY 1 Turn off the printer, and then unplug the power cord from the wall outlet. 2 Gently remove the power supply from the printer, and then reinsert it. 3 Plug the power cord into the wall outlet, and then turn on the printer. REMOVE AND RECONNECT THE USB CABLE CONNECTED TO YOUR PRINTER CHECK THE USB CONNECTION 1 Check the USB cable for any obvious damage. If the cable is damaged, then use a new one. 2 Firmly plug the square end of the USB cable into the back of the printer.
If the printer will not come out of Power Saver mode, then reset the power: 1 Unplug the power cord from the wall outlet, and then wait 10 seconds. 2 Insert the power cord into the wall outlet, and then turn on the printer. If this problem persists, then check our Web site for updates for your printer software or firmware. RECONNECT THE PRINTER POWER SUPPLY 1 Turn off the printer, and then unplug the power cord from the wall outlet. 2 Gently remove the power supply from the printer, and then reinsert it.
Network Troubleshooting If you are having trouble setting up your printer on a network, print a network setup page, and then see the complete network troubleshooting information in the Network Getting Started Guide or the comprehensive User's Guide available on the installation software CD. Printing a network setup page A network setup page lists the configuration settings of the printer, including the IP address and MAC address of the printer. 1 Load plain paper.
Notices Edition notice April 2009 The following paragraph does not apply to any country where such provisions are inconsistent with local law: LEXMARK INTERNATIONAL, INC., PROVIDES THIS PUBLICATION “AS IS” WITHOUT WARRANTY OF ANY KIND, EITHER EXPRESS OR IMPLIED, INCLUDING, BUT NOT LIMITED TO, THE IMPLIED WARRANTIES OF MERCHANTABILITY OR FITNESS FOR A PARTICULAR PURPOSE.
Federal Communications Commission (FCC) compliance information statement This product complies with the limits for a Class B digital device, pursuant to Part 15 of the FCC Rules. Operation is subject to the following two conditions: 1 this device may not cause harmful interference, and 2 this device must accept any interference received, including interference that may cause undesired operation.