Lexmark Intuition S500 Series Quick Reference Guide November 2010 www.lexmark.
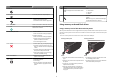
Important Message About Cartridge Recycling! Please Read Before Opening Your Inkjet Cartridge Box At Lexmark, we take our commitment to the environment seriously, and we encourage our customers to participate in our easy, no-cost method for returning empty Lexmark cartridges to Lexmark for proper recycling. We will insure that cartridges are properly handled with zero waste to landfills. Go to www.lexmark.com/recycle. Follow instructions to request postage-paid bags. Bags usually arrive within 7–10 days.
Contents Copying photos...................................................................................................................16 Important safety information.........................................................2 Canceling copy jobs............................................................................................................16 About your printer..........................................................................4 Scanning...............................................
Minimizing your printer's environmental impact About your printer We are committed to protecting the environment and are continually improving our printers to reduce their environmental impact. By selecting certain printer settings or tasks, you may be able to reduce your printer's environmental impact even further. Finding information about the printer Conserving energy The Quick Reference Guide contains basic instructions on how to accomplish common printer tasks like printing, copying, and scanning.
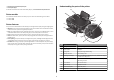
• Recycle paper from discarded print jobs. • Use recycled paper. Understanding the parts of the printer 11 To read the Lexmark Environmental Sustainability Report, see www.lexmark.com/environment. 10 Printer models 1 The installation software CD that came with your printer works for the following printer models: 2 • Lexmark S505 • Lexmark S508 3 Printer features 9 Your printer comes with full features that will help you manage and accomplish printing and imaging tasks: 8 • Wireless.
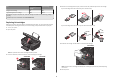
11 Use the To Paper feed guard Prevent items from falling into the paper slot. 6 Use the To Printhead access Install the printhead. Note: The carrier moves to the printhead access area when no printhead is installed in the printer. 1 2 7 Ink cartridge access 8 Scanner unit Install, replace, or remove ink cartridges. • Access the ink cartridges and printhead. • Remove paper jams.
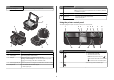
3 Use To Scan Access the scan menu and scan documents. 12 Use To Display View: Note: The display is turned off in Power Saver mode. 4 Photo Access the photo menu and print photos. 13 5 Back 6 Color/Black Switch to color mode or black-and-white mode. 7 Start Start a print, scan, or copy job, depending on which mode is selected. 8 2-Sided/Eco-Mode Setup • Printer status • Messages • Menus Access the setup menu and change printer settings.
Ordering and replacing ink cartridges Ordering ink cartridges Page yields available at www.lexmark.com/pageyields. For best results, use only Lexmark ink cartridges. Lexmark S500 Series models (except Lexmark S508) Warning—Potential Damage: Do not touch any cables, any network adapter, any connector, the memory device, or the printer in the areas shown while actively printing, reading, or writing from the memory device. A loss of data can occur.
Return Program Cartridge1 Regular cartridge2 Magenta color cartridge 108 108A High yield magenta color cartridge 108XL 108XLA Item 4 Remove the ink cartridge from the pack, and then remove the protective cap from the ink cartridge. If your ink cartridge comes with a muzzle cap, then remove the cap. 1 Licensed for a single use only. After use, return this cartridge to Lexmark for remanufacturing, refilling, or recycling. 2 Available only on the Lexmark Web site at www.lexmark.com.
Maintaining ink cartridges Cleaning the printhead nozzles In addition to the following tasks that you can perform, your printer performs an automatic maintenance cycle every week if it is plugged into an electrical outlet. It will briefly come out of Power Saver mode or will temporarily power on if it is turned off. Poor print quality is sometimes due to clogged printhead nozzles. Clean the printhead nozzles to improve the quality of your prints.
3 Double-click Install. Using the printer software 4 Follow the instructions on the installation dialog. Using the Internet Minimum system requirements 1 Go to the Lexmark Web site at www.lexmark.com. The printer software requires up to 500MB of free disk space. 2 Navigate to: Downloads > Driver Finder > select your printer > select your operating system Supported operating systems • • • • • • • • • * 3 Download the driver and install the printer software.
Use the Lexmark Toolbar (referred to as Toolbar) Lexmark Tools for Office (referred to as Tools for Office) Lexmark Fax Solutions (referred to as Fax Solutions) Abbyy Sprint OCR Lexmark Wireless Setup Utility (referred to as Wireless Setup Utility) Lexmark Service Center (referred to as Service Center) Using the Macintosh printer software To • • • • Print black or text-only Web pages to save ink. Schedule automatic printing of Web pages.
Use the To Lexmark Printer Utility (not available in Mac OS X version 10.6) (referred to as Printer Utility) • • • • • • • Use Visit Lexmark SmartSolutions Get help with cartridge installation. Print a test page. Print an alignment page. To • Visit the SmartSolutions Web site. • Choose your custom solutions. Note: Your printer may not come with these Web Links, depending on the features of the printer that you purchased. Clean the printhead nozzles. Order ink or supplies. Register the printer.
Printing on both sides of the paper (duplexing) automatically • For Long-Edge binding, pages are bound along the long edge of the page (left edge for portrait, top edge for landscape). The automatic duplex unit, available only on select printer models, supports A4- and letter-size paper. If you purchased a model without automatic duplex, or if you need to print duplex using other paper sizes, then see the instructions for printing on both sides of the paper (duplexing) manually.
7 If you want to adjust the print settings: c When prompted, press the up or down arrow button to select the name of the network computer, and then press a Press again. b Make your selections using the arrow buttons. c After adjusting your settings, press the up or down arrow button to scroll to Continue, and then • You may be prompted to enter a PIN if the computer requires it. Enter the PIN using the keypad. • To assign a computer name and a PIN to the computer, see the Help for the printer software .
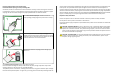
When you select color or black-only printing, the light near your choice comes on. Copying ADF 5 Press Scanner glass . Copying photos Use the ADF for multiple-page documents. 1 Load photo paper. Note: The ADF is available only on select models. If you purchased a printer without an ADF, then load original documents or photos on the scanner glass. 2 Place a photo facedown on the scanner glass. 3 From the printer control panel, press . 4 Press the up or down arrow button to scroll to Photo Reprint.
3 Press the left or right arrow button to scroll to USB or the name of the network computer, and then Scanning ADF press . The local or network computer is the destination that will receive the scan. Wait until the printer has finished downloading a list of the scan applications available on the selected computer. Scanner glass Notes: Use the ADF for multiple-page documents.
Scanning directly to e-mail using the printer software 2 Click or Start. 3 Click All Programs or Programs, and then select the printer program folder from the list. For Windows users 4 Navigate to: 1 Load an original document faceup into the ADF or facedown on the scanner glass. 2 Click Printer Home > select your printer > PDF Scanning starts and the scan progress dialog appears. or Start. 5 Save the document as a PDF.
Incorrect language appears on the display • Turn the printer off, wait about 10 seconds, and then turn the printer back on. If the "Before you troubleshoot" checklist does not solve the problem, then try one or more of the following: Using the Service Center to solve printer problems The Service Center provides step-by-step troubleshooting help and contains links to printer maintenance tasks and customer support.
3 Wipe the printhead contacts using a clean, lint-free cloth. REMOVE AND REINSERT THE PRINTHEAD 1 Open the printer and lift the latch. 2 2 Remove the printhead. 4 Reinsert the printhead, and then close the latch until it clicks. Warning—Potential Damage: Do not touch the printhead nozzles. 5 Close the printer. Note: If removing and reinserting the printhead does not resolve the error, then contact technical support.
CHECK THE USB CONNECTION MAKE SURE YOUR PRINTER IS SET AS THE DEFAULT PRINTER 1 Check the USB cable for any obvious damage. If the cable is damaged, then use a new one. RECONNECT THE PRINTER POWER SUPPLY 2 Firmly plug the square end of the USB cable into the back of the printer. 1 Turn off the printer. 3 Firmly plug the rectangular end of the USB cable into the USB port of the computer. The USB port is marked with a Note: Make sure the printer is not in Power Saver mode.
5 Press the arrow buttons to scroll to Deep Clean Printhead, and then press Cannot print through USB . A cleaning page prints. 6 Press the arrow buttons to scroll to Align Printer, and the press If the "Before you troubleshoot" checklist does not solve the problem, then try one or more of the following: . An alignment page prints. CHECK THE USB CONNECTION Note: Do not remove the alignment page until printing is finished. 1 Check the USB cable for any obvious damage.
4 Press Federal Communications Commission (FCC) compliance information statement to select Print Setup Page. The network setup page prints. This product complies with the limits for a Class B digital device, pursuant to Part 15 of the FCC Rules. Operation is subject to the following two conditions: Notices 1 this device may not cause harmful interference, and 2 this device must accept any interference received, including interference that may cause undesired operation.