
Quick Reference Guide


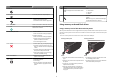

Use the To
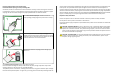
11 Paper feed guard Prevent items from falling into the paper slot.
2
1
6
4
3
5
8
7
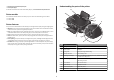
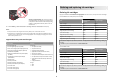
Use the To
1 Scanner lid Access the scanner glass.
2 Scanner glass Scan and copy photos and documents.
3 USB port Connect the printer to a computer using a USB cable.
Warning—Potential Damage: Do not touch the USB port except when
plugging in or removing a USB cable or installation cable.
4 Power supply with port Connect the printer to a working electrical outlet that is near and accessible.
5 Duplex unit
• Print on both sides of a sheet of paper.
• Remove paper jams.
Use the To
6 Printhead access Install the printhead.
Note: The carrier moves to the printhead access area when no printhead
is installed in the printer.
7 Ink cartridge access Install, replace, or remove ink cartridges.
8 Scanner unit
• Access the ink cartridges and printhead.
• Remove paper jams.
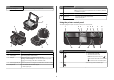
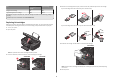
Using the printer control panel
The following diagrams explain the sections of the printer control panel:
1
COLOR
BLACK
2-Sided
Eco-Mode
ON
Setup
START
2 3 4 6
91012
5
1113
78
Use To
1 Power
• Turn the printer on and off.
• Switch to Power Saver mode.
Note: When the printer is on, press
to
switch to Power Saver mode. Press and hold
for three seconds to turn off the printer.
2 Copy Access the copy menu and make copies.
6