MS310 Series User's Guide August 2012 Machine type(s): 4514 Model(s): 220, 230 www.lexmark.
Contents 2 Contents Safety information.......................................................................................5 Learning about the printer...........................................................................7 Finding information about the printer......................................................................................................7 Selecting a location for the printer.......................................................................................................
Contents 3 Understanding the printer menus..............................................................51 Menus list................................................................................................................................................51 Paper menu.............................................................................................................................................51 Network/Ports menu..........................................................................
Contents 4 [x]‑page jam, open front door. [20y.xx]..................................................................................................92 [x]‑page jam, open rear door. [20y.xx]....................................................................................................97 [x]‑page jam, clear standard bin. [20y.xx]...............................................................................................99 [x]‑page jam, remove tray 1 to clear duplex. [23y.xx].........................
Safety information 5 Safety information Connect the power cord to a properly grounded electrical outlet that is near the product and easily accessible. Do not place or use this product near water or wet locations. CAUTION—POTENTIAL INJURY: This product uses a laser. Use of controls or adjustments or performance of procedures other than those specified herein may result in hazardous radiation exposure.
Safety information CAUTION—POTENTIAL INJURY: To reduce the risk of equipment instability, load each tray separately. Keep all other trays closed until needed. CAUTION—SHOCK HAZARD: Do not set up this product or make any electrical or cabling connections, such as the fax feature, power cord, or telephone, during a lightning storm. SAVE THESE INSTRUCTIONS.
Learning about the printer 7 Learning about the printer Finding information about the printer What are you looking for? Find it here Initial setup instructions: Setup documentation—The setup documentation came with the printer and is also available on the Lexmark Web site at http://support.lexmark.com.
Learning about the printer 8 What are you looking for? Find it here The latest supplemental information, updates, and customer support: Lexmark Support Web site— http://support.lexmark.com • • • • • Documentation Note: Select your country or region, and then select your product to view the appropriate support site. Driver downloads Support telephone numbers and hours of operation for your country or region can be found on the Support Web site or on the printed warranty that came with your printer.
Learning about the printer 9 5 4 1 3 2 1 Right side 305 mm (12 in.) 2 Front 510 mm (20 in.) 3 Left side 205 mm (8 in.) 4 Rear 205 mm (8 in.) 5 Top 305 mm (12 in.) Printer configurations CAUTION—POTENTIAL INJURY: To reduce the risk of equipment instability, load each tray separately. Keep all trays closed until needed. You can configure your printer by adding one optional 250‑ or 550‑sheet tray. For instructions on installing the optional tray, see “Installing optional trays” on page 17.
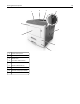
Learning about the printer 10 1 2 3 4 9 5 8 6 7 1 Printer control panel 2 Paper stop 3 Standard bin 4 Front door release button 5 Controller board access door 6 Standard 250‑sheet tray 7 Optional 250‑ or 550‑sheet tray 8 50‑sheet multipurpose feeder 9 Front door
Learning about the printer 11 Using the printer control panel 1 2 3 4 5 6 8 7 Light or button Color Description 1 Error light Yellow An error has occurred. 2 Paper jam light Yellow A paper jam has occurred. 3 Load or remove paper light Yellow Paper must be loaded in the tray or removed from the bin. 4 Toner low or replace imaging unit light Yellow The toner cartridge is low on toner, or the imaging unit needs to be replaced.
Learning about the printer 8 12 Light or button Color Description Stop or cancel button Red Use this to cancel a print job. Understanding the printer control panel light sequences The printer control panel lights can mean different things, depending on the light sequence. The lights can be on, off, blinking, or blinking slowly, indicating a printer status, a warning, or an error. The following table shows the appearances of the lights.
Learning about the printer Light sequence 13 Message Flushing buffer Resolution reduced Non-Lexmark toner cartridge Non-Lexmark imaging unit Printer had to restart Toner cartridge very low Imaging unit very low Toner cartridge nearly low Imaging unit nearly low Service error Load paper Remove paper from standard bin Change paper Toner cartridge low Imaging unit low Ready Waiting Busy Not ready
Learning about the printer 14 If the printer control panel light sequence matches a light sequence in the “Primary light sequence” column of the twice quickly on the printer control panel. Search for a matching light sequence in the following table, then press “Supplemental light sequence” column, and then see the message in the same row.
Learning about the printer Primary light sequence 15 Supplemental light sequence Message Paper jam, open rear door Paper jam, remove standard tray to clear duplex Paper jam, remove standard tray to clear duplex Paper jam, open front door Paper jam, remove standard tray Paper jam, remove optional tray Paper jam, manual feeder Using the Embedded Web Server Note: This functionality is available only in network printers or printers connected to print servers.
Learning about the printer 16 Using the Local Printer Settings Utility The Local Printer Settings Utility lets you change and save settings for a printer that is connected to a computer locally through a USB or parallel cable. To download and install the Local Printer Settings Utility, see “Installing the Local Printer Settings Utility” on page 20. To access the Local Printer Settings Utility: 1 Click or Start. 2 Click Programs > Lexmark > Local Printer Settings Utility.
Additional printer setup 17 Additional printer setup Installing hardware options Installing optional trays CAUTION—SHOCK HAZARD: If you are accessing the controller board or installing optional hardware or memory devices sometime after setting up the printer, then turn the printer off, and unplug the power cord from the electrical outlet before continuing. If you have any other devices attached to the printer, then turn them off as well, and unplug any cables going into the printer.
Additional printer setup 18 7 Align the printer with the tray, and then slowly lower the printer into place. 8 Connect the power cord to the printer, then to a properly grounded electrical outlet, and then turn on the printer. 2 1 Note: When the printer software and any hardware options are installed, it may be necessary to manually add the options in the printer driver to make them available for print jobs. For more information, see “Updating available options in the printer driver” on page 20.
Additional printer setup 19 • The appropriate Ethernet cable with the Ethernet port Warning—Potential Damage: Do not touch the USB cable, any network adapter, or the printer in the area shown while actively printing. Loss of data or a malfunction can occur. 1 2 3 7 4 5 * 6 Use the To 1 USB port* Attach an optional wireless network adapter. 2 USB printer port Connect the printer to a computer. 3 Ethernet port* Connect the printer to a network.
Additional printer setup 20 If the installation dialog does not appear after a minute, then launch the CD manually: a Click , or click Start and then click Run. b In the Start Search or Run dialog, type D:\setup.exe, where D is the letter of your CD or DVD drive. c Press Enter, or click OK. 3 Click Install, and then follow the instructions on the computer screen. For Macintosh users 1 Close all open applications. 2 Insert the Software and Documentation CD.
Additional printer setup 21 For Windows users 1 Open the printers folder. a Click , or click Start and then click Run. b In the Start Search or Run dialog, type control printers. c Press Enter, or click OK. 2 Select the printer. 3 Right‑click the printer, and then select Properties. 4 Click the Configuration tab. 5 Do either of the following: • Click Update Now ‑ Ask Printer. • Under Configuration Options, manually add any installed hardware options. 6 Click Apply.
Additional printer setup 22 You will need an Ethernet cable to connect the printer to the network and an available port where the printer can physically connect to the network. Use a new network cable when possible to avoid potential problems caused by a damaged cable. Installing the printer on an Ethernet network For Windows users 1 Insert the Software and Documentation CD.
Additional printer setup 23 4 Add the printer. • For IP printing: a From the Apple menu, navigate to either of the following: – System Preferences > Print & Scan – System Preferences > Print & Fax b Click +. c Click the IP tab. d Type the printer IP address in the address field, and then click Add. • For AppleTalk printing: Notes: – Make sure AppleTalk is activated on your printer. – This feature is supported only in Mac OS X version 10.5.
Additional printer setup 24 • 802.1X user name and password • Certificates – No security If your wireless network does not use any type of security, then you will not have any security information. Note: Using an unsecured wireless network is not recommended. Notes: – If you do not know the SSID of the network that your computer is connected to, then launch the wireless utility of the computer network adapter, and then look for the network name.
Additional printer setup Installing the Wireless Setup Utility 1 Go to the Lexmark Web site at http://support.lexmark.com. 2 Download the latest Wireless Setup Utility. 3 Double‑click the downloaded software installer package. 4 Follow the instructions on the computer screen. Launching the Wireless Setup Utility Notes: • Make sure the printer is turned on. • Make sure a wireless network adapter installed in your printer is attached and working properly. 1 Click or Start.
Additional printer setup 26 • Make sure a wireless network adapter installed in your printer is attached and working properly. 1 From the Finder, navigate to: Applications > select your printer folder 2 Double‑click Wireless Setup Assistant, and then follow the instructions on the computer screen. Note: If you encounter problems while running the application, then click ? .
Additional printer setup 27 • Make sure to check the first section of the network setup page to see if the status is Connected. If the status is Not Connected, then the LAN drop may not be active, or the network cable may be defective. Contact your system support person for a solution, and then print another network setup page.
Loading paper and specialty media 28 Loading paper and specialty media The selection and handling of paper and specialty media can affect how reliably documents print. For more information, see “Avoiding jams” on page 90 and “Storing paper” on page 45. Setting the paper size and type Using the Embedded Web Server 1 Open a Web browser, and then type the printer IP address in the address field. Notes: • Print a network setup page or menu settings page, and then locate the IP address in the TCP/IP section.
Loading paper and specialty media 29 Using the standard bin and paper stop The standard bin holds up to 150 sheets of 20‑lb paper. It collects prints facedown. The standard bin includes a paper stop that keeps paper from sliding out the front of the bin as it stacks. To open the paper stop, pull it so that it flips forward. Note: Close the paper stop when moving the printer to another location.
Loading paper and specialty media 30 Busy ‑ Blinking LGL EXEC B5
Loading paper and specialty media 31 2 Squeeze, and then slide the width guide tab to the correct position for the size of the paper you are loading.
Loading paper and specialty media 32 3 Unlock the length guide. Squeeze, and then slide the length guide tab to the correct position for the size of the paper you are loading. 1 A5 LG A6 B E 5 X E L C 2 A 5 Notes: • For some paper sizes like letter, legal, and A4, squeeze and slide the length guide tab backward to accommodate their length. • When loading legal‑size paper, the length guide extends beyond the base leaving the paper exposed to dust.
Loading paper and specialty media 33 LTR/ L A4 LG EX EC B5 A5 A4 A6 LT R C E X E B5 5 A 4 Flex the sheets back and forth to loosen them, and then fan them. Do not fold or crease the paper. Straighten the edges on a level surface. 5 Load the paper stack. Note: Make sure the paper is below the maximum fill indicator located on the side of the width guide. 1 2 Notes: • Load recycled or preprinted paper with the printable side facedown.
Loading paper and specialty media 34 6 Insert the tray. 7 From the Embedded Web Server or your computer, set the paper size and type in the Paper menu to match the paper loaded in the tray. Notes: • If the printer is not connected to a network, then access the Paper menu using Local Printer Settings Utility or Printer Settings, depending on your operating system. • Set the correct paper size and type to avoid paper jams and print quality problems.
Loading paper and specialty media 35 a Pull the multipurpose feeder extender. b Pull the extender gently so the multipurpose feeder is fully extended and open. 2 Squeeze the tab on the left width guide, and then move the guides for the paper you are loading. 1 2 3 Prepare the paper or specialty media for loading. • Flex sheets of paper back and forth to loosen them, and then fan them. Do not fold or crease the paper. Straighten the edges on a level surface. • Hold transparencies by the edges.
Loading paper and specialty media 36 • Flex the stack of envelopes back and forth to loosen them, and then fan them. Straighten the edges on a level surface. 4 Load the paper or specialty media. Notes: • Do not force paper into the multipurpose feeder. Overfilling may cause paper jams. • Make sure the paper or specialty media is below the maximum paper fill indicator located on the paper guides.
Loading paper and specialty media 37 • Load letterhead faceup with the top edge entering the printer first. For two‑sided (duplex) printing, load letterhead facedown with the bottom edge of the sheet entering the printer first. • Load envelopes with the flap on the left side facedown. Warning—Potential Damage: Never use envelopes with stamps, clasps, snaps, windows, coated linings, or self‑stick adhesives. These envelopes may severely damage the printer.
Loading paper and specialty media 38 Notes: • Print a network setup page or menu settings page, and then locate the IP address in the TCP/IP section. The IP address appears as four sets of numbers separated by periods, such as 123.123.123.123. • If you are using a proxy server, then temporarily disable it to load the Web page correctly. 2 Click Settings > Paper Menu. 3 From the Tray Configuration section, select a tray, and then change the paper size and type settings.
Loading paper and specialty media 39 • If you are using a proxy server, then temporarily disable it to load the Web page correctly. 2 Click Settings > Paper Menu > Custom Types. 3 Select a custom paper type name, and then select a custom paper type. Note: Plain Paper is the factory default paper type for all user‑defined custom names. 4 Click Submit.
Paper and specialty media guide 40 Paper and specialty media guide Additional information for printing on specialty media may be found in the Cardstock and Label Guide available at http://support.lexmark.com. Paper guidelines Selecting the correct paper or specialty media reduces printing problems. For the best print quality, try a sample of the paper or specialty media before buying large quantities. Paper characteristics The following paper characteristics affect print quality and reliability.
Paper and specialty media guide 41 Grain direction Grain refers to the alignment of the paper fibers in a sheet of paper. Grain is either grain long, running the length of the paper, or grain short, running the width of the paper. For 60–90‑g/m2 (16–24‑lb) bond paper, grain long paper is recommended. Fiber content Most high‑quality xerographic paper is made from 100% chemically treated pulped wood.
Paper and specialty media guide 42 • Avoid papers with rough or heavily textured surfaces. Use papers printed with heat‑resistant inks designed for use in xerographic copiers. The ink must be able to withstand temperatures up to 230°C (446°F) without melting or releasing hazardous emissions. Use inks that are not affected by the resin in toner. Inks that are oxidation‑set or oil‑based generally meet these requirements; latex inks might not. When in doubt, contact the paper supplier.
Paper and specialty media guide 43 guarantee that the paper manufacturer uses wood pulp from forestry operators that employ environmentally and socially responsible forest management and restoration practices. 3 Choose the most appropriate paper for printing needs: normal 75 or 80 g/m2 certified paper, lower weight paper, or recycled paper.
Paper and specialty media guide 44 Tips on using envelopes Print samples on the envelopes being considered for use before buying large quantities. • Use envelopes designed specifically for laser printers. Check with the manufacturer or vendor to ensure that the envelopes can withstand temperatures up to 230°C (446°F) without sealing, wrinkling, curling excessively, or releasing hazardous emissions. • For best performance, use envelopes made from 90‑g/m2 (24‑lb bond) paper or 25% cotton.
Paper and specialty media guide 45 • If zone coating of the adhesive is not possible, then remove a 2‑mm (0.06‑inch) strip on the leading and driver edge, and then use a non‑oozing adhesive. • Portrait orientation is recommended, especially when printing bar codes. Tips on using letterhead • • • • Use letterhead designed specifically for laser printers. Print samples on the letterhead being considered for use before buying large quantities.
Paper and specialty media guide Paper size 46 Standard tray Optional 250‑ or 550‑sheet tray Multipurpose feeder Duplex mode A4 210 x 297 mm (8.3 x 11.7 in.) A5 X 148 x 210 mm (5.8 x 8.3 in.) A6 X X 105 x 148 mm (4.1 x 5.8 in.) JIS B5 X 182 x 257 mm (7.2 x 10.1 in.) Letter 216 x 279 mm (8.5 x 11 in.) Legal 216 x 356 mm (8.5 x 14 in.) Executive X 184 x 267 mm (7.3 x 10.5 in.) Oficio (Mexico)1 216 x 340 mm (8.5 x 13.4 in.) Folio 216 x 330 mm (8.5 x 13 in.) Statement X 140 x 216 mm (5.5 x 8.
Paper and specialty media guide Paper size B5 Envelope 47 Standard tray Optional 250‑ or 550‑sheet tray Multipurpose feeder Duplex mode X X X X X X 176 x 250 mm (6.9 x 9.8 in.) Other Envelope 229 x 356 mm (9 x 14 in.) 1 This size setting formats the page for 216 x 356 mm (8.5 x 14 in.) unless the size is specified by the software application. 2 Universal is supported only in the standard tray if the paper size is at least 105 x 148 mm (4.1 x 5.8 in.).
Paper and specialty media guide Paper type 48 250‑ or 550‑sheet tray Multipurpose feeder Rough/Cotton Duplex mode X 1 One‑sided paper labels designed for laser printers are supported for occasional use. It is recommended to print 20 or fewer pages of paper labels per month. Vinyl, pharmacy, and two‑sided labels are not supported. 2 Bond and Heavy Paper are supported in duplex mode up to 90‑g/m2 (24‑lb) paper weight.
Printing 49 Printing This chapter covers printing, printer reports, and job cancelation. Selection and handling of paper and specialty media can affect how reliably documents print. For more information, see “Avoiding jams” on page 90 and “Storing paper” on page 45. Printing documents Printing a document 1 From the Embedded Web Server or your computer, set the paper size and type in the Paper menu to match the paper loaded in the tray.
Printing 50 Notes: • Print a network setup page or menu settings page, and then locate the IP address in the TCP/IP section. The IP address appears as four sets of numbers separated by periods, such as 123.123.123.123. • If you are using a proxy server, then temporarily disable it to load the Web page correctly. 2 Click Settings > Print Settings > Quality Menu. 3 Adjust the toner darkness setting. 4 Click Submit.
Understanding the printer menus 51 Understanding the printer menus You may print a menus list by printing the menu settings and network setup pages. Access the menus from a network printer by using the Embedded Web Server. If your printer is connected by USB or parallel cable, then access the menus using the Local Printer Settings Utility for Windows or Printer Settings for Macintosh.
Understanding the printer menus 52 Paper Size/Type menu Use To Tray [x] Size A4 A5 A6 JIS‑B5 Letter Legal Executive Oficio (Mexico) Folio Statement Universal Specify the paper size loaded in each tray. Tray [x] Type Plain Paper Transparency Recycled Labels Bond Letterhead Preprinted Colored Paper Light Paper Heavy Paper Rough/Cotton Custom Type [x] Specify the type of paper loaded in each tray. Notes: • Letter is the US factory default setting. A4 is the international factory default setting.
Understanding the printer menus 53 Use To MP Feeder Size A4 A5 A6 JIS B5 Letter Legal Executive Oficio (Mexico) Folio Statement Universal 7 3/4 Envelope 9 Envelope 10 Envelope DL Envelope C5 Envelope B5 Envelope Other Envelope Specify the paper size loaded in the multipurpose feeder.
Understanding the printer menus 54 Use To Manual Paper Size A4 A5 A6 JIS B5 Letter Legal Executive Oficio (Mexico) Folio Statement Universal Specify the paper size being manually loaded. Manual Paper Type Plain Paper Card Stock Transparency Recycled Labels Bond Letterhead Preprinted Colored Paper Light Paper Heavy Paper Rough/Cotton Custom Type [x] Specify the paper type being manually loaded.
Understanding the printer menus 55 Configure MP menu Use To Configure MP Cassette Manual First Determine when the printer selects paper from the multipurpose feeder. Notes: • Cassette is the factory default setting. Cassette configures the multipurpose feeder as the default paper source. • Manual sets the multipurpose feeder only for manual‑feed print jobs. • First sets the multipurpose feeder as the primary paper source regardless of settings.
Understanding the printer menus 56 Use To Rough Envelope Texture Rough Specify the relative texture of the rough envelopes loaded. Letterhead Texture Smooth Normal Rough Specify the relative texture of the letterhead loaded. Preprinted Texture Smooth Normal Rough Specify the relative texture of the preprinted paper loaded. Colored Texture Smooth Normal Rough Specify the relative texture of the colored paper loaded.
Understanding the printer menus 57 Use To Transparency Weight Light Normal Heavy Specify the relative weight of the transparencies loaded. Recycled Weight Light Normal Heavy Specify the relative weight of the recycled paper loaded. Labels Weight Light Normal Heavy Specify the relative weight of the labels loaded. Bond Weight Light Normal Heavy Specify the relative weight of the bond paper loaded. Envelope Weight Light Normal Heavy Specify the relative weight of the envelope loaded.
Understanding the printer menus 58 Use To Cotton/Rough Weight Light Normal Heavy Specify the relative weight of the cotton or rough paper loaded. Custom [x] Weight Light Normal Heavy Specify the relative weight of the custom paper loaded. Note: Heavy is the factory default setting. Notes: • Normal is the factory default setting. • The options appear only when the custom type is supported.
Understanding the printer menus 59 Use To Custom [x] Loading Duplex Off Determine and set two‑sided printing for all print jobs that specify Custom [x] as the paper type. Note: Custom [x] Loading is available only if the custom type is supported. Notes: • Duplex sets two‑sided printing as the default for all print jobs unless one‑sided printing is set from Printing Preferences or Print dialog. • If Duplex is selected, then all print jobs are sent through the duplex unit, including one‑sided jobs.
Understanding the printer menus 60 Network/Ports menu Standard USB menu Use To PCL SmartSwitch On Off Set the printer to automatically switch to PCL emulation when a print job received through a USB port requires it, regardless of the default printer language. Notes: • On is the factory default setting. • If PCL SmartSwitch is enabled, then the printer uses PCL emulation.
Understanding the printer menus 61 Settings menu General Settings menu Use To Display Language English Francais Deutsch Italiano Espanol Dansk Norsk Nederlands Svenska Portuguese Suomi Russian Polski Greek Magyar Turkce Cesky Simplified Chinese Traditional Chinese Korean Japanese Set the language of the text appearing on the Embedded Web Server, Local Printer Settings for Windows, or Printer Settings for Macintosh.
Understanding the printer menus 62 Use To Timeouts Sleep Mode Disabled 1–120 min Set the amount of time the printer waits after a job is printed before it goes into a reduced power state. Notes: • “30 min” is the factory default setting. • “Disabled” appears only when Energy Conserve is set to Off. • Lower settings conserve more energy, but may require longer warm‑up times. • Select a high setting if the printer is in constant use.
Understanding the printer menus 63 Use To Timeouts Print Timeout Disabled 1–255 sec Set the amount of time in seconds the printer waits to receive an end‑of‑job message before canceling the remainder of the print job. Notes: • “90 sec” is the factory default setting. • When the timer expires, any partially printed page still in the printer is printed, and then the printer checks to see if any new print jobs are waiting. • Print Timeout is available only when using PCL emulation.
Understanding the printer menus 64 Use To Print Recovery Jam Assist On Off Notes: • On is the factory default setting. On sets the printer to automatically dump blank or partially printed pages to the standard bin after a jammed page has been cleared. • Off requires the user to remove all pages from all possible jam locations. Print Recovery Page Protect Off On Successfully print a page that may not have printed otherwise. Notes: • Off is the factory default setting.
Understanding the printer menus 65 Print Settings Setup menu Use To Printer Language PCL Emulation PS Emulation Set the default printer language. Notes: • PCL Emulation is the factory default setting. • PCL Emulation uses a PCL interpreter for processing print jobs. • PS Emulation uses a PostScript interpreter for processing print jobs. • Setting a printer language default does not prevent a software program from sending print jobs that use another printer language.
Understanding the printer menus 66 Finishing menu Use To Sides (Duplex) 1 sided 2 sided Specify whether two‑sided (duplex) printing is set as the default for all print jobs. Notes: • “1 sided” is the factory default setting. • You can set two‑sided printing from the software program. For Windows users: 1 Click File > Print. 2 Click Properties, Preferences, Options, or Setup. For Macintosh users: 1 Choose File > Print. 2 Adjust the settings from the print dialog and pop‑up menus.
Understanding the printer menus 67 Use To Paper Saver Off 2‑Up 3‑Up 4‑Up 6‑Up 9‑Up 12‑Up 16‑Up Print multiple‑page images on one side of a paper. Paper Saver Ordering Horizontal Reverse Horizontal Reverse Vertical Vertical Specify the positioning of multiple‑page images when using Paper Saver. Paper Saver Orientation Auto Landscape Portrait Specify the orientation of a multiple‑page document. Paper Saver Border None Solid Notes: • Off is the factory default setting.
Understanding the printer menus 68 Use To Enhance Fine Lines On Off Enable a print mode preferable for files such as architectural drawings, maps, electrical circuit diagrams, and flow charts. Notes: • Off is the factory default setting. • You can set this option from the printer software. For Windows users, click File > Print, and then click Properties, Preferences, Options, or Setup. For Macintosh users, choose File > Print, and then adjust the settings from the Print dialog and pop‑up menus.
Understanding the printer menus 69 Use To PCL Emulation Settings A4 Width 198 mm 203 mm Set the printer to print on A4‑size paper. Notes: • 198 mm is the factory default setting. • The 203‑mm setting sets the width of the page to allow printing of eighty 10‑pitch characters. PCL Emulation Settings Auto CR after LF On Off Specify whether the printer automatically performs a carriage return (CR) after a line feed (LF) control command.
Understanding the printer menus 70 Use To Tray Renumber Restore Defaults Yes No Restore all tray and feeder assignments to the factory default settings. Security menu Set Date and Time menu Use To Current Date and Time View the current date and time settings for the printer. Manually Set Date and Time [input date/time] Enter the date and time. Time Zone [list of time zones] Select the time zone.
Saving money and the environment 71 Saving money and the environment Lexmark is committed to environmental sustainability and is continually improving its printers to reduce their impact on the environment. We design with the environment in mind, engineer our packaging to reduce materials, and provide collection and recycling programs. For more information, see: • The Notices chapter • The Environmental Sustainability section of the Lexmark Web site at www.lexmark.
Saving money and the environment 72 Saving energy If your printer is connected to a computer by a USB or parallel cable, then use the Local Printer Settings Utility for Windows or Printer Settings for Macintosh. If your printer is connected to the network, then use the Embedded Web Server. Note: Some features are available only in select printer models. Using Sleep and Hibernate modes Sleep mode saves energy by lowering power consumption during extended periods of inactivity.
Saving money and the environment 73 Notes: • Print a network setup page or menu settings page, and then locate the IP address in the TCP/IP section. • If you are using a proxy server, then temporarily disable it to load the Web page correctly. 2 Click Settings > General Settings > Timeouts. 3 In the Sleep Mode field, enter the number of minutes you want the printer to wait before it enters Sleep Mode. 4 Click Submit.
Saving money and the environment 74 • If you are using a proxy server, then temporarily disable it to load the Web page correctly. 2 Click Settings > General Settings > Schedule Power Modes. 3 From the Action menu, select the power mode. 4 From the Time menu, select the time. 5 From the Day(s) menu, select the day or days. 6 Click Add. Using the printer settings on the computer (Windows only) • Access the Schedule Power Modes menu using the Local Printer Settings Utility.
Saving money and the environment 75 Returning Lexmark cartridges for reuse or recycling Lexmark Cartridge Collection Program diverts millions of Lexmark cartridges from landfills annually by making it both easy and free for Lexmark customers to return used cartridges to Lexmark for reuse or recycling. One hundred percent of the empty cartridges returned to Lexmark are either reused or demanufactured for recycling. Boxes used to return the cartridges are also recycled.
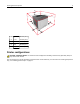
Securing the printer 76 Securing the printer Using the security lock feature The printer is equipped with a security lock feature. Attach a security lock compatible with most laptop computers in the location shown to secure the printer in place. Statement of Volatility Your printer contains various types of memory that can store device and network settings, and user data.
Securing the printer 77 Erasing volatile memory The volatile memory (RAM) installed in your printer requires a power source to retain information. To erase the buffered data, simply turn off the printer. Erasing non‑volatile memory 1 Turn off the printer. 2 Open the front door of the printer and hold down while turning the printer on. Release printer control panel light sequence matches the light sequence in the following illustration.
Securing the printer 3 Press 78 until the printer control panel light sequence matches the light sequence in the following illustration, and then press . ‑ Blinking ‑ Blinking The printer will restart several times during this process. Note: Wipe All Settings securely removes device settings, jobs, and passwords from the printer memory. 4 Close the front door.
Maintaining the printer 79 Maintaining the printer Warning—Potential Damage: Failure to maintain optimum printer performance periodically, or to replace parts and supplies, may cause damage to your printer. Cleaning the printer Cleaning the printer Note: You may need to perform this task after every few months. Warning—Potential Damage: Damage to the printer caused by improper handling is not covered by the printer warranty.
Maintaining the printer 80 Using the printer control panel From the printer control panel, press section. , and then check the supply and part status in the Supply Information Estimated number of remaining pages The estimated number of remaining pages is based on the recent printing history of the printer. Its accuracy may vary significantly and is dependent on many factors, such as actual document content, print quality settings, and other printer settings.
Maintaining the printer Item 81 Return Program cartridge For the United States and Canada Toner Cartridge 501 High Yield Toner Cartridge 501H Extra High Yield Toner Cartridge 501X1 Ultra High Yield Toner Cartridge 501U2 For the European Union, European Economic Area , and Switzerland Toner Cartridge 502 High Yield Toner Cartridge 502H Extra High Yield Toner Cartridge 502X1 Ultra High Yield Toner Cartridge 502U2 For the Asia Pacific Region (includes Australia and New Zealand) Toner Cartri
Maintaining the printer 82 Item Regular cartridge Extra High Yield Toner Cartridge 500XA2 Ultra High Yield Toner Cartridge 500UA3 1 This cartridge is supported only in MS310d and MS310dn printer models. 2 This cartridge is supported only in MS410d and MS410dn printer models. 3 This cartridge is supported only in MS510dn, MS610dn, and MS610de printer models.
Maintaining the printer 83 Replacing supplies Replacing the toner cartridge 1 Press the button on the right side of the printer, and then open the front door. 1 2 2 Pull the toner cartridge out using the handle. 3 Unpack the toner cartridge, and then remove all packing materials. 4 Shake the new cartridge to redistribute the toner. 5 Insert the toner cartridge into the printer by aligning the side rails of the cartridge with the arrows on the side rails inside the printer.
Maintaining the printer 84 6 Close the front door. Replacing the imaging unit 1 Press the button on the right side of the printer, and then open the front door. 1 2 2 Pull the toner cartridge out using the handle.
Maintaining the printer 85 3 Lift the green handle, and then pull the imaging unit out of the printer. 4 Unpack the new imaging unit, and then shake it. 5 Remove all packing materials from the imaging unit. Warning—Potential Damage: Do not expose the imaging unit to direct light for more than 10 minutes. Extended exposure to light may cause print quality problems. Warning—Potential Damage: Do not touch the photoconductor drum. Doing so may affect the print quality of future print jobs.
Maintaining the printer 86 6 Insert the imaging unit into the printer by aligning the arrows on the side rails of the imaging unit with the arrows on the side rails inside the printer. 7 Insert the toner cartridge into the printer by aligning the side rails of the cartridge with the arrows on the side rails inside the printer. 8 Close the front door.
Maintaining the printer 87 • If an optional tray is installed, then remove it from the printer. To remove the optional tray, slide the latch on the right side of the tray toward the front of the tray until it clicks into place. • Use the handholds located on both sides of the printer to lift it. • Make sure your fingers are not under the printer when you set it down. • Before setting up the printer, make sure there is adequate clearance around it.
Managing the printer 88 Managing the printer This chapter covers basic administrative support tasks using the Embedded Web Server. Finding advanced networking and administrator information This chapter covers basic administrative support tasks using the Embedded Web Server. For more advanced system support tasks, see the Networking Guide on the Software and Documentation CD or the Embedded Web Server Administrator's Guide on the Lexmark Web site at http://support.lexmark.com.
Managing the printer 89 Notification Description Off The normal printer behavior for all supplies occurs. E‑mail Only The printer generates an e-mail when the supply condition is reached. The status of the supply appears on the menus page and status page. Warning The printer displays a warning light sequence and generates an e-mail about the status of the supply. The printer does not stop when the supply condition is reached.
Clearing jams 90 Clearing jams Carefully select paper and specialty media and load them properly to avoid most jams. For more information, see “Avoiding jams” on page 90. If jams do occur, then follow the steps outlined in this chapter. Note: Jam recovery is set to Auto by default. The printer reprints jammed pages unless the memory required to hold the pages is needed for other printer tasks. Avoiding jams Load paper properly • Make sure paper lies flat in the tray.
Clearing jams 91 • Do not slide the paper into the tray. Load paper as shown in the illustration. • Make sure the guides in the tray or the multipurpose feeder are properly positioned and are not pressing tightly against the paper or envelopes. • Push the tray firmly into the printer after loading paper. Use recommended paper • Use only recommended paper or specialty media. • Do not load wrinkled, creased, damp, bent, or curled paper. • Flex, fan, and straighten paper before loading it.
Clearing jams 92 1 2 6 5 3 4 Access area Description 1 Standard bin 2 Rear door 3 Standard 250‑sheet tray (Tray 1) 4 Optional 250‑ or 550‑sheet tray (Tray 2) 5 Multipurpose feeder door 6 Front door Notes: • When Jam Assist is set to On, the printer automatically flushes blank pages or pages with partial prints to the standard bin after a jammed page has been cleared. Check your printed output stack for discarded pages.
Clearing jams ‑ On ‑ On If the printer control panel light sequence matches the light sequence in the preceding illustration, then press twice quickly to see the supplemental light sequence.
Clearing jams 94 If the supplemental light sequence matches the light sequence in the preceding illustration, then do the following. CAUTION—HOT SURFACE: The inside of the printer might be hot. To reduce the risk of injury from a hot component, allow the surface to cool before touching it. 1 Press the button on the right side of the printer, and then open the front door. 1 2 2 Pull out the toner cartridge using the handle. 3 Lift the green handle, and then pull out the imaging unit from the printer.
Clearing jams 4 Place the imaging unit aside on a flat, smooth surface. Warning—Potential Damage: Do not expose the imaging unit to direct light for more than 10 minutes. Extended exposure to light can cause print quality problems. 5 Lift the green flap in front of the printer. 6 Firmly grasp the jammed paper on each side, and then gently pull it out. Note: Make sure all paper fragments are removed.
Clearing jams 96 7 Insert the imaging unit by aligning the arrows on the side rails of the unit with the arrows on the side rails inside the printer, and then insert the imaging unit into the printer. 8 Insert the toner cartridge by aligning the side rails of the cartridge with the arrows on the side rails inside the printer, and then insert the cartridge into the printer. 9 Close the front door. 10 From the printer control panel, press to clear the message and continue printing.
Clearing jams [x]‑page jam, open rear door. [20y.xx] ‑ On ‑ On If the printer control panel light sequence matches the light sequence in the preceding illustration, then press twice quickly to see the supplemental light sequence.
Clearing jams 98 If the supplemental light sequence matches the light sequence in the preceding illustration, then do the following. 1 Press the button on the right side of the printer, and then open the front door. 1 2 2 Gently pull down the rear door. CAUTION—HOT SURFACE: The inside of the printer might be hot. To reduce the risk of injury from a hot component, allow the surface to cool before touching it. 3 Firmly grasp the jammed paper on each side, and then gently pull it out.
Clearing jams 99 4 Close the rear and front doors. 5 From the printer control panel, press to clear the message and continue printing. [x]‑page jam, clear standard bin. [20y.
Clearing jams 100 If the printer control panel light sequence matches the light sequence in the preceding illustration, then press twice quickly to see the supplemental light sequence. ‑ On ‑ On ‑ On If the supplemental light sequence matches the light sequence in the preceding illustration, then do the following. 1 Firmly grasp the jammed paper on each side, and then gently pull it out. Note: Make sure all paper fragments are removed.
Clearing jams [x]‑page jam, remove tray 1 to clear duplex. [23y.xx] ‑ On ‑ On If the printer control panel light sequence matches the light sequence in the preceding illustration, then press twice quickly to see the supplemental light sequence.
Clearing jams Light sequence ‑ On ‑ Blinking ‑ On ‑ On ‑ On ‑ On If the supplemental light sequence matches any of the light sequences in the preceding illustrations, then do the following. CAUTION—HOT SURFACE: The inside of the printer might be hot. To reduce the risk of injury from a hot component, allow the surface to cool before touching it. 1 Pull out the tray completely.
Clearing jams 103 2 Locate the blue lever, and then pull it down to release the jam. Note: If the jammed paper is not visible in the duplex area, then open the rear door, and then gently remove the jammed paper. Make sure all paper fragments are removed. 3 Firmly grasp the jammed paper on each side, and then gently pull it out. Note: Make sure all paper fragments are removed. 4 Insert the tray. 5 From the printer control panel, press to clear the message and continue printing.
Clearing jams [x]‑page jam, remove tray [x]. [24y.xx] ‑ On ‑ On If the printer control panel light sequence matches the light sequence in the preceding illustration, then press twice quickly to see the supplemental light sequence.
Clearing jams Light sequence ‑ On ‑ On ‑ On ‑ On If the supplemental light sequence matches any of the light sequences in the preceding illustrations, then do the following. 1 Pull out the tray completely. 2 Firmly grasp the jammed paper on each side, and then gently pull it out. Note: Make sure all paper fragments are removed.
Clearing jams 106 3 Insert the tray. 4 From the printer control panel, press to clear the message and continue printing. [x]‑page jam, clear manual feeder. [250.xx] ‑ On ‑ On If the printer control panel light sequence matches the light sequence in the preceding illustration, then press twice quickly to see the supplemental light sequence.
Clearing jams 107 ‑ On ‑ On ‑ On ‑ On If the supplemental light sequence matches the light sequence in the preceding illustration, then do the following. 1 From the multipurpose feeder, firmly grasp the jammed paper on each side, and then gently pull it out. Note: Make sure all paper fragments are removed. 2 Flex the sheets of paper back and forth to loosen them, and then fan them. Do not fold or crease the paper. Straighten the edges on a level surface. 3 Reload paper into the multipurpose feeder.
Troubleshooting 108 Troubleshooting Understanding the printer messages Toner cartridge messages Cartridge, imaging unit mismatch [41.xy] ‑ On ‑ On ‑ Slowly blinking ‑ Slowly blinking If the printer control panel light sequence matches the light sequence in the preceding illustration, then do the following: 1 Check if the toner cartridge and imaging unit are both MICR or non-MICR supplies.
Troubleshooting 109 Cartridge low [88.xx] ‑ On ‑ On If the printer control panel light sequence matches the light sequence in the preceding illustration, then you may need to order a toner cartridge. If necessary, press Cartridge nearly low [88.xy] ‑ Slowly blinking on the printer control panel to continue printing.
Troubleshooting 110 ‑ On ‑ On If the printer control panel light sequence matches the light sequence in the preceding illustration, then press the printer control panel, if necessary, to continue printing. on Cartridge very low [88.xy] ‑ Blinking ‑ On ‑ On If the printer control panel light sequence matches the light sequence in the preceding illustration, then you may need to replace the toner cartridge very soon. For more information, see the “Replacing supplies” section of the User’s Guide.
Troubleshooting 111 Non-Lexmark cartridge, see User’s Guide [33.xy] ‑ Blinking ‑ Blinking ‑ Blinking ‑ On If the printer control panel light sequence matches the light sequence in the preceding illustration, then the printer has detected a non‑Lexmark supply or part installed in the printer. Your Lexmark printer is designed to function best with genuine Lexmark supplies and parts.
Troubleshooting Replace cartridge, 0 estimated pages remain [88.xy] ‑ On ‑ On If the printer control panel light sequence matches the light sequence in the preceding illustration, then press twice quickly to see the supplemental light sequence.
Troubleshooting 113 If the supplemental light sequence matches the light sequence in the preceding illustration, then replace the toner cartridge. For more information, see the instruction sheet that came with the supply or see the “Replacing supplies” section of the User’s Guide. Note: If you do not have a replacement toner cartridge, then see the “Ordering supplies” section of the User’s Guide or visit www.lexmark.com. Replace cartridge, printer region mismatch [42.
Troubleshooting 114 If the printer control panel light sequence matches the light sequence in the preceding illustration, then press twice quickly to see the supplemental light sequence. ‑ On ‑ Blinking ‑ On If the supplemental light sequence matches the light sequence in the preceding illustration, then install a toner cartridge that matches the region number of the printer. x indicates the value of the printer region. y indicates the value of the cartridge region.
Troubleshooting Reinstall missing or unresponsive cartridge [31.xy] ‑ On ‑ On If the printer control panel light sequence matches the light sequence in the preceding illustration, then press twice quickly to see the supplemental light sequence.
Troubleshooting 116 If the supplemental light sequence matches the light sequence in the preceding illustration, then try one or more of the following: • Remove the toner cartridge, and then reinstall it. • Remove the toner cartridge, and then install a new one. For more information, see the instruction sheet that came with the supply. Replace unsupported cartridge [32.
Troubleshooting 117 Imaging unit messages Imaging unit low [84.xy] ‑ Blinking ‑ On If the printer control panel light sequence matches the light sequence in the preceding illustration, then you may need to order an imaging unit. If necessary, press Imaging unit nearly low [84.xy] on the printer control panel to continue printing.
Troubleshooting 118 ‑ Slowly blinking ‑ Blinking ‑ On If the printer control panel light sequence matches the light sequence in the preceding illustration, then press the printer control panel, if necessary, to continue printing. on Imaging unit very low [84.xy] ‑ Blinking ‑ Blinking ‑ On If the printer control panel light sequence matches the light sequence in the preceding illustration, then you may need to replace the imaging unit very soon.
Troubleshooting 119 Non-Lexmark imaging unit, see User’s Guide [33.xy] ‑ Blinking ‑ Blinking ‑ Blinking ‑ Blinking If the printer control panel light sequence matches the light sequence in the preceding illustration, then the printer has detected a non‑Lexmark supply or part installed in the printer. Your Lexmark printer is designed to function best with genuine Lexmark supplies and parts.
Troubleshooting 120 Replace imaging unit, 0 estimated pages remain [84.xy] ‑ On ‑ Blinking ‑ On If the printer control panel light sequence matches the light sequence in the preceding illustration, then replace the imaging unit. For more information, see the instruction sheet that came with the supply. Note: If you do not have a replacement imaging unit, then see the “Ordering supplies” section of the User’s Guide or visit www.lexmark.com. Reinstall missing or unresponsive imaging unit [31.
Troubleshooting 121 ‑ On ‑ Blinking If the printer control panel light sequence matches the light sequence in the preceding illustration, then press twice quickly to see the supplemental light sequence. ‑ On ‑ On ‑ Blinking If the supplemental light sequence matches the light sequence in the preceding illustration, then try one or more of the following: • Remove the imaging unit, and then reinstall it. • Remove the imaging unit, and then install a new one.
Troubleshooting 122 Replace unsupported imaging unit [32.xy] ‑ On ‑ On ‑ On ‑ Blinking If the printer control panel light sequence matches the light sequence in the preceding illustration, then remove the imaging unit, and then install a supported one. For more information, see the instruction sheet that came with the supply. Note: If you do not have a replacement imaging unit, then see the “Ordering supplies” section of the User’s Guide or visit www.lexmark.com.
Troubleshooting 123 Paper loading messages Change [paper source] to [custom type name], load [orientation] ‑ Blinking ‑ On If the printer control panel light sequence matches the light sequence in the preceding illustration, then try one or more of the following: • Load the tray or feeder with the correct size and type of paper, and then press on the printer control panel to continue printing.
Troubleshooting 124 Change [paper source] to [custom string] load [orientation] ‑ Blinking ‑ On If the printer control panel light sequence matches the light sequence in the preceding illustration, then try one or more of the following: • Load the tray or feeder with the correct size and type of paper, and then press on the printer control panel to continue printing.
Troubleshooting 125 Change [paper source] to [paper size] load [orientation] ‑ Blinking ‑ On If the printer control panel light sequence matches the light sequence in the preceding illustration, then try one or more of the following: • Load the tray or feeder with the correct size and type of paper, and then press on the printer control panel to continue printing.
Troubleshooting 126 Change [paper source] to [paper type] [paper size] load [orientation] ‑ Blinking ‑ On If the printer control panel light sequence matches the light sequence in the preceding illustration, then try one or more of the following: • Load the tray or feeder with the correct size and type of paper, and then press on the printer control panel to continue printing.
Troubleshooting Incorrect paper size, open [paper source] [34] ‑ On ‑ On If the printer control panel light sequence matches the light sequence in the preceding illustration, then press twice quickly to see the supplemental light sequence.
Troubleshooting 128 ‑ On If the supplemental light sequence matches the light sequence in the preceding illustration, then try one or more of the following: • Load the correct size of paper. • • • • From the printer control panel, press to clear the light sequence and print using a different tray. Check the length and width guides and make sure the paper is loaded properly in the tray. Make sure the correct paper size and type are specified in Print Properties or the Print dialog settings.
Troubleshooting 129 If the printer control panel light sequence matches the light sequence in the preceding illustration, then try one or more of the following: • Load the tray or feeder with the correct size and type of paper. • From the printer control panel, press to continue printing. Note: If the printer finds a tray that has the correct size and type of paper, then it feeds from that tray.
Troubleshooting 130 Load [paper source] with [paper size] [orientation] ‑ On ‑ On If the printer control panel light sequence matches the light sequence in the preceding illustration, then try one or more of the following: • Load the tray or feeder with the correct size of paper. • From the printer control panel, press to continue printing. Note: If the printer finds a tray that has the correct size of paper, then it feeds from that tray.
Troubleshooting 131 Load [paper source] with [paper type] [paper size] [orientation] ‑ On ‑ On If the printer control panel light sequence matches the light sequence in the preceding illustration, then try one or more of the following: • Load the tray or feeder with the correct size and type of paper. • From the printer control panel, press to continue printing. Note: If the printer finds a tray that has the correct size and type of paper, then it feeds from that tray.
Troubleshooting 132 Load Manual Feeder with [custom type name] [orientation] ‑ On ‑ On If the printer control panel light sequence matches the light sequence in the preceding illustration, then try one or more of the following: • Load the multipurpose feeder with the correct size and type of paper. • From the printer control panel, press to continue printing. Note: If no paper is loaded in the feeder, then the printer manually overrides the request, and then prints from an automatically selected tray.
Troubleshooting 133 Load Manual Feeder with [custom type string] [orientation] ‑ On ‑ On If the printer control panel light sequence matches the light sequence in the preceding illustration, then try one or more of the following: • Load the multipurpose feeder with the correct size and type of paper. • From the printer control panel, press to continue printing.
Troubleshooting 134 Load Manual Feeder with [paper size] [orientation] ‑ On ‑ On If the printer control panel light sequence matches the light sequence in the preceding illustration, then try one or more of the following: • Load the feeder with the correct size and type of paper. • From the printer control panel, press to continue printing. Note: If no paper is loaded in the feeder, then the printer manually overrides the request, and then prints from an automatically selected tray.
Troubleshooting 135 Load Manual Feeder with [paper type] [paper size] [orientation] ‑ On ‑ On If the printer control panel light sequence matches the light sequence in the preceding illustration, then try one or more of the following: • Load the multipurpose feeder with the correct size and type of paper. • From the printer control panel, press to continue printing.
Troubleshooting 136 Remove paper from standard output bin ‑ Blinking If the printer control panel light sequence matches the light sequence in the preceding illustration, then do the following: 1 Remove the paper stack from the standard output bin. 2 From the printer control panel, press to continue printing.
Troubleshooting 137 ‑ On ‑ On If the printer control panel light sequence matches the light sequence in the preceding illustration, then press twice quickly to see the supplemental light sequence. ‑ On ‑ Blinking ‑ On If the supplemental light sequence matches the light sequence in the preceding illustration, then try one or more of the following: • • • • From the printer control panel, press to continue printing. Unplug the router, then wait for 30 seconds, and then plug the router back again.
Troubleshooting Standard parallel port disabled [56] ‑ On ‑ On If the printer control panel light sequence matches the light sequence in the preceding illustration, then press twice quickly to see the supplemental light sequence.
Troubleshooting 139 ‑ On If the supplemental light sequence matches the light sequence in the preceding illustration, then try one or more of the following: • From the printer control panel, press to continue printing. Note: The printer discards any data received through the parallel port. • Set the Parallel Buffer to Auto. – If the printer is on a network, then access the Embedded Web Server. 1 Open a Web browser, and then type the printer IP address in the address field.
Troubleshooting 140 If the printer control panel light sequence matches the light sequence in the preceding illustration, then press twice quickly to see the supplemental light sequence. ‑ On ‑ On ‑ On If the supplemental light sequence matches the light sequence in the preceding illustration, then try one or more of the following: • From the printer control panel, press to continue printing. • Turn off the printer, and then turn it back on.
Troubleshooting Standard USB port disabled [56] ‑ On ‑ On If the printer control panel light sequence matches the light sequence in the preceding illustration, then press twice quickly to see the supplemental light sequence.
Troubleshooting 142 ‑ On If the supplemental light sequence matches the light sequence in the preceding illustration, then try one or more of the following: • From the printer control panel, press to continue printing. Note: The printer discards any data received through the USB port. • Set the USB Buffer to Auto: – If the printer is on a network, then access the Embedded Web Server. 1 Open a Web browser, and then type the printer IP address in the address field.
Troubleshooting 143 If the printer control panel light sequence matches the light sequence in the preceding illustration, then press twice quickly to see the supplemental light sequence. ‑ On ‑ On ‑ On If the supplemental light sequence matches the light sequence in the preceding illustration, then try one or more of the following: • From the printer control panel, press to print the portion of the job already stored and begin collating the rest of the print job.
Troubleshooting Insufficient memory to support Resource Save feature [35] ‑ On ‑ On If the printer control panel light sequence matches the light sequence in the preceding illustration, then press twice quickly to see the supplemental light sequence.
Troubleshooting If the supplemental light sequence matches the light sequence in the preceding illustration, then press printer control panel to clear the light sequence. 145 on the The job will be printed without using Resource Save. Memory full [38] ‑ On ‑ On If the printer control panel light sequence matches the light sequence in the preceding illustration, then press twice quickly to see the supplemental light sequence.
Troubleshooting 146 ‑ On ‑ On ‑ On ‑ On If the supplemental light sequence matches the light sequence in the preceding illustration, then try one or more of the following: • From the printer control panel, press to continue printing. A data loss will occur. • From the printer control panel, press • Install additional printer memory. • Decrease the resolution setting. to cancel the print job.
Troubleshooting Complex page, some data may not have printed [39] ‑ On ‑ On If the printer control panel light sequence matches the light sequence in the preceding illustration, then press twice quickly to see the supplemental light sequence.
Troubleshooting 148 If the supplemental light sequence matches the light sequence in the preceding illustration, then try one or more of the following: • From the printer control panel, press to continue printing. A data loss may occur. • From the printer control panel, press to cancel the print job. • Install additional printer memory. • Reduce the number and size of fonts, the number and complexity of images, and the number of pages in the print job.
Troubleshooting 149 If the printer control light sequence matches the light sequence in the preceding illustration, then press quickly to see the supplemental light sequence. twice ‑ On ‑ Blinking ‑ On If the supplemental light sequence matches the light sequence in the preceding illustration, then try one or more of the following: • From the printer control panel, press to continue printing. • From the printer control panel, press to cancel the print job.
Troubleshooting 150 Printer had to restart. Last job may be incomplete. ‑ Blinking ‑ Blinking ‑ Blinking ‑ On If the printer control panel light sequence matches the light sequence in the preceding illustration, then press the printer control panel to continue printing. For more information, visit http://support.lexmark.com or contact customer support.
Troubleshooting 151 Service error ‑ Blinking ‑ Blinking ‑ Blinking ‑ Blinking ‑ Blinking ‑ Blinking If the printer control panel light sequence matches the light sequence in the preceding illustration, then turn off the printer, and then turn it back on. If the lights are still blinking after 10 seconds, then the printer may need to be serviced. Visit http://support.lexmark.com or contact your system support person.
Troubleshooting Too many trays attached [58] ‑ On ‑ On If the printer control panel light sequence matches the light sequence in the preceding illustration, then press twice quickly to see the supplemental light sequence.
Troubleshooting 153 ‑ On If the supplemental light sequence matches the light sequence in the preceding illustration, then do the following: 1 Turn off the printer. 2 Unplug the power cord from the electrical outlet. Note: Optional trays lock together when stacked. Remove stacked trays one at a time from the top to the bottom. 3 Remove the extra tray or trays. 4 Connect the power cord to a properly grounded electrical outlet. 5 Turn the printer back on.
Troubleshooting 154 Action Yes No Step 5 Go to step 6. Make sure to match the following: Check if the cables connecting the printer and the computer are inserted in the correct ports. • The USB symbol on the cable with the USB symbol on the printer Are the cables inserted in the correct ports? • The appropriate Ethernet cable with the Ethernet port Step 6 Make sure the electrical outlet is not turned off by a switch or breaker. Turn on the switch or reset the breaker. Go to step 7.
Troubleshooting 155 Option problems Cannot detect internal option Action Yes No Step 1 The problem is solved. Go to step 2. Turn off the printer, then wait for about 10 seconds, and then turn on the printer. Does the internal option operate correctly? Step 2 Go to step 3. Connect the internal option to the controller board. Go to step 4. Reinstall the internal option. Check if the internal option is properly installed in the controller board.
Troubleshooting 156 Tray problems Action Yes No Step 1 a Open the tray and do one or more of the following: The problem is solved. Go to step 2. • Check for paper jams or misfeeds. • Check if the paper size indicators on the paper guides are aligned with the paper size indicators on the tray. • If you are printing on custom‑size paper, then make sure that the paper guides rest against the edges of the paper. • Make sure the paper is below the maximum paper fill indicator.
Troubleshooting 157 Paper feed problems Paper frequently jams Action Yes No Step 1 a Pull out the tray, and then do one or more of the following: Go to step 2. The problem is solved. Go to step 3. The problem is solved. Contact customer The problem is solved. • Make sure paper lies flat in the tray. • Check if the paper size indicators on the paper guides are aligned with the paper size indicators on the tray. • Check if the paper guides are aligned against the edges of the paper.
Troubleshooting 158 Jammed pages are not reprinted Actions a From the Print Recovery menu, set Jam Recovery to Auto or On. To access the Print Recovery menu, try one or more of the following: Yes No The problem is solved. Contact customer support. • If the printer is on a network, then open a Web browser and type the printer IP address in the address field. Then navigate to Settings > General Settings > Print Recovery.
Troubleshooting 159 Action Yes No Step 2 The problem is solved. Go to step 3. a Check if the printer is plugged in and turned on, and if the printer control panel light sequence matches the light sequence in the following illustration: Ready ‑ On b Resend the print job. Do the jobs print? Step 3 The problem is solved. Go to step 4. If printer control panel light sequence indicates an error, then clear the message.
Troubleshooting 160 Action Yes Step 6 The problem is solved. Contact customer support. a Remove and reinstall the printer software. For more information, see No “Installing the printer software” on page 19. Note: The printer software is available at http://support.lexmark.com. b Resend the print job. Do the jobs print? Printing slows down Notes: • When printing using narrow paper, the printer prints at a reduced speed to prevent damage to the fuser.
Troubleshooting Action 161 Yes No Step 3 The problem is solved. Install additional From the Eco‑Mode menu, change the environmental settings. To access printer memory. the Eco‑Mode menu, do either of the following: For more information, • If the printer is on a network, then open a Web browser and type the contact customer support. printer IP address in the address field. Then navigate to Settings > General Settings > Eco‑Mode.
Troubleshooting 162 Actions Yes Step 3 The problem is solved. Contact customer support. a Depending on your operating system, open Printing Preferences or No the Print dialog, and then specify the paper type. b Resend the print job. Does the job print from the correct tray or on the correct paper? Incorrect characters print Action Yes Step 1 Turn off the printer, Go to step 2. and then turn it back on to deactivate Hex Trace mode.
Troubleshooting Action 163 Yes No a From the Paper menu, set the paper size and type to match the paper The problem is solved. Contact customer support. loaded in the trays to be linked. To access the Paper menu, do either of the following: • If the printer is on a network, then open a Web browser and type the printer IP address in the address field. Then navigate to Settings > Paper Menu.
Troubleshooting 164 Action Yes Step 3 The problem is solved. Contact customer support. Reduce the number and size of fonts, the number and complexity of images, and the number of pages in the job. No Does the job print and collate correctly? Unexpected page breaks occur Action Yes No Step 1 The problem is solved. Go to step 2. From the Setup menu, adjust the print timeout setting.
Troubleshooting 165 Action Yes No Step 1 a Check if there is packing material left on the imaging unit. Go to step 2. The problem is solved. Go to step 3. The problem is solved. Contact customer support. The problem is solved. 1 Remove the toner cartridge, and then the imaging unit. 2 Check if the packing material is properly removed from the imaging unit. Warning—Potential Damage: Do not expose the imaging unit to direct light for more than 10 minutes.
Troubleshooting Action 166 Yes Step 1 Go to step 2. a Move the width and length guides in the tray to the correct positions for the paper loaded. b Resend the print job. No The problem is solved. Is the page or image clipped? Step 2 Go to step 3. From the Paper menu, set the paper size and type to match the paper loaded in the tray. To access the Paper menu, do either of the following: • Specify the correct paper size and type from the tray settings to match the paper loaded in the tray.
Troubleshooting 167 Shadow images appear on prints Leading edge A AB BC CD D A B C D ABCD Trailing edge Action Yes No Step 1 Go to step 2. Load paper with the correct paper type and weight in the tray. Go to step 3. Change the paper type and weight to match the paper loaded in the tray. Go to step 4. The problem is solved. Contact customer support. The problem is solved. Check if the paper loaded in the tray has the correct paper type and weight.
Troubleshooting 168 Action Yes No Step 1 a From the Quality menu, select a lower number to reduce the toner density. To access the Quality menu, do either of the following: The problem is solved. Go to step 2. • If the printer is on a network, then open a Web browser and type the printer IP address in the address field. Then, navigate to Settings > Print Settings > Quality Menu.
Troubleshooting 169 Action Yes No Step 2 Go to step 3. Do one or more of the following: From the Paper menu, check if the paper size setting matches the paper loaded in the tray. To access the Paper menu, do either of the following: • Change the paper size setting to match the paper loaded in the tray. • If the printer is on a network, then open a Web browser and type the printer IP address in the address field. Then, navigate to Settings > Paper Menu.
Troubleshooting 170 Action Yes No Step 3 Go to step 4. The problem is solved. Go to step 5. The problem is solved. Contact customer support. The problem is solved. Yes No a Depending on your operating system, specify the paper type and weight from Printing Preferences or from the Print dialog. b Resend the print job. Is the paper still curled? Step 4 a Remove the paper from the tray, and then turn it over. b Resend the print job.
Troubleshooting 171 Action Yes No Step 2 Go to step 3. Specify the correct paper type and weight to match the paper loaded in the tray. Go to step 4. The problem is solved. From the Paper menu, set the paper size and type to match the paper loaded in the tray. To access the Paper menu, do either of the following: • If the printer is on a network, then open a Web browser and type the printer IP address in the address field. Then navigate to Settings > Paper Menu.
Troubleshooting 172 Action Yes Step 4 From the Paper Texture Go to step 5. menu, change the texture settings. To access the Paper Texture menu, do either of the following: Check if the paper loaded in the tray has texture or rough finishes. Are you printing on textured or rough paper? No • If the printer is on a network, then open a Web browser and type the printer IP address in the address field. Then navigate to Settings > Paper Menu > Paper Texture.
Troubleshooting 173 Repeating defects appear on prints Action Yes Step 1 Go to step 2. Measure the distance between the defects. Check for a distance between the defects that equals: • 97 mm (3.82 in.) • 47 mm (1.85 in.) • 38 mm (1.5 in.) Is the distance between defects equal to one of the listed measurements? Step 2 Replace the imaging unit, and then resend the print job.
Troubleshooting 174 Action Yes No Step 1 a From the Quality menu, reduce the toner darkness. To access the Quality menu, do either of the following: Go to step 2. The problem is solved. Go to step 3. Change the paper type, texture, and weight to match the paper loaded in the tray. Go to step 4. The problem is solved. • If the printer is on a network, then open a Web browser and type the printer IP address in the address field. Then navigate to Settings > Printer Settings > Quality Menu.
Troubleshooting 175 Action Yes Step 4 From the Paper Texture Go to step 5. menu, change the texture settings to match the paper you are printing on. To access the Paper Texture menu, do either of the following: Check if the paper loaded in the tray has texture or rough finishes. Are you printing on textured or rough paper? No • If the printer is on a network, then open a Web browser and type the printer IP address in the address field. Then navigate to Settings > Paper Menu > Paper Texture.
Troubleshooting 176 Print is too light ABC DEF Action Yes No Step 1 a From the Quality menu, increase the toner darkness. To access the Quality menu, do either of the following: Go to step 2. The problem is solved. Go to step 3. Change the paper type, texture, and weight to match the paper loaded in the tray. • If the printer is on a network, then open a Web browser and type the printer IP address in the address field. Then navigate to Settings > Printer Settings > Quality Menu.
Troubleshooting 177 Action Yes No Step 3 Go to step 4. The problem is solved. a Depending on your operating system, specify the paper type, texture, and weight from Printing Preferences or the Print dialog. b Resend the print job. Is the print still too light? Step 4 Make sure that the paper has no texture or rough finishes. Are you printing on textured or rough paper? From the Paper Texture Go to step 5. menu, change the texture settings to match the paper you are printing on.
Troubleshooting 178 Action Yes No Step 6 Go to step 7. The problem is solved. Contact customer support. The problem is solved. Yes No a Shake the imaging unit to redistribute the toner. 1 Remove the toner cartridge, and then the imaging unit. 2 Firmly shake the imaging unit. Warning—Potential Damage: Do not expose the imaging unit to direct light for more than 10 minutes. Extended exposure to light may cause print quality problems. 3 Reinstall the imaging unit, and then the cartridge.
Troubleshooting 179 Printer is printing solid black pages Action Yes No Step 1 a Reinstall the imaging unit. 1 Remove the toner cartridge, and then the imaging unit. Go to step 2. The problem is solved. Contact customer support. The problem is solved. Action Yes No Step 1 Go to step 2. Set the paper type to Transparency. Warning—Potential Damage: Do not expose the imaging unit to direct light for more than 10 minutes. Extended exposure to light may cause print quality problems.
Troubleshooting 180 Action Yes No Step 2 Contact customer support. The problem is solved. Yes No a Check if you are using a recommended type of transparency. b Resend the print job. Is the print quality still poor? Streaked horizontal lines appear on prints ABCDE ABCDE ABCDE Action Step 1 Go to step 2. a Depending on your operating system, specify the tray or feeder from Printing Preferences or the Print dialog. The problem is solved. b Resend the print job.
Troubleshooting 181 Action Yes No Step 4 Go to step 5. The problem is solved. Contact customer support. The problem is solved. Yes No a Reinstall the imaging unit. 1 Remove the toner cartridge, and then the imaging unit. Warning—Potential Damage: Do not expose the imaging unit to direct light for more than 10 minutes. Extended exposure to light may cause print quality problems. 2 Install the imaging unit, and then the cartridge. b Resend the print job.
Troubleshooting 182 Action Yes No Step 3 Go to step 4. The problem is solved. Go to step 5. The problem is solved. a Load paper from a fresh package. Note: Paper absorbs moisture due to high humidity. Store paper in its original wrapper until you use it. b Resend the print job. Do streaked vertical lines still appear on prints? Step 4 a Reinstall the imaging unit. 1 Remove the toner cartridge, and then the imaging unit.
Troubleshooting 183 Action Yes No Step 3 Go to step 4. The problem is solved. Contact customer support. The problem is solved. Action Yes No Step 1 Go to step 2. The problem is solved. a Redistribute the toner in the imaging unit. 1 Remove the toner cartridge, and then the imaging unit. 2 Firmly shake the imaging unit. Warning—Potential Damage: Do not expose the imaging unit to direct light for more than 10 minutes. Extended exposure to light may cause print quality problems.
Troubleshooting 184 Action Yes No Step 2 Go to step 3. The problem is solved. Go to step 4. The problem is solved. Go to step 5. The problem is solved. Contact customer support. The problem is solved. a From the Paper Menu, set the paper type and weight to match the paper loaded in the tray. To access the Paper Menu, do either of the following: • If the printer is on a network, then open a Web browser and type the printer IP address in the address field.
Troubleshooting 185 Toner specks appear on prints Action Yes No Replace the imaging unit, and then resend the print job. Contact customer support. The problem is solved. Action Yes No Step 1 Go to step 2. Change the paper type and weight settings to match the paper loaded in the tray. Change the texture settings in the Paper menu. Contact customer support at http://support.lexmar k.com or your service representative.
Troubleshooting 186 Action Yes No Replace the imaging unit, and then resend the print job. Contact customer support. The problem is solved. Action Yes No Step 1 The problem is solved. Go to step 2. Is the print density uneven? Embedded Web Server does not open a Turn on the printer. b Open a Web browser, and then type the printer IP address. c Press Enter. Does the Embedded Web Server open? Step 2 Make sure the printer IP address is correct. The problem is solved. Go to step 3.
Troubleshooting 187 Action Yes No Step 4 The problem is solved. Go to step 5. Check if the cable connections to the printer and print server are secure. a Connect the cables properly. For more information, see the setup documentation that came with the printer. b Open a Web browser, and then type the printer IP address. c Press Enter. Does the Embedded Web Server open? Step 5 Temporarily disable the Web proxy servers.
Notices 188 Notices Product information Product name: Lexmark MS310d, MS310dn Machine type: 4514 Model(s): 220, 230 Edition notice August 2012 The following paragraph does not apply to any country where such provisions are inconsistent with local law: LEXMARK INTERNATIONAL, INC., PROVIDES THIS PUBLICATION “AS IS” WITHOUT WARRANTY OF ANY KIND, EITHER EXPRESS OR IMPLIED, INCLUDING, BUT NOT LIMITED TO, THE IMPLIED WARRANTIES OF MERCHANTABILITY OR FITNESS FOR A PARTICULAR PURPOSE.
Notices 189 GOVERNMENT END USERS The Software Program and any related documentation are "Commercial Items," as that term is defined in 48 C.F.R. 2.101, "Computer Software" and "Commercial Computer Software Documentation," as such terms are used in 48 C.F.R. 12.212 or 48 C.F.R. 227.7202, as applicable. Consistent with 48 C.F.R. 12.212 or 48 C.F.R. 227.7202-1 through 227.7207-4, as applicable, the Commercial Computer Software and Commercial Software Documentation are licensed to the U.S.
Notices 190 Any questions regarding this compliance information statement should be directed to: Director of Lexmark Technology & Services Lexmark International, Inc.
Notices 191 Product disposal Do not dispose of the printer or supplies in the same manner as normal household waste. Consult your local authorities for disposal and recycling options. Static sensitivity notice This symbol identifies static-sensitive parts. Do not touch in the areas near these symbols without first touching the metal frame of the printer.
Notices 192 DANGER - Invisible laser radiation when cartridges are removed and interlock defeated. Avoid exposure to laser beam. PERIGO - Radiação a laser invisível será liberada se os cartuchos forem removidos e o lacre rompido. Evite a exposição aos feixes de laser. Opasnost - Nevidljivo lasersko zračenje kada su kasete uklonjene i poništena sigurnosna veza. Izbjegavati izlaganje zracima. NEBEZPEČÍ - Když jsou vyjmuty kazety a je odblokována pojistka, ze zařízení je vysíláno neviditelné laserové záření.
Notices 193 Sleep Mode This product is designed with an energy-saving mode called Sleep Mode. The Sleep Mode saves energy by lowering power consumption during extended periods of inactivity. The Sleep Mode is automatically engaged after this product is not used for a specified period of time, called the Sleep Mode Timeout. Factory default Sleep Mode Timeout for this product (in minutes): 30 min. By using the configuration menus, the Sleep Mode Timeout can be modified between 1 minute and 120 minutes.
Notices 194 European Community (EC) directives conformity This product is in conformity with the protection requirements of EC Council directives 2004/108/EC, 2006/95/EC and 2009/125/EC on the approximation and harmonization of the laws of the Member States relating to electromagnetic compatibility, safety of electrical equipment designed for use within certain voltage limits and the ecodesign of energyrelated products. The manufacturer of this product is: Lexmark International, Inc.
Notices 195 Cet appareil a été conçu pour fonctionner uniquement avec l'antenne fournie. L'utilisation de toute autre antenne est strictement interdite par la réglementation d'Industry Canada. En application des réglementations d'Industry Canada, l'utilisation d'une antenne de gain supérieur est strictement interdite. Pour empêcher toute interférence radio au service faisant l'objet d'une licence, cet appareil doit être utilisé à l'intérieur et loin des fenêtres afin de garantir une protection optimale.
Notices 196 This product may be used in the countries indicated in the table below. AT BE BG CH CY CZ DE DK EE EL ES FI FR HR HU IE IS IT LI LT LU LV MT NL NO PL PT RO SE SI SK TR UK Česky Společnost Lexmark International, Inc. tímto prohlašuje, že výrobek tento výrobek je ve shodě se základními požadavky a dalšími příslušnými ustanoveními směrnice 1999/5/ES. Dansk Lexmark International, Inc.
Notices 197 Polski Niniejszym Lexmark International, Inc. oświadcza, że niniejszy produkt jest zgodny z zasadniczymi wymogami oraz pozostałymi stosownymi postanowieniami Dyrektywy 1999/5/EC. Português A Lexmark International Inc. declara que este este produto está conforme com os requisitos essenciais e outras disposições da Diretiva 1999/5/CE. Slovensky Lexmark International, Inc. týmto vyhlasuje, že tento produkt spĺňa základné požiadavky a všetky príslušné ustanovenia smernice 1999/5/ES.
Notices 198 STATEMENT OF LIMITED WARRANTY FOR LEXMARK LASER PRINTERS, LEXMARK LED PRINTERS, AND LEXMARK MULTIFUNCTION LASER PRINTERS Lexmark International, Inc., Lexington, KY This limited warranty applies to the United States and Canada. For customers outside the U.S., refer to the countryspecific warranty information that came with your product.
Notices 199 Before you present this product for warranty service, remove all print cartridges, programs, data, and removable storage media (unless directed otherwise by Lexmark). For further explanation of your warranty alternatives and the nearest Lexmark authorized servicer in your area contact Lexmark on the World Wide Web. Remote technical support is provided for this product throughout its warranty period.
Notices 200 Additional rights Some states do not allow limitations on how long an implied warranty lasts, or do not allow the exclusion or limitation of incidental or consequential damages, so the limitations or exclusions contained above may not apply to you. This limited warranty gives you specific legal rights. You may also have other rights that vary from state to state.
Index 201 Index Symbols [x]‑page jam, clear standard bin. [20y.xx] 99 [x]‑page jam, open front door. [20y.xx] 92 [x]‑page jam, open rear door. [20y.xx] 97 [x]‑page jam, remove tray 1 to clear duplex. [23y.xx] 101 [x]‑page jam, remove tray [x]. [24y.
Index F FCC notices 189, 194 finding more information about the printer 7 Finishing menu 66 G General Settings menu 61 green settings Hibernate mode 72 Hibernate Timeout 73 Schedule Power Modes 73 Sleep mode 72 H Hibernate mode using 72 Hibernate Timeout setting 73 I imaging unit ordering 82 replacing 84 Imaging unit low [84.xy] 117 Imaging unit nearly low [84.xy] 117 Imaging unit very low [84.
Index paper jams accessing jam areas 91 paper jams, clearing behind front door 92 behind rear door 97 in duplex area 101 in standard bin 99 in Tray 1 104 in Tray 2 104 Paper Loading menu 58 paper messages [x]‑page jam, remove tray 1 to clear duplex. [23y.
Index Non-Lexmark cartridge, see User’s Guide [33.xy] 111 Non-Lexmark imaging unit, see User’s Guide [33.xy] 119 PPDS font error [50] 148 Printer had to restart. Last job may be incomplete. 150 Reinstall missing or unresponsive cartridge [31.xy] 115 Reinstall missing or unresponsive imaging unit [31.xy] 120 Remove paper from standard output bin 136 Replace cartridge, 0 estimated pages remain [88.xy] 112 Replace cartridge, printer region mismatch [42.
Index Too many trays attached [58] 152 trays linking 37 unlinking 37 troubleshooting cannot open Embedded Web Server 186 checking an unresponsive printer 153 solving basic printer problems 153 troubleshooting, paper feed message remains after jam is cleared 157 troubleshooting, print incorrect characters print 162 incorrect margins on prints 168 jammed pages are not reprinted 158 job prints from wrong tray 161 job prints on wrong paper 161 jobs do not print 158 large jobs do not collate 163 paper curl 169