
Printer User Manual
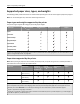
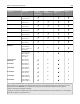


Table Of Contents
- Contents
- Safety information
- Overview
- Selecting a location for the printer
- Additional printer setup
- Installing internal options
- Installing hardware options
- Attaching cables
- Setting up the printer software
- Networking
- Preparing to set up the printer on an Ethernet network
- Installing the printer on an Ethernet network
- Preparing to set up the printer on a wireless network
- Connecting the printer to a network using the Wireless Setup Wizard
- Connecting the printer to a wireless network using the Wi-Fi Protected Setup
- Connecting the printer to a wireless network using the Embedded Web Server
- Changing port settings after installing a new network Internal Solutions Port
- Setting up serial printing
- Verifying printer setup
- Using MS810n, MS810dn, MS811n, MS811dn, MS812dn
- Learning about the printer
- Loading paper and specialty media
- Printing
- Managing your printer
- Finding advanced networking and administrator information
- Checking the virtual display
- Configuring supply notifications from the Embedded Web Server
- Modifying confidential print settings
- Copying printer settings to other printers
- Printing a menu settings page
- Printing a network setup page
- Checking the status of parts and supplies
- Saving energy
- Restoring factory default settings
- Securing the printer
- Using MS810de
- Learning about the printer
- Setting up and using the home screen applications
- Loading paper and specialty media
- Printing
- Managing your printer
- Finding advanced networking and administrator information
- Checking the virtual display
- Configuring supply notifications from the Embedded Web Server
- Modifying confidential print settings
- Copying printer settings to other printers
- Printing a menu settings page
- Printing a network setup page
- Checking the status of parts and supplies
- Saving energy
- Restoring factory default settings
- Securing the printer
- Using MS812de
- Learning about the printer
- Setting up and using the home screen applications
- Loading paper and specialty media
- Printing
- Managing your printer
- Finding advanced networking and administrator information
- Checking the virtual display
- Configuring supply notifications from the Embedded Web Server
- Modifying confidential print settings
- Copying printer settings to other printers
- Printing a menu settings page
- Printing a network setup page
- Checking the status of parts and supplies
- Saving energy
- Restoring factory default settings
- Securing the memory before moving the printer
- Paper and specialty media guide
- Understanding the printer menus
- Saving money and the environment
- Maintaining the printer
- Clearing jams
- Avoiding jams
- Understanding jam messages and locations
- [x]-page jam, lift front cover to remove cartridge. [200–201]
- [x]-page jam, open upper rear door. [202]
- [x]-page jam, open upper and lower rear door. [231–234]
- [x]-page jam, remove standard bin jam. [203]
- [x]-page jam, remove tray 1 to clear duplex. [235–239]
- [x]-page jam, open tray [x]. [24x]
- [x]-page jam, clear manual feeder. [250]
- [x]-page jam, remove paper, open stapler door. Leave paper in bin. [455–457]
- [x]-page jam, remove paper, open finisher rear door. Leave paper in bin. [451]
- [x]-page jam, remove paper, open expander rear door. Leave paper in bin. [41y.xx]
- [x]-page jam, remove paper, open mailbox rear door. Leave paper in bin. [43y.xx]
- Troubleshooting
- Understanding the printer messages
- Cartridge, imaging unit mismatch [41.xy]
- Cartridge low [88.xy]
- Cartridge nearly low [88.xy]
- Cartridge very low, [x] estimated pages remain [88.xy]
- Change [paper source] to [custom string] load [orientation]
- Change [paper source] to [custom type name] load [orientation]
- Change [paper source] to [paper size] load [orientation]
- Change [paper source] to [paper type] [paper size] load [orientation]
- Check tray [x] connection
- Close door or insert cartridge
- Close front door
- Complex page, some data may not have printed [39]
- Configuration change, some held jobs were not restored [57]
- Defective flash detected [51]
- Disk must be formatted for use in this device
- Disk near full. Securely clearing disk space.
- Empty the hole punch box
- Error reading USB drive. Remove USB.
- Error reading USB hub. Remove hub.
- Imaging unit low [84.xy]
- Imaging unit nearly low [84.xy]
- Imaging unit very low, [x] estimated pages remain [84.xy]
- Incompatible output bin [x] [59]
- Incompatible tray [x] [59]
- Incorrect paper size, open [paper source] [34]
- Insert hole punch box
- Insert staple cartridge
- Insert Tray [x]
- Install bin [x]
- Install Tray [x]
- Insufficient memory for Flash Memory Defragment operation [37]
- Insufficient memory, some Held Jobs were deleted [37]
- Insufficient memory, some held jobs will not be restored [37]
- Insufficient memory to collate job [37]
- Insufficient memory to support Resource Save feature [35]
- Load staples
- Load [paper source] with [custom string] [paper orientation]
- Load [paper source] with [custom type name] [paper orientation]
- Load [paper source] with [paper size] [paper orientation]
- Load [paper source] with [paper type] [paper size] [paper orientation]
- Load manual feeder with [custom string] [paper orientation]
- Load manual feeder with [custom type name] [paper orientation]
- Load manual feeder with [paper size] [paper orientation]
- Load manual feeder with [paper type] [paper size] [paper orientation]
- Maintenance kit low [80.xy]
- Maintenance kit nearly low [80.xy]
- Maintenance kit very low, [x] estimated pages remain [80.xy]
- Memory full [38]
- Network [x] software error [54]
- Non-Lexmark [supply type], see User’s Guide [33.xy]
- Not enough free space in flash memory for resources [52]
- PPDS font error [50]
- Paper changes needed
- Parallel port [x] disabled [56]
- Reattach bin [x]
- Reattach bins [x] – [y]
- Reinstall missing or unresponsive cartridge [31.xy]
- Reinstall missing or unresponsive fuser [31.xy]
- Reinstall missing or unresponsive imaging unit [31.xy]
- Remove defective disk [61]
- Remove packaging material, [area name]
- Remove paper from all bins
- Remove paper from bin [x]
- Remove paper from [linked set bin name]
- Remove paper from standard output bin
- Replace cartridge, 0 estimated pages remain [88.xy]
- Replace cartridge, printer region mismatch [42.xy]
- Replace imaging unit, 0 estimated pages remain [84.xy]
- Replace maintenance kit, 0 estimated pages remain [80.xy]
- Replace roller kit [81.xx]
- Replace unsupported cartridge [32.xy]
- Replace unsupported fuser [32.xy]
- Replace unsupported imaging unit [32.xy]
- Restore held jobs?
- Serial port [x] disabled [56]
- Some held jobs were not restored
- Standard network software error [54]
- Standard USB port disabled [56]
- Supply needed to complete job
- Too many bins attached [58]
- Too many disks installed [58]
- Too many flash options installed [58]
- Too many trays attached [58]
- Tray [x] paper size unsupported
- Unformatted flash detected [53]
- Unsupported disk
- Unsupported option in slot [x] [55]
- USB port [x] disabled [56]
- Solving printer problems
- Printer does not respond
- Printing problems
- Confidential and other held jobs do not print
- Envelope seals when printing
- Error message about reading the flash drive appears
- Incorrect characters print
- Job prints from the wrong tray or on the wrong paper
- Large jobs do not collate
- Multiple-language PDF files do not print
- Print job takes longer than expected
- Print jobs do not print
- Printing slows down
- Tray linking does not work
- Unexpected page breaks occur
- Hardware and internal option problems
- Paper feed problems
- Print quality problems
- Characters have jagged or uneven edges
- Clipped pages or images
- Compressed images appear on prints
- Gray background on prints
- Horizontal voids appear on prints
- Incorrect margins on prints
- Paper curl
- Print irregularities
- Print is too dark
- Print is too light
- Printer is printing blank pages
- Printer is printing solid black pages
- Repeating defects appear on prints
- Shadow images appear on prints
- Skewed print
- Streaked horizontal lines appear on prints
- Streaked vertical lines appear on prints
- Toner fog or background shading appears on prints
- Toner specks appear on prints
- Toner rubs off
- Transparency print quality is poor
- Uneven print density
- Vertical voids appear on prints
- Solving home screen applications problems
- Embedded Web Server does not open
- Contacting customer support
- Understanding the printer messages
- Notices
- Product information
- Edition notice
- GOVERNMENT END USERS
- Trademarks
- Licensing notices
- Noise emission levels
- EU waste electronics information
- Product disposal
- Static sensitivity notice
- ENERGY STAR
- Temperature information
- Laser notice
- Laser advisory label
- Power consumption
- STATEMENT OF LIMITED WARRANTY FOR LEXMARK LASER PRINTERS, LEXMARK LED PRINTERS, AND LEXMARK MULTIFUN ...
- Modular component notice
- Patent acknowledgment
- Multiple model information
- Federal Communications Commission (FCC) compliance information statement
- European Community (EC) directives conformity
- Regulatory notices for wireless products
- Exposure to radio frequency radiation
- Industry Canada (Canada)
- Notice to users in the European Union
- Model-specific information
- Hibernate Mode
- Federal Communications Commission (FCC) compliance information statement
- European Community (EC) directives conformity
- Radio interference notice
- Regulatory notices for wireless products
- Exposure to radio frequency radiation
- Industry Canada (Canada)
- Notice to users in the European Union
- Index

customers minimize printing and copying waste. In addition, the company encourages purchasing paper from suppliers
who demonstrate their commitment to sustainable forestry practices.
Lexmark does not endorse specific suppliers, although a converter’s product list for special applications is maintained.
However, the following paper choice guidelines will help alleviate the environmental impact of printing:
1 Minimize paper consumption.
2 Be selective about the origin of wood fiber. Buy from suppliers who carry certifications such as the Forestry
Stewardship Council (FSC) or The Program for the Endorsement of Forest Certification (PEFC). These certifications
guarantee that the paper manufacturer uses wood pulp from forestry operators that employ environmentally and
socially responsible forest management and restoration practices.
3 Choose the most appropriate paper for printing needs: normal 75 or 80 g/m
2
certified paper, lower weight paper,
or recycled paper.
Unacceptable paper examples
Test results indicate that the following paper types are at risk for use with laser printers:
• Chemically treated papers used to make copies without carbon paper, also known as carbonless papers
• Preprinted papers with chemicals that may contaminate the printer
• Preprinted papers that can be affected by the temperature in the printer fuser
• Preprinted papers that require a registration (the precise location on the page) greater than ± 2.3 mm (± 0.9 in.),
such as optical character recognition (OCR) forms. In some cases, registration can be adjusted with a software
application to successfully print on these forms.)
• Coated papers (erasable bond), synthetic papers, thermal papers
• Rough-edged, rough or heavily textured surface papers or curled papers
• Recycled papers that fail EN12281:2002 (European testing)
• Paper weighing less than 60 g/m
2
(16 lb)
• Multiple part forms or documents
For more information about Lexmark, visit
www.lexmark.com. General sustainability-related information can be found
at the Environmental Sustainability link.
Storing paper
Use these paper storage guidelines to help avoid jams and uneven print quality:
• For best results, store paper where the temperature is 21°C (70°F) and the relative humidity is 40 percent. Most
label manufacturers recommend printing in a temperature range of 18–24°C (65–75°F) with relative humidity
between 40 and 60 percent.
• Store paper in cartons, on a pallet or shelf, rather than on the floor.
• Store individual packages on a flat surface.
• Do not store anything on top of individual paper packages.
• Take paper out of the carton or wrapper only when you are ready to load it in the printer. The carton and wrapper
help keep the paper clean, dry, and flat.
Paper and specialty media guide 191