
Operation Manual


4 Touch the name of the recipient.
To search for additional recipients, touch New Search, and then type the name of the next recipient.
5 Touch > E‑mail It.
Customizing e-mail settings
Adding e-mail subject and message information
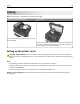
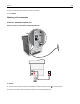
1 Load an original document faceup, short edge first into the ADF tray or facedown on the scanner glass.
Notes:
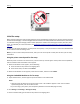
• Do not load postcards, photos, small items, transparencies, photo paper, or thin media (such as magazine
clippings) into the ADF tray. Place these items on the scanner glass.
• The ADF indicator light comes on when the paper is loaded properly.
2 If you are loading a document into the ADF tray, then adjust the paper guides.
3 From the home screen, navigate to:
E-mail > Recipient(s) > type the e‑mail address >
4 Touch Subject > type the e‑mail subject > .
5 Touch Message > type your message > .
Changing the output file type
1 Load an original document into the ADF tray or on the scanner glass.
2 From the home screen, navigate to:
E-mail > Recipient(s) > type the e‑mail address >
> Send as
3 Select the file type you want to send.
4 Touch > Send It.
Canceling an e-mail
• When using the ADF, touch Cancel Job while Scanning appears.
• When using the scanner glass, touch Cancel Job while Scanning appears, or while Scan the Next Page /
Finish the Job appears.
E-mailing 94