MarkNet internal print servers MarkNet N2000 series and MarkNet S Quick Start Jan 2000 www.lexmark.
Edition: January 2000 The following paragraph does not apply to any country where such provisions are inconsistent with local law: LEXMARK INTERNATIONAL, INC., PROVIDES THIS PUBLICATION “AS IS” WITHOUT WARRANTY OF ANY KIND, EITHER EXPRESS OR IMPLIED, INCLUDING, BUT NOT LIMITED TO, THE IMPLIED WARRANTIES OF MERCHANTABILITY OR FITNESS FOR A PARTICULAR PURPOSE. Some states do not allow disclaimer of express or implied warranties in certain transactions, therefore, this statement may not apply to you.
MarkNet internal print server Quick Start Setup - - - - - - - - - - - - - - - - - - - - 4 Prerequisites - - - - - - - - - - Attach the printer to the network Print a network setup page - - - Configure and print- - - - - - - - - - - - - - - - - TCP/IP - - - - - - - - - - - - - - - - - - - - - - Step 1: Set the IP address, netmask and gateway Step 2: Set up to print - - - - - - - - - - - - - Novell NetWare- - - - - - - - - - - - - - - - - - NDPS (Novell Distributed Print Services)- - - Non-NDPS (qu
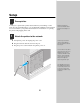
Setup Prerequisites You may have purchased a printer that has Ethernet, Token-Ring or other network ports preinstalled. If not, you should install a MarkNet™ internal print server now. Refer to your printer documentation for instructions on opening the printer and plugging in the card. 1 MarkNet internal print servers are sometimes called internal network adapters or INAs. Attach the printer to the network a Turn printer power off. Unplug the power cord. b Plug the network cable into the network port.
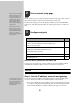
Look for the UAA (universally administered address) under the Network heading on the setup page. The UAA is a 12-digit number. The left column shows the address in MSB form and the right column shows the address in canonical form. The UAA is preset at the factory. However, you can override it with an optional locally administered address (LAA) if you want some particular physical address for this print server. 2 Print a network setup page Use the printer operator panel to print the network setup page.
• If you don’t have DHCP, there are other methods you can use to manually assign the address, such as the printer operator panel, static ARP and telnet, RARP and telnet, BOOTP, or MarkVision or other Lexmark utility. Instructions for three of these methods follow. Printer operator panel A simple way to set the IP address, netmask and gateway inside the print server is to use the printer operator panel. You need to be standing at the printer to use this method.
Print server TCP/IP setup utility It doesn’t matter which form of the UAA you use (MSB or canonical). You can use this simple utility to initialize the printer IP address if your workstation is running Windows 95, Windows 98 or Windows NT and is on the same subnet as the printer. You need to know the 12-digit physical address of the print server to use this method. Information on installing, using and troubleshooting the utility resides on the CD.
3 Set up your Windows 95, Windows 98, or Windows NT clients in the usual way. (Hint: Start, Settings, Printers, Add Printer.) Point-to-point printing (LexIP) You can print from any Windows 95, Windows 98 or Windows NT workstation directly to a Lexmark printer located anywhere on the IP network. No server is required. 1 Install the TCP/IP software component on the workstation. Look on the Drivers, MarkVision and Utilities CD for the software.
Novell NetWare NDPS (Novell Distributed Print Services) Some versions of the Drivers, MarkVision and Utilities CD contain the Lexmark NDPS IP Gateway. To find out if your CD contains the gateway, look on the CD for a subdirectory named NDPS. If you have MarkNet print servers in an NDPS environment, we recommend that you install the Lexmark NDPS IP Gateway. This allows your printers to be tightly integrated with NDPS so that you can easily monitor, control and print to them.
AppleTalk The MarkNet print server works automatically with AppleTalk networks. You simply connect the power and the network cables, and you’re up and running. However, if you would like to use a zone and printer name different from the defaults you can use MarkVision for Macintosh to change these settings. MarkVision for Macintosh resides on the Drivers, MarkVision and Utilities CD. Each Macintosh user on the AppleTalk network who wants to use the printer should do the following steps.
Troubleshooting For expanded troubleshooting information, look on the Drivers, MarkVision and Utilities CD. Click View Documentation and look for the MarkNet link. Free firmware updates for any Lexmark print server are available on the web site at www.lexmark.com. TCP/IP 1 Make sure the TCP/IP protocol is turned on (activated) in the print server. To find out, print a network setup page and look in the paragraph under TCP/IP. 2 Issue a ping command to the print server. ping 192.168.236.
Novell NetWare NDPS (Novell Distributed Print Services) 1 Make sure the TCP/IP protocol is turned on (activated) in the print server. To find out, print a network setup page and look in the paragraph under TCP/IP. 2 Make sure your NetWare file server has TCP/IP support configured and loaded. 3 4 5 Make sure you are running NDPS version 2.0 or later. 6 Make sure you’ve created and loaded an NDPS Manager. Read the online documentation about Lexmark’s NDPS support.
Windows NT Server 4.0 1 Make sure you are using TCP/IP for communications between the Windows server and the MarkNet print server. 2 Make sure TCP/IP is turned on (activated) in the print server. To find out, print a network setup page and look in the paragraph under TCP/IP. 3 Verify that TCP/IP is installed properly on the Windows server. (Hint: Start, Settings, Control Panel, Network, Protocols). 4 Issue a ping command to the print server. ping 192.168.236.
AppleTalk 1 Make sure the AppleTalk protocol is turned on (activated) in the print server. To find out, print a network setup page and look under AppleTalk. 2 Make sure the status of the MarkNet print server is “connected”. To find out, look on the network setup page for Status. 3 Do you see the printer in the Chooser? If not, restart the Macintosh workstation and look again.
Lexmark customer support World Wide Web www.lexmark.com CompuServe Go Lexmark Internet ftp.lexmark.com U.S. and Canada, technical support and any other customer needs 1-800-LEXMARK Lexmark phone numbers (worldwide) On the Drivers, MarkVision and Utilities CD, click Contact Lexmark, Customer Support.
Electronic Emission Notices Federal Communications Commission (FCC) Compliance Information Statement The MarkNet internal print server has been tested and found to comply with the limits for a Class A digital device, pursuant to Part 15 of the FCC Rules. Operation is subject to the following two conditions: (1) this device may not cause harmful interference, and (2) this device must accept any interference received, including interference that may cause undesired operation.
AVERTISSEMENT: Ce produit appartient à la classe A. Dans un environnement résidentiel, ce produit risque de provoquer des interférences radio, auquel cas l'utilisateur devra prendre les mesures adéquates. AVVERTENZA: Questo prodotto appartiene alla Classe A. In ambiente domestico, questo prodotto può causare interferenze radio, nel qual caso è necessario adottare adeguate precauzioni. WARNUNG: Bei diesem Gerät handelt es sich um ein Produkt der Klasse A.
Lexmark and Lexmark with diamond design are trademarks of Lexmark International, Inc., registered in the United States and/or other countries. © 2000 Lexmark International, Inc. 740 West New Circle Road Lexington, Kentucky 40550 www.lexmark.