Contents Understanding your printer .............................................. 7 Printer parts .................................................................................. 7 Control panel ................................................................................. 8 Loading paper .................................................................. 10 Supported photo paper types ...................................................... 10 Loading the photo paper ...................................
Printing from a digital camera ........................................ 15 Customizing your photo prints ....................................... 16 Printing an index page ................................................................ 16 Printing all photos ....................................................................... 16 Printing a photo in black and white ............................................. 17 Cropping a photo ........................................................................
Refilling the print cartridge .......................................................... 30 Ordering supplies ........................................................................ 30 Replacing the print cartridge ....................................................... 31 Aligning the print cartridge .......................................................... 34 Cleaning the print cartridge nozzles ............................................ 34 Printing a test page ........................................
6
Understanding your printer Printer parts 8 1 7 2 6 3 5 4 # Part Purpose 1 Paper support Load paper into the printer. 2 Carry handle Transporting the printer. 3 Access cover Install or replace print cartridge. 4 PictBridge port Connect a PictBridge-enabled digital camera to the printer. Use the controls on the camera to select and print your photos. 5 Memory card slots Insert memory cards. 6 Paper exit Allows paper to exit after printing is complete.
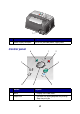
1 # Part Purpose 1 Power supply cord port Install the provided power supply cord. Control panel 8 1 2 7 6 3 4 5 # Button Purpose 1 Menu • Display the Photo menu. 2 Stop/Clear • Deselect the displayed photo for printing. • Stop the print job.
# Button Purpose 3 Start Begin printing the selected photos. 4 Power Turn the printer on and off. 5 Up arrow • Scroll through menu options. • Change the selected area when cropping an image. • Skip forward through the pictures on the memory card 10 at a time. Down arrow • Scroll through menu options. • Change the selected area when cropping an image. • Skip backward through the pictures on the memory card 10 at a time. Right arrow (+) • Increase the number of prints.
Loading paper Supported photo paper types Type Size Usage Photo/Glossy cards Photo paper: 4 x 6 inches (102 x 152 mm) Print photos Hagaki card: 3.9 x 5.8 inches (100 x 148 mm) Print photos A6 card: 4.1 x 5.8 inches (105 x 148 mm) Print photos Index card: 4 x 6 inches (102 x 152 mm) Print test pages and cartridge maintenance pages Card stock Note: Do not load more than 25 sheets into the paper support. Loading the photo paper 1 Lift the paper support.
Inserting memory cards Supported memory cards Note: Your card manufacturer may differ from the ones pictured.
Inserting memory cards The memory card reader has two slots to accommodate different size memory cards. A small light turns on when a memory card is inserted. The light blinks to indicate the memory card is being read or is transmitting data. Warning: Do not remove the memory card while the light is blinking.
Printing from a memory card Step 1: Load photo paper Note: For help loading photo paper and a list of supported paper types, see page 10. Step 2: Insert a memory card Note: If you are unsure of what type of memory card you have, see page 11. The I Want To... menu appears. Step 3: View your photos 1 Press the down arrow to highlight Slide Show. 2 Press Select. Each photo will appear on the display for five seconds. To skip ahead, press the right arrow button. To go back, press the left arrow button.
Step 5: Customize the photo You can adjust the photo settings before you print. If you want to: • • • • • Crop the photo, see page 18. Adjust the brightness, see page 19. Change the number of prints, press Number Of Prints. Change the print quality, see page 23. Change the blank paper size, see page 22. Step 6: To select another photo, repeat steps 4 and 5. When you are finished selecting your photo(s), continue with step 7. Step 7: Print photo(s) Press Start.
Printing from a digital camera You can connect a PictBridge-enabled digital camera to your printer and use the buttons on the camera to select and print your photos: 1 Insert one end of the USB cable into the camera. Note: Use only the USB cable that came with your camera. 2 Insert the other end of the cable into the PictBridge port on the front of the printer. 3 Refer to the instructions included with your camera for PictBridge connection and usage information.
Customizing your photo prints Printing an index page 1 Load photo paper. 2 Insert a memory card. Note: If you are unsure of what type of memory card you have, see page 11. The I Want To... menu appears. 3 Press Menu. The Photo menu appears. 4 Press the down arrow button until you highlight Print Index Page. 5 Press Select. If Preview before Print is on, a preview of the print job is first displayed. Press Start to print the index page. If Preview before Print is off, the index page prints immediately.
3 Press the down arrow button until you highlight Print All Photos. 4 Press Select. If Preview before Print is on, a preview of the print job is first displayed. Press Start to print the photos. If Preview before Print is off, the photos print immediately. Note: To adjust the Preview setting, see page 23. Printing a photo in black and white 1 Load photo paper. 2 Insert a memory card. Note: If you are unsure of what type of memory card you have, see page 11. The I Want To...
If Preview before Print is on, a preview of the print job is first displayed. Press Start again to print the photo. If Preview before Print is off, the photo prints immediately. Note: To adjust the Preview setting, see page 23. Cropping a photo 1 Load photo paper. 2 Insert a memory card. Note: If you are unsure of what type of memory card you have, see page 11. The I Want To... menu appears with View Photos or Print highlighted. 3 Press Select.
If Preview before Print is off, the photo prints immediately. Note: To adjust the Preview setting, see page 23. Adjusting the brightness 1 Load photo paper. 2 Insert a memory card. Note: If you are unsure of what type of memory card you have, see page 11. The I Want To... menu appears with View Photos or Print highlighted. 3 Press Select. 4 Press the right or left arrow buttons to scroll to the photo you want to adjust. 5 Press Menu. The Photo menu appears.
Adjusting the number of prints 1 Load photo paper. 2 Insert a memory card. Note: If you are unsure of what type of memory card you have, see page 11. The I Want To... menu appears with View Photos or Print highlighted. 3 Press Select. 4 Press the right or left arrow buttons to scroll to the photo you want to adjust. 5 Press Number Of Prints until you reach the desired quantity. To adjust the number of prints of other photos, repeat steps 4 and 5. 6 Press Start to print the photo(s).
Viewing slide show 1 Insert a memory card. Note: If you are unsure of what type of memory card you have, see page 11. The I Want To... menu appears. 2 Press the down arrow button until you highlight Slide Show. 3 Press Select. 4 Press Stop/Clear when you are ready to select the photos you want to print. Printing DPOF selection The Digital Print Order Format (DPOF) is an option available on some digital cameras.
Customizing your printer settings Adjustments made to the settings in this section will remain in effect until you adjust the settings again or until you reset the factory default settings. Changing the blank paper size The factory default setting is 4x6. 1 Press Menu. The Photo menu appears. 2 Press the down arrow button until you highlight Blank Paper Size. 3 Press the right or left arrow buttons to scroll through the paper sizes. Your choices are 4x6, A6, and Hagaki.
Changing the print quality The factory default setting is Automatic. 1 Press Menu. The Photo menu appears. 2 Press the down arrow button until you highlight Print Quality. 3 Press the right or left arrow buttons to scroll through the print quality settings. Your choices are Draft, Normal, and Photo. 4 Press Select to save your choice. Adjusting preview before print The factory default setting is On. 1 Press Menu. The Photo menu appears.
3 Press the up arrow button twice. 4 Press the right or left arrow buttons to scroll through the languages. 5 Press Select to save your choice. Changing the power save The factory default setting is 20 Min. 1 Press Menu. The Photo menu appears. 2 Press the down arrow button until you highlight Power Save. 3 Press the right or left arrow buttons to scroll through the settings. Your choices are Immediately, 10 Min, 20 Min, and 30 Min. 4 Press Select to save your choice.
Restoring factory defaults 1 Press Menu. The Photo menu appears. 2 Press the down arrow button until you highlight Restore Settings. 3 Press Select.
Traveling with your printer Before you travel When traveling with your printer, make sure you bring the following items: • Photo paper. • Extra print cartridge if you expect to do a lot of printing. For compatible print cartridges, see “Ordering supplies” on page 30. • A memory card for photos or a PictBridge-enabled camera with a USB cable. For compatible memory cards, see “Supported memory cards” on page 11. Packing the printer 1 Turn the printer off. 2 Remove all photo paper from the paper support.
5 Disconnect the power cord. 1 2 6 Raise the carry handle. Note: When traveling with your printer, it is not necessary to remove the print cartridge. Warning: Always travel with the printer in the upright position.
Unpacking the printer 1 Place the printer on a flat, level surface. 2 Lower the carrying handle. 3 Connect the power cord. 2 1 4 Press Power. Make sure the power light and display are on. 5 Lift the paper support.
6 Load photo paper. The printer is now ready to print your photos. Insert a memory card containing photos or connect your PictBridge-enabled camera to the printer.
Maintaining your print cartridge Checking the ink level status 1 Press Menu. The Photo menu appears. 2 Press the down arrow button until you highlight Ink Levels. 3 Press Select. Note: Press Stop/Clear to return to the previous menu. If you need to order a new print cartridge, see “Ordering supplies” on page 30. Refilling the print cartridge Lexmark’s warranty does not cover the repair of failures or damage caused by a refilled cartridge. We do not recommend use of a refilled cartridge.
Replacing the print cartridge Removing a used print cartridge 1 If the printer is off, press the Power button. 2 Open the access cover. 3 Press down on the cartridge lever to open the cartridge lid.
4 Remove the old cartridge. Installing a print cartridge 1 If you are installing a new print cartridge, remove the sticker and transparent tape from the bottom of the print cartridge. 1 2 Warning: Do not touch the gold contact area on the back or the nozzles on the bottom of the cartridge. 2 Unless it is already open, press down on the cartridge lever to open the cartridge lid.
3 Insert the cartridge. 4 Snap the lid closed. 5 Close the access cover. 6 Load a blank 4x6 index card into the paper support. 7 When prompted on the display, press Select to print the cartridge alignment page. Note: You may discard this page after it prints.
Aligning the print cartridge 1 Load a blank 4x6 index card. 2 Press Menu. The Photo menu appears. 3 Press the down arrow button until you highlight Align Cartridge. 4 Press Select. Note: Discard the index card after it prints. Cleaning the print cartridge nozzles 1 Load a blank 4x6 index card. 2 Press Menu. The Photo menu appears. 3 Press the down arrow button until you highlight Clean Cartridge.
4 Press Select. Note: Discard the index card after it prints. Printing a test page 1 Load a blank 4x6 index card. 2 Press Menu. The Photo menu appears. 3 Press the down arrow button until you highlight Print Test Page. 4 Press Select. Note: Discard the index card after it prints.
Troubleshooting Category Purpose “Setup troubleshooting” on page 37 Resolves issues that occur during the initial printer setup. “Print troubleshooting” on page 38 Resolves issues that occur while printing. “Improving print quality” on page 40 Resolves issues with the print quality of your photos. “Jams and misfeeds troubleshooting” on page 43 Resolves issues with paper jams and misfeeds.
Setup troubleshooting Symptom Diagnosis Solution Incorrect language appears on the display Did you select the wrong language during the initial printer setup? See “Changing the control panel display language” on page 23. The Power light is not lit Is the power supply pushed all the way into the printer? 1 Disconnect the power supply cord from the wall outlet, and then from the printer. 2 Reconnect the power supply cord by pushing it all the way into the wall outlet and the connector on the printer.
Print troubleshooting Symptom Diagnosis Solution Poor photo quality Are you using the correct print quality setting? Try using a different print quality setting. For help, see “Changing the print quality” on page 23. Did the ink completely dry on the photo paper before you moved it? Allow the ink some time to dry completely before handling the print. Is the photo paper wrinkled? Use a new piece of photo paper that is straight and unwrinkled.
Symptom Diagnosis Solution Poor quality at the edges of the page Are you using the correct paper size with the size you selected in the printer? The printer supports three paper sizes: 4x6, A6, and Hagaki. 1 Verify the paper size you are using. 2 Verify the printer setting matches your paper size. See “Changing the blank paper size” on page 22. Printer does not print or respond Slow print speed Is the printer on? Press the Power button.
Improving print quality Basic solutions If you are not satisfied with the print quality of your document, make sure you: • Use the appropriate paper size for your print. See “Changing the blank paper size” on page 22. • Select a higher print quality. See “Changing the print quality” on page 23. Advanced solutions If your photo still does not have the print quality you want, follow these steps: 1 Align the print cartridge. See page 34. If print quality has not improved, continue to step 2.
Reinserting the print cartridge 1 Remove the print cartridge. See page 31. 2 Insert the print cartridge. See page 32. 3 Print your photo again. Wiping the print cartridge nozzles and contacts 1 Remove the print cartridge. See page 31. 2 Dampen a clean, lint-free cloth with water and place it on a level surface. Note: Place two pieces of paper under the cloth to avoid getting ink on the work surface. 3 Gently hold the nozzles against the cloth for about three seconds, and then wipe in the direction shown.
5 With another clean section of the cloth, repeat steps 3 and 4. 6 Let the nozzles and contacts dry completely. 7 Reinsert the print cartridge. See “Installing a print cartridge” on page 32. 8 Run the clean cartridge utility. See “Cleaning the print cartridge nozzles” on page 34. 9 Print your photo again.
Jams and misfeeds troubleshooting Symptom Diagnosis Solution Paper jams Did the jam occur at the paper support? Turn the power off. Firmly grasp the photo paper and gently pull it from the printer. Paper misfeeds, skews, or multiple sheets feed Is the photo paper loaded correctly? See “Loading the photo paper” on page 10. Are you using photo paper recommended for your printer? The printer supports three photo paper sizes: 4x6, A6, and Hagaki.
Memory card and PictBridge troubleshooting Symptom Diagnosis Solution Memory card is not recognized by the printer Is the memory card damaged? Verify that there is no damage to the memory card. Is the memory card inserted correctly? Insert the memory card correctly. See page 12. Is there more than one memory card inserted at the same time. Only one memory card may be used at one time. Are you using a supported memory card type? For supported memory cards, see page 11.
Error messages troubleshooting Error Message What it indicates Solution Ink low The print cartridge is running out of ink. Replace the cartridge. See page 31. The Ink Low warning occurs when your cartridge is about 25% full, 15% full, and 10% full. Paper jam There is a paper jam. 1 Clear the paper jam. See “Jams and misfeeds troubleshooting” on page 43. 2 Press Select to reprint the last photo. Carrier jam The print cartridge carrier is stuck. 1 Remove all the paper from the printer.
Error Message What it indicates Solution Card problem The memory card was inserted incorrectly or is damaged. 1 Verify that there is no damage to the memory card. 2 Insert the card correctly. See page 12. A second memory card has been detected. Only one memory card may be used at one time. Remove the second card. No images The memory card has no supported images. Use a different memory card containing photos. Card format The memory card formatting is not supported.
Finding more information Resource Description Setup sheet Instructions on how to set up your printer. User’s Guide Information on: • • • • • Lexmark Web site Digital photo printing Using the control panel Maintenance Troubleshooting Safety http://support.lexmark.com/ The Web site has information on: • Customer Care—Product registration, contact information, order status, warranty status, and repair information.
Notices Electronic emission notices Federal Communications Commission (FCC) compliance information statement The Lexmark 310 Series Photo Jetprinter, Type Number 4300, has been tested and found to comply with the limits for a Class B digital device, pursuant to Part 15 of the FCC Rules. Operation is subject to the following two conditions: (1) this device may not cause harmful interference, and (2) this device must accept any interference received, including interference that may cause undesired operation.
Japanese VCCI notice If this symbol appears on your product, the accompanying statement is applicable. Korean MIC statement If this symbol appears on your product, the accompanying statement is applicable. This equipment has undergone EMC registration as a household product. It can be used in any area, including a residential area.
Printer energy consumption The following table documents the energy consumption characteristics of the printer. Mode Description Power consumption Printing Printer is generating hard copy output 10 W Power Saver Printer is in energy saving mode 7W Off Printer is plugged into a wall outlet, but switch is turned off 5.5 W The power consumption levels listed in the previous table represent time-averaged measurements. Instantaneous power draws may be substantially higher than the average.
Index A access cover 7 adjust printer settings 22 aligning the print cartridge 34 arrow button 9 B black & white photos 17 blank paper loading 10 selecting 22 selecting type 22 size 10 type 10 brightness, adjust 19 buttons, control panel - (left arrow) 9 + (right arrow) 9 down arrow 9 left arrow 9 Menu 8 Number of Prints 9 Power 9 right arrow 9 Rotate 9 Select 9 Start 9 Stop/Clear 8 up arrow 9 C cable, USB 15 cards, memory 11 cartridge, print aligning 34 clean contacts 41 clean nozzles automatic 34 manua
Size warning 46 F FCC statement 48 finding more information 47 H handle 7 I I Want To...
PictBridge port 7 printing 15 troubleshooting 44 USB cable 15 Plus (+) button 9 Power button 9 power save 24 power supply port 8 preview before print 23 print alignment page 34 all photos 16 black & white photo 17 index page 16 preview 23 selecting photo 13 test page 35 using DPOF selections 21 using PictBridge-enabled digital camera 15 print cartridge aligning 34 clean contacts 41 clean nozzles automatic 34 manual 41 ink level status 30 installing 32 ordering 30 part numbers 30 refilling 30 removing 31 rep
print 37 U Understanding your printer 7 unpacking the printer, travel 28 up arrow button 9 USB cable 15 USB, PictBridge port 15 W Web site, Lexmark 47 wiping print cartridge contacts 41 nozzles 41 X xD Picture Card, memory card 11 54