
Printer User's Guide


3 From the Maintenance tab, click Align to fix blurry edges.
4 Click Print.
If you aligned the cartridge to improve print quality, print your document again. If print quality has not improved,
clean the print cartridge nozzles.
Cleaning the print cartridge nozzles
1 Load photo paper.
2 Open the Solution Center. See “Using the Solution Center” on page 9.
3 From the Maintenance tab, click Clean to fix horizontal streaks.
4 Click Print.
A page prints, forcing ink through the print cartridge nozzles to clean them.
5 Print the document again to verify that the print quality has improved.
6 If print quality has not improved, try cleaning the nozzles up to two more times.
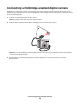
Wiping the print cartridge nozzles and contacts
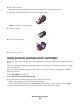
1 Remove the print cartridge.
2 Dampen a clean, lint-free cloth with water.
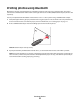
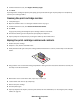
3 Gently hold the cloth against the print cartridge nozzles for about three seconds, and then wipe in the direction
shown.
4 Using another clean section of the cloth, gently hold the cloth against the contacts for about three seconds, and
then wipe in the direction shown.
5 With another clean section of the cloth, repeat step 3 and step 4.
6 Let the nozzles and contacts dry completely.
7 Reinsert the print cartridge.
8 Print the photo again.
9 If print quality does not improve, clean the print nozzles. For more information, see “Cleaning the print cartridge
nozzles” on page 20.
Maintaining the printer
20