Pro710 Series Quick Reference Guide December 2011 www.lexmark.
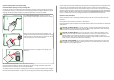
Important Message About Cartridge Recycling! Please Read Before Opening Your Inkjet Cartridge Box At Lexmark, we take our commitment to the environment seriously, and we encourage our customers to participate in our easy, no-cost method for returning empty Lexmark cartridges to Lexmark for proper recycling. We will insure that cartridges are properly handled with zero waste to landfills. Go to www.lexmark.com/recycle. Follow instructions to request postage-paid bags. Bags usually arrive within 7–10 days.
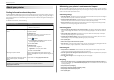
Contents Contents 3 Copying.........................................................................................25 Important safety information.........................................................2 Tips for copying..................................................................................................................25 About your printer..........................................................................5 Making a two‑sided (duplex) copy automatically..........................
Contents Configuring Wi‑Fi Protected Setup manually.....................................................................42 Troubleshooting............................................................................43 Notices.........................................................................................52 Edition notice.....................................................................................................................52 Index......................................................
About your printer 5 Minimizing your printer's environmental impact About your printer Finding information about the printer The Quick Reference Guide contains instructions on adding your printer to a wireless network, setting up a fax connection, and accomplishing common printer tasks like printing, copying, scanning, and faxing. It also includes information on troubleshooting printer setup issues as well as solving basic networking and faxing problems.
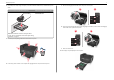
About your printer To read the Lexmark Environmental Sustainability Report, visit www.lexmark.com/environment. Note: Your printer may not come with some of these programs or some of the functions of these programs, depending on the features of the printer that you purchased. 6 Setting up the printer 1 Unpack the printer.
About your printer 7 2 To initiate printer setup using a computer, insert the installation software CD, or download the printer a Remove the language sheet holder from the printer control panel. driver. 1 With a CD or DVD drive (Windows/Macintosh) 2 Without a CD or DVD drive or for Linux Download the printer driver from www.lexmark.com.
About your printer 8 6 Move the paper guides to the sides. 8 Load paper and adjust the paper guides. 1 1 2 Note: Make sure the paper is below the maximum fill line located on the edge of the paper tray. Overloading the tray can cause paper jams. 9 Insert the paper tray. 2 3 7 For A4‑ or legal‑size paper, extend the paper tray. 1 10 Connect the power cord only. Note: Do not attach the USB cable yet.
About your printer 9 11 Make sure the printer is on. 14 Set the country or region, and then press . Country/Region United States Albania Algeria Please choose a country or region and press OK 15 Set the date, and then press . Set Date 18 12 Set the language on the printer control panel, and then press . / 01 / 2011 Press OK when complete. 16 Set the time, and then press . Set Time 05 13 Confirm the language, and then press .
About your printer 10 17 Set the time zone, and then press 20 Enter your name or company name, and then press . . Your fax name identifies you as the sender in all your sent faxes. Time Zone (UTC-05:00) Eastern Time (USA/Ca... Fax Name (UTC-06:00) Central Time (USA/Ca... (UTC-07:00) Mountain Time (USA/C...
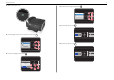
About your printer 22 Open the printer. 11 24 Insert each ink cartridge. Slide your finger along the ink cartridge until the cartridge clicks into place. 23 Unpack the ink cartridges. Notes: • Install the color ink cartridges first. Then, use two hands to install the black cartridge. • Install the new ink cartridges immediately after removing the protective cap to avoid exposing the ink to air. 25 Close the printer.
About your printer 12 26 Extend and flip out the paper stop. Understanding the parts of the printer 1 2 3 4 2 5 1 6 27 From the printer control panel, press to print an alignment page. 7 11 10 Notes: • • • • • The alignment page prints. Do not remove the page until printing is finished. The alignment page may take a while to print. Streaks on the alignment page are normal and not an indication of a problem. The alignment page that prints may differ from the one shown.
About your printer 13 16 12 13 17 Use the 15 20 To Printhead access area Install the printhead. Note: The carrier moves to the printhead access area when no printhead is installed in the printer. EXT LINE 14 21 Jam clearance cover Remove jammed pages. Using the printer control panel EXT LINE 2 1 3 4 5 18 21 20 19 Use the To 12 Scanner unit Access the ink cartridges. 13 Ink cartridge access area Install, replace, or remove the ink cartridges.
About your printer 5 14 Use To Keypad In Copy mode or Photo mode: Enter the number of copies or prints you want to make. In Fax mode: • • • • 6 7 Back Select 10 Dial tone Dial the telephone number manually using the keypad before sending the fax. 11 Address Book Access fax numbers from a saved list of numbers. 12 Color Switch to color mode. 13 Black Switch to black‑and‑white mode. 14 Start Start a job, depending on which mode is selected. 15 Cancel Enter fax numbers.
About your printer 15 Images: • .jpg, .jpeg, .jpe (Joint Photographic Experts Group) • .tiff, .tif (Tagged Image File Format) Using a flash drive with the printer Make sure the flash drive contains files that are supported by the printer. For more information, see “Supported file types” on page 14. 1 Insert a flash drive into the USB port. Notes: • The flash drive uses the same port that is used for a PictBridge camera cable.
Ordering and replacing supplies 16 Notes: Ordering and replacing supplies • To get more ink, order high‑yield ink cartridges. • Depending on your country or region, you may get the ink cartridges individually or in packs. • You can order a mix of standard ink cartridges and high‑yield ink cartridges, depending on your Ordering ink cartridges needs.
Ordering and replacing supplies 17 If your ink cartridge comes with a twist cap, then remove the cap. 2 Open the printer. V725w INK COM 150, PATIBI 150, 150A LITY CHART 150A , 150X , 150X L, 150X L, 150X LA, 155, LA, 155, 155A 155A , 155X Cyan L, 155X LA xx xx xx xx xx xx xx XX XX MAC : Black 150, 150, 150A 150A , 150X , 150X L, 150X L, 150X LA, 155, LA, 155, 155A 155A www.l exmar XX XX XX XX MT/MN: 4449-70E Mage Yellow nta k.com 2 Insert each ink cartridge.
Ordering and replacing supplies 18 Maintaining ink cartridges In addition to the following tasks that you can perform, your printer performs an automatic maintenance cycle every week if it is plugged into an electrical outlet. It will briefly come out of Sleep mode or will temporarily turn on if it is turned off. Aligning the printhead If the characters or lines on your printed image appear jagged or wavy, then you may need to align the printhead. 1 Load plain paper.
Using the printer software 19 Using the printer software Installing the printer software Note: If you installed the printer software on this computer before but need to reinstall the software, then uninstall the current software first. Minimum system requirements The printer software requires up to 500MB of free disk space. Supported operating systems • • • • • • • • • • • • • • • • • • • • • • • * For Windows users 1 Close all open software programs. 2 Insert the installation software CD.
Using the printer software 20 Printer software Use the LexmarkTM Printer Home (referred to as Printer Home) To • • • • • • • • • • Use the To Printing Preferences When you click File > Print > Properties with a document open, a Printing Preferences dialog appears. The dialog lets you select options for the print job, such as the following: Launch applications or programs. Scan or e‑mail a photo or document. • • • • • • Edit scanned documents. Scan documents to PDF.
Using the printer software 21 Notes: • Your printer may not come with these applications, depending on the features of the printer that you purchased or the installation type (standard or custom) chosen when you installed the printer. • To take advantage of the full features of your printer, select the custom install option during installation, and then select all packages listed. Accessing Web links Web links are links to predefined Web pages that are saved in the printer folder.
Printing Printing Printing a document For Windows users 1 With a document open, click File > Print. 22 3 Navigate to: Layout tab > Print on Both Sides (Duplex) area > Print on both sides • Click Long edge for print jobs with pages that are bound along the long edge of the page. • Click Short edge for print jobs with pages that are bound along the short edge of the page. 4 Click the Paper/Finishing tab, and then select a supported paper type. 5 Click OK to close any printer software dialogs.
Printing 23 • For Short‑Edge binding, pages are bound along the short edge of the page (top edge for portrait, left edge for landscape). Portrait Landscape When the printer detects the memory device, Storage Device Detected appears on the display. 2 If document files are stored on the memory device, then the printer automatically switches to File Print mode.
Printing Printing from a mobile device What is LexPrint? LexPrint is a free application that lets you print easily from your iPad, iPhone, or iPod touch using any Lexmark printer connected to the same wireless network. It lets you print Web pages, photos from the photo album, or photos you recently captured using the camera of your mobile device, depending on its features. You can also customize print settings from your mobile device.
Copying 25 2 Load an original document faceup into the ADF or facedown on the scanner glass. Copying ADF 3 From the printer control panel, navigate to: > Copy > Scanner glass > Copies 4 Press the left or right arrow button to select the number of copies. 5 From the Copy menu screen, press the up or down arrow button to scroll to the option you want to set, and then press the left or right arrow button to scroll to the setting you want. If necessary, press to make a selection.
Copying 26 • For short-edged binding, pages are bound along the short edge of the page (top edge for portrait orientation and left edge for landscape orientation). 5 Press , and then follow the instructions on the display. Canceling copy jobs To cancel a copy job, press , and then press . Scanning stops and the printer returns to the previous menu.
Scanning 27 2 From the printer control panel, navigate to: Scanning > Scan > > Computer > USB‑Connected Computer > The USB‑connected computer will receive the scan by default. ADF Scanner glass Note: Make sure the scan software is installed on the destination computer. 3 Press the up or down arrow button to scroll to the scan option you want to set, and then press the left or right arrow button to scroll to the setting you want. Set the color, quality, original image size, and other scan options.
Scanning 28 Scanning starts and the scan progress dialog appears. 2 Click or Start. 5 Save the document as a PDF. 3 Click All Programs or Programs, and then select the printer program folder from the list. For Macintosh users 4 Navigate to: Printer Home > select your printer > Scan 5 Select Email photo, Email document, or Email PDF. Note: You can select Email document only if an OCR application is stored on your computer. Scanning starts and the scan progress dialog appears.
E-mailing 29 Applications > select your printer folder > Printer Settings > Email E-mailing 2 Follow the instructions on the computer screen, and then click Save Settings. Sending e-mail Canceling an e‑mail Do one or more of the following: Tips for e‑mailing • Make sure to enter your e‑mail account information and set up the SMTP server before sending an e‑mail. • Make sure the printer is connected to an Ethernet or wireless network before sending an e‑mail.
Setting up the printer to fax Setting up the printer to fax CAUTION—POTENTIAL INJURY: To reduce risk of fire, use only the telecommunications (RJ‑11) cord provided with this product or a UL Listed 26 AWG or larger replacement when connecting this product to the public switched telephone network. CAUTION—SHOCK HAZARD: Do not use the fax feature during a lightning storm.
Setting up the printer to fax 31 Connected to different wall jacks Setup 3: Printer is sharing the line with a telephone subscribed to voice mail service EXT LINE EXT LINE PHONE LINE 02 To connect: Connect the cable from the wall jack to the port of the printer. Tips for this setup: • If you have only one telephone number on your line, then you need to set the printer to receive faxes automatically (Auto Answer On). • Set the printer to pick up calls two rings after the answering machine.
Setting up the printer to fax 32 When you answer the telephone and you hear fax tones, press *9* or the manual answer code on the telephone to receive the fax. • You can also set the printer to receive faxes automatically (Auto Answer On), but you need to turn off the voice mail service when you are expecting a fax. This setting works best if you are using voice mail more often than fax. To install a filter for the printer: 1 Connect the line port of the DSL filter to the wall jack.
Setting up the printer to fax 33 2 Connect the other end of the cable to the port labeled Phone Line 1 or Phone Port on the VoIP adapter. The port labeled Phone Line 2 or Fax Port is not always active. You may need to pay extra to your VoIP provider if you want to activate the second phone port.
Setting up the printer to fax 34 • If you need two phone ports for your devices but do not want to pay extra, then do not plug the printer into the second phone port. You can use a phone splitter. Plug the phone splitter into the Phone Line 1 or Phone Port , and then plug the printer and telephone into the splitter. Make sure you use a phone splitter, not a line splitter. To make sure that you are using the correct splitter, plug an analog telephone into the splitter and then listen for a dial tone.
Setting up the printer to fax 35 Connecting the printer to a non‑RJ‑11 wall jack Notes: • Do not remove the wrap plug from the port of the printer. • The printer may not come with an RJ-11 adapter in your country or region. If the additional device (telephone or answering machine) has an RJ-11 connector, then you can remove the wrap plug and connect the device to the port of the printer.
Setting up the printer to fax 36 France Netherlands Switzerland Connecting the printer to a wall jack in Germany Finland Norway United Kingdom The German wall jack has two kinds of ports. The N ports are for fax machines, modems, and answering machines. The F port is for telephones. Warning—Potential Damage: If your country or region is on the list, then do not remove the wrap plug port of the printer. It is necessary for the proper functioning of the devices on the from the telephone line.
Setting up the printer to fax 37 Connect the printer to any of the N ports. If you hear a dial tone, then the telephone line and the wall jack are working. Make sure the printer is properly connected to the telephone line 1 While the printer is connected to a telephone line through the an analog telephone into the port on the back of the printer, plug port of the printer. 2 Listen for a dial tone. If you hear a dial tone, then the printer is properly connected to the telephone line.
Setting up the printer to fax 38 Step 5: Set the number of rings Note: In some models, entries 1–89 are for individual contacts and entries 90–99 are for fax groups. Enter the entry number before entering the contact name and fax number of the contact. If you set Auto Answer to On in Step 4, then do the following. If you set Auto Answer to Off, then proceed to Step 6. Using the fax software If you are connecting the printer to a computer, then you can also create a contact list using the fax software.
Faxing 39 Sending faxes using the computer Faxing For Windows users CAUTION—SHOCK HAZARD: Do not use the fax feature during a lightning storm. Do not set up this product or make any electrical or cabling connections, such as the fax feature, power cord, or telephone, during a lightning storm. 1 With a document open, click File > Print. 2 Make sure the appropriate printer is selected, and then click Properties, Preferences, Options, or Setup.
Faxing 40 Receiving faxes automatically • Make sure that the telephone is plugged into the printer is connected to the wall jack through the 1 Make sure that Auto Answer is on: From the printer control panel, navigate to: > Setup > > Fax Setup > > Ringing and Answering > > Auto Answer > > On > 2 Set the number of rings before the printer picks up incoming faxes: a Press the arrow buttons to scroll to Pick Up On, and then press .
Wireless networking Wireless networking 41 For Windows users 1 Close all open software programs. 2 Insert the installation software CD.
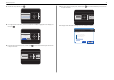
Wireless networking 42 You can find these WPS logos on the side, back, or top of your access point. For more information on accessing the wireless settings and determining the WPS capability of your access point, see the documentation that came with the access point or contact your system support person. Configuring Wi‑Fi Protected Setup manually Note: Make sure your access point (wireless router) is Wi‑Fi Protected Setup (WPS) certified. For more information, see the User’s Guide.
Troubleshooting 43 Incorrect language appears on the display Troubleshooting If the "Before you troubleshoot" checklist does not solve the problem, then try one or more of the following: Before you troubleshoot CHANGE THE LANGUAGE USING THE PRINTER MENUS Use this checklist to solve most printer problems: • Make sure the power cord is plugged into the printer and into a properly grounded, working electrical 1 From the printer control panel, navigate to: > Setup > outlet.
Troubleshooting 44 If your printer does not appear in the list, then try either of the following: CHECK THE USB CONNECTION 1 Check the USB cable for any obvious damage. If the cable is damaged, then use a new one. 2 Firmly plug the square end of the USB cable into the back of the printer. 3 Firmly plug the rectangular end of the USB cable into the USB port of the computer. The USB port is marked with . Note: If you continue to have problems, then try another USB port on the computer.
Troubleshooting 45 If the cartridges do not seem to fit, then make sure the printhead is properly seated, and then try installing the cartridges again. Cannot delete documents from the print queue If you have jobs stuck in the print queue and cannot delete them to get other jobs to print, then the computer and printer may not be communicating. 2 Load plain, unmarked paper.
Troubleshooting 46 DECREASE THE TRANSMISSION SPEED OF THE FAX MODEM • “Cannot receive faxes” on page 47 • “Cannot run the fax software” on page 47 The modem of the printer can transmit data at 33,600 bps. This is the maximum speed at which the printer can send and receive faxes. It is not necessary, however, to set the modem to its fastest transmission capability. The speed of the modem of the receiving fax machine must match or be greater than the speed at which you are sending your fax.
Troubleshooting 47 3 If the prefix is not correct, enter the correct prefix, and then press . MAKE SURE THAT YOU HAVE THE CORRECT MANUAL ANSWER CODE If you set the printer to receive faxes manually (Auto Answer Off), then you need to press the correct code when a fax comes in so that the printer can receive it.
Troubleshooting 48 Print a network setup page to verify the SSID the printer is using. If you are not sure if your SSID is correct, then run the wireless setup again. • Your WEP key or WPA passphrase is correct (if your network is secure). Log on to the access point and check the security settings. A security key is like a password. All devices on the same wireless network using WEP, WPA, or WPA2 share the same security key.
Troubleshooting • From 8 to 63 ASCII characters. ASCII characters are letters, numbers, and symbols found on a keyboard. ASCII characters in a WPA passphrase are case‑sensitive. Note: If you do not know this information, then see the documentation that came with the access point, or contact your system support person.
Troubleshooting In Mac OS X version 10.4 or earlier 1 From the Finder, navigate to: 50 If you see this message again after you have waited long enough for the printer and the laptop to attach to the network, then there may be a problem with your wireless network. Applications > Internet Connect > AirPort Make sure that the laptop and printer have both received IP addresses: The SSID of the network that the computer is connected to is displayed in the Network menu.
Troubleshooting 51 • Make sure your DHCP server, which may also be your wireless router, is working and is configured to assign IP addresses. If you are not sure how to do this, then refer to the manual that came with your wireless router. If the printer and computer have valid IP addresses and the network is operating correctly, then continue troubleshooting. MAKE SURE THE WIRELESS PORT IS SELECTED Note: This solution applies to Windows users only. 1 Click , or click Start and then click Run.
Notices Notices 52 All other trademarks are the property of their respective owners. Federal Communications Commission (FCC) compliance information Edition notice statement December 2011 This product complies with the limits for a Class B digital device, pursuant to Part 15 of the FCC Rules.
Index Index A Address Book 38 ADF output tray location 12 ADF paper guide location 12 ADF tray location 12 aligning the printhead 18 answering machine setting up 30 Automatic Document Feeder (ADF) location 12 B bidirectional communication enabling 50 broadcast fax, sending immediately 39 buttons printer control panel 13 C Caller ID setting 37 canceling copy job 26 e‑mail 29 print job 23 scan job 28 cannot delete documents from print queue 45 cannot print over wireless network 48 cannot print through USB
Index networking finding IP address of computer 48 finding IP address of computer (Mac) 48 finding IP address of printer 48 IP addresses 48 notices 2, 52 O ordering ink cartridges 16 P page does not print 44 paper conserving 5 paper exit tray location 12 paper stop location 12 paper tray location 12 PDF creating from scan 28 Personal Identification Number method using 42 phone book 38 phone plug 34 phone splitter 32 photos printing from a flash drive 23 PictBridge and USB port location 12 power supply por
Index Printing Preferences 19 Product Update 19 Status Messenger 19 Status Monitor Center 19 Tools for Office 19 Wireless Setup Utility 19 wireless network information needed for setting up wireless printing 41 installing printer on (Macintosh) 41 installing printer on (Windows) 41 troubleshooting 47 wireless setup information needed for 41 wireless troubleshooting cannot print over wireless network 48 Wi‑Fi Protected Setup configuring manually 42 using 41 Wi‑Fi Protected Setup logo identifying 41 55