
Printer User Manual
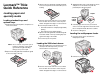

Lexmark™ T64x
Quick Reference
Loading paper and
specialty media
Loading standard trays and
optional trays
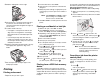
1 Remove the tray from the printer, and place it on
a flat, level surface.
Note: Do not remove a tray when a job is
printing or when the control panel
green indicator light is blinking.
Doing so may cause a jam.
2 Squeeze the side guide tab, and slide the guide
to the outer edge of the tray.
3 Squeeze the rear guide tab, and slide the guide
to the correct position for the size media you are
loading.
4 Flex the sheets back and forth to loosen them,
then fan them. Do not fold or crease the print
media. Straighten the edges on a level surface.
5 Place the print media in the tray:
• Print side facedown for simplex (single-sided)
printing
• Print side faceup for duplex printing
6 Squeeze the side guide tab, and slide the guide
toward the inside of the tray until it lightly rests
against the edge of the media.
7 Insert the tray into the printer.
Loading the 2000-sheet drawer
1 Open the loading door. If the elevator tray is not
already in the lowered position, push the
elevator button to lower the tray.
2 Flex the sheets back and forth to loosen them,
then fan them. Do not fold or crease the print
media. Straighten the edges on a level surface.
3 Slightly bend the stack of print media as shown,
and place it on the elevator tray with the
preferred print side facing down.
4 Carefully align each stack as you load it to
ensure a smooth edge where the stacks meet.
Do not load print media above the load line.
5 Close the loading door.
Loading the multipurpose feeder
1 Push the release latch, and lower the
multipurpose feeder.
2 Pull the tray extension out.
Simplex
(single
sided)
Duplex