Lexmark T522 Setup Guide May 2001 www.lexmark.
Edition: May 2001 The following paragraph does not apply to any country where such provisions are inconsistent with local law: LEXMARK INTERNATIONAL, INC., PROVIDES THIS PUBLICATION “AS IS” WITHOUT WARRANTY OF ANY KIND, EITHER EXPRESS OR IMPLIED, INCLUDING, BUT NOT LIMITED TO, THE IMPLIED WARRANTIES OF MERCHANTABILITY OR FITNESS FOR A PARTICULAR PURPOSE. Some states do not allow disclaimer of express or implied warranties in certain transactions; therefore, this statement may not apply to you.
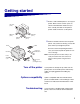
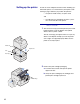
Getting started 1 Select a well-ventilated place to set up your printer. Allow at least as much space as shown in the illustration. Make sure you have a sturdy, low table or the optional printer stand on which to set the printer. 2 Remove all items from the box except the printer. If any items are missing, contact the place where you bought the printer. 137.16 cm (4.5 ft) 304.8 mm (12 in.) 304.8 mm (12 in.) 508 mm (20 in.) 304.8 mm (12 in.
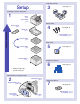
Load print material Setup 3 See page 17 Install paper options and printer 1 Printer page 6 Print cartridge page 6 Attach cables Envelope feeder 4 page 9 Duplex unit See page 18 Order of installation page 5 Network printing - page 18 Local printing - page 19 250-Sheet drawer page 4 Verify setup * 5 500-Sheet drawer page 4 See page 21 2000-Sheet drawer page 3 Configure for TCP/IP 6 See page 23 * Option install order may be reversed.
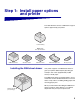
Step 1: Install paper options and printer The table illustrates various combinations of paper options supported by your printer. Lexmark T522(n) Attach up to: Four optional drawers. 2000-Sheet drawer 250-Sheet drawer 500-Sheet drawer Installing the 2000-sheet drawer 500-Sheet Duplex unit Envelope feeder Your printer supports one 2000-sheet drawer. It gives your printer added capacity by letting you load up to four reams (approximately 2,000 sheets) of 20 lb. paper.
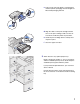
Installing a 250-sheet or 500-sheet drawer Paper drawers attach under the printer and optional duplex unit. The printer automatically recognizes any drawer that has been installed. A drawer consists of a paper tray and a support unit. The 250-sheet drawer and the 500-sheet drawer are installed the same way. Tray labels Lexmark T522 label (colored triangle) 1 Remove the tray from the support unit. Remove all packing material and tape from both the support unit and the tray.
Installing a duplex unit The duplex unit attaches under the printer, below the standard input tray and above any paper drawers. Refer to the Lexmark T522 online information, on the Lexmark T522 Publications CD, for details about using the duplex unit. Back cover Lexmark T522 label (colored triangle) 1 500 Sheet Duplex Place the duplex unit on top of any installed paper drawers, or the table or printer cabinet where you plan to use the printer.
Setting up the printer In order to ensure adequate clearance when installing system board options, see “Install memory and option cards” starting on page 10 before you position the printer if: • You plan to install memory or option cards and • You will have less than 605.6 mm (24 in.) clearance on the left side of the printer. CAUTION! Make sure your fingers are not under the printer when you set it down.
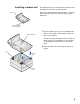
c Pull on each end of the plastic, V-shaped piece and then pull the packaging material straight out. Discard all packaging material. d Align the slides on the print cartridge with the slots on the print cartridge cradle. Use the colored arrows inside the printer for placement. e Guide the print cartridge down as it drops and snaps into place. f Close the upper front door. 3 Attach decals to any optional paper trays. Decals showing the number “1” are on your printer and the standard input tray.
4 Attach the operator panel overlay. If English is not your preferred language, attach the overlay with the appropriately translated names for the operator panel. Operator panel overlay a Peel the protective backing off the overlay. b Align the holes in the overlay with the buttons on the operator panel and press it into place. c Rub the overlay firmly to make sure it adheres securely to the operator panel. d Peel the protective covering away from the overlay. 5 Attach the paper bail.
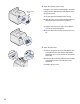
Installing the envelope feeder Lexmark T522 label (colored triangle) The envelope feeder attaches to the front of your printer behind the lower front door. It can be removed when you are not using it, making the printer more compact. Refer to the Lexmark T522 online information for details about using the envelope feeder. Release latch 1 Push the release latch and open the printer lower front door. 2 Lift open the envelope feeder connector door.
Step 2: Install memory and option cards You can customize your printer memory capacity and connectivity by adding optional cards.
3 Press down on the side door latches and open the side door. 4 Loosen, but do not remove, the six screws on the shield. You need a small Phillips screwdriver to loosen these screws. Note: Screws are used to give added protection against memory theft. Screws 5 Use the tabs to slide the shield up until the top three screws fit into the three keyholes on the shield. 6 Hold the shield by the tabs and lift it off.
Installing printer memory or flash memory Note: Some memory and firmware options for other Lexmark printers cannot be used with your printer. Refer to the Lexmark T522 Publications CD for specifications. 1 Follow the steps in “Accessing the printer system board” on page 10. 2 Unpack the memory option. Avoid touching the connection points along its edge. Save the packaging materials. 3 Open both latches on the connector completely.
Installing an optional firmware card Warning! Optional firmware cards are easily dam- Follow the instructions in this section to install an optional firmware card. The system board has one location where a firmware card can be installed. 1 Access the system board. (See page 10 for instructions.) 2 Unpack the firmware card. aged by static electricity. Touch something metal on the printer before you touch a card. Resting posts Avoid touching the metal contacts on the connector. Save the packaging.
Installing an option card Install a MarkNet internal print server to add an Ethernet or Token-Ring port for connecting your printer to a network. Your printer has two connectors that support the following option cards: Install a MarkNet N2501e or N2401e internal print server if you received either of these cards as part of a multifunction printer upgrade.
3 Remove and save the two screws on the back of the printer that attach the metal plate to the slot. Remove and discard the plate. 4 Unpack the card. Save the packaging materials. 5 Align the connection points on the card with the connector on the system board and push the card firmly into the system board connector. 6 Insert the two screws saved from the metal plate (or the extra screws shipped with the card) into the holes. 7 Tighten the screws to secure the card.
Reattaching the shield and closing the doors After you have installed option cards on the printer system board, follow these steps to reattach the shield and close the doors. 1 Grasp the shield by the tabs and align the three keyholes on the shield with the top three screws. Holding the shield by the tabs, slide it down onto the screws. Tighten all six screws. 2 Close the side door. 3 Close the upper and lower front doors.
Step 3: Load print material Width guide tab Length guide Length guide lever Complete these instructions to load print material into any of the standard or optional trays. All paper trays are loaded in the same way. 1 Remove the paper tray. 2 Pull the width guide tab and slide the width guide to the far right side of the tray. 3 Squeeze the length guide lever and slide the length guide to the correct position for the size paper you are loading.
Step 4: Attach cables You can attach your printer to a network or locally (directly to a computer). Network printing You can attach your printer to a network using standard network cables. A 10BaseT/100BaseTX Fast Ethernet port is standard on the Lexmark T522 printer. You can add a Token-Ring or 10Base2 Ethernet port by installing an optional MarkNet internal print server. To attach the printer to a network: 1 Make sure the printer, computer, and any other attached devices are turned off and unplugged.
– Token-Ring networks (Shielded Twisted Pair) use a DB9 connector. – Ethernet 10Base2 networks (Thin Coax) use a BNC T-connector. Local printing You can attach your printer locally using either the USB port or parallel port. A USB port is standard on all printer models. The parallel port is standard on the base (nonnetwork) model. The parallel port requires an IEEE-1284 compliant parallel cable. We recommend Lexmark part number 1329605 (10 ft) or 1427498 (20 ft).
If you have installed an optional Tri-Port Adapter, you can locally attach the printer with a serial cable. We recommend Lexmark part number 1038693 (50 ft). For details on LocalTalk or infrared connections, refer to the documentation that shipped with the Tri-Port Adapter. Note: All Windows operating systems support parallel cable connections. However, only the Windows 98/ Me and Windows 2000 operating systems support USB cable connections.
Step 5: Verify printer setup Turning on the printer 1 Plug one end of the printer power cord into the socket at the back of the printer and the other end into a properly grounded outlet. 2 Turn on the printer. If the printer is attached locally (directly to a computer), leave the computer and any other attached devices turned off. You will turn these on in a later step. The printer requires time to warm up after you turn it on.
Ready 1 Menu 2 Select 3 Return 1 Press Menu until you see Utilities Menu, and then press Select. 2 Press Menu until you see Print Net Setup, and then press Select to print the page. The network setup page prints and the printer returns to Ready status. 4 3 Go 5 Stop 6 Check the first section on the network setup page and confirm that Status is “Connected.” Note: If an optional MarkNet card is installed in Slot 1, you see Print Net1 Setup.
Step 6: Configure for TCP/IP If you have TCP/IP available on your network, we recommend that you assign an IP address to the printer. Setting the printer IP address If your network is using DHCP, an address is automatically assigned. 1 Look for the address under the TCP/IP heading on the network setup page you printed in “Printing a network setup page” on page 21. 2 Go to “Verifying the IP settings” on page 24 and begin with step 2.
6 Change the address by pressing Menu to increase (or decrease) each number. Press Select to move to the next segment. Press Select when you are finished. The message Saved appears briefly. Verifying the IP settings 7 Press Menu until you see Set IP Netmask, and then press Select. 8 Repeat step 6 to set the IP Netmask. 9 Press Menu until you see Set IP Gateway, and then press Select. 10 Repeat step 6 to set the IP Gateway.
Step 7: Install printer drivers A printer driver is software that lets your computer communicate with your printer. The following table is a quick guide to finding the specific instructions you need. Type of printer installation Network environment or operating system Page Network Windows 25 (Ethernet or Token-Ring connections) (Windows 95/98/Me, Windows NT 4.
System drivers are built into Windows operating systems. Custom drivers are available on the drivers CD. Updated system and custom drivers are available on the Lexmark Web site at www.lexmark.com/drivers. Printing methods The following network printing methods are supported: • Direct IP printing • Shared printing (point and print, peer-to-peer) Creating ports and installing drivers Read the detailed instructions on the drivers CD. Click View documentation and look for network printer installation.
Depending upon which drivers CD shipped with your printer, you may also find this software on the drivers CD. Launch this utility and follow the instructions to install the PPDs. Send a test print job when you have finished. UNIX/Linux Your printer supports many UNIX platforms, such as Sun Solaris and Linux. Note: The Sun Solaris package is located both on the drivers CD and on the Lexmark Web site at www.lexmark.com/drivers.
lation. This documentation is also available on the Lexmark Web site at www.lexmark.com/publications. Local printing Windows The following instructions explain how to install a printer driver on a printer attached to a computer using a parallel or USB connection. Supported connections The following printer connections are supported: • Parallel (Windows 95/98/Me, Windows NT 4.
UNIX/Linux Your printer supports many UNIX platforms, such as Sun Solaris and Linux. Note: The Sun Solaris package is located both on the drivers CD and on the Lexmark Web site at www.lexmark.com/drivers. Lexmark provides a printer driver package for each supported UNIX platform containing all the necessary drivers and PPDs. The user’s guide contained in each package gives detailed instructions for installing and using Lexmark printers in UNIX environments.
P/N 09H0401 E.C. 2H0000 Lexmark and Lexmark with diamond design are trademarks of Lexmark International, Inc., registered in the United States and/or other countries. © 2001 Lexmark International, Inc. 740 West New Circle Road Lexington, Kentucky 40550 www.lexmark.