Lexmark W812 User’s Reference July 2002 www.lexmark.
Table of contents Chapter 1: Printer overview .............................................................. 7 Chapter 2: Sending a job to print ................................................... 10 Chapter 3: Canceling a print job .................................................... 11 Canceling a job from the printer operator panel ................................................. 11 Canceling a job from the Windows taskbar ........................................................
Chapter 8: Loading the trays .......................................................... 21 Loading 250-sheet trays ..................................................................................... 21 Loading 500-sheet trays ..................................................................................... 26 Chapter 9: Loading the multipurpose feeder ................................ 28 Printing envelopes ..............................................................................................
Chapter 24: Replacing the fuser .................................................... 61 Removing the old fuser ...................................................................................... 61 Installing a new fuser ......................................................................................... 63 Chapter 25: Understanding the printer operator panel ............... 65 Operator panel buttons ......................................................................................
Chapter 38: Job Menu ................................................................... 133 Chapter 39: Quality Menu ............................................................. 136 Chapter 40: Paper Menu ............................................................... 138 Chapter 41: PCL Emul Menu ........................................................ 144 Chapter 42: PPDS Menu ............................................................... 149 Chapter 43: Serial Menu ....................................
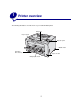
1 Printer overview The following illustrations show the views of your Lexmark W812 printer.
Print cartridge Fuser Release button Network card connector Parallel port connector Power cord connector Duplex connector 8
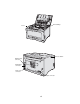
To increase paper capacity, you can purchase additional 250-sheet and 500-sheet trays. The following illustration shows the printer configured with one optional 500-sheet tray and one optional 250-sheet tray that is extended for A3 size paper. 500-sheet tray 250-sheet tray The following illustration shows the printer configured with two optional 500-sheet trays.
2 Sending a job to print To print a job from a typical Windows application: 1 Open the file you want to print. 2 From the File menu, select Print. 3 Verify that the correct printer is selected in the dialog box. 4 Modify the printer settings as appropriate (such as the pages you want to print or the number of copies). Note: Click Properties or Setup to adjust printer settings not available from the first screen, and then click OK. 5 Click OK or Print to send the job to the selected printer.
3 Canceling a print job Canceling a job from the printer operator panel To cancel a job after it has started printing, press Menu until you see Cancel Job, and then press Select. Canceling a job from the Windows taskbar When you send a job to print, a small printer icon appears in the right corner of the taskbar. 1 Double-click the printer icon. A list of print jobs appears. 2 Select the job you want to cancel. 3 Press Delete on your keyboard.
4 Conserving supplies Several settings in your application software or on the display let you conserve toner and paper: For more information, see... Supply Setting What the setting does Toner Toner Darkness in the Quality Menu Lets you adjust the amount of toner released on a sheet of paper. The values range from 1 (lightest setting) to 10 (darkest setting). Toner Darkness Paper and specialty media Multipage Print in the Finishing Menu Prints two or more page images on one side of a sheet.
5 Holding a job in the printer When sending a job to the printer, you can specify in the driver that you want the printer to hold the job in memory. When you are ready to print the job, you must go to the printer and use the operator panel menus to identify which held job you want to print. Note: Print and Hold functions require a minimum of 16MB available printer memory. We recommend a minimum of 32MB available printer memory and a hard disk.
Accessing held jobs from the operator panel 1 To access held jobs from the operator panel: – – If the printer is Busy, press Menu. The Job Menu appears. If the printer is Ready, continue to step 2. 2 Press Menu until you see Held Jobs or Confidential Job on the operator panel display, depending on the type of job you want to access. 3 Press Select. User Name appears on the first line of the operator panel. The second line displays the names of users currently associated with Print and Hold jobs.
Repeating print jobs If you send a Repeat Print job, the printer prints all requested copies of the job and stores the job in memory so you can print additional copies later. You can print additional copies as long as the job remains stored in memory. Note: Repeat Print jobs are automatically deleted from printer memory when the printer requires extra memory to process additional held jobs.
Printing confidential jobs When you send a job to the printer, you can enter a personal identification number (PIN) from the driver. The PIN must be four digits using the numbers 1–6. The job is then held in printer memory until you enter the same four-digit PIN from the printer operator panel and choose to print or delete the job. This ensures that the job does not print until you are there to retrieve it, and no one else using the printer can print the job.
6 Paper and specialty media specifications The following table lists supported paper and specialty media sizes and weights for the standard and optional trays, as well as for the multipurpose feeder. We recommend that you try a limited sample of any paper or specialty media you are considering using with the printer before purchasing large quantities. Source Paper sizes supported Maximum weight Capacity (sheets) 2 250 sheets (75 g/m2 [20 lb]) Tray 1 A3, A4, A5, JIS B4, JIS B5, letter, legal, 8.
The following papers are not recommended for use with your printer: • • • • • • • Paper with a rough or heavily textured surface Coated papers, such as erasable bond Preprinted papers manufactured with chemicals that may contaminate the printer Multiple-part forms Synthetic papers Thermal papers Recycled paper having a weight less than 75 g/m2 (20 lb) Letterhead Preprinted papers such as letterhead must be able to withstand temperatures up to 200°C (392°F) without melting or releasing hazardous emissions
Labels Your printer can print on many labels designed for use with laser printers. These labels are supplied in letter size and A4 size sheets. Label adhesives, face sheet (printable stock), and topcoats must be able to withstand temperatures of 205°C (401°F) without melting or releasing hazardous emissions and pressure of 25 pounds per square inch (psi). Try a sample of any labels you are considering using with the printer before purchasing a large quantity.
7 • Linking trays If you load the same size and type of paper or media in more than one tray, the printer automatically links the trays. This means that when one tray is empty, it feeds from the next linked tray. For example, if you have the same size and type of paper or media loaded in tray 2 and tray 3, the printer feeds from tray 2 until it becomes empty, and then it feeds from the next linked tray—tray 3.
8 Loading the trays Loading 250-sheet trays Follow the instructions in this section to load paper and specialty media into any of the 250-sheet trays. To load paper longer than A4 or letter size, go to page 24. Note: Do not exceed the recommended capacity or media weights (see “Paper and specialty media specifications”). Letter, A4, A5, or JIS B5 size paper 1 Remove the tray, and then set it on a flat surface. 2 Remove the tray cover.
5 Flex the sheets back and forth to loosen them, and then fan them. Do not fold or crease the paper. Straighten the edges of the stack on a level surface. 6 Place the paper or specialty media against the back of the tray. If loading letterhead, insert the letterhead face up, with the top of the page facing the right side guide. Do not load bent or wrinkled paper. 7 Slide the side guides until they lightly touch the stack of paper.
9 Replace the tray cover. 10 Insert the tray. 11 Adjust the paper size dial to match the size of the paper loaded in the tray. If the dial is not set correctly, you may get a paper jam or 34 Wrong Paper Size message. 12 Select the paper type and paper source from your software application.
A3, JIS B4, legal, 8.5x13, or 11x17 size paper Extend the paper tray to load paper longer than A4 or letter size. 1 Remove the tray, and then set it on a flat surface. 2 Remove the tray cover. 3 Slide the locking mechanisms on the left and right sides of the tray inward to unlock the extension.
4 Pull the extension out until it stops. 5 Slide the locking mechanisms outward to lock the extension in place. 6 Follow steps 3 through 10 beginning on page 21 to finish loading the tray. 7 Adjust the paper size dial to match the size of the paper loaded in the tray. If the dial is not set correctly, you may get a paper jam or 34 Wrong Paper Size message 8 Select the paper type and paper source from your software application.
Loading 500-sheet trays Follow these instructions to load paper into a 500-sheet tray. Note: Do not exceed the recommended capacity or media weights (see “Paper and specialty media specifications”). 1 Remove the tray, and then set it on a flat surface. 2 Remove the tray cover. 3 Flex the sheets back and forth to loosen them, and then fan them. Do not fold or crease the paper. Straighten the edges of the stack on a level surface. 4 Place the paper against the back of the tray.
5 Make sure the paper fits easily under the two corner bucklers. 6 Replace the tray cover. 7 Insert the tray. Note: Do not exceed the maximum stack height indicated on the tray. If you have frequent paper jams, try loading the paper to the lower stack height line. 8 Select the paper type and paper source from both the operator panel and your software application.
9 Loading the multipurpose feeder Use the multipurpose feeder for paper, specialty media (transparencies and label sheets), envelopes, and Hagaki cards. Note: Do not exceed the recommended capacity or media weights (see “Paper and specialty media specifications”). 1 Open the multipurpose feeder. 2 Slide the side guides to the correct position for the size paper or specialty media you are loading.
3 Flex the sheets back and forth to loosen them, and then fan them. Do not fold or crease the paper. Straighten the edges of the stack on a level surface. 4 Insert the paper or specialty media, print side up, into the multipurpose feeder. Note: To avoid jams when printing transparencies, we recommend you remove each one as it exits into the output bin. 5 Select the paper size, paper type and paper source from both the operator panel and your software application. 6 Press Go to start your print job.
Printing envelopes 1 Insert the envelopes print side up, flap down, into the multipurpose feeder. 2 Slide the side guides to fit the width of the envelopes. 3 Select the paper size, paper type, and paper source from both the operator panel and your software application. 4 Press Go to start your print job.
10 Tips for successful printing Storing paper Use the following guidelines to avoid paper feeding problems and uneven print quality. • Store paper in an environment where the temperature is approximately 21°C (70°F) and the relative humidity is 40%. • Store cartons of paper on a pallet or shelf rather than directly on the floor. • If you store individual packages of paper out of the original carton, make sure they rest on a flat surface so the edges do not buckle or curl.
The following hints can help you avoid paper jams: • Use only recommended paper. Refer to the Card Stock & Label Guide available on Lexmark’s Web site at www.lexmark.com for more information about which paper provides optimum results for your printing environment. • If you need detailed information before purchasing large quantities of customized paper, refer to the Card Stock & Label Guide. • Do not load wrinkled, creased, or damp paper. • Flex, fan, and straighten paper before you load it.
11 Using the optional duplex unit Duplexing your print jobs conserves supplies and reduces costs. To print a duplex job, select Duplex from your printer driver. Note: To avoid paper jams when duplexing universal size jobs, make sure the paper size is between 148 mm–297 mm (5.8 in.–11.7 in.) wide and 148 mm–508 mm (5.8 in.– 20 in.) long. Choose how you want your job duplexed: Long Edge or Short Edge.
12 Checking an unresponsive printer Sometimes printer problems are very easy to solve. If your printer is not responding, first make sure: • • • • • The power cord is plugged into the printer and a properly grounded electrical outlet. The electrical outlet is not turned off by any switch or breaker. Other electrical equipment plugged into the outlet is working. The printer is turned on.
13 Solving print quality problems You can solve many print quality problems by replacing a supply or maintenance item that has reached the end of its intended life. Check the operator panel for a message about a printer consumable. See Determining the status of supplies for information about other ways to identify consumables that need to be replaced. Use the following table to find solutions to print quality problems. Symptom Cause Solution Blank pages The print cartridge is defective or empty.
Symptom Cause Solution Print too light • The Toner Darkness setting is too light. • You are using paper that does not meet the printer specifications. • The print cartridge is low on toner. • The print cartridge is defective or has been installed in more than one printer. • Select a different Toner Darkness setting from the printer driver before sending the job to print. • Use recommended paper and specialty media. Refer to the Card Stock & Label Guide available on Lexmark’s Web site at www.lexmark.
Symptom Cause Solution Print irregularities • Paper has absorbed moisture due to high humidity. • You are using paper that does not meet the printer specifications. • The fuser is worn or defective. • Load paper from a fresh package in the paper tray. For information on storing paper, see Storing paper. • Use recommended paper and specialty media. Avoid textured paper with rough finishes. Refer to the Card Stock & Label Guide available on Lexmark’s Web site for detailed specifications.
Symptom Cause Solution Streaked vertical lines Toner is smeared before fusing to the paper. If paper is stiff, try feeding from another tray. Toner specks • The print cartridge is defective. • The fuser is worn or defective. • Toner is in the paper path. • Replace the print cartridge. See Replacing the print cartridge. • Replace the fuser. See Replacing the fuser. • Call for service. Toner rubs off the paper easily when you handle the sheets.
Symptom Cause Solution Incorrect margins • Guides in the selected tray are set for a different size paper than what is loaded in the tray. • Auto size sensing is set to Off, but you loaded a different size paper in a tray. For example, you inserted A4 size paper into the selected tray but did not set the Paper Size to A4. • Move the guides in the tray to the proper positions for the size loaded. See Loading the trays for detailed instructions on adjusting the guides in each tray.
14 Solving paper feed problems Symptom Cause Solution Paper frequently jams. You are using paper that does not meet the printer specifications. Use recommended paper and specialty media. Refer to the Card Stock & Label Guide available on Lexmark’s Web site at www.lexmark.com for detailed specifications. See Clearing jams for more information. See Avoiding jams for information that can help prevent jams from occurring. Paper frequently jams (continued).
Symptom Cause Solution Paper frequently jams (continued). The paper frequently jams in the optional 500-sheet tray. Load the paper to the stack height indicated with an A. Paper jams when duplexing Universal size paper. The Universal paper size selected is outside the range for duplexed jobs. Use paper between 148 mm–297 mm (5.8 in.–11.7 in.) wide and 148 mm–508 mm (5.8 in.–20 in.) long. The Paper Jam message remains after you remove the jammed paper. There is still a jam in the paper path.
15 Solving printing problems Symptom Cause Solution The operator panel display is blank or displays only diamonds. The printer self test failed. Turn the printer off, wait about 10 seconds, and turn the printer back on. Performing Self Test appears on the display. When the test is completed, the Ready message is displayed. If the messages do not appear, turn the printer off and call for service. Jobs do not print. The printer is not ready to receive data.
Symptom Cause Solution Jobs do not print (continued). You are using the wrong printer driver or are printing to a file. • Verify that you selected the printer driver associated with your Lexmark W812 printer. • If you are using a USB port, make sure you are running Windows 98, Windows Me, or Windows 2000, and using a Windows 98, Windows Me, or Windows 2000 compatible printer driver. Your MarkNet™ print server is not set up properly or is not connected properly.
Symptom Cause Solution Tray linking does not work. Tray linking is not configured properly. To configure the linked trays: Large jobs do not collate. Collate is not set to On. Set Collation to On in the Finishing Menu or through the printer driver. The job is too complex. Reduce the complexity of the print job by eliminating the number and size of fonts, the number and complexity of images, and the number of pages in the job. The printer does not have enough memory.
16 Solving other option problems Symptom Cause Solution The option does not operate correctly after it is installed, or it stops working. The option is not installed correctly. Remove the option, and then reinstall it. Cables connecting the option to the printer are not attached correctly. Check the cable connections. The printer driver does not recognize that the option is installed. Your printer driver may not automatically recognize that an option is attached to your printer.
17 Calling for service When you call for printer service, describe the problem you are experiencing, the message on the display, and the troubleshooting steps you have already taken to find a solution. You need to know your printer model type and serial number. Refer to the label on the back of the printer near the power cord for this information. Note: The serial number is also listed on the menu settings page you can print from the Utilities Menu. See Printing a menu settings page for more information.
18 Understanding jam messages Paper jam messages Message Area where jam occurs See...
19 Clearing jams When a jam occurs, the printer displays a 2xx Paper Jam message and stops printing. Once you clear the jam, open and close the top cover to clear the message and resume printing. Click any of the messages below for instructions on clearing the jam. 203 Fuser jam 202 Print cartridge jam 230/231/232 Duplex jam 200/201 Multipurpose feeder jam 200/201 Paper tray jam A 200 Paper Jam may occur when the printer is turned off while a job is printing.
Clearing 200/201 jams from the paper tray Paper may get jammed in the tray or lodged behind the tray. To clear the jam: 1 Pull out the tray the printer is using for the current job, and then remove the tray cover. 2 If the paper jammed in the tray, remove it. 3 Check inside the tray area for any jammed paper and remove it. 4 Replace the cover, and then reinsert the tray. 5 Open and close the top cover to clear the message.
Clearing 200/201 jams from the multipurpose feeder 1 Open the multipurpose feeder and remove any paper from the tray. 2 If paper is jammed inside the multipurpose feeder, remove it. 3 Open and close the top cover to clear the message. Clearing 203 jams from the fuser A 203 Paper Jam occurs when paper jams in the fuser. To clear the jam: 1 Remove any paper in the output tray.
2 Press the release button on the left side of the printer to open the top cover. CAUTION: The fuser may be hot. Let it cool before continuing. 3 Raise the fuser paper guide and remove any jammed paper. 4 Lower the fuser paper guide. 5 Close the top cover to clear the message.
Clearing 202 jams from the print cartridge A 202 Paper Jam occurs after paper has left the paper tray but has not reached the fuser. To clear the jam: 1 Remove any paper in the output tray. 2 Press the release button on the left side of the printer to open the top cover. 3 Remove the print cartridge, and then set it aside.
4 Open the print cartridge paper guide lever and remove any jammed paper. 5 Close the print cartridge paper guide lever. 6 Reinsert the print cartridge. 7 Close the top cover to clear the message. Clearing 230/231/232 jams from the duplex unit A 230 Paper Jam occurs when paper jams at the top of the fuser before going through the duplex unit upper cover, or after it enters the duplex unit upper cover.
3 Check for any jammed paper and remove it. 4 Close the duplex unit upper cover. 5 Open the duplex unit lower cover. 6 Check for any jammed paper and remove it. 7 Close the duplex unit lower cover. 8 Remove the print cartridge and remove any jammed paper. (See Clearing 202 jams from the print cartridge for help.) 9 Reinsert the print cartridge. 10 Close the top cover to clear the message.
20 Ordering supplies In the U.S., contact Lexmark at 1-800-539-6275 for information about Lexmark Authorized Supplies Dealers in your area. In other countries/regions, visit the Lexmark Web site at www.lexmark.com or contact the place where you bought your printer. You can also visit the Lexmark online store at www.lexmark.com to order supplies. Click the Web link on the bottom of this page.
21 Determining the status of supplies To determine the status of all of the consumables installed in your printer, print the menu settings page. See Printing a menu settings page for detailed instructions. One or two pages print depending on the number of menu settings you have. Look for “Consumable Status” on the page; the life remaining for each of the items is indicated.
22 Recycling used supplies Lexmark’s Operation ReSourceSM program lets you participate in a worldwide recycling effort at no cost to you. Pack your used print cartridge in the new print cartridge shipping box. Follow the instructions in the box to send the used cartridge back to Lexmark. You can also recycle the fuser. If a prepaid shipping label is not available for your country/region, contact the place where you bought your printer for additional recycling information.
23 Replacing the print cartridge When the Toner Low message appears on the display, check that you have a new print cartridge, P/N 14K0050, on hand. To use the remaining toner, remove the print cartridge, shake it gently back and forth, and reinsert it. When the print fades or no longer prints satisfactorily, replace the print cartridge If Toner Alarm is set to Single or Continuous, press Go to continue printing.
2 Pull out the print cartridge and set it aside. WARNING: Lexmark does not recommend refilling used print cartridges or purchasing refilled cartridges from a third party. Print quality and printer reliability cannot be guaranteed if you do. For best results, use genuine Lexmark supplies. Installing the new print cartridge 1 Remove the print cartridge from its packing materials. WARNING: Do not touch the photoconductor drum on the bottom of the print cartridge.
2 Shake the cartridge in all directions to distribute the toner. 3 Place the cartridge on a flat surface and remove the toner seal. 4 Align the cartridge with the grooves in the printer, and insert it into the printer. 5 Close the top cover. 6 Follow the instructions on the print cartridge box to recycle the used print cartridge.
24 Replacing the fuser Replace the fuser when an 80 Scheduled Maintenance message appears. Removing the old fuser 1 Turn the printer off. 2 Press the release button on the left side of the printer and open the top cover.
3 Pull out the print cartridge. 4 Pull up the fuser latches on each end to release the fuser.
5 Grasping the handles on each end of the fuser, pull the fuser toward you, and then up out of the printer. 6 Set the fuser aside. Installing a new fuser 1 Unwrap the new fuser. Follow the recycling instructions in the box to dispose of the old fuser. 2 Insert the new fuser.
3 Push down the fuser latches to lock the fuser into position. 4 Align the print cartridge with the grooves in the printer and reinsert it into the printer. 5 Close the cover. 6 Reset the fuser page counter back to zero: a Press and hold Select and Return while turning the printer on. b When Performing Self Test appears, release Select and Return. Config Menu appears. c Press Menu until Reset Maint Cnt appears, and then press Select. Reset Maint Cnt =Reset appears. d Press Select.
25 Understanding the printer operator panel The operator panel has five buttons, a display, and a light that flashes when the printer is processing a job. Ready Display 1 Menu 2 Select 3 Return4 Go5 Stop 6 Operator panel buttons Button Function Go Press Go to: • Return to the Ready state if the printer is offline (the Ready message does not appear on the display). • Exit printer menus and return to the Ready state. • Clear some operator panel messages.
Button Function Select Press Select to: • • • • Open the menu shown on the second line of the display. Save the displayed menu item as the new user default setting. Clear certain messages from the display. Continue printing after the Change message appears. See Change for more information. Return Press Return to go back to the previous menu level or menu item. Stop Press Stop at the Ready, Busy, or Waiting message to temporarily take the printer offline. The message changes to Not Ready.
26 Configuring printer alerts You can configure the printer several ways to let you know when it requires attention. Using the Setup Menu Menu item Function Value Result Alarm Control Lets you establish whether the printer sounds an alarm when it requires operator intervention. Off The alarm does not sound, but printing stops until the interventions are cleared. Single The printer stops printing, displays a message, and activates the selected alarm type.
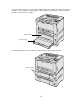
27 Removing memory and option cards Use these instructions to guide you as you remove memory or option cards. Use the following illustration to locate the connector for the card you want to remove. Option card connector Memory and flash card connectors Firmware card connector Removing the printer system board access panel 1 Turn the printer off. 2 Unplug the printer power cord. 3 Disconnect all cables from the back of the printer.
4 Press the release button on the left side of the printer, and then open the top cover. 5 Push the side release button as you slide the right cover toward the rear of the printer. 6 Remove the right cover and set it aside.
7 Loosen the screws on the access panel and remove it. Removing memory cards Complete the following steps to remove printer memory or flash memory cards. WARNING: Printer memory and flash memory cards are easily damaged by static electricity. Touch something metal on the printer before you touch a memory card. 1 Remove the access panel (see Removing the printer system board access panel for help). 2 Locate the memory card you want to remove.
4 Pull the card straight out of the connector. 5 Place the card in its original packaging, or wrap the card in paper and store it in a box. 6 Reinstall the access panel (see Reinstalling the system board access panel). Removing an option card Complete the following steps to remove an internal print server, USB/Parallel Interface Card, or hard disk with adapter card. WARNING: Option cards are easily damaged by static electricity. Touch something metal on the printer before you touch an option card.
3 Locate the option card you want to remove. 4 Gently pull the option card out of the connector slot on the system board. 5 Place the card in its original packaging, or wrap the card in paper and store it in a box. 6 If you do not plan to insert another card, reattach the metal plate that covers the connector slot. 7 Secure the other end of the metal plate to the system board with the screw. 8 Reinstall the access panel (see Reinstalling the system board access panel).
Removing a firmware card Complete the following steps to remove a firmware card. If an option card has been installed, you must remove it before removing the firmware card. See Removing an option card. WARNING: Optional firmware cards are easily damaged by static electricity. Touch something metal on the printer before you touch an optional firmware card. 1 Remove the access panel (see Removing the printer system board access panel for help). 2 Gently pull the firmware card straight out in one motion.
Reinstalling the system board access panel 1 Insert the metal tab on the access cover behind the printer frame, and then secure the cover with the two screws. 2 Insert the two tabs at the front end of the right cover behind the printer frame, and then align the cover with the release button. 3 Slide the right cover forward until it securely engages with the printer frame. 4 Close the top cover. 5 Reconnect all cables, plug in the power cord, and turn the printer on.
28 Disabling the operator panel menus A network administrator can lock the printer menus to keep others from changing default menu settings from the operator panel. To disable the menus: 1 Turn the printer off. 2 Press and hold the Select and Return buttons, and then turn the printer on. 3 Release the buttons when Performing Self Test appears on the display. When the printer self test completes, Config Menu appears. 4 Press Menu until you see Panel Menus, and then press Select.
29 Disabling Power Saver Disabling Power Saver in the Setup Menu helps keep your printer ready to print without delays. 1 Press Menu until you see Setup Menu, and then press Select. 2 Press Menu until you see Power Saver, and then press Select. 3 Press Menu until you see Disabled, and then press Select. If the Disabled value is not available, first change the Energy Conserve setting to Off in the Config Menu: 1 Turn the printer off.
30 Size Sensing When size sensing is set to Auto, the default, the printer recognizes the size paper currently loaded in the 250-sheet or 500-sheet trays. When you switch to a different size paper, set the paper size dial to match the new size paper you loaded. Do not forget to select the paper type from both the operator panel and your printer driver.
31 Printing a menu settings page Print the menu settings page to review the printer settings and to verify that printer options are installed correctly. Note: See Understanding the printer operator panel to identify the display and operator panel buttons if you need help. 1 Make sure the printer is on and the Ready message appears. 2 Press Menu until you see Utilities Menu, and then press Select. 3 Press Menu until you see Print Menus, and then press Select to print the page.
32 Restoring factory default settings 1 Make sure the printer is on and the Ready message appears. 2 Press Menu until you see Utilities Menu, and then press Select. 3 Press Menu until you see Factory Defaults, and then press Select. 4 When Restore appears, press Select. The message Restoring Factory Defaults appears, followed by the Ready message. When you select Restore: – – – No other button actions are available on the operator panel while Restoring Factory Defaults appears.
33 Changing menu settings You can use the operator panel to change printer menu settings and customize your printer to meet your specific needs. Note: Changes to specific print jobs made from a software application override the settings made from the operator panel. See the menu map for a list of the menus and their menu items. To select a new value: 1 Press Menu until you see the menu you need, and then press Select.
34 Understanding fonts Resident fonts Your printer is equipped with resident fonts stored permanently in printer memory. Different fonts are available in PCL 6, PostScript 3, and PPDS emulations. Some of the most popular typefaces, like Courier and Times New Roman, are available for all printer languages. The fonts in the PCL emulation are compatible with the fonts in the HP4050 and include four additional fonts and many extra symbol sets to support extra languages and applications.
PCL 6 emulation PostScript 3 emulation PPDS emulation ITC Bookman Demi Bookman-Demi Bookman-Demi ITC Bookman Demi Italic Bookman-DemiItalic Bookman-DemiItalic Clarendon Condensed Bold Coronet Coronet-Regular CourierPS Courier Courier CourierPS Oblique Courier-Oblique Courier-Oblique CourierPS Bold Courier-Bold Courier-Bold CourierPS Bold Oblique Courier-BoldOblique Courier-BoldOblique CG Omega CG Omega Bold CG Omega Italic CG Omega Bold Italic Garamond Antiqua Garamond-Antiqua Garam
PCL 6 emulation PostScript 3 emulation Courier Italic Intl-Courier-Oblique Courier Bold Intl-Courier-Bold Courier Bold Italic Intl-Courier-BoldOblique Letter Gothic LetterGothic Letter Gothic Italic LetterGothic-Slanted Letter Gothic Bold LetterGothic-Bold PPDS emulation Courier Bold LetterGothic-BoldSlanted Marigold Marigold Century Schoolbook Roman NewCenturySchlbk-Roman Century Schoolbook Roman Century Schoolbook Italic NewCenturySchlbk-Italic Century Schoolbook Italic Century Sch
PCL 6 emulation PostScript 3 emulation Univers Condensed Bold Italic Univers-CondensedBoldOblique Wingdings Wingdings-Regular ITC Zapf Chancery Medium Italic ZapfChancery-MediumItalic ZapfChancery-MediumItalic ITC Zapf Dingbats ZapfDingbats ZapfDingbats Univers-Extended Univers-ExtendedObl Univers-BoldExt Univers-BoldExtObl Univers-Light Univers-LightOblique Clarendon Clarendon-Light Clarendon-Bold Helvetica-Condensed Helvetica-Condensed-Bold Helvetica-Condensed-BoldObl Helvetica-Condensed-Obliq
PCL 6 emulation PostScript 3 emulation CooperBlack-Italic Copperplate-ThirtyTwoBC Copperplate-ThirtyThreeBC Eurostile Eurostile-Bold Eurostile-ExtendedTwo Eurostile-BoldExtendedTwo GillSans GillSans-Italic GillSans-Bold GillSans-BoldItalic GillSans-Condensed GillSans-BoldCondensed GillSans-Light GillSans-LightItalic GillSans-ExtraBold Goudy Goudy-Italic Goudy-Bold Goudy-BoldItalic Goudy-ExtraBold HoeflerText-Regular HoeflerText-Italic HoeflerText-Black HoeflerText-BlackItalic HoeflerText-Ornaments JoannaMT
Resident bitmapped fonts PCL 6 emulation PostScript 3 emulation PPDS emulation Line Printer 16 POSTNET Bar code Courier 10 Courier 12 Courier 17.1 Courier 10 Bold Boldface PS Symbol sets A symbol set is an encoded collection of alphabetic and numeric characters, punctuation, and special characters available in the font you select. Symbol sets support the requirements for different languages or specific applications, such as math symbols used for scientific text.
PS Text ISO 16: Portuguese ISO 8859-9 Latin 5 Pi Font ISO 17: Spanish ISO 8859-10 Latin 6 Symbol ISO 21: German ISO 8859-15 Latin 9 PC-8 Bulgarian PC-857 Latin 5 (Turkish) Roman-9 PC-8 Danish/Norwegian (437N) PC-858 Multilingual Euro Roman Extension PC-8 Greek Alternate (437G) PC-860 Portugal Ventura ITC Zapf Dingbats PC-8 Turkish (437T) PC-861 Iceland Ventura International PC-8 Latin/Greek PC-863 Canadian French Ventura Math PC-8 PC Nova PC-865 Nordic Ventura US PC-8 Polish Mazov
35 Printing sample fonts Your printer has resident fonts stored permanently in memory. Different fonts may be available in PCL, PostScript, and PPDS emulations. To print samples of all the fonts currently available for your printer in PCL emulation or PostScript 3 emulation: 1 Make sure the printer is on and Ready appears on the display. 2 Press Menu until you see Utilities Menu, and then press Select. 3 Press Menu until you see Print Fonts, and then press Select.
9 Press Menu until you see Utilities Menu, and then press Select. 10 Press Menu until you see Print Fonts, and then press Select. – Select PPDS Fonts to print a listing of the fonts available in PPDS emulation. 11 Press Select. The message Printing Font List remains on the display until all pages print. The printer returns to the Ready message after the font sample list prints. Follow step 1–step 5 above, selecting Off to deactivate PPDS Emulation.
36 Understanding printer messages The printer operator panel displays messages describing the current state of the printer and indicates possible printer problems you must resolve. This topic provides a list of all printer messages, explains what they mean, and tells you how to clear the messages.
Activating Demo Mode What this message means: The printer is activating files stored in the printer that demonstrate the printer features. In this mode, regular print jobs are ignored and only demonstration files listed on the operator panel can be printed. What you can do: Scroll through the list of demonstration files and select the file you want to print. See also: Deactivating Demo Mode Activating Menu Changes What this message means: The printer is activating changes made to the printer settings.
Busy What this message means: The printer is busy receiving, processing, or printing data. What you can do: • Wait for the message to clear. • Press Menu to open the Job Menu and cancel the current job. Canceling Job What this message means: The printer is processing a request to cancel the current print job. What you can do: Wait for the message to clear.
Check Connection What this message means: The specified device is either not fully connected to the printer or is experiencing a hardware failure. What you can do: • Reestablish communication by removing the specified device and reattaching it to the printer. • In the case of a hardware failure, turn the printer off and back on. If the error recurs, turn the printer off, remove the specified device, and call for service.
Deactivating Demo Mode What this message means: The printer is ready to print jobs. What you can do: Send print jobs to the printer. See also: Activating Demo Mode Deactivating PPDS What this message means: The printer is deactivating the PPDS emulation printer language. What you can do: Wait for the message to clear. Jobs will print using PCL emulation.
Delete All Jobs What this message means: The printer is requesting confirmation to delete all held jobs. What you can do: • Press Go to continue. The printer deletes all held jobs. • Press Stop to cancel the operation. Deleting Jobs What this message means: The printer is deleting one or more held jobs. What you can do: Wait for the message to clear. Disabling Menus What this message means: The printer is responding to a request to disable the menus. What you can do: Wait for the message to clear.
Disk Corrupted. Reformat? What this message means: The printer has attempted a disk recovery process and cannot repair the disk. What you can do: Turn off the printer and remove the disk. See also: Disk Recovery x/5 yyy% Disk Recovery x/5 yyy% What this message means: The printer is attempting to recover the hard disk. Disk recovery takes place in five phases; the second line on the operator panel display shows the percent complete of the current phase. What you can do: Wait for the message to clear.
Enter PIN: =___ What this message means: The printer is waiting for you to enter your four-digit personal identification number (PIN). What you can do: Use the operator panel buttons to enter the PIN you identified in the driver when you sent the confidential job to the printer. See also: Holding a job in the printer Flushing Buffer What this message means: The printer is flushing corrupted print data and discarding the current print job. What you can do: Wait for the message to clear.
Formatting Disk yyy% What this message means: The printer is formatting the hard disk. When formatting takes longer than usual, the second line of the display shows the percent complete. What you can do: Wait for the message to clear. WARNING: Do not turn the printer off while this message is displayed. Formatting Flash What this message means: The printer is formatting the flash memory. What you can do: Wait for the message to clear.
Held Jobs may be lost What this message means: The printer memory is too full to continue processing print jobs. What you can do: • Press Go to clear the message and continue printing. The printer frees memory by deleting the oldest held job and continues deleting held jobs until there is enough printer memory to process the job. • Press Stop to clear the message without deleting any held jobs. The current job may not print correctly. • Press Menu to open the Job Menu and cancel the current job.
Insert Print Cartridge What this message means: The print cartridge is either not installed or not installed correctly. What you can do: Correctly install the print cartridge to clear the message. Insert Tray What this message means: The specified tray is either missing or not fully inserted into the printer. What you can do: Insert the specified tray completely into the printer.
Load Manual What this message means: A request for a manual feed job has been sent to the printer. The printer is ready for insertion of a single sheet into the manual feed slot. What you can do: • Load a sheet of the paper specified in the second line of the display in the manual feed tray or multipurpose feeder. • Press Select or Go to ignore the manual feed request and print on paper already installed in one of the input sources.
Menus Disabled What this message means: The printer menus are disabled. You cannot change the printer settings from the operator panel. What you can do: You can still open the Job Menu to cancel a job that is printing or to select a confidential job or a held job that you want to print. If you need access to the printer menus, contact your network administrator.
No Jobs Found. Retry? What this message means: The four-digit personal identification number (PIN) you entered is not associated with any confidential print job. What you can do: • Press Go to enter another PIN. • Press Stop to clear the PIN entry prompt. See also: Holding a job in the printer Not Ready What this message means: The printer is not ready to receive or process data. Someone pressed Stop to take the printer offline. What you can do: Press Go to make the printer ready to receive jobs.
Power Saver What this message means: The printer is ready to receive and process data. It is reducing its electricity consumption while idle. If the printer remains inactive for the period of time specified in the Power Saver menu item (20 minutes is the factory default), the Power Saver message replaces the Ready message on the display. What you can do: • Send a job to print. • Press Go to quickly warm the printer to normal operating temperature and display the Ready message.
Printing Directory List What this message means: The printer is processing or printing a directory of all files stored in flash memory or on a hard disk. What you can do: Wait for the message to clear. See also: Print Directory Printing Font List What this message means: The printer is processing or printing a list of all available fonts for the specified printer language. What you can do: Wait for the message to clear.
Printing Menu Settings What this message means: The printer is processing or printing the menu settings page. What you can do: Wait for the message to clear. See also: Print Menus; Printing a menu settings page Printing Quality Test Pages What this message means: The printer is processing or printing three pages of text and graphics to help you isolate the cause of print quality problems. What you can do: Wait for the message to clear.
Program Flash What this message means: The printer is storing resources, such as fonts or macros, in flash memory. What you can do: Wait for the message to clear. WARNING: Do not turn the printer off while this message is displayed. Programming Disk What this message means: The printer is storing resources, such as fonts or macros, on the hard disk. What you can do: Wait for the message to clear. WARNING: Do not turn the printer off while this message is displayed.
Queuing and Deleting Jobs What this message means: The printer is deleting one or more held jobs and sending one or more jobs to print. What you can do: Wait for the message to clear. See also: Printing and deleting held jobs Queuing Jobs What this message means: The printer is sending one or more held jobs to print. What you can do: Wait for the message to clear. See also: Holding a job in the printer Ready What this message means: The printer is ready to receive and process print jobs.
Ready Hex What this message means: The printer is in Hex Trace mode and is ready to receive and process print jobs. What you can do: • Send a job to print. All data sent to the printer is printed in hexadecimal and character representation. Control strings are printed, not executed. • Turn the printer off and then on to exit Hex Trace mode and return to Ready status. Remove Paper What this message means: The specified output bin, or bins, is full.
Resetting Maint Cnt Value What this message means: The printer is resetting the counter that tracks wear on the fuser. What you can do: Wait for the message to clear. Resetting the Printer What this message means: The printer is resetting to the current default settings. Any active print jobs are canceled. What you can do: Wait for the message to clear. See also: Changing menu settings Restore Held Jobs.
Restoring Factory Defaults What this message means: The printer is restoring the factory default printer settings. When factory default settings are restored: • All downloaded resources (fonts, macros, symbol sets) in the printer memory are deleted. • All menu settings return to the factory default setting except: – – The Display Language setting in the Setup Menu. All settings in the Parallel Menu, Serial Menu, Network Menu, and USB Menu. What you can do: Wait for the message to clear.
Std Bin Full What this message means: The standard bin is full. What you can do: Remove the stack of paper in the bin to clear the message. Toner Low What this message means: The print cartridge is low on toner. What you can do: • Replace the print cartridge. • Press Go to clear the message and continue printing. Note: If you do not replace the print cartridge, you may experience print quality problems. Tray Empty What this message means: The specified tray is out of paper.
Tray Low What this message means: The specified tray is low on paper. What you can do: Add paper to the tray to clear the message. See also: Loading the trays Tray Missing What this message means: The specified tray is either missing or not fully inserted into the printer. What you can do: Insert the tray completely into the printer. See also: Loading the trays USB What this message means: The printer is processing data through the specified USB port.
Waiting What this message means: The printer has received a page of data to print but is waiting for an End of Job command, a Form Feed command, or additional data. What you can do: • Press Go to print the contents of the buffer. • Press Menu to open the Job Menu and cancel the current job. See also: Canceling a print job 1565 Emul Error Load Emul Option What this message means: The download emulator version on the firmware card does not match the printer code version.
31 Defective Print Cartridge What this message means: A defective print cartridge is installed. What you can do: Remove the specified print cartridge and install a new one. See also: Replacing the print cartridge 34 Wrong Paper Size in Tray What this message means: The printer was expecting to pick a different size paper from the specified tray than what it now detects is moving through the paper path. What you can do: • Press Go to clear the message and continue printing.
35 Res Save Off Deficient Memory What this message means: The printer lacks the memory needed to enable Resource Save. This message usually indicates too much memory is allocated for one or more of the printer link buffers. What you can do: • Press Go to disable Resource Save and continue printing. • To enable Resource Save after you get this message: – – • Make sure the link buffers are set to Auto, and exit the menus to activate the link buffer changes.
37 Insufficient Memory What this message means: The printer memory is full and cannot continue processing current print jobs. What you can do: • Press Go to clear the message and continue the current print job. The printer frees memory by deleting the oldest held job and continues deleting held jobs until there is enough printer memory to process the job. • Press Stop to clear the message without deleting any held jobs. The current job may not print correctly.
39 Complex Page What this message means: The page may not print correctly because the print information on the page is too complex. What you can do: • Press Go to clear the message and continue printing the job. The job may not print correctly. • Press Menu to open the Job Menu and cancel the current job. • To avoid this error in the future: – – – Reduce the complexity of the page by reducing the amount of text or graphics on the page and deleting unnecessary downloaded fonts or macros.
50 PPDS Font Error What this message means: The printer cannot find a selected PPDS font and the Best Fit setting is turned off. What you can do: • Press Go to clear the message and continue processing the job. • Press Menu and select Cancel Job from the Job Menu. • Press Menu and select Reset Printer from the Job Menu. See also: Cancel Job or Reset Printer 51 Defective Flash What this message means: The printer detects defective flash memory.
53 Unformatted Flash What this message means: The printer detects unformatted flash memory. What you can do: • Press Go to clear the message and continue printing. You must format the flash memory before you can store any resources on it. • If the error message remains, the flash memory may be defective and require replacing. 54 Serial Option Error 54 Standard Serial Error What this message means: The printer has detected a serial interface error on a serial port.
54 Std Par ENA Connection Lost 54 Par ENA Connection Lost What this message means: The printer has lost the connection to an external print server (also called an external network adapter or ENA). What you can do: • Make sure the cable connecting the ENA and the printer is securely attached. Turn the printer off and then on to reset the printer. • Press Go to clear the message. The printer erases any reference to the ENA and then resets.
56 USB Port Disabled 56 Standard USB Port Disabled What this message means: Data has been sent to the printer through a USB port, but the USB port is disabled. What you can do: • Press Go to clear the message. The printer discards any data received through the USB port. • Make sure the USB Buffer menu item in the USB Menu is not set to Disabled.
58 Too Many Disks Installed What this message means: Too many hard disks are installed on the printer. The printer only supports one hard disk at a time. What you can do: Turn off and unplug the printer. Remove the excess hard disks from the printer. Plug in the printer and turn it on. See also: Removing memory and option cards 58 Too Many Flash Options What this message means: Too many flash memory options are installed on the printer. What you can do: Turn off and unplug the printer.
61 Defective Disk What this message means: The printer detects a defective hard disk. What you can do: • Press Go to clear the message and continue printing. • Install a different hard disk before you perform any operations that require one. See also: Setup Guide 62 Disk Full What this message means: There is not enough memory on the hard disk to store the data sent to the printer. What you can do: • Press Go to clear the message and continue processing.
64 Unsupported Disk Format What this message means: The printer detects an unsupported disk format. What you can do: • Press Go to clear the message. • Format the disk. Note: Disk operations are not allowed until the disk is formatted. 80 Scheduled Maintenance What this message means: The printer requires replacement of routine maintenance items to maintain top performance and avoid print quality and paper feed problems.
900–999 Service What these messages mean: Messages 900–999 relate to printer problems that may require service. What you can do: Turn the printer off and check all cable connections. Turn the printer back on. If the service message recurs, call for service and report the message number and description of the problem.
37 Finishing Menu Use the Finishing Menu to define how the printer delivers the printed output. Select a menu item for more details: • Blank Pages • Multipage Order • Collation • Multipage Print • Copies • Multipage View • Duplex • Separator Sheets • Duplex Bind • Separator Source • Multipage Border Note: Values marked by an asterisk (*) are the factory default settings. Blank Pages Purpose: To specify whether to include application-generated blank pages as part of your printed output.
Collation Purpose: To keep the pages of a print job stacked in sequence when printing multiple copies of the job. Values: Off* Prints each page of a job the number of times specified by the Copies menu item. For example, if you set Copies to 2 and send three pages to print, the printer prints page 1, page 1, page 2, page 2, page 3, page 3. On Prints entire job the number of times specified by the Copies menu item.
Duplex Bind Purpose: To define the way duplexed pages will be bound, and how the printing on the back of the sheet (evennumbered pages) is oriented in relation to the printing on the front (odd-numbered pages). Values: Long Edge* Assumes binding along the long end of the page (left edge for portrait orientation and top edge for landscape orientation). Short Edge Assumes binding along the short edge of the page (top edge for portrait orientation and left edge for landscape orientation).
Multipage Order Purpose: To determine the positioning of multiple page images when using Multipage Print. The positioning depends on the number of images and whether the images are portrait or landscape in orientation.
Multipage Print Purpose: To print multiple page images on one side of a sheet of paper. Also called n-up or Paper Saver. Values: Off* Prints 1 page image per side. 6 Up Prints 6 page images per side. 2 Up Prints 2 page images per side. 9 Up Prints 9 page images per side. 3 Up Prints 3 page images per side. 12 Up Prints 12 page images per side. 4 Up Prints 4 page images per side. 16 Up Prints 16 page images per side.
Separator Sheets Purpose: To insert blank separator sheets between jobs, between multiple copies of a job, or between each page of a job. Values: None* Does not insert separator sheets. Between Copies Inserts a blank sheet between each copy of a job. If Collation is Off, a blank page is inserted between each set of printed pages (all page 1’s, all page 2’s, and so on). If Collation is On, a blank page is inserted between each collated copy of the job. Between Jobs Inserts a blank sheet between jobs.
38 Job Menu The Job Menu is available when the printer is idle, when the printer is busy processing or printing a job, when a printer message is displayed, or when the printer is in Hex Trace mode. Press Menu to open the Job Menu. Select a menu item for more details: • Abort Restore • Held Jobs • Cancel Job • Print Buffer • Confidential Job • Reset Printer Abort Restore Purpose: To abort the restoration of held jobs on the hard disk. Cancel Job Purpose: To cancel the current print job.
Confidential Job Purpose: To print confidential jobs stored in printer memory. (When the confidential job prints, it is automatically deleted from printer memory.) First select your user name and enter the personal identification number (PIN) associated with your confidential job: Enter PIN Use the operator panel buttons to enter the PIN associated with your confidential job. Then select a value: Print All Jobs Prints all jobs associated with your PIN. Print A Job Prints the specified confidential job.
Print Buffer Purpose: To print any data stored in the print buffer. Note: Print Buffer is only available when you enter the Job Menu while Waiting is displayed. The Waiting state occurs if an incomplete job is sent to the printer or an ASCII job, such as a print screen command, is printing.
39 Quality Menu Use the Quality Menu to change printer settings affecting the quality of printed characters and images. Select a menu item for more details: • PictureGrade • Print Resolution • Toner Darkness Note: Values marked by an asterisk (*) are the factory default settings. PictureGrade Purpose: To improve the quality of grayscale printing at 300 and 600 dots per inch (dpi) in PCL emulation and PostScript emulation.
Toner Darkness Purpose: To lighten or darken text images, or conserve toner. Values: 1 6 2 7 3 8* 4 9 5 10 Select a lower value for finer line width, higher definition in graphics, and lighter grayscale images. Select a higher value for bolder line widths or darker grayscale images. Select 10 for very bold text. Select a value less than 7 to conserve toner. A vertical bar ( | ) indicates the factory default value. An arrow symbol ( V ) indicates a user default value.
40 Paper Menu Use the Paper Menu to define the paper loaded in each paper tray and the default paper source and output bin. Select a menu item for more details: • Configure MP • Paper Source • Custom Types • Paper Type • Paper Loading • Substitute Size • Paper Size • Universal Setup Note: Values marked by an asterisk (*) are the factory default settings. Configure MP Purpose: To determine when the printer selects paper loaded in the multipurpose feeder.
Custom Types Purpose: To specify the kind of paper associated with each of the Custom Types available in the Paper Type menu item. Values for Custom Type , where represents 1, 2, 3, 4, 5, 6 (paper or transparencies): Paper* Labels Card Stock Envelope Transparency Note: If a user-defined name is available, it is displayed instead of Custom Type . The user-defined name is truncated to 14 characters.
Paper Size Purpose: To identify the default paper size for each paper source. For trays with automatic size sensing, only the value detected by the hardware is displayed. Values: First select a paper source: Tray Size MP Feeder Size Manual Pap Size Manual Env Size Then select a value (*denotes country/region-specific factory default values): A4* A5 JIS B5 10 Envelope* Letter* Legal Executive DL Envelope* JIS B4 A3 11 x 17 C5 Envelope 8.
Paper Source Purpose: To identify the default paper source. Values: Tray (Tray 1*) MP Feeder Manual Paper Manual Env If you loaded the same size and type of paper in two paper sources (and the Paper Size and Paper Type menu items are correctly set), the trays are automatically linked. When one paper source is empty, paper automatically feeds from the next linked source. Note: The default for Bond Texture is Rough instead of Normal.
Paper Type Purpose: To identify the type of paper installed in each paper source. Values: First select a paper source: Tray Type MP Feeder Type Manual Pap Type Manual Env Type Then select a value: Plain Paper Labels Preprinted Envelope Card Stock Bond Custom Type Colored Paper Transparency Letterhead The Paper Type default for each envelope source is Envelope.
Substitute Size Purpose: To have the printer substitute the specified paper size if the requested size is not loaded. Values: Off Printer prompts the user to load the requested paper size. Statement/A5 Prints A5 size jobs on statement size paper if only statement size paper is loaded, and prints statement size jobs on A5 paper if only A5 paper is loaded.
41 PCL Emul Menu Use the PCL Emul Menu to change printer settings that only affect jobs using the PCL emulation printer language. Select a menu item for more details: • A4 Width • Orientation • Auto CR after LF • Pitch • Auto LF after CR • Point Size • Font Name • Symbol Set • Font Source • Tray Renumber • Lines per Page Note: Values marked by an asterisk (*) are the factory default settings. A4 Width Purpose: To select the width of the logical page for A4 size paper.
Auto CR after LF Purpose: To specify whether the printer automatically performs a carriage return after a line feed control command. Values: Off* Printer does not perform a carriage return after a line feed control command. On Printer performs a carriage return after a line feed control command. Auto LF after CR Purpose: To specify whether the printer automatically performs a line feed after a carriage return control command.
Font Source Purpose: To determine the set of fonts displayed in the Font Name menu item. Values: Resident* Displays all fonts resident in printer RAM when the printer ships from the factory. Download Displays all fonts downloaded to printer RAM. Flash Displays all fonts stored in flash memory. Disk Displays all fonts stored on the printer hard disk. All Displays all fonts available to the printer from all sources.
Orientation Purpose: To determine how text and graphics are oriented on the page. Values: Portrait* Prints text and graphics parallel to the short edge of the paper. Landscape Prints text and graphics parallel to the long edge of the paper. Pitch Purpose: To specify the font pitch for scalable monospaced fonts. Values: 0.08...100 (in increments of 0.01 cpi) 10* Pitch refers to the number of fixed-space characters in a horizontal inch of type. You can select a pitch from 0.
Symbol Set Purpose: To choose a symbol set for a specified font name. Values: 10U PC-8* (country/region-specific factory default values) 12U PC-850* (country/region-specific factory default values) A symbol set is a set of alphabetic and numeric characters, punctuation, and special symbols used when printing with a selected font. Symbol sets support the different requirements for languages or specific applications, such as math symbols for scientific text.
42 PPDS Menu Use the PPDS Menu to change printer settings that only affect jobs using the PPDS emulation printer language. Select a menu item for more details: • Auto CR after LF • Lines per Page • Auto LF after CR • Orientation • Best Fit • Page Format • Character Set • Tray 1 Renumber • Lines per Inch Note: Values marked by an asterisk (*) are the factory default settings.
Auto LF after CR Purpose: To specify whether the printer automatically performs a line feed after a carriage return control command. Values: Off* Printer does not perform a line feed after a carriage return control command. On Printer performs a line feed after a carriage return control command. Best Fit Purpose: To specify whether the printer substitutes the closest matching font when a requested font is not found.
Lines per Inch Purpose: To determine the number of lines that print. Values: 1...255 60* (country/region-specific factory default values) 64* (country/region-specific factory default values) The printer sets the amount of space between each line (vertical line spacing) based on the Lines per Page, Paper Size, and Orientation menu items. Select the correct Paper Size and Orientation before changing Lines per Page.
Orientation Purpose: To determine how text and graphics are oriented on the page. Values: Portrait* Prints text and graphics parallel to the short edge of the paper. Landscape Prints text and graphics parallel to the long edge of the paper. Page Format Purpose: To determine where the printer positions the text on the page using the margins set from software applications. Values: Print* The left and top margin areas on the print job are equal to the software margin settings plus the unprintable area.
43 Serial Menu Use the Serial Menu to change printer settings affecting jobs sent to the printer through a serial port (Serial Opt ). Select a menu item for more details: • Baud • PCL SmartSwitch • Data Bits • PS SmartSwitch • Honor DSR • Robust XON • Job Buffering • RS-232 • NPA Mode • Serial Buffer • Parity • Serial Protocol Note: Values marked with an asterisk (*) are the factory default settings.
Baud Purpose: To specify the rate at which data can be received through the serial port. Values: 1200 57600 2400 115200 4800 9600* 19200 38400 See also: Technical Reference Data Bits Purpose: To specify the number of data bits that are sent in each transmission frame.
Honor DSR Purpose: To determine whether the printer uses the Data Set Ready (DSR) signal. DSR is one of the handshaking signals for most serial interface cables. Values: Off* All data received by the serial port is treated as valid data. On Only data received while the DSR signal is high is treated as valid. The serial interface uses DSR to distinguish data sent by the computer from data created by electrical noise in the serial cable. This electrical noise can cause stray characters to print.
Parity Purpose: To select the parity for serial input and output data frames. Values: Even Odd None* Ignore See also: Technical Reference PCL SmartSwitch Purpose: To configure the printer so it automatically switches to PCL emulation when a print job received through the serial port requires it, regardless of the default printer language. Values: On* Printer examines data on the serial interface and selects PCL emulation if the data indicates that is the required printer language.
PS SmartSwitch Purpose: To configure the printer so it automatically switches to PostScript emulation when a print job received through the serial port requires it, regardless of the default printer language. Values: On* Printer examines data on the serial interface and selects PostScript emulation if the data indicates that is the required printer language. Off Printer does not examine the incoming data.
Serial Buffer Purpose: To configure the size of the serial input buffer. Values: Disabled Disables serial (Parallel, USB) port. Any jobs already buffered on the disk are printed before normal processing of incoming jobs resumes. Auto* Printer automatically calculates the serial buffer size (recommended setting). 3K to maximum size allowed User specifies the serial buffer size.
44 Network Menu Use the Network Menu to change printer settings affecting jobs sent to the printer through a network port (either Standard Network or Network Opt ). Select a menu item for more details: • Job Buffering • NPA Mode • MAC Binary PS • PCL SmartSwitch • Network Buffer • PS SmartSwitch • Network Setup • Std Net Setup Note: Values marked by an asterisk (*) are the factory default settings. Job Buffering Purpose: To temporarily store jobs on the printer hard disk before printing.
MAC Binary PS Purpose: To configure the printer to process Macintosh binary PostScript print jobs. Values: On Printer processes raw binary PostScript print jobs from computers using the Macintosh operating system. Note: This setting often causes Windows print jobs to fail. Off Printer filters PostScript print jobs using standard protocol. Auto* Printer processes print jobs from computers using either Windows or Macintosh operating systems.
NPA Mode Purpose: To specify whether the printer performs the special processing required for bidirectional communication, following the conventions defined in the Network Printing Alliance (NPA) Protocol. Values: Off Printer does not perform NPA processing. Auto* Printer examines the data to determine the format and then processes it appropriately. Note: Changing this menu item automatically resets the printer.
PS SmartSwitch Purpose: To configure the printer so it automatically switches to PostScript emulation when a print job received through the network port requires it, regardless of the default printer language. Values: On* Printer examines data on the network interface connection and selects PostScript emulation if the data indicates that is the required printer language. Off Printer does not examine the incoming data.
45 Parallel Menu Use the Parallel Menu to change printer settings affecting jobs sent to the printer through a parallel port (either Std Parallel or Parallel Opt ). Select a menu item for more details: • Advanced Status • Parallel Mode 2 • Honor Init • PCL SmartSwitch • Job Buffering • PCL SmartSwitch; Printer Language • MAC Binary PS • Protocol • NPA Mode • PS SmartSwitch • Parallel Buffer • Parallel Mode 1 Note: Values marked by an asterisk (*) are the factory default settings.
Honor Init Purpose: To determine whether the printer honors hardware initialization requests from the computer. The computer requests initialization by activating the INIT signal on the parallel interface. Many personal computers activate the INIT signal each time the computer is turned on and off. Values: Off* Printer does not honor hardware initialization requests from the computer. On Printer honors hardware initialization requests from the computer.
NPA Mode Purpose: To specify whether the printer performs the special processing required for bidirectional communication, following the conventions defined in the Network Printing Alliance (NPA) Protocol. Values: On Printer performs NPA processing. If data is not in NPA format, it is rejected as bad data. Off Printer does not perform NPA processing. Auto* Printer examines data and determines the format and then processes it appropriately.
Parallel Mode 2 Purpose: To determine whether the parallel port data is sampled on the leading or trailing edge of strobe. Values: On* Samples parallel port data on the leading edge of strobe. Off Samples parallel port data on the trailing edge of strobe. PCL SmartSwitch Purpose: To configure the printer so it automatically switches to PCL emulation when a print job received through the parallel port requires it, regardless of the default printer language.
PS SmartSwitch Purpose: To configure the printer so it automatically switches to PostScript emulation when a print job received through the parallel port requires it, regardless of the default printer language. Values: On* Printer examines data on the parallel interface and selects PostScript emulation if the data indicates that is the required printer language. Off Printer does not examine the incoming data.
46 Setup Menu Use the Setup Menu to configure a variety of printer features. Select a menu item for more details: • Alarm Control • Power Saver • Auto Continue • Print Area • Display Language • Print Timeout • Download Target • Printer Language • Jam Recovery • Resource Save • Job Accounting • Toner Alarm • Page Protect • Wait Timeout Note: Values marked by an asterisk (*) are the factory default settings.
Auto Continue Purpose: To define the amount of time (in seconds) the printer waits after displaying an operator intervention error message before it resumes printing. Values: Disabled* Printer does not resume printing until someone clears the error message. 5...255 Printer waits the specified amount of time, and then automatically resumes printing. This timeout value also applies if the menus are displayed (and the printer is offline) for the specified period of time.
Jam Recovery Purpose: To establish whether the printer reprints jammed pages. Values: On Printer reprints jammed pages. Off Printer does not reprint jammed pages. Auto* Printer reprints a jammed page unless the memory required to hold the page is needed for other printer tasks. Job Accounting Purpose: To store statistical information about your most recent print jobs on the hard disk.
Power Saver Purpose: To specify the amount of time (in minutes) the printer waits after a job is printed before it goes into a reduced power state. Values: 1...240 Specifies the amount of time after a print job before the printer goes into Power Saver mode. (Your printer may not support the entire range of values.) The factory default Power Saver setting depends on your printer model. Print the menu settings page to determine the current Power Saver setting.
Print Timeout Purpose: To specify the amount of time (in seconds) the printer waits before printing the last page of a print job that does not end with a command to print the page. The print timeout counter does not start until Waiting is displayed. Values: Disabled The printer does not print the last page of a print job until one of the following occurs: • The printer receives enough information to fill the page. • The printer receives a Form Feed command. • You select Print Buffer from the Job Menu. 1.
Toner Alarm Purpose: To specify how the printer responds when it is low on toner. Values: Off The printer displays a warning and continues printing. Single* Printer stops printing, displays an error message, and sounds three quick beeps. Continuous Printer stops printing, displays an error message, and repeats three beeps every 10 seconds until the toner cartridge is replaced.
47 PostScript Menu Use the PostScript Menu to change printer settings that only affect jobs using the PostScript emulation printer language. Select a menu item for more details: • Font Priority • Print PS Error Note: Values marked by an asterisk (*) are the factory default settings. Font Priority Purpose: To establish the font search order. Values: Resident* Printer searches printer memory for the requested font before searching flash memory or hard disk.
48 USB Menu Use the USB Menu to change printer settings affecting a Universal Serial Bus (USB) port. Select a menu item for more details: • Job Buffering • PCL SmartSwitch • MAC Binary PS • PS SmartSwitch • NPA Mode • USB Buffer Note: Values marked by an asterisk (*) are the factory default settings. Job Buffering Purpose: To temporarily store jobs on the printer hard disk before printing. Values: Off* Does not buffer print jobs to the hard disk. On Buffers print jobs to the hard disk.
MAC Binary PS Purpose: To configure the printer to process Macintosh binary PostScript print jobs. Values: On Printer processes raw binary PostScript print jobs from computers using the Macintosh operating system. Note: This setting often causes Windows print jobs to fail. Off Printer filters PostScript print jobs using standard protocol. Auto* Printer processes print jobs from computers using either Windows or Macintosh operating systems.
PS SmartSwitch Purpose: To configure the printer so it automatically switches to PostScript emulation when a print job received through the USB port requires it, regardless of the default printer language. Values: On* Printer examines data on the USB interface and selects PostScript emulation if the data indicates that is the required printer language. Off Printer does not examine the incoming data.
49 Utilities Menu Use the Utilities Menu to print a variety of listings relating to available printer resources, printer settings, and print jobs. Other menu items let you set up printer hardware and troubleshoot printer problems.
Factory Defaults Purpose: To return your printer settings to the factory default values. Values: Restore • All menu items are returned to the factory default values except: – Display Language. – All settings in the Parallel Menu, Serial Menu, Network Menu, and USB Menu. • All downloaded resources (fonts, macros, and symbol sets) in printer memory (RAM) are deleted. (Resources residing in flash memory or on the hard disk are unaffected.) Do Not Restore User-defined settings remain.
Hex Trace Purpose: To help isolate the source of a print job problem. With Hex Trace selected, all data sent to the printer is printed in hexadecimal and character representation. Control codes are not executed. To exit Hex Trace, turn the printer off or reset the printer from the Job Menu. Job Acct Stat Purpose: To print a listing of all job statistics stored on the hard disk, or to clear all statistics on the disk. Values: Print Prints all statistics available for the most recent print jobs.
Print Fonts Purpose: To print a sample of all the fonts available for the selected printer language. Values: PCL Fonts Prints a sample of all printer fonts available for PCL emulation. PS Fonts Prints a sample of all printer fonts available for PostScript emulation. PPDS Fonts Prints a sample of all printer fonts available for PPDS emulation.
Remove Held Jobs Purpose: To remove confidential and held jobs from the printer hard disk. Note: Remove Held Jobs is only available when confidential jobs or held jobs are stored on an installed hard disk. Values: All Removes all confidential and held jobs stored on the hard disk. Confidential Removes confidential jobs stored on the hard disk. Held Removes held jobs stored on the hard disk.
50 Notices • Edition notice • Trademarks • Licensing notice • Safety information • Cautions and warnings • Electronic emission notices • Noise emission levels • Energy Star • Laser notice Edition notice Edition: July 2002 The following paragraph does not apply to any country where such provisions are inconsistent with local law: LEXMARK INTERNATIONAL, INC.
Comments about this publication may be addressed to Lexmark International, Inc., Department F95/ 032-2, 740 West New Circle Road, Lexington, Kentucky 40550, U.S.A. In the United Kingdom and Eire, send to Lexmark International Ltd., Marketing and Services Department, Westhorpe House, Westhorpe, Marlow Bucks SL7 3RQ. Lexmark may use or distribute any of the information you supply in any way it believes appropriate without incurring any obligation to you.
Candid Agfa Corporation CG Omega Product of Agfa Corporation CG Times Based on Times New Roman under license from The Monotype Corporation plc, is a product of Agfa Corporation Chicago Apple Computer, Inc. Clarendon Linotype-Hell AG and/or its subsidiaries Eurostile Nebiolo Geneva Apple Computer, Inc.
Licensing notice The printer resident software contains: • Software developed and copyrighted by Lexmark • Lexmark modified software licensed under the provisions of the GNU General Public License version 2 and the GNU Lesser General Public License version 2.
Cautions and warnings CAUTION: A caution identifies something that might cause you harm. WARNING: A warning identifies something that might damage your printer hardware or software. Electronic emission notices Printers with a network cable attached Federal Communications Commission (FCC) compliance information statement The Lexmark W812n network printer, Machine Type 4022-110 , has been tested and found to comply with the limits for a Class A digital device, pursuant to Part 15 of the FCC Rules.
A declaration of conformity with the requirements of the directives has been signed by the Director of Manufacturing and Technical Support, Lexmark International, S.A., Boigny, France. This product satisfies the Class A limits of EN 55022 and safety requirements of EN 60950. Warning When a print server is installed, this is a Class A product. In a domestic environment, this product may cause radio interference, in which case, the user may be required to take adequate measures.
Any questions regarding this compliance information statement should be directed to: Director of Lab Operations Lexmark International, Inc. 740 West New Circle Road Lexington, KY 40550 (859) 232-3000 Industry Canada compliance statement This Class B digital apparatus meets all requirements of the Canadian Interference-Causing Equipment Regulations.
Noise emission levels The following measurements were made in accordance with ISO 7779 and reported in conformance with ISO 9296. 1-meter average sound pressure, dBA Printing 52 dBA Idling 32 dBA Energy Star The EPA ENERGY STAR Office Equipment program is a partnership effort with office equipment manufacturers to promote the introduction of energy-efficient products and to reduce air pollution caused by power generation.
Index A A4 Width (PCL Emul Menu) 144 Abort Restore (Job Menu) 133 aborting restoration of held jobs 133 Advanced Status (Parallel Menu) 163 Alarm Control (Setup Menu) 168 alarms error messages 169 setting 168 toner 173 Auto Continue (Setup Menu) 169 Auto CR after LF (PCL Emul Menu) 145 Auto CR after LF (PPDS Menu) 149 Auto LF after CR (PCL Emul Menu) 145 Auto LF after CR (PPDS Menu) 150 auto size sensing 20 automatic size sensing 140 automatic tray linking 20 avoiding paper jams 31 B Baud (Serial Menu) 154
G Go button 65 H Hagaki cards, printing 28 hard disk formatting 179 printing downloaded resources 180 setting as download target 169 Held jobs 13 Held Jobs (Job Menu) 134 Hex Trace (Utilities Menu) 180 Honor DSR (Serial Menu) 155 Honor Init (Parallel Menu) 164 I interfaces network 159 parallel 163 serial 153 USB 175 J Jam Recovery (Setup Menu) 170 jams avoiding 31 See paper jams job canceling 133 confidential 134 held 134 statistics 170 Job Accounting (Setup Menu) 170 Job Acct Stat (Utilities Menu) 180 J
Enabling Menus 96 Enter PIN =___ 97 Flushing Buffer 97 Formatting Disk 97 Formatting Disk yyy% 98 Formatting Flash 98 Held Jobs may be lost 99 Held Jobs May Not Be Restored 99 Insert Print Cartridge 100 Insert Tray 100 Invalid Network Code 100 Invalid Standard Network Code 100 Load Manual 101 Load Tray 101 Maintenance 101 Menus Disabled 102 Network 102 Network Card Busy 102 No Jobs Found.
PS SmartSwitch 167 Parallel Mode 1 (Parallel Menu) 165 Parallel Mode 2 (Parallel Menu) 166 parallel port configuring bidirectional communication 163 buffer size 165 data sampling 166 hardware initialization 164 NPA mode 165 PCL SmartSwitch 166 protocol 166 PS SmartSwitch 167 enabling resistors 165 Parity (Serial Menu) 156 PCL Emul Menu 144 A4 Width 144 Auto CR after LF 145 Auto LF after CR 145 Font Name 145 Font Source 146 Lines per Page 146 Orientation 147 Pitch 147 Point Size 147 Symbol Set 148 Tray Renum
duplexed jobs 33 envelopes 30 font samples 88 Hagaki cards 28 label sheets 28 menu settings page 78 specialty media 28 transparencies 28 problem solving clearing operator panel error messages 65 stopping printer 66 problems calling for service 46 incorrect characters print 43 job didn’t print 42 job prints 43 from wrong tray 43 on wrong paper or media 43 large jobs do not collate 44 operator panel 42 blank 42 displays black diamonds 42 options operating incorrectly 45 stops working 45 paper feed frequent ja
T V taking printer offline 66 with Menu button 65 with Stop button 66 test printing Hex Trace mode 180 menus page 181 timeout print 172 wait 173 toner alarm 173 Toner Alarm (Setup Menu) 173 Toner Darkness (Quality Menu) 137 transparencies guidelines 18 printing 28 Tray 1 Renumber (PPDS Menu) 152 tray linking 20 Tray Renumber (PCL Emul Menu) 148 values, selecting 80 verifying printing 78 menus settings page 78 W Wait Timeout (Setup Menu) 173 wait timeout, configuring 173 U Universal Setup (Paper Menu) 1
Lexmark and Lexmark with diamond design are trademarks of Lexmark International, Inc., registered in the United States and/or other countries. © 2002 Lexmark International, Inc.