
Operation Manual

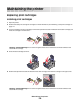

d Press or repeatedly until Device Setup appears.
e Press .
f Press or repeatedly until Date/Time appears.
g Press .
h Enter the date using the keypad.
i Press .
j Enter the time using the keypad.
k Press .
l If the hour you entered is 12 or less, press or repeatedly until AM, PM, or 24hr appears.
m Press to save the setting.
Blocking junk faxes
1 From the desktop, double-click the Productivity Studio icon.
2 From the left pane of the Welcome screen, click Fax.
The Fax Solution Software appears.
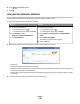
3 Click Tools Preferences and Settings.
4 Click the Receiving Faxes tab.
5 From the “Block Junk Faxes” area, select the check box beside Enable Fax Blocking.
6 If you want to block faxes from specific phone numbers:
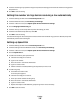
a Click Manage Block List.
b Click New.
c Enter a phone number in the Fax Identifier field and corresponding contact name in the Notes field.
Notes:
• You can include a calling card number as part of the fax number.
• A fax number can include up to 64 numbers, commas, periods, and/or these symbols: * # + - ( ).
• You can block faxes from up to 50 phone numbers.
7 Click OK to save the setting.
Blocking unwanted changes to fax settings
This feature blocks network users from changing fax settings.
1 From the control panel, press Settings.
2 Press or repeatedly until Device Setup appears.
3 Press .
4 Press or repeatedly until Host Fax Settings appears.
5 Press .
Faxing
115