Quick Reference
Contents Loading paper and specialty media...............................................3 Loading the paper tray........................................................................................................................................................3 Clearing jams.......................................................................................7 200–201 paper jam.............................................................................................................................
Loading paper and specialty media Loading the paper tray Do not load the paper tray while a job prints or while Busy appears on the display. Doing so may cause a paper jam. 1 Pull the paper tray completely out. 2 Squeeze the width guide tabs on the right guide as shown, and slide the width guides to the sides of the tray. The width guides move in unison.
3 Squeeze the length guide tabs together as shown, and then slide the length guide to the correct position for the paper size. Use the size indicators on the bottom of the tray to help position the guide. If you are loading a longer size of paper, then squeeze the length guide tab and slide the length guide backward to the correct position for the paper size. The tray extends backward as shown. 4 Flex the sheets back and forth to loosen them, and then fan them. Do not fold or crease the paper.
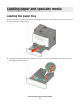
Load the paper stack toward the back of the tray as shown with the recommended print side facedown. Note: The maximum fill line on the side of the width guide indicates the maximum height for loading paper. Do not overload the tray. Load letterhead with the print side facedown and the top edge of the sheet toward the front of the tray. 6 Squeeze the width guide tabs on the right guide, and then slide the width guides to lightly touch the side of the stack.
7 Insert the paper tray. 8 If the paper type you loaded differs from the type that was previously loaded in the tray, then change the Paper Type setting for the tray.
Clearing jams 200–201 paper jam 200 paper jam 1 Remove the tray from the printer.
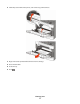
2 Remove the jam if you see it here. 3 If you do not see it, see “201 paper jam” on page 8. 201 paper jam 1 Open the front door, and then remove the photoconductor kit and toner cartridge.
2 Lift the flap at the front of the printer, and remove any jammed sheets. 3 Align and insert the photoconductor kit and toner cartridge. 4 Close the front door. 5 Insert the tray. 6 Press .
202 paper jam CAUTION—HOT SURFACE: The inside of the printer might be hot. To reduce the risk of injury from a hot component, allow the surface to cool before touching. 1 Open the front door, and then remove the photoconductor kit and toner cartridge.
2 Lift the flap at the front of the printer, and then remove any jammed sheets.
3 Open the rear door. 4 Remove the jam. 5 Close the rear door. 6 Align and insert the photoconductor kit and toner cartridge. 7 Close the front door. 8 Press .
241 paper jam 1 Remove the tray from the printer. 2 Remove the jam. 3 Insert the tray. 4 Press .
251 paper jam A sheet of paper or specialty media failed to feed completely from the manual feeder. Part of it may be still visible. If it is visible, then gently pull the jammed sheet from the front of the manual feeder. If the sheet is not visible, then complete the following steps: 1 Remove the photoconductor kit and toner cartridge.
2 Lift the flap at the front of the printer, and then remove any jammed sheets. 3 Align and insert the photoconductor kit and toner cartridge. 4 Press .