X215 MFP User’s Guide April 2003 www.lexmark.
Edition: April 2003 The following paragraph does not apply to any country where such provisions are inconsistent with local law: LEXMARK INTERNATIONAL, INC., PROVIDES THIS PUBLICATION “AS IS” WITHOUT WARRANTY OF ANY KIND, EITHER EXPRESS OR IMPLIED, INCLUDING, BUT NOT LIMITED TO, THE IMPLIED WARRANTIES OF MERCHANTABILITY OR FITNESS FOR A PARTICULAR PURPOSE. Some states do not allow disclaimer of express or implied warranties in certain transactions; therefore, this statement may not apply to you.
Contents Chapter 1: Getting started............................................................. 7 Understanding the parts ................................................................................. 8 Front view ................................................................................................. 8 Rear view ................................................................................................. 8 Unpacking ..........................................................................
Rear output slot ...................................................................................... 30 Chapter 4: Printing....................................................................... 31 Printing a document ..................................................................................... 31 Accessing Print Properties ........................................................................... 32 Using your program ............................................................................
Chapter 7: Faxing......................................................................... 51 Sending a fax automatically ......................................................................... 51 Using the scanning bed .......................................................................... 51 Using the ADF ........................................................................................ 52 Sending a fax manually ................................................................................
Manual bypass area (BYPASS JAM) ....................................................... 78 Clearing display messages .......................................................................... 79 Solving problems.......................................................................................... 79 Paper feeding problems ......................................................................... 80 Printing and copying problems ...............................................................
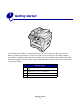
1 Getting started The Lexmark X215™ MFP is a multifunction printer. You can use it to copy, fax, print, and scan. Before unpacking your machine, select a level, stable surface on which to set it. Allow adequate space for air circulation and opening covers and trays. The area should be well-ventilated and away from direct sunlight or sources of heat, cold, and humidity. Do not set the machine close to the edge of your desk or table. Clearance space Front 482.6 mm (19 in.
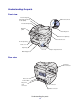
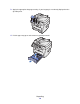
Understanding the parts Front view Document guide ADF release knob Automatic document feeder (ADF) Document input tray Operator panel Scanning bed Document output tray Document cover Front output tray Front cover Paper tray Paper output extension Manual bypass Rear view Telephone line connector Rear cover Power switch AC power cord connector USB connector Parallel connector Understanding the parts 8
Unpacking 1 Remove the machine and all accessories from the box. Make sure you have the following items: AC power cord Lexmark X215 Setup sheet Telephone line cord Drivers and Documentation CD Toner cartridge Language overlays Note: The Drivers and Documentation CD contains the driver software, the User’s Guide and the Adobe Acrobat Reader program. 2 Remove all tape from the machine.
3 Apply the appropriate language overlays, if your language is not already displayed on the operator panel. 4 Pull the paper tray open and remove any packing material.
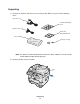
Installing the toner cartridge 1 Open the front cover. 2 Remove the toner cartridge. CAUTION: Do not touch the photoconductor drum located on the bottom of the toner cartridge.
3 Gently shake the cartridge to distribute the toner. Note: Thoroughly shaking the cartridge will assure the maximum copies per cartridge. 4 Insert the toner cartridge until it locks into place. 5 Close the front cover.
Connecting the cables 1 Connect the supplied telephone cord to the line jack and the other end to the wall jack. 2 Connect either a parallel (IEEE-1284 compliant) or USB cable to the printer port and the other end to your computer. OR Note: If any new hardware screens appear on your computer as a result of connecting with the USB cable, click Cancel and proceed with setup.
Powering on the machine 1 Plug one end of the supplied three-pronged electrical cord into the AC socket on the machine and the other end into a properly grounded electrical outlet. 2 Turn on the power switch. The message Warming Up Please Wait appears on the display.
Understanding the operator panel Copy Fax 1 3 2 4 Light Copy Normal Fax Dark Number Darkness Resolution Scale Phonebook Advanced Redial/ Pause Text Mixed Photo Content Select Menu 5 6 Return 7 1 2 3 4 5 6 7 8 9 * 0 # 8 9 Content Selects the output type for the current copy job. Select from Text, Mixed, or Photo quality. Darkness Adjusts the brightness of the current copy job to the selected value. Number Selects the number of copies that you want to make.
Setting the date and time When you turn your machine on, the display prompts you to enter the correct date and time. To set the date and time: 1 Use the numeric keypad to enter the two-digit month and day, and the four-digit year. For example, 01-23-2003. 2 Enter the current time. The default clock setting is 12-hour. 3 Press the asterisk (*) to select AM or PM, and then press Select.
Setting the country It is important to select your country or, if your country is not listed, the country closest to you. This information ensures that the fax modem on your machine can work at the optimal setting for the regional telephone system. To set your country: 1 Press Menu. 2 Press a scroll button ( or ) until MACHINE SETUP appears on the top line of the display, and then press Select. 3 Press a scroll button until Country appears on the bottom line of the display, and then press Select.
Setting the Power Saver mode Power Saver mode reduces power consumption when the machine is not in use. To select the amount of time that the machine waits after each job before it switches to Power Saver mode: 1 Press Menu. 2 Press a scroll button ( or ) until MACHINE SETUP appears on the top line of the display, and then press Select. 3 Press a scroll button until Power Saver appears on the bottom line of the display, and then press Select.
2 Installing software After setting up your machine and connecting it to your computer, you must install the drivers. The drivers are available on the CD packaged with your machine. The CD contains the following: • Drivers for printing, scanning (TWAIN), and USB support • User’s Guide • Adobe Acrobat Reader Installing the drivers 1 Close all unnecessary programs. 2 Launch the Drivers and Documentation CD. 3 Follow the instructions on the screen.
Removing the drivers You should remove the drivers if you are upgrading the software or if your driver installation fails. You can remove the software using the CD or the Windows unInstallShield. Note: Before removing, close all programs. You must restart your computer after removing the drivers. 1 Click Start Programs Lexmark X215. 2 You can select each driver individually to remove. • • To remove the scan driver, select TWAIN Driver Uninstall.
3 Loading paper and changing paper size Selecting print materials Select print materials that are an appropriate size for your input source (paper tray or manual bypass). Using print materials that are not recommended may cause paper jams or poor print quality. Size, input sources and capacities Input source/capacity1 Size (mm/in.) Plain paper Paper tray Manual bypass Yes/250 Yes/1 No/0 Yes/1 No/0 Yes/1 No/0 Yes/1 No/0 Yes/1 Letter (215.9 x 279/8.5 x 11) A4 (210 x 297/8.27 x 11.
Size, input sources and capacities Input source/capacity1 Size (mm/in.) Card stock2 Paper tray No/0 Manual bypass Yes/1 A6 card (105 x 148/4.13 x 5.88) Postcard (101.6 x 152.4/4 x 6) 1 Maximum capacity may be reduced depending on paper thickness. 2 This media must be fed one sheet at a time through the manual bypass.
• To avoid fading, do not expose the printed transparencies to prolonged sunlight. • Store unused materials at temperatures between 59o F and 86o F (15o C to 30o C). The relative humidity should be between 10% and 70%. • The laser printing process heats paper to high temperatures of 180° C (356° F). Use only paper able to withstand these temperatures without discoloring, bleeding, or releasing hazardous emissions.
Loading the paper tray The paper tray can hold a maximum of 250 sheets of 20 lb plain paper. For copying or faxing, use A4, letter, or legal size paper only. For printing, use any supported paper size. The paper tray is preset to use letter size paper. To load a larger size paper, you must adjust the guides. To load the paper tray: 1 Pull open the paper tray and push down the pressure plate until it locks in position.
Holding the tray on a stable surface, press the guide lock and slide the rear guide until it locks at the paper length you want. 2 Prepare a stack of paper for loading by flexing or fanning it back and forth. Straighten the edges on a level surface.
3 Load the paper with the print side facing down and the short edges of the paper placed at the front and rear of the tray. Note: Load letterhead paper with the design side facing down. The top, short edge of the sheet with the logo should be placed at the front of the tray. LE TT ER HE AD 4 Make sure the paper is below the triangle on the left inside wall of the tray. Note: Paper overloading may cause paper jams.
5 Squeezing the paper guides as shown, move the guides until they lightly touch the side of the stack of paper. Note: Do not push the paper guides far enough to cause the materials to warp. Incorrect adjustments may cause paper jams. 6 Close the paper tray. Note: The paper level indicator, on the front of the paper tray, shows the amount of paper currently in the tray. When the indicator lowers, the tray is empty.
Loading the manual bypass The manual bypass is located at the front of your machine. Use the manual bypass to print transparencies, labels, envelopes or postcards. Make sure that the specialty media is flat and free of any curls. You may also use the manual bypass to make quick runs of paper types or sizes that are not currently loaded in the paper tray. For information on acceptable print media to use in the manual bypass, see “Selecting print materials” on page 21.
Setting the paper type and size After loading paper in the paper tray or manual bypass, set the paper type and size using the operator panel buttons. The settings apply when copying only. When printing, select the paper type and size in the program you are using. Using the paper tray To set the paper type and size for the paper tray: 1 Press Menu. 2 Press a scroll button ( or ) until PAPER MENU appears on the top line of the display, and then press Select.
Selecting an output location The machine has two output locations; the front output tray and the rear output slot. Front output tray Rear output slot Front output tray The front output tray should be used to output plain paper only. You should use the rear output slot for envelopes, labels, small custom-sized paper, postcards, and transparencies. To use the front output tray, make sure the rear cover is closed. Paper is output facedown into the front output tray, with the last page on the bottom.
4 Printing Printing a document To print a job from a typical Windows program: 1 Open the document you want to print. 2 Click File Print. The Print window appears. 3 Verify the correct printer (Lexmark X215) is selected in the Print window. 4 Modify the print settings as appropriate (for example, the pages you want to print or the number of copies). Note: Click Properties to adjust advanced print settings not available from the first window (for example, orientation, paper source, size, and type).
Accessing Print Properties The print properties are where you specify print settings. Some of the settings you might want to adjust for a print job include: • • • • • • • Orientation - The direction information is printed on a page. (See page 34.) 2-UP or 4-UP - Multiple pages printed on one sheet. (See page 35.) Scale - The size information is printed on a page. (See page 35.) Fit to Page - Used to fit a document to a selected paper size. (See page 36.) Watermark - Text printed over an existing document.
Understanding the print settings All of the print settings are on the four main tabs of Print Properties: the Layout tab, Paper tab, Graphics tab, and Extras tab. From this tab: You can change these settings: Layout Orientation - Select how you want the document oriented on the printed page. Layout - Select the type of layout you want your document to have. Paper Copies - Select the number of copies you want to print. Type - Select the type of paper you are using.
Changing the direction information is printed on a page You can select to rotate the information 180 degrees, or print the information in a portrait or landscape orientation. Portrait prints across the width of the page, and landscape prints across the length of the page. Landscape Portrait 1 Access Print Properties either from your program or from the Printers folder. For help, see page 32.
Printing multiple pages on one sheet of paper You can select the number of pages to print on a single sheet of paper. To print more than one page per sheet, the pages will appear decreased in size and arranged on the sheet. You can print up to 4 pages on one sheet. 1 2 3 4 1 Access Print Properties either from your program or from the Printers folder. For help, see page 32. 2 From the Layout tab, choose either 2-UP or 4-UP in the Type drop-down list.
Fitting your document to a selected paper size You can scale your print job to any selected paper size regardless of the digital document size. This can be useful when you want to check fine details on a small document. A 1 Access Print Properties either from your program or from the Printers folder. For help, see page 32.
Creating a watermark 1 Access Print Properties either from your program or from the Printers folder. For help, see page 32. 2 From the Extras tab, click Edit in the Watermark section. The Edit Watermarks window appears. 3 Enter your text message in the Watermark Message box. 4 Select the watermark options you want. You can select to print on the first page only, specify font attributes, or set the angle of the watermark. 5 Click Add to add the new watermark to the list. 6 Click OK.
Using overlays An overlay is text or images in a special file format that can be printed on any document. Overlays are often used to take the place of preprinted forms and letterhead. Instead of using preprinted letterhead, you can create an overlay containing the same information that is currently on your letterhead. Then, to print a document with your company’s letterhead, you can select to print the letterhead overlay on your document. This eliminates the need to load special paper in the machine.
Using an overlay After you create an overlay, you can use it to print with your document. To print an overlay with a document: 1 Create or open the document you want to print. 2 Access Print Properties either from your program or from the Printers folder. For help, see page 32. 3 From the Extras tab, select the overlay you want from the Overlay drop-down list. If the overlay file you want does not appear in the Overlay drop-down list: a Click Edit. b Click Load Overlay.
Printing on both sides of the paper You can print on both sides of the paper using the manual bypass to feed previously printed pages back into your machine. 1 Open the document you want to print. 2 Click File Print. 3 Verify the correct printer (Lexmark X215) is selected in the Print window. 4 Click Properties. If the Properties button does not appear in the Print window, click Options, Printer, or Setup (depending on the program) first, and then click Properties in the next window.
Accessing the printer driver Help The printer driver Help gives detailed information about various printing features. To access the Help: 1 Open the document you want to print. 2 Click File Print. The Print window appears. 3 Verify the correct printer (Lexmark X215) is selected in the Print window. 4 Click Properties to open the Properties window.
5 Copying Using the scanning bed 1 Make sure paper is in the tray. If you need to load paper, see “Loading the paper tray” on page 24. 2 Open the document cover. Note: If you are copying a page from a book or magazine, lift the cover until its hinges are caught by the stopper.
3 Place the document facedown on the glass and align it with the registration guide on the left top corner. AB C Note: Make sure that no other documents are in the automatic document feeder (ADF). If a document is detected in the ADF, that document is copied before the document on the glass. 4 Close the document cover. Note: If you are copying a book or magazine that is thicker than 30 mm, leave the document cover open. 5 If you are only making one copy, go to step 6 now.
Using the ADF You can copy up to 30 documents (20 lb, 75 g/m2) using the ADF. When you use the ADF: • • • • • Do not load documents smaller than 142 x 148 mm (5.5 x 5.83 in.) or larger than 216 x 356 mm (8.5 x 14 in.). Do not attempt to feed the following types of documents: – Carbon-paper or carbon-backed paper – Coated paper – Onion skin or thin paper – Wrinkled, creased, curled, rolled, or torn paper Remove all staples and paper clips before loading documents.
3 Press Start to begin copying. Note: • • Press Stop/Clear to cancel a copy job in progress. Clean the document glass regularly. Dust on the document glass may affect print quality. Customizing settings You can temporarily modify all the copy options (darkness, content, number, scale, and advanced) using the operator panel buttons. Settings remain in effect until a predefined Timeout period is expired. To change the Timeout period, see page 48.
the background color in your copy, load the document about 5 mm away from the edges of the scanning bed, or change the darkness setting. Number To select the number of copies from 1 to 99: 1 Press Number. 2 Enter the number of copies you want to print using the numeric keypad, and then press Select. The selected number appears on the display. Scale If you copy original documents from the document glass, you can reduce or enlarge the size of a copied image from 25% to 400%.
Advanced Using the advanced option, you can copy images onto a page in a variety of layouts. The advanced settings available when a document is loaded in the ADF include: • • • • Off: Turns off the advanced copy features. Collation: Controls the sequence in which multiple page documents are printed (for example, if you copied a 5 page document without collation, the copier would output 5 pages of the first page, 5 pages of the second page, and so on.
Customizing default settings The default settings for the basic copy options (darkness, content, number, scale) are set using the operator panel menu. When you copy a document, these default settings are used unless you change them using the operator panel buttons (see page 45). To customize the default settings: Press Menu. 3 Press a scroll button ( or ) until COPY MENU appears on the top line of the display, and then press Select. 4 Press a scroll button to scroll through the copy options.
Creating two-sided copies You can create two-sided copies by using the manual bypass to feed previously copied output pages back into your machine. Using the ADF 1 Copy the first side of your original document normally. Note: Make sure to maintain a consistent orientation when loading documents into the ADF. If you do not, the reverse side of the document copy could print upside down. 2 Reload your original document into the ADF with the opposite side facing up.
6 Scanning Scanning a document or image Scanning with this machine requires the use of TWAIN-compliant software, such as Scansoft PaperPort or Adobe Photoshop. The first time you use the scanning function, select your machine as your TWAIN source in the program you want to use. To scan a document or image: 1 Place the document or image on the document glass or in the ADF. 2 Open a program, such as PaperPort or Photoshop.
7 Faxing There are two ways you can send or receive a fax: • • Automatic Manual You might select the Automatic mode when you know the receiving fax machine and your fax machine are connected to a dedicated phone line (that is, the phone line is used only for faxing). If the phone line is shared between a telephone and a fax machine, you might want to select the Manual mode. Sending a fax automatically Using the scanning bed 1 Make sure there are no documents loaded in the ADF.
Using the ADF 1 Place your document into the ADF. 2 Customize any fax settings you want to change. For help, see page 54. 3 Using the numeric keypad, enter the number of the fax machine to which you want to send your document. Note: You may enter a number using shortcuts or groups. For help, see page 58. 4 Press Start. Note: Pressing Stop/Clear cancels the faxing process.
Using the ADF 1 Place your document into the ADF. 2 Customize any fax settings you want to change. For help, see page 54. 3 Press the telephone icon button to get a dial tone. 4 Using the numeric keypad, enter the number of the fax machine to which you want to send your document. Note: You may enter a number using shortcuts or groups. For help, see page 58. 5 When you hear a high-pitched fax signal, indicating a connection with the receiving fax machine, press Start.
Customizing settings You can modify all the fax options using the operator panel menu. (See the following table for the available options.)The Resolution option can be modified from either the operator panel menu or by pressing the Resolution button. Settings selected using the operator panel menu become the default settings and are in effect for all fax jobs. Settings selected using the Resolution button remain in effect until a predefined Timeout period is expired.
Option Darkness Description You can select the default Darkness setting to make the document you are faxing lighter or darker. Select one of the following settings: • Light - works well with dark print. • Normal - works well with standard typed or printed documents. • Dark -works well with light print or faint pencil markings. Redials Specifies the number of redial attempts (0 to 13). If you enter 0, the machine will not redial.
Using special features The fax function includes some special features (phonebook, broadcast, and delay send) designed to make faxing a document faster and easier. You can access these special features on the machine operator panel or through the operator panel menus. Phonebook The phonebook is a directory of frequently used numbers that you can assign to specific keys for quick dialing when sending a fax. These programmed numbers are called shortcuts.
Editing a shortcut 1 Press Phonebook until EDIT appears on the bottom line of the display, and then press Select. 2 Press a scroll button ( or ) until SHORTCUT appears on the bottom line of the display, and then press Select. 3 Enter the location of the shortcut that you want to edit. 4 Press the scroll buttons to edit the fax number, or press Select to edit the shortcut ID. When finished, press Select to return to the Phonebook menu. 5 To return to the Ready prompt, press Stop/Clear.
4 Using the keypad, enter the location of the group that you want to edit. 5 Enter the location of the shortcut that you want to edit and press Select, or press Return to edit the group ID. 6 Press Select. 7 To return to the Ready prompt, press Stop/Clear. Using shortcuts and groups 1 Place your document in either the ADF or on the scanning bed.
4 Press a scroll button until DELAY SEND appears on the bottom line of the display, and then press Select. 5 Enter the fax number to which you want to send, and then press Select. The operator panel prompts you for another number. 6 Using the numeric keypad, press 1 (for Yes) if you have another number, or 2 (for No) if you have entered the last number.
Clearing display messages Display Cancel? Meaning The memory is full and unable to store all the pages of the document. Solutions To cancel the fax job, press 1 (for Yes). If you want to send the pages that were stored, press 2 (for No). Note: You should send the remaining pages later when memory is available. COMM. ERROR Facsimile communication problem has occurred. Ask the sender to resend the fax.
8 Reports Your machine can print reports containing a wide range of important information. Here are some examples of the different types of reports: Report Content Phonebook Current shortcuts and groups stored in the machine. Sent Most recent faxes sent. Received Most recent faxes received. Pending Pending fax jobs that have been entered using the Delay Send feature. Confirmation Faxes that have been confirmed received. Settings Current default settings. Power Fail • Time the power failed.
9 Maintenance Cleaning the machine To maintain print quality, follow these cleaning procedures each time the toner cartridge is replaced or if print quality problems occur. Warning: • • • Do not put water directly onto any part of the machine. Do not use ammonia-based cleaners or volatile solvents, such as thinner, on the machine. While cleaning the inside of the machine, be careful not to touch the transfer roller located under the toner cartridge. Oil from your fingers can affect print quality.
Cleaning the inside of the machine During the printing process, paper, toner, and dust particles can accumulate inside the machine. This buildup can cause print quality problems, such as toner specks or smearing. Cleaning the inside of the machine eliminates or reduces these problems. 1 Turn the machine off, unplug the power cord, and then wait for the machine to cool down. 2 Open the front cover and remove the toner cartridge.
5 Reinsert the toner cartridge and close the cover. 6 Plug in the power cord and turn the machine on. Cleaning the scan unit Keeping the scan unit clean helps ensure the best possible copies. You should clean the scan unit as needed. To clean the scan unit: 1 Slightly dampen a soft, lint-free cloth or paper towel with water. 2 Open the document cover. 3 Wipe the surfaces of the document glass and ADF until they are clean and dry.
Redistributing toner When the toner cartridge is near the end of its life, white streaks or light print occurs. The Toner Low indicator lights up and the LCD displays the message TONER LOW. To temporarily reestablish print quality by redistributing the remaining toner in the cartridge: 1 Open the front cover. 2 Pull the toner cartridge out, and then gently shake the cartridge to distribute the toner evenly.
Replacing the toner cartridge If the toner runs out, the message TONER EMPTY appears on the display and blank pages print. Note: Incoming faxes will not print if this message appears. To replace the toner cartridge: 1 Open the front cover. 2 Pull the toner cartridge out. Note: Return the empty toner cartridge to Lexmark for appropriate environmental handling. See page 68 for more information.
3 Unpack the toner cartridge and gently shake it horizontally four or five times to distribute the toner evenly. Note: Save the packaging, and use it to return your empty cartridge to Lexmark. For more information, see page 68. 4 Slide the toner cartridge in until it locks into place. 5 Close the front cover.
Returning the empty toner cartridge Using the Lexmark Cartridge Return Program is a free and easy way to return cartridges directly to Lexmark for appropriate environmental handling. Place the empty cartridge into the box from the new replacement cartridge. Reseal the box with clear packing tape, and then apply a prepaid return shipping label. (The shipping label is available online at www.lexmark.com/or at no cost to you.) Note: Details may vary by country, but the program is always available at no charge.
10 Troubleshooting Preventing document and paper jams Follow these tips to help prevent document and paper jams. • Use only recommended print materials. • Do not mix paper types in the paper tray. • Do not use creased, damp, or curled paper. • Flex, fan, and straighten the paper before loading. • Make sure the adjustable paper guides are positioned correctly. • Make sure the recommended print side has the correct orientation when loading paper in the paper tray and the manual bypass.
Clearing document jams The message DOCUMENT JAM appears on the display if a document jams while feeding through the ADF. ADF misfeed 1 Open the ADF top cover CAUTION: Keep hair and personal articles away from moving parts to avoid getting them caught in the roller.
2 If more than one inch of your document has passed beneath the ADF roller, close the ADF top cover, and then proceed with the instructions for clearing a jam in “Roller misfeed” on page 72. If an inch or less is engaged in the ADF, gently pull the document out. 3 Close the ADF top cover, and then load the documents back into the ADF. Note: To prevent document jams, use the document glass, rather than the ADF, for thick, thin, or a mixed set of documents.
Output misfeed 1 Open the document cover and turn the release knob to remove the misfed documents from the exit area. 2 Close the document cover, and then load the documents back into the ADF. Roller misfeed 1 Open the document cover and turn the release knob to so that you can easily access the misfed document. 2 Remove the document from the ADF or the feed area by carefully pulling it with both hands. 3 Close the document cover, and then load the document back into the ADF.
Clearing paper jams The message PAPER JAM appears on the display if paper loaded in the output tray jams during processing. Use the following table to locate and clear the paper jam. Message Location of jam Go to... PAPER JAM 0 Paper feed area page 73 PAPER JAM 1 Paper exit area page 75 PAPER JAM 2 Fuser and toner cartridge areas page 77 BYPASS JAM Manual bypass area page 78 Note: To avoid tearing the paper, pull the paper out gently and slowly.
3 Remove the jammed paper by gently pulling it straight out. If there is any resistance when you pull the paper, or the paper is not seen in this area, continue with the instructions for clearing a jam in the fuser and toner cartridge areas on page 77. 4 Insert the paper tray until it snaps into place.
5 Open and close the front cover to resume printing. Paper exit area (PAPER JAM 1) 1 Open and close the front cover. The jammed paper automatically exits. If the paper does not exit, continue with step 2. 2 Gently pull the paper out of the front output tray.
3 If there is any resistance when you pull the paper, or the paper is not seen in the front output tray, open the rear cover. 4 Remove the jammed paper by gently pulling it straight out. 5 Close the rear cover. 6 Open and close the front cover to resume printing.
Fuser and toner cartridge areas (PAPER JAM 2) CAUTION: The fuser area is hot. Avoid contact with the fuser area to prevent burns. 1 Open the front cover and remove the toner cartridge. 2 Remove the jammed paper by gently pulling it straight out. 3 Reinstall the toner cartridge and close the front cover. Printing automatically resumes.
Manual bypass area (BYPASS JAM) The message BYPASS JAM appears on the display if paper is loaded improperly in the manual bypass. To clear a jam in the manual bypass: 1 Remove the jammed paper by gently pulling it straight out. 2 Open and close the front cover.
Clearing display messages Display Meaning Solution BYPASS JAM No feeding from the manual bypass. Load paper in the manual bypass or remove the jam from the manual bypass. DOCUMENT JAM Jam in the ADF. Clear the jam. DOOR OPEN Front or rear cover is not securely latched. Close the covers until they lock. FUSER ERROR Problem in the fuser unit. Unplug the power cord and plug it back in. If the problem persists, call for service. LOAD BYPASS No document loaded in the manual bypass.
Paper feeding problems Symptom Possible cause and solution Paper jam. Clear the paper jam. See page 73. Paper sticks together. • Ensure that there is not too much paper in the paper tray. Depending on the thickness of your paper, the paper tray can hold up to 250 sheets of paper. • Make sure that you are using the correct type of paper. See page 21. • Remove paper from the paper tray and flex or fan the paper. • Humid conditions may cause some paper to stick together. Multiple sheets do not feed.
Printing and copying problems Problem Machine does not print. Print job is extremely slow. Possible cause Solution Machine is not receiving power. • Check the power cord connections. • Check the power switch and the power source. Machine is busy scanning. Wait until scanning is complete before using the printer. Machine is not selected as the default printer. Select Lexmark X215 as your default printer in Windows. Front or rear covers are not closed. Close the covers. Paper jam.
Problem Machine prints, but the text is wrong, garbled, or incomplete. Possible cause Printer cable is loose or defective. Solution • Disconnect the printer cable, and then reconnect it. • Try a print job that you have already printed successfully. • If possible, attach the cable and the machine to another computer and try another print job. • Try a new printer cable. Wrong printer driver selected. Check the program’s printer selection menu to ensure that your machine is selected.
Problem Possible cause Solution Copy image is skewed. Original document not positioned correctly. • Ensure the original is positioned correctly on document glass or that ADF paper guides are aligned. See page 49. • Check that paper is loaded correctly. Blank copies. Original document not positioned correctly. Ensure that the original is facedown on the document glass or faceup in the ADF. Image rubs off the copy easily. • Ensure the correct media type is selected.
Scanning problems Problem Possible cause and solution Scanner does not work. • Your machine may be busy printing. Wait until printing completes before using the scanner. • Make sure that you place the document to be scanned face down on the document glass, or face up in the Automatic Document Feeder. • Check that the USB or parallel cable is connected properly. • Check that the USB or parallel cable is not defective. Swap the cable with a known good cable. If necessary, replace the cable.
Problem Possible cause and solution Incoming fax has blank spaces or is received with a poor quality. • Fax machine sending you the fax may be faulty. • Fax machine sending you a fax may have a dirty document glass. Clean the document glass. • Noisy phone line can cause line errors. • Check your machine by making a copy. • Toner cartridge may be empty. Replace the toner cartridge. Some of the words on a incoming fax are stretched. Fax machine sending you the fax had a temporary jam.
Print quality problems Problem Light or faded print Solution If a vertical white streak or faded area appears: AaBbCc AaBbCc AaBbCc AaBbCc AaBbCc • The toner supply is low. You may be able to temporarily extend the toner cartridge life. See page 64. Toner specs • The paper may not meet specifications (for example, the paper is too moist or too rough). See page 22. • The paper path may need cleaning. See page 63.
Problem Gray background AaBbCc AaBbCc AaBbCc AaBbCc AaBbCc Toner smear Repetitive defects AaBbCc AaBbCc AaBbCc AaBbCc AaBbCc Background scatter A Misformed characters Solution If the amount of background shading becomes unacceptable, the procedures below may fix the problem. • Use lighter weight pages. See page 21. • Check the machine’s environment. Very dry (low humidity) or humid (higher than 80% RH) conditions can increase the amount of background shading. • Install a new toner cartridge.
Problem Solution Page skew • Check the paper type and quality. See page 21. • Ensure that the paper or other material is loaded correctly and the guides are not too tight or too loose against the paper stack. See page 21. AaBbC AaBbCcc AaBbCc AaBbCc AaBbCc Curl or wave Wrinkles or creases • Check the paper type and quality. Both high temperature and humidity can cause paper curl. See page 21. • Turn over the stack of paper in the paper tray. Also try rotating the paper 180° in the tray.
Problem Loose toner Solution Clean the inside of the machine. • Check the paper type and quality. See page 21. • Install a new toner cartridge. See page 65. • If the problem persists, the machine may require repair. Contact a service representative. Character voids A Horizontal stripes AaBbCc AaBbCc AaBbCc AaBbCc AaBbCc Character voids are white areas within the parts of characters that should be solid black: • If you are using transparencies, try another type of transparency.
Notices Safety information • If your product is not marked with this symbol that is properly grounded. , it must be connected to an electrical outlet CAUTION: Do not use the fax feature during a lightning storm. Do not set up this product or make any electrical or cabling connections, such as the power cord or telephone, during a lightning storm. • The power cord must be connected to an electrical outlet that is near the product and easily accessible.
Laser notices The following laser notice label may be affixed to this machine: Laser advisory label Laser notice The machine is certified in the U.S. to conform to the requirements of DHHS 21 CFR Subchapter J for Class I (1) laser products, and elsewhere is certified as a Class I laser product conforming to the requirements of IEC 60825-1. Class I laser products are not considered to be hazardous.
device may not cause harmful interference, and (2) this device must accept any interference received, including interference that may cause undesired operation. The FCC Class B limits are designed to provide reasonable protection against harmful interference in a residential installation. This equipment generates, uses, and can radiate radio frequency energy and, if not installed and used in accordance with the instructions, may cause harmful interference to radio communications.
States relating to electromagnetic compatibility and safety of electrical equipment designed for use within certain voltage limits and on radio equipment and telecommunications terminal equipment. A declaration of conformity with the requirements of the directives has been signed by the Director of Manufacturing and Technical Support, Lexmark International, S.A., Boigny, France. This product satisfies the Class B limits of EN 55022 and safety requirements of EN 60950.
Telecommunications notices Federal Communications Commission (FCC) compliance information statement This equipment complies with Part 68 of the FCC rules and the requirements adopted by the Administrative Council for Terminal Attachments (ACTA). On the back of this equipment is a label that contains, among other information, a product identifier in the format US:AAAEQ##TXXXX. If requested, this number must be provided to your telephone company.
The Telephone Consumer Protection Act of 1991 makes it unlawful for any person to use a computer or other electronic device, including fax machines, to send any message unless said message clearly contains in a margin at the top or bottom of each transmitted page or on the first page of the transmission, the date and time it is sent and an identification of the business or other entity, or other individual sending the message, and the telephone number of the sending machine or such business, other entity, o
the line, or can have them removed by calling the German network provider. Normally, metering pulses are not provided unless specifically requested by the subscriber at the time of installation. Using the Lexmark X215 in Switzerland The Lexmark X215 requires a Swiss billing tone filter (Lexmark part number 14B5109) to be installed on any line which receives metering pulses in Switzerland. The Lexmark filter must be used, as metering pulses are present on all analog telephone lines in Switzerland.
Lexmark and Lexmark with diamond design are trademarks of Lexmark International, Inc., registered in the United States and/or other countries. © 2003 Lexmark International, Inc. 740 West New Circle Road Lexington, Kentucky 40550 www.lexmark.