Lexmark Z12 Color Jetprinter TM User’s Guide for Windows 95 and Windows 98
Edition: January 2000 The following paragraph does not apply to any country where such provisions are inconsistent with local law: LEXMARK INTERNATIONAL, INC., PROVIDES THIS PUBLICATION “AS IS” WITHOUT WARRANTY OF ANY KIND, EITHER EXPRESS OR IMPLIED, INCLUDING, BUT NOT LIMITED TO, THE IMPLIED WARRANTIES OF MERCHANTABILITY OR FITNESS FOR A PARTICULAR PURPOSE. Some states do not allow disclaimer of express or implied warranties in certain transactions; therefore, this statement may not apply to you.
Contents Contents Printing 1 Step 1: Insert the appropriate print cartridge 1 Step 2: Load the print media 2 Step 3: Customize the printer settings 4 Step 4: Print your document 6 Maintaining your printer 7 Using the Control Program 7 Improving print quality 8 Preserving print cartridges 12 Troubleshooting 13 Printer prints slowly or doesn’t print 14 Paper misfeeds or jams 16 Document prints with mistakes or poor quality 17 Problems with transparencies or envelopes 19 Error messages and flashing lights 20
Energy Star 25 Power supply 25 Safety information 25 Printer parts 26 Index 27 • • iv • Contents • •
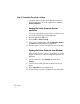
Printing 1 Printing For information about setting up your printer, refer to the setup sheet. See page 26 for a diagram of the printer parts. Printing with your printer is as easy as: 1 2 3 4 Insert the appropriate print cartridge (see next section). Load the print media (see page 2). Customize the printer settings (see page 4). Print your document (see page 6). Step 1: Insert the appropriate print cartridge Your printer uses one cartridge at a time: either a black cartridge or a color cartridge.
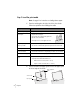
Step 2: Load the print media Note: See page 3 for instructions on loading banner paper. 1 Place the media against the right side of the sheet feeder. Follow these guidelines when loading print media: Load up to: Make sure: 100 sheets of plain paper • The print side is facing you. 10 envelopes • The print side is facing you. • The envelopes are loaded vertically against the right side of the sheet feeder. • The stamp location is in the upper left corner.
Loading banner paper Although the paper support holds up to 20 sheets of banner paper, load only the number of sheets needed to make your banner. For example, if your banner is 12 sheets long, load only 12 sheets. Printing Use banner paper recommended for inkjets only. We do not recommend using continuous form paper for dot matrix printers. 1 Remove any paper from the sheet feeder. 2 Load the banner paper: a Pull the paper support up slightly to unlock the front tabs.
Step 3: Customize the printer settings Your printer software includes several applications that let you perform printing tasks. One of these applications is called the Printer Properties. Opening the Printer Properties from an application This lets you change printer settings ONLY for the documents you are currently creating in your software application. 1 Open the application’s File menu. 2 Choose Print (or Printer) Setup.
Click the... Document/Quality tab to: Paper tab to: • • • • Select a paper size. Select a page orientation. Set the number of copies to print. Reverse the printing order of your document pages. The first page of your document will be on top of the stack in the paper exit tray. • Collate your document. Printing The Printer Properties application includes two tabs: Paper and Document/Quality. Each tab contains settings for operating your printer and its software.
Customizing printer settings for specialty papers The Printer Properties settings were initially set to the default settings. Use the default settings for printing on plain paper. To change your printer settings for printing on specialty papers, use the following table. When you Click this are printing Printer on: Properties tab: To make these selections: Envelopes Paper From the Paper Size area, scroll to select the appropriate envelope size.
2 Maintaining your printer The Control Program lets you monitor your printer and install or replace print cartridges. To open the Control Program, from the Start menu click: 1 2 3 Programs. Lexmark Z12 Series. Lexmark Z12 Control Program. Click the... Cartridge tab to: Status tab to: • • • • Monitor the status of your print job. Cancel your print job. Print a test page. View your ink level. Options tab to enable/disable various printer software functions, such as Sound Effects and Buffer Mode.
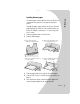
Improving print quality Installing or replacing your print cartridge 1 Make sure the Power light is On. Power light 2 Paper Feed light Raise the front cover. The print cartridge carrier moves to the loading position unless the printer is busy. Front cover Print cartridge carrier in the loading position 3 • • 8 • Chapter 2 • • Remove the old print cartridge. Store it in the print cartridge storage unit (see page 12) or dispose of it.
4 5 6 7 8 a If you are installing a b Insert the print c Push back firmly on new cartridge, cartridge into the the cartridge until it snaps securely into remove the sticker print cartridge carrier. and transparent tape place. on the bottom of the print cartridge. Close the front cover. From the Control Program’s Cartridge tab, select Install/Change Cartridge. For help, see page 7. Select the type of cartridge you installed and click OK.
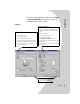
Aligning the print cartridge 1 2 Load plain paper in the printer. From the Control Program’s Cartridge tab, select Align Cartridge. For help, see page 7. Your printer prints an alignment test page and a dialog box displays. The test page that prints has a group of alignment patterns. Each pattern has a number under it. 3 Find the number under the alignment pattern that comes closest to forming a straight line. In the example, pattern 3 comes closest to forming a straight line.
If you have a color cartridge installed in your printer, the printer prints a nozzle test pattern similar to the one shown: Compare the diagonal line above the printed bars to the diagonal line below the printed bars. Look for a break in the diagonal line above the printed bars. A broken line indicates clogged nozzles. Maintaining your printer 3 Note: In the examples above, there are no broken lines, indicating that the nozzles are not clogged.
Preserving print cartridges To ensure the longest life from your print cartridge and optimum performance from your printer: • Keep a new print cartridge in its packaging until you are ready to install it. • Do not remove a print cartridge from the printer except to replace, clean, or store it (see the following section). The print cartridge does not print correctly if removed from the printer and left exposed for an extended period of time.
3 Paper misfeeds or jams (see page 16) Document prints with mistakes or poor quality (see page 17) Problems with transparencies or envelopes (see page 19) Error messages and flashing lights (see page 20) From the list of printing problems in the left margin, select a category that describes your printing problem, and then read the category for the solution. Note: See page 26 for an explanation of printer parts, including the buttons, lights, and locations of cable connections.
• If you are using a parallel cable, make sure that two-way communications is enabled in your printer software: 1 From the printer’s Control Program, click the Options tab. 2 Make sure Disable Printer to PC Communications is not selected. Printer prints slowly or doesn’t print Your printer and your computer may not be able to communicate properly.
Printer prints very slowly Note: Photos or documents containing graphics may take longer to print than regular text. Printer ejects a blank page after appearing to print Make sure: • You have removed the sticker and transparent tape on the bottom of the print cartridge. For help, see page 9. • Your Lexmark printer is set as the default printer. Troubleshooting • Close any open applications not in use. • Select a lower Print Quality setting in the Printer Properties. For help, see page 4.
Test page does not print Make sure: • Your print cartridge is installed properly. For help, see page 8. • You are using the correct cable, and it is not damaged. If you are using a parallel cable, make sure it is an IEEE 1284compliant parallel cable that supports bidirectional printing. • Your Lexmark printer is set as the default printer. Paper misfeeds or jams Paper misfeeds Make sure: • You are using a paper recommended for inkjet printers.
Printer has a paper jam Remove the paper from the sheet feeder. If the paper is lodged too far into the printer and can’t be removed: 1 2 Document prints with mistakes or poor quality Vertical straight lines are not smooth Troubleshooting 3 4 5 Press the Power button to turn the printer Off. Pull firmly on the paper to remove it. If you can’t reach the paper because it is too far into the printer, raise the front cover and pull the paper out. Close the front cover.
Printed pages have alternating bands of light and dark print (intermittent printing) • Make sure Enable Buffer Mode is selected on the Options tab of the Control Program. For help, see page 7. • Select High 1200dpi Print Quality on the Document/Quality tab in the Printer Properties. For help, see page 4. • Your printer may have two-way communications problems. For help, see page 14.
Characters are missing or unexpected • Make sure your Lexmark printer is selected as the default printer. • Your printer may have two-way communication problems. For help, see page 14. • When you change printer settings from your application, the settings apply only to the specific document you opened with that application. To make the settings apply to all documents, change the settings from Windows. See page 4 for more information.
Error messages and flashing lights Paper Jam message For help, see page 17. Power light Paper Feed light Ink Low message The print cartridge is running out of ink. Purchase a new print cartridge. For help replacing your print cartridge, see page 8. The Power light is On and the Paper Feed light is blinking • If the printer is out of paper: 1 Load paper. 2 Press the Paper Feed button. • If the printer has a paper jam, see page 17 for help.
Appendix In this section, you can find information about: Installing printer software Uninstalling printer software Printing from DOS Warranty Notices Safety Printer parts Installing printer software You can obtain the printer software using: • the compact disc (CD-ROM) that came with your printer • the World Wide Web • diskettes If your printer software does not install properly, a communications error message appears when you try to print.
b In the command-line text box, type the letter of your CD-ROM drive, followed by :\setup (for example, d:\setup), and then click OK. 2 When the Lexmark Z12 software installation screen appears, select Tools. 3 Select Create Diskettes. If your printer software does not install properly or your printer port is not set to the correct port, you may need to uninstall, and then reinstall the printer software. Lexmark International, Inc.
present the feature or option with the product. • If you transfer this product to another user, warranty service under the terms of this statement is available to that user for the remainder of the warranty period. You should transfer proof of original purchase and this statement to that user. The warranty period is 12 months and starts on the date of original purchase as shown on the purchase receipt. To obtain warranty service you may be required to present proof of original purchase.
damages. This is true even if you advise Lexmark or a Remarketer of the possibility of such damages. Lexmark is not liable for any claim by you based on a third party claim. This limitation of remedies also applies to any developer of materials supplied to Lexmark. Lexmark’s and the developer’s limitations of remedies are not cumulative. Such developer is an intended beneficiary of this limitation.
safety of electrical equipment designed for use within certain voltage limits. A declaration of conformity with the requirements of the Directive has been signed by the Director of Manufacturing and Technical Support, Lexmark International, S.A., Boigny, France. Japanese VCCI notice The United Kingdom Telecommunications Act 1984 This apparatus is approved under the approval number NS/G/1234/J/100003 for the indirect connections to the public telecommunications systems in the United Kingdom.
Printer parts Paper Feed button Power button Press to turn the printer on or off. Press to load paper, eject paper, or continue printing. Paper support Holds paper upright in the sheet feeder. Sheet feeder Load paper here. Front cover Lights See page 20 for more explanation. Paper guide Open to install a print cartridge or clear paper jams. Paper exit tray Position next to paper for proper feeding. Print cartridge storage unit Store the cartridge (black or color) not currently in use.
Index A aligning print cartridge 10 B C cards loading 2 setting recommendations 6 cartridge, print aligning 10 cleaning nozzles 10 installing 8 part numbers 1 replacing 8 storing 12 D diagram of printer parts 26 diskettes, installing printer software 21 DOS printing 7, 22 downloaded printer driver installing 21 Paper Jam 17 Printer Offline 15 European Community Directives Conformity notice 24 F Index banding 18 banners loading 2, 3 printing 3 recommended paper 3 selecting in Printer Properties 3 sett
ink cartridge See print cartridge Ink Low message 20 installing print cartridge 8 printer software 21 intermittent printing 18 internet printing Web Smoothing 5 iron-on transfers loading 2 setting recommendations 6 J Japanese VCCI notice 25 L lights locating 26 Paper Feed 20 patterns 20 Power 20 loading banners 2, 3 custom size paper 2 envelopes 2 greeting cards 2 index cards 2 iron-on transfers 2 postcards 2 transparencies 2 location of printer parts 26 M messages, error Ink Low 20 Paper Jam 17 Printer
R replacing, print cartridge 8 reverse page order 5 S safety information 25 setting recommendations banner paper 6 cards 6 custom size paper 6 envelopes 6 greeting cards 6 index cards 6 iron-on transfers 6 postcards 6 transparencies 6 sheet feeder locating 26 software, printer Control Program 7 downloading 21 installing 21 Printer Properties 4 uninstalling 22 solving printer problems See troubleshooting Statement of Limited Warranty 22 supplies, ordering 7 T test page alignment 10 does not print 16 nozzl
W warranty statement 22 Web Smoothing 5 • • 30 • Index • •