Lexmark Z22/Z32 ™ Color Jetprinter™ User’s Guide for Windows 95 and 98, and Mac OS 8.
Edition: April 2000 The following paragraph does not apply to any country where such provisions are inconsistent with local law: LEXMARK INTERNATIONAL, INC., PROVIDES THIS PUBLICATION “AS IS” WITHOUT WARRANTY OF ANY KIND, EITHER EXPRESS OR IMPLIED, INCLUDING, BUT NOT LIMITED TO, THE IMPLIED WARRANTIES OF MERCHANTABILITY OR FITNESS FOR A PARTICULAR PURPOSE. Some states do not allow disclaimer of express or implied warranties in certain transactions; therefore, this statement may not apply to you.
Contents Contents Basic printing for Windows 1 Step 1: Load the paper 1 Step 2: Customize the printing options 3 Step 3: Print your document 6 Basic printing for Macintosh 7 Step 1: Load the paper 7 Step 2: Customize the printing options 9 Step 3: Print your document 14 Maintaining your printer 15 Using the Control Program in Windows 15 Using the Control Panel in Macintosh 16 Installing or replacing print cartridges 17 Improving print quality 18 Troubleshooting 23 Printer prints slowly or doesn’t print 23
Appendix 31 Installing printer software 31 Uninstalling printer software for Windows 33 Uninstalling printer software for Macintosh 33 Printing from DOS 33 Electronic emission notices 33 Energy Star 34 Power supply information 34 Safety information 34 Statement of limited warranty 35 Index 37 • • • • iv •
Basic printing for Windows Basic printing for Windows This chapter describes how to use your printer with Windows 95 and Windows 98. For help using your printer with Mac OS 8.6 or Mac OS 9, see page 7. For help using your printer with Windows NT 4.0 or Windows 2000, refer to the User’s Guide button on the Printer Software CD.
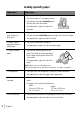
Loading specialty paper Load up to: Make sure: 10 envelopes • The print side is facing you. • The stamp location is in the upper left corner. • The envelopes are loaded vertically against the right side of the sheet feeder. • The paper guide is against the side of the envelopes. 10 greeting cards, index cards, postcards, or photo cards • The print side is facing you. 25 sheets of photo paper, glossy paper, or coated paper • The glossy or coated side is facing you.
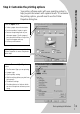
Step 2: Customize the printing options Basic printing for Windows Your printer software works with your operating system to help you print documents with superior results. To customize the printing options, you will need to use the Printer Properties dialog box. Click the Paper tab to: • Select a paper size and orientation. • Set the number of copies to print. • Reverse the printing order of your document pages. The first page of your document will be on top of the stack in the paper exit tray.
Changing the Printer Properties from an application You can open the Printer Properties from almost any application. This lets you change printer settings ONLY for the document you are currently creating in the application. To open the Printer Properties from an application: 1 Open the application’s File menu. 2 Choose Print (or Printer) Setup. 3 In the Printer Setup dialog box, click the Properties, Option, or Setup button (depending on the application). 4 Change settings as needed (see page 3).
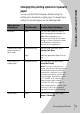
Basic printing for Windows Changing the printing options for specialty paper You can use the Printer Properties default settings for printing most documents on plain paper. To change these settings for specialty paper, use the following table: When you are printing on: Click this tab: To make these selections: Envelopes Paper From the Paper Size area, scroll to select the appropriate envelope size. Note: Many applications are designed to override the envelope settings in Printer Properties.
When you are printing on: Sheets of custom size paper Click this tab: To make these selections: Paper • From the list of Paper Sizes, scroll to select Custom. • Enter the dimensions for your custom paper size. For help, see “Loading specialty paper” on page 2. Iron-On transfers Document/Quality From the Paper Type area, select IronOn Transfer. Note: To ensure that the iron-on transfer will print correctly, you may want to print on plain paper before printing on an iron-on transfer.
Basic printing for Macintosh Basic printing for Macintosh This chapter describes how to use your printer with Mac OS 8.6 and Mac OS 9. For help using your printer with Windows 95 or Windows 98, see page 1. For help using your printer with Windows NT 4.0 or Windows 2000, refer to the User’s Guide button on the Printer Software CD.
Loading specialty paper Load up to: Make sure: 10 envelopes • The print side is facing you. • The stamp location is in the upper left corner. • The envelopes are loaded vertically against the right side of the sheet feeder. • The paper guide is against the side of the envelopes. 10 greeting cards, index cards, postcards, or photo cards • The print side is facing you. 25 sheets of photo paper, glossy paper, or coated paper • The glossy or coated side is facing you.
Step 2: Customize the printing options Basic printing for Macintosh Your printer software works with your operating system to help you print documents with superior results. To customize your printing options, you will need to use the Page Setup dialog box and the Print dialog box. Page Setup Click the Help button to access the printer driver help. { Click this pop-up menu to select a paper size. Click one of these to select the page orientation.
Print Click the Help button to access the printer driver help. Click this pop-up menu to select print settings. This area displays a summary of the current settings. From the pop-up menu, choose: Select: When you want to: General Copies type in the number of copies (1-99). Pages print all pages or a given page range. Print Last Page First print the pages in the reverse order. Wait for pages to dry add more time between pages as they exit the printer.
From the pop-up menu, choose: Color When you want to: ColorSync Color Matching select a printer profile to match the color on the screen to the color in the document. Built-in Color Matching let the printer driver match the color on the screen to the color in the document. Print in Foreground print quickly. Basic printing for Macintosh Background Printing Select: Note: Do not use your system while the document is printing. Print in Background •print most documents.
2 Choose Print.... The Print dialog box opens. 3 Change the settings as needed. 4 Select Save Settings. Changing the print settings from the desktop To change the print settings from the desktop: 1 From the desktop, open the File menu. 2 Choose Print.... The Print dialog box opens. 3 Change the settings as needed. 4 Select Save Settings.
When you are printing on: Open this dialog box: Sheets of custom size paper Page Setup From the Paper Size pop-up menu, select Edit Custom Paper Sizes and enter the dimensions for your custom paper size. Iron-On transfers Print On the Paper Type/Quality pane, select IronOn Transfer for the Paper Type. To make these selections: Basic printing for Macintosh Note: To ensure that the iron-on transfer will print correctly, you may want to print on plain paper before printing on an ironon transfer.
When you are printing on: Open this dialog box: Coated paper Print To make these selections: On the Paper Type/Quality pane, select Coated for the Paper Type. Step 3: Print your document 1 Open the File menu. 2 Choose Print.... The Print dialog box opens. 3 Select Print. Note: The Lexmark Z22 ships with a High Resolution Color cartridge only. You can instantly improve print speed and print quality by simply adding an optional Waterproof Black Cartridge (P/N 17G0050).
Using the Control Panel in Macintosh The Control Panel lets you perform printer maintenance and install or replace print cartridges. To open the Control Panel, choose: 1 Apple 2 Control Panels 3 Lexmark Z22/Z32 Control Panel Click the... Cartridges tab to: • • • • Install or change print cartridges. Align print cartridges for best print quality. Clean the print nozzles. Print a test page. Help button to access printer driver help. About tab to find the printer software version and copyright information.
Installing or replacing print cartridges 1 Make sure the Power light is On. Power light Paper Feed light Maintaining your printer 2 Raise the front cover. The print cartridge carrier moves to the loading position unless the printer is busy. Front cover Print cartridge carrier in the loading position 3 Remove the old print cartridge. Store it in an air-tight container or dispose of it.
Notes: If you installed a Lexmark Z32 printer driver, both cartridges must be installed before you can print. If you installed a combined Lexmark Z22/Z32 printer driver, you can print with either the black or color cartridge. It is not necessary to install two cartridges for printing. For the best possible photo quality, print with a photo and color cartridge combination in your printer. To replace the black cartridge with a photo cartridge, see page 17.
Your printer prints an alignment test page and the Align Cartridge dialog box displays. The test page that prints has alignment pattern(s), depending on the cartridge combination installed. Each pattern has a number under it. The test page that prints is similar to the one shown: Maintaining your printer 4 From each alignment group on the test page, find the number under the alignment pattern that comes closest to forming a straight line.
2 Open the Control Program for Windows or the Control Panel for Macintosh. 3 From the Cartridges tab, select Clean Print Nozzles. For help, see page 15 or 16. The printer feeds a sheet of paper and prints a nozzle test pattern similar to the one shown: Broken lines at the top of the page indicate clogged nozzles. Purge lines print when ink is forced through the print nozzles to unclog them. Unbroken lines at the bottom of the page indicate the nozzles were cleaned.
Maintaining your printer If the bottom line still has breaks, run the test up to two more times. • If the print quality is satisfactory after running the test three times, the print nozzles are clean. You do not need to complete the remaining steps. • If the print quality of both lines is not satisfactory after running the test three times, continue with step 4. 5 Remove and reinstall the print cartridge. 6 Repeat the nozzle test. 7 If the lines are still broken, wipe the print cartridge nozzles.
• Do not remove a print cartridge from the printer except to replace, clean, or store it in an air-tight container. The print cartridge will not print correctly if removed from the printer and left exposed for an extended period of time. Lexmark’s printer warranty does not cover repair of failures or damage caused by a refilled cartridge. Lexmark does not recommend use of refilled cartridges. Refilling cartridges can affect print quality and cause damage to the printer.
4 Paper misfeeds or jams, see page 26. Document prints with mistakes or poor quality, see page 27. Problems with transparencies photos, or envelopes see page 29. Error messages and flashing lights, see page 30. From the list of printing problems in the left margin, select a category that describes your printing problems, and then read the category for the solution. Troubleshooting Printer prints slowly or doesn’t print, see page 23.
• Error messages (such as Printer Offline) and job progress information do not display on your computer screen. Before proceeding, verify that: • The printer software has been installed correctly. See page 31. • The parallel or USB cable is securely attached to both the printer and the computer. • The printer is plugged in and turned On. If you have a switch box or other device (such as a scanner or fax) connected to the computer’s parallel port, make sure it supports bidirectional communication.
• Note: If you are printing photos or your document contains graphics, it may take longer to print than regular text. Printer is plugged in but doesn’t print, or you get a Printer Offline message Make sure: Troubleshooting • The printer is turned On and the paper is loaded correctly. • The parallel or USB cable is completely plugged into the printer. • The printer is set as the default printer. • For Windows, the print job is not being held or paused in the print queue.
• You are using the correct cable. If you are using a parallel cable, make sure it is an IEEE 1284-compliant parallel cable that supports bidirectional printing. Paper misfeeds or jams Paper misfeeds or multiple sheets feed through the printer Make sure: • You are using a paper recommended for inkjet printers. • You do not force the paper down into the printer when you load it. Align the top of the paper with the paper alignment guides on the paper support.
Printer does not feed envelopes or specialty paper If regular paper feeds without problems, make sure: Troubleshooting • You are loading the envelopes correctly. For help, see "Loading specialty paper"on page 2. • You are using an envelope size supported by your printer, and it is selected in Printer Properties for Windows and in Page Setup for Macintosh. • Your application is designed to print envelopes. Check the user’s documentation that came with your application.
• Test the cartridge alignment. For help, see page 18. • Clean the print nozzles. For help, see page 19. Print is too dark or smudged Make sure: • You let the ink dry before handling the paper. • The Paper Type setting matches the paper type loaded in the printer. • The paper is straight and unwrinkled. • The print quality setting is appropriate for the paper type. If you are printing on regular paper, select the Quick Print 600dpi Print Quality setting. • You may need to clean the print nozzles.
Colors on the printout differ from the colors on the screen Troubleshooting • An ink cartridge may be out of ink or low on ink. Check the ink level graphic on the Cartridges tab of your printer’s Control Program or Control Panel. • Use a different brand of paper. Every paper brand accepts ink differently and prints with slight color variations. • Remove any extra devices such as a scanner, and connect the printer to the parallel or USB port.
• Use a transparency or photo paper designed for an inkjet printer. Transparencies or photos contain white lines • Select the High Quality 1200dpi setting. • Your print nozzles may need cleaning. For help, see page 19. Error messages and flashing lights Paper Jam message For help, see page 26. Ink Low message Power light Paper Feed light Your print cartridge is running out of ink. Purchase a new print cartridge.
Appendix In this section, you can find information about: • Installing printer software • Uninstalling printer software • Notices • Safety • Warranty Installing printer software You can obtain the printer software using: • the compact disc (CD-ROM) that came with your printer • the World Wide Web • diskettes (Windows only) If your printer software does not install properly, a communications error message appears when you try to print. You may need to uninstall, and then reinstall the printer software.
Note for Macintosh users If your Macintosh computer locks up or freezes while printing, you may need to turn off the printer and computer, and then turn them back on. When you turn them back on, the printer driver’s spooler may attempt to start printing the job that was in the queue before the computer locked up. This could cause your system to lock up again. To recover from this problem: 1 Turn off the printer and the computer. 2 Hold down the Shift key and turn on the computer.
Note: No diskettes are available for use with Macintosh. Uninstalling printer software for Windows If your printer software does not install properly, or your printer is not installed to the correct port, you may need to uninstall, and then reinstall the software. To uninstall the printer software: Programs. 2 Select Lexmark Z22/Z32 Series. 3 Select Lexmark Z22/Z32 Series Uninstall. 4 Follow the instructions on your screen.
cables or by unauthorized changes or modifications to this equipment. Unauthorized changes or modifications could void the user's authority to operate this equipment. Note: To assure compliance with FCC regulations on electromagnetic interference for a Class B computing device, use a properly shielded and grounded cable such as Lexmark part number 1329605 for parallel attach or 43H5856 for USB attach. Use of a substitute cable not properly shielded and grounded may result in a violation of FCC regulations.
Statement of limited warranty Lexmark International, Inc., Lexington, KY This warranty applies to the United States and Canada. For customers outside the U.S. and Canada, refer to the countryspecific warranty information that came with your printer. Lexmark Z22 Color Jetprinter™ This Statement of Limited Warranty applies to this product if it was originally purchased for your use, and not for resale, from Lexmark or a Lexmark remarketer, referred to in this statement as “Remarketer.
• Maintenance by anyone other than Lexmark or a Lexmark authorized servicer • Operation of a product beyond the limit of its duty cycle • Failure to have installed a maintenance kit as specified (if applicable) • Use of printing media outside of Lexmark specifications • Use of other than Lexmark supplies (such as toner cartridges, inkjet cartridges, and ribbons) • Use of other than Lexmark product or component ALL EXPRESS AND IMPLIED WARRANTIES, INCLUDING THE IMPLIED WARRANTIES OF MERCHANTABILITY AND FITNES
Index A aligning print cartridges 18 B C cards Macintosh loading 8 settings 12 Windows loading 2 settings 5 cartridges, print aligning 18 Print dialog 10 Printer Properties 5 D default settings, changing Macintosh 12 Windows 5 diskettes, installing printer software 32 DOS printing 33 downloaded printer driver, installing 32 Index Background Printing options 11 banding 28 banner paper Macintosh loading 8 settings 13 Windows loading 2 settings 5 bidirectional communications 23 blinking lights Paper Fee
F Federal Communications Commission compliance information statement 33 flashing lights 30 foils Macintosh loading 8 settings 13 Windows loading 2 settings 6 G General options 9, 10 glossy paper Macintosh loading 8 settings 13 Windows loading 2 settings 5 greeting cards Macintosh loading 8 settings 12 Windows loading 2 settings 5 I improving print quality 18 index cards Macintosh loading 8 settings 12 Windows • • • • 38 • loading 2 settings 5 Industry Canada compliance statement 34 Ink Low message 30 in
print cartridge contacts, cleaning 21 print cartridges aligning 18 installing 17 preserving 21 removing 17 replacing 17 wiping nozzles 21 Print dialog for Macintosh 10 print nozzles 21 cleaning 19 wiping 21 print quality banding 28 different colors 29 faded colors 29 improving 18 missing colors 20, 29 smudged 28 too dark 28 troubleshooting 27 print settings,specialty paper Macintosh 12 Windows 5 printer driver downloading 32 installing 31, 32 uninstalling 33 printer driver Help Macintosh 9, 10 Windows 3 Pri
envelopes 12 glossy paper 13 greeting cards 12 index cards 12 iron-on transfers 13 photo cards 12 photo paper 13 postcards 12 transparencies 13 Windows banner paper 5 coated paper 5 custom size paper 6 envelopes 5 glossy paper 5 greeting cards 5 index cards 5 iron-on transfers 6 photo cards 5 photo paper 5 postcards 5 transparencies 6 sheet feeder 1, 7 software applications Control Panel 16 Control Program 15 software, printer installing 31 uninstalling 33 specialty papers Macintosh banner paper 8 coated pa