Lexmark Z53 Color Jetprinter User’s Guide for Windows 95 and Windows 98
Edition: February 2001 The following paragraph does not apply to any country where such provisions are inconsistent with local law: LEXMARK INTERNATIONAL, INC., PROVIDES THIS PUBLICATION “AS IS” WITHOUT WARRANTY OF ANY KIND, EITHER EXPRESS OR IMPLIED, INCLUDING, BUT NOT LIMITED TO, THE IMPLIED WARRANTIES OF MERCHANTABILITY OR FITNESS FOR A PARTICULAR PURPOSE. Some states do not allow disclaimer of express or implied warranties in certain transactions; therefore, this statement may not apply to you.
Contents Contents Steps to basic printing 1 Step One: Load the paper 2 Step Two: Customize the Printer Properties 5 Step Three: Print your document 8 Printing beyond the basics 9 Printing on both sides of a sheet of paper 9 Printing handouts 12 Printing booklets 15 Printing posters 18 Maintaining your printer 21 Using the Control Program 21 Installing or replacing print cartridges 22 Improving print quality 23 Troubleshooting 27 Printer prints slowly or doesn’t print 28 Paper misfeeds or jams 30 Document p
Energy star 38 Safety information 38 Index 39 • • iv • • •
Steps to basic printing This book describes how to use your printer on Windows 95 and Windows 98. For help using your printer with: • Windows NT 4.0 or Windows 2000, refer to the User’s Guide button on the Printer Software CD for Windows. • Macintosh OS 8.6 or higher, refer to the User’s Guide icon found in the desktop Lexmark Z53 folder.
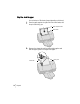
Step One: Load the paper You can load up to 100 sheets of paper (depending on thickness). 1 Place the paper against the right side of the sheet feeder, with the print side facing you. Paper alignment marks Sheet feeder 2 Squeeze the release tab and the paper guide together and slide the paper guide to the edge of the paper.
Follow these guidelines when loading specialty papers: Load up to: Make sure: 10 envelopes • the print side is facing you. • the envelopes are loaded vertically against the right side of the sheet feeder and the paper guide is against the edge of the envelopes. • The stamp location is in the upper left corner. 10 greeting cards, index cards, postcards, or photo cards • the print side is facing you. 25 sheets of photo paper • the print side is facing you.
Load up to: Make sure: up to 100 sheets of customsized paper • the print side is facing you and the paper guide is against the side of the paper. • your paper size fits within these dimensions: - Width dimensions: 76 mm to 216 mm 3.0” to 8.5” - Length dimensions: 127 mm to 432 mm 5.0” to 17.0” 25 iron-on transfers • you load the iron-on transfers following the instructions on the package. • the paper guide is against the side of the iron-on transfers.
Your printer software includes several applications that let you easily perform printing tasks. One of these applications is called Printer Properties. The Printer Properties application include four tabs: Job Finishing, Paper, Document/Quality, and Advanced. Each tab contains settings relating to the operation of your printer and its software.
Click the... Paper tab to: • Select a paper size and orientation • Set the number of copies to print • Reverse the printing order of your document pages. The first page of your document will be on top of the stack in the paper exit tray.
When your printer software was first installed, the Printer Properties settings were set to the default settings. Use the default settings for printing most documents on plain paper. To change your printer settings for printing on specialty papers, use the following table: When you are printing on this specialty paper: Click this Printer Properties tab: To make these selections: Envelopes Paper From the Paper Size area, scroll to select the appropriate envelope size.
When you are printing on this specialty paper: Click this Printer Properties tab: To make these selections: Sheets of custom size paper Paper From the list of Paper Sizes, scroll to select Custom. Enter the dimensions for your custom paper size. For help, see “Loading specialty papers” on page 3. Iron-on transfers Document/Quality From the Paper Type area, select Iron-On Transfer. Transparencies Document/Quality From the Paper Type area, select Transparency.
Printing beyond the basics You can use your printer to print: • • • • on both sides of a sheet of paper (see the next section) handouts (see page 12) booklets (see page 15) posters (see page 18) Printing beyond the basics 2 Printing on both sides of a sheet of paper Your Lexmark printer lets you print on both sides of a sheet of paper. Besides saving paper, this feature is helpful when you want to print booklets or tablets.
Step Two: Customize the Printer Properties for your two-sided print job 1 2 3 Open the Printer Properties. For help, see page 5. Select the page orientation and size: a Click the Paper tab. b Select the appropriate Paper Size. Size c Select Portrait or Landscape orientation. Customize the Printer Properties for two-sided printing: a Click the Job Finishing tab. b Select Two-sided printing.
Step Three: Print your two-sided document 1 a When the entire stack is finished printing, remove the stack. b Flip the stack of paper. c Insert the stack of paper and instruction page with the printed side facing away from you and the arrows pointing down. 3 4 Printing beyond the basics 2 From your application’s File menu, select Print. Print The oddnumbered pages print first. When the first side of all your two-sided document is finished printing, your printer software prompts you to reload the paper.
Printing handouts You can conserve paper by printing handouts or multiple page images on a single sheet of paper. Step One: Load the paper Four page images on a single sheet of paper Load up to 100 sheets of paper against the right side of the sheet feeder. For help, see page 2. Step Two: Customize the Printer Properties for handouts You can print your handouts on one side of the paper, or on both sides of the paper. 1 2 3 • • 12 • Chapter 2 • • Open the Printer Properties. For help, see page 5.
4 a Click the Job Finishing tab. b Select Handout. Handout c Select the Number of Prints (page images) to print on a single sheet. The graphic shows three PortraitPortrait oriented page images with Page Borders Borders. d To print a representation of the paper edges for each page image, select Print Page Borders. Borders 5 Printing beyond the basics Customize the Printer Properties for printing handouts: The screen graphic changes as you make selections, showing how the printed page will look.
Step Three: Print your handouts 1 2 3 From your application’s File menu, select Print. Print From the Print dialog box, click OK or Print (depending on the application). • If you formatted your handouts to print on one side of each page, go to step 5. • If you formatted your handouts for two-sided printing, continue with printing the second side of your handouts. When the first side of all your handouts is finished printing, your printer software prompts you to reload the paper.
Printing booklets Step One: Load the paper Load up to 100 sheets of paper against the right side of the sheet feeder. For help, see page 2. Step Two: Customize your Printer Properties 1 2 3 4 5 6 Select the correct paper size in your software application. You can select from these paper sizes when printing booklets: • Statement • Letter • A4 • A5 Open the Printer Properties. For help, see page 5. Click the Job Finishing tab. Select Booklet.
Step Three: Print your booklet 1 2 3 From your application’s File menu, select Print. Print From the Print dialog box, click OK or Print (depending on the application). When the first side of your booklet is finished printing, your printer software prompts you to reload the paper. a When the entire stack is finished printing, remove the stack. b Flip the stack of paper. c Insert the stack of paper and instruction page with the printed side facing away from you and the arrows pointing down. 4 5 Click OK.
Building a booklet 1 2 Five bundles stacked to form a booklet. 3 4 Take the first bundle from the paper exit tray, fold it in half and set it aside. Take the next bundle, fold it in half, and stack it on top of the first bundle. Stack the rest of your bundles, one on top of the other, until your booklet is complete. Bind the bundles together to complete your booklet. Printing beyond the basics Printing beyond the basics Once your document prints, stack the bundles together and bind your booklet.
Printing posters You can use the printer software to enlarge the size of your printout. For example, you can enlarge a photograph to poster size. Note: The poster finishing option is designed to print a single-page as a 4, 9, or 16-page poster. A single page enlarged to a nine page poster. Step One: Load the paper Load up to 100 sheets of paper against the right side of the sheet feeder. For help, see page 2. Note: For the best print quality, use a heavy-weight paper.
Step Three: Print and assemble your poster From your application’s File menu, select Print. Print From the Print dialog box, click OK or Print (depending on the application). Note: If you need to reprint a specific page(s) of your poster, skip to the next section. 3 Printed pages with the white edge trimmed from two adjacent sides On each printed page, trim the white edges from two adjacent sides. For example, trim the white edge from the top and left sides of each page.
Selecting specific pages to print You can reprint specific pages of your poster without having to reprint all of the pages of your poster. To select specific pages to print: 1 2 From the Job Finishing tab, click Select Pages to Print. Print From the Select Pages to Print screen: In the example shown, only one page, tile 1, is selected to print. Click Select All to select all the tiles, and then click the tiles you do not want to print.
3 Maintaining your printer The Control Program lets you monitor your printer, and install or replace print cartridges. To open the Control Program from the Start menu, click: 1 2 3 Programs. Programs Lexmark Z53 Series. Series Lexmark Z53 Control Program. Program Maintaining your printer Using the Control Program Click the...
Installing or replacing print cartridges 1 Make sure the Power light is On. Power light 2 Paper Feed light Raise the front cover. The print cartridge carrier moves to the loading position unless the printer is busy. Front cover Print cartridge carrier in the loading position Warning: Warning DO NOT touch the gold contact area on the print cartridge. • • 22 • Chapter 3 • • 3 Remove the old print cartridge. Store or dispose of the old cartridge.
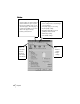
From the Control Program’s Cartridges tab, select Install/Change Cartridge Cartridge. For help, see page 21. Select the cartridge type you installed and click OK. OK 6 If you installed a new cartridge, the Alignment dialog box displays. Follow the instructions on the Alignment screen to complete the cartridge installation. For help, see page 24. Maintaining your printer 5 Improving print quality If the print quality is not satisfactory, a simple cartridge alignment may improve print quality.
Aligning print cartridges 1 2 Load plain paper in the printer. From the Control Program’s Cartridges tab, select Align Cartridges. Cartridges For help, see page 21. Your printer prints an alignment test page and the Align Cartridge dialog box displays. The test page that prints has several alignment patterns, depending on the cartridge combination installed. Each pattern has a number under it.
Cleaning print nozzles 1 2 Broken lines at the top of the page indicate clogged nozzles. Cyan, magenta, yellow, and black purge lines (shown here in black and white) print when ink is forced through the print nozzles. If any of these colors do not print, you may need to replace your print cartridge. Unbroken lines at the bottom of the page indicate the nozzles were cleaned. 3 4 Maintaining your printer Load plain paper in the printer.
5 6 Repeat the nozzle test. If the lines are still broken, wipe the print cartridge nozzles. For help, see the next section. Wiping print nozzles If print quality does not improve after cleaning the print nozzles (see page 25), there may be dried ink on the print cartridge nozzles. For help on wiping the print nozzles, see the Troubleshooting: Print Quality section of the printer driver Help.
4 Troubleshooting This section lists printer problems, and what you can do to solve them. From the list of printing problems in the left margin, select a category that describes your printing problem. Read the category for help finding the solution. Paper misfeeds or jams (see page 30) 30) When your printer has a problem, first make sure that: Document prints with mistakes or poor quality (see page 31) 31) Problems with transparencies, photos, envelopes...
Printer prints slowly or doesn’t print If your printer does not print, your printer and your computer may not be able to communicate properly. The following events also indicate two-way communications problems: • A message displays on your computer screen indicating your printer cannot establish bidirectional communications with your computer. • Print cartridge ink level indicators on the Status or Cartridges tabs of the printer’s Control Program are shaded.
Printer is plugged in but doesn’t print, or you get a Printer Offline message Make sure: From the Printers folder, double-click the Lexmark Z53 icon. icon 2 Click the Printer menu and make sure no check mark appears next to the Pause Printing option. Print a test page. If the test page prints, the printer is functioning properly. Check your application. 1 Troubleshooting • The printer is turned On, and has paper loaded correctly. • The parallel, or USB, cable is completely plugged into the printer.
Paper misfeeds or jams Paper misfeeds or pulls multiple sheets while moving through the printer Make sure: • You are using a paper recommended for inkjet printers. • You do not force the paper down into the printer when you load it. Align the top of the paper with the paper alignment guides on the paper support. • You do not load too much paper in the sheet feeder. Depending on the thickness of your paper, the sheet feeder can hold up to 100 sheets of paper.
2 Document prints with mistakes or poor quality Vertical straight lines are not smooth To improve the print quality of vertical straight lines in tables, borders, and graphs: • Select a higher Print Quality setting. • Test the cartridge alignment. For help, see page 24. • Clean the print nozzles. For help, see page 25. Troubleshooting 3 4 5 Pull firmly on the paper to remove it. If you cannot reach the paper because it is too far into the printer, raise the front cover and pull the paper out.
Print is too dark or smudged Make sure: • You let the ink dry before handling the paper. • The Paper Type setting in the Printer Properties matches the paper type loaded in the printer. • The paper is straight and unwrinkled. • The Print Quality setting is appropriate for the paper type. If you are printing on regular paper, select Draft (300 x 600 dpi). • You may need to clean the print nozzles. For help, see page 25.
• Use a different brand of paper. Every paper brand accepts ink differently and prints with slight color variations. • Remove any extra devices such as a scanner, and connect the printer to the parallel port. Colors on the printout are faded • Clean the print nozzles. For help, see page 25. • If the colors still seem faded, wipe the print nozzles and contacts. For help, see the Troubleshooting: Print Quality section of the printer driver Help. Troubleshooting • Your print cartridge may be low on ink.
Printer does not feed envelopes or specialty papers For help, see "Printer does not feed envelopes or specialty papers"on page 30. Error messages and flashing lights Paper Jam message For help, see "Printer has a paper jam"on page 30. Power light Paper Feed light Ink Low message The print cartridge is running out of ink. Purchase a new print cartridge. The Power light is On and the Paper Feed light is blinking • If the printer is out of paper: 1 Load paper. 2 Press the Paper Feed button.
Appendix • Printing from DOS • Warranty • Notices Printing from DOS To open your printer online Help system and find information on printing from DOS: 1 Open the Printer Properties (for help, see page 5), or the Control Program (for help, see page 21). Statement of limited warranty • Conforms to Lexmark’s official published specifications, and Lexmark International, Inc., Lexington, KY • Is in good working order. This warranty applies to the United States and Canada. For customers outside the U.S.
To obtain warranty service you may be required to present proof of original purchase. Warranty service will be provided at a Remarketer or a Lexmark designated location. You may be required to deliver your product to the Remarketer or Lexmark, or ship it prepaid and suitably packaged to a Lexmark designated location. You are responsible for loss of, or damage to, a product in transit to the Remarketer or the designated location.
Electronic emission notices • Increase the separation between the equipment and receiver. Federal Communications Commission (FCC) Compliance Information Statement • Connect the equipment into an outlet on a circuit different from that to which the receiver is connected. The FCC Class B limits are designed to provide reasonable protection against harmful interference in a residential installation.
Japanese VCCI Notice The United Kingdom Telecommunications Act 1984 This apparatus is approved under the approval number NS/G/1234/J/100003 for the indirect connections to the public telecommunications systems in the United Kingdom. Energy star Power supply If your power supply fails, replace it with the Lexmark replacement part or other UL LISTED Direct Plug-In Power Unit marked “Class 2” and rated 30 Vdc at 1A.
Index A aligning print cartridges B banding 31 banner paper loading 3 setting recommendations 7 bidirectional communications disabling 27 problems indicators 28 binding options long edge 10 short edge 10 blinking lights Paper Feed 34 Power 34 booklets building 17 bundling 17 printing 15 buttons Clean Print Nozzles 25 C cards loading 3 setting recommendations 7 error messages Ink Low 34 Paper Jam 30, 34 Printer Offline 29 European Community Directives Conformity 37 D greeting cards loading 3 setting re
improving print quality 23 index cards loading 3 setting recommendations 7 Industry Canada Compliance Statement 37 Ink Low message 34 installing print cartridge 22 intermittent printing 31 Internet printing Web Smoothing 6 iron-on transfers loading 4 setting recommendations 8 J Japanese VCCI Notice 38 L lights Paper Feed 34 patterns 34 Power 22 loading paper 2 specialty papers 3 long edge binding 10 M Macintosh 1 margins, minimum settings 32 messages, error Ink Low 34 Paper Jam 34 Printer Offline 29 •
R release tab locating 2 using 2 reloading instructions two-sided printing 10 removing print cartridge 22 reverse page order 6 S safety information 38 select pages to print button 20 setting recommendations banner paper 7 cards 7 custom-sized paper 8 envelopes 7 iron-on transfers 8 normal 7 photo papers 7 poster 18 transparencies 8 two-sided printing 10 sheet feeder 2 Sheets Per Bundle selecting 15 short edge binding 10 software applications Control Program 21 specialty papers banner paper 3 cards 3 cust
• • 42 • • •