Z600 Series Color Jetprinter™ User’s Guide for Windows • Setup troubleshooting A checklist to find solutions to common setup problems. • Printer overview Learn about the printer parts and the printer software. • Printing ideas How to print several projects on various types of paper. • Maintenance Caring for your cartridges and ordering supplies. • General troubleshooting Error messages, print quality problems, paper jams, and much more. January 2003 www.lexmark.
Edition: January 2003 The following paragraph does not apply to any country where such provisions are inconsistent with local law: LEXMARK INTERNATIONAL, INC., PROVIDES THIS PUBLICATION “AS IS” WITHOUT WARRANTY OF ANY KIND, EITHER EXPRESS OR IMPLIED, INCLUDING, BUT NOT LIMITED TO, THE IMPLIED WARRANTIES OF MERCHANTABILITY OR FITNESS FOR A PARTICULAR PURPOSE. Some states do not allow disclaimer of express or implied warranties in certain transactions; therefore, this statement may not apply to you.
Contents Chapter 1: Printer overview .......................................................... 5 Understanding the printer parts...................................................................... 5 Understanding the printer software ................................................................ 6 Chapter 2: Printing ideas............................................................. 10 Printing on plain paper .................................................................................
Chapter 4: Setup troubleshooting .............................................. 49 Troubleshooting checklist............................................................................. 49 Solving printer software installation problems .............................................. 50 Chapter 5: General troubleshooting........................................... 53 Understanding error messages and flashing lights ...................................... 53 Resolving unsuccessful or slow printing..............
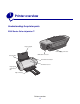
1 Printer overview Understanding the printer parts Z600 Series Color Jetprinter™ Paper support Power supply connector Sheet feeder USB cable connector Power/Resume button Front cover Paper guide and release tab Paper exit tray Printer overview 5
The following table describes each part. Use this: When you want to: Power/Resume button • Turn the printer on or off. • Eject paper from the printer. For more information, see “Printer has a paper jam” on page 57. • Check the printer status. For more information, see “Understanding error messages and flashing lights” on page 53. Front cover • Install or change print cartridges. • Clear paper jams. Paper exit tray Stack paper after printing.
• • • • • Quality/Speed: Normal Type: Plain Paper Paper Size: A4 or Letter Orientation: Portrait Layout: Normal For more information about the printer settings for different types of print jobs, see “Printing ideas” on page 10. Customizing the settings for your document 1 With your document open, click File Print. The Print dialog box appears. 2 From the Print dialog box, click Properties, Preferences, or Options. 3 From the Quality/Copies tab, select a print quality setting.
Paper Setup tab From: Select: Type Plain Paper, Envelope, Banner, Coated Paper, Photo/Glossy Paper, Transparency, Iron-On Transfer, or Card Stock. Paper Size A size specific to your paper type. If your paper size is not listed, select Custom Size. For help, see “Printing on custom size paper” on page 40. Orientation Portrait or Landscape. Print Layout tab From: Select: Layout Normal, Banner, Mirror, N-up, Poster, or Booklet.
The following table describes the LSC tabs: From this tab: You can: How To • Receive printer information. • Receive basic printing tips. • Receive printing project information. Troubleshooting • View tips for your printer status. • View common troubleshooting topics. Maintenance • • • • • Install a print cartridge. View information about how to purchase new cartridges. Clean the print cartridge nozzles. Align the cartridges. Solve other problems.
2 Printing ideas Printing on plain paper You can load up to 100 sheets of plain paper at a time, depending on the thickness of the paper. Step 1: Load the paper • Load the paper vertically against the right side of the paper support. • Do not force the paper into the printer. • Squeeze and slide the paper guide to the left side of the paper. Note: If you are using letter size paper, adjusting the paper guide may not be necessary.
Step 2: Customize the print settings If you are using plain A4 or letter size paper, and you want to print with normal print quality, you do not need to adjust the settings. If you are using specialty media, follow the steps for your paper type. Step 3: Print your document Click OK. Printing photos You can load up to 50 sheets of coated, photo, or glossy paper at a time, depending on the thickness of the paper.
• Squeeze and slide the paper guide to the left side of the photo paper. Note: If you are using letter size paper, adjusting the paper guide may not be necessary. Step 2: Customize the print settings 1 With your document open, click File Print. The Print dialog box appears. 2 From the Print dialog box, click Properties, Preferences, or Options. 3 Select a print quality: a From Print Properties dialog box, select the Quality/Copies tab. b From the Quality/Speed area, select Better or Best.
Step 3: Print your photos Click OK. Note: To prevent smudging, remove each photo as it exits the printer, and then let it dry before stacking. Printing on premium or coated paper You can load up to 100 pages of premium paper at a time, depending on the thickness of the paper. Step 1: Load the premium or coated paper • If your paper includes instructions, read them carefully. • Load the premium paper vertically against the right side of the paper support.
Step 2: Customize the print settings 1 With your document open, click File Print. The Print dialog box appears. 2 From the Print dialog box, click Properties, Preferences, or Options. 3 Select a print quality: a From Print Properties dialog box, select the Quality/Copies tab. b From the Quality/Speed area, select Better or Best. Note: Higher print quality settings result in better quality documents, but may take longer to print.
Step 1: Load the paper • Load the paper vertically against the right side of the paper support. • Do not force the paper into the printer. • Make sure the print side is facing you. • Squeeze and slide the paper guide to the left side of the paper. Note: If you are using letter size paper, adjusting the paper guide may not be necessary. Note: For the best print quality, use a heavier weight paper. Step 2: Customize the print settings 1 With your document open, click File Print.
3 Print on both sides of the page: a From Print Properties dialog box, select the Print Layout tab. b From the Duplexing area, select Two-Sided. c Select Side Flip or Top Flip. If you select Side Flip, the pages of your document turn like the pages of a magazine. If you select Top Flip, the pages turn like the pages of a legal pad. d Check the steps for your paper type to further customize your document. e Click OK. Step 3: Print your document Click OK.
Printing cards You can load up to 25 greeting cards, index cards, photo cards, or postcards at a time, depending on the thickness of the cards. Step 1: Load the cards • If your cards include instructions, read them carefully. • Load the cards vertically against the right side of the paper support. • Make sure the print side is facing you. • Do not force the cards into the printer. • Squeeze and slide the paper guide to the left side of the cards.
2 From the Print dialog box, click Properties, Preferences, or Options. 3 Select a print quality: a From Print Properties dialog box, select the Quality/Copies tab. b From the Quality/Speed area, select Better or Best if you are printing on photo cards or greeting cards. Select Normal for other types of cards. 4 Select a paper type: a From Print Properties dialog box, select the Paper Setup tab. b From the Type area, select Card Stock.
• Load the envelopes vertically against the right side of the paper support. • Make sure the print side is facing you. • Make sure the stamp location is in the upper left corner. • Do not force the envelopes into the printer. • Squeeze and slide the paper guide to the left side of the envelopes. Step 2: Customize the print settings 1 With your document open, click File Print. The Print dialog box appears. 2 From the Print dialog box, click Properties, Preferences, or Options.
4 Select an envelope size: a From Print Properties dialog box, select the Paper Setup tab. b From the Envelope Size menu, select the correct size. For more information about printing on custom size paper, see “Printing on custom size paper” on page 40. 5 Select the orientation: a From Print Properties dialog box, select the Paper Setup tab. b From the Orientation area, select Landscape. 6 Click OK. Note: Many software programs are designed to override the settings in Paper Setup.
• Do not force the paper into the printer. • Squeeze and slide the paper guide to the left side of the paper. Note: If you are using letter size paper, adjusting the paper guide may not be necessary. Step 2: Customize the print settings 1 With your document open, click File Print. The Print dialog box appears. 2 From the Print dialog box, click Properties, Preferences, or Options. 3 To print color images in black and white: a From Print Properties dialog box, select the Quality/Copies tab.
Printing a booklet You can print and bundle your document to make a booklet. You can load up to 100 sheets of paper at a time, depending on the thickness of the paper. Step 1: Load the paper • Load the paper vertically against the right side of the paper support. • Make sure the print side is facing you. • Do not force the paper into the printer. • Squeeze and slide the paper guide to the left side of the paper.
Step 2: Customize the print settings 1 With your document open, click File Print. The Print dialog box appears. 2 From the Print dialog box, click Properties, Preferences, or Options. 3 Select a paper size: a From Print Properties dialog box, select the Paper Setup tab. b From the Paper Size menu, select A4 or Letter. 4 Select a print layout: a From Print Properties dialog box, select the Print Layout tab. b From the Layout area, select Booklet. 5 Enter the number of sheets per bundle.
Step 3: Print your document Click OK. After the first half of your booklet and the reloading instruction page prints, your printer software prompts you to reload the paper. 1 Insert the stack of paper and the reloading instruction page with the printed side facing away from you and the arrows pointing down into the paper support. 2 Click Continue Printing. If you do not want to print the reloading instruction page: 1 From Print Properties dialog box, click Options Style Options.
To build your booklet: 1 Remove the first bundle from the paper exit tray, fold it in half, and set it aside. 2 Remove the next bundle, fold it in half, and then stack it on top of the first bundle. 3 Continue to stack the bundles on top of each other until your booklet is complete. 4 Bind the bundles to complete your booklet. Printing labels You can load up to 25 sheets of labels at a time, depending on the thickness of the sheets. Step 1: Load the labels • Use labels designed for inkjet printers.
• Make sure the print side is facing you. • Do not force the labels into the printer. • Squeeze and slide the paper guide to the left side of the labels. Note: If you are using letter size sheets of labels, adjusting the paper guide may not be necessary. Step 2: Customize the print settings 1 With your document open, click File Print. The Print dialog box appears. 2 From the Print dialog box, click Properties, Preferences, or Options.
Step 3: Print your labels Click OK. Note: The paper exit tray holds up to 10 sheets of labels. If you want to print more than 10 sheets, remove the first 10 sheets from the paper exit tray before the others print. Printing handouts You can conserve paper by printing handouts, or multiple page images, on a single sheet of paper. Load up to 100 sheets of paper at a time, depending on the thickness of the paper. Step 1: Load the paper • Load the paper vertically against the right side of the paper support.
• Squeeze and slide the paper guide to the left side of the paper. Note: If you are using letter size paper, adjusting the paper guide may not be necessary. Note: For the best print quality, use a heavier weight paper. Step 2: Customize the print settings 1 With your document open, click File Print. The Print dialog box appears. 2 From the Print dialog box, click Properties, Preferences, or Options. 3 Select a print layout: a From Print Properties dialog box, select the Print Layout tab.
Step 3: Print your handouts Click OK. If you formatted your handouts to print on one side of the page, you are finished. If you formatted your handouts to print on both sides of the page, continue printing your handouts. 1 After the first half of your handouts prints, your printer software prompts you to reload the paper. Insert the paper and reloading instruction page with the printed side facing away from you and the arrows pointing down into the paper support. 2 Click Continue Printing.
Step 1: Load the paper • Load the paper vertically against the right side of the paper support. • Make sure the print side is facing you. • Do not force the paper into the printer. • Squeeze and slide the paper guide to the left side of the paper. Note: If you are using letter size paper, adjusting the paper guide may not be necessary. Note: For the best print quality, use a heavier weight paper. Step 2: Customize the print settings 1 With your document open, click File Print.
3 Select a print quality: a From Print Properties dialog box, select the Quality/Copies tab. b From the Quality/Speed area, select Normal. Note: Higher print quality settings result in better print quality, but may take longer to print. 4 Select a print layout: a From Print Properties dialog box, select the Print Layout tab. b From the Layout area, select Poster.
2 Arrange the pages so that every trimmed edge overlaps an untrimmed edge (the white edge). 3 Tape the backs of the pages together. 4 To complete your poster, trim any remaining white edges. Printing iron-on transfers You can load up to 100 iron-on transfers at a time, depending on the thickness of the transfers. You may want to print on plain paper before loading your iron-on transfers. Note: For best results, load one iron-on transfer at a time.
• Squeeze and slide the paper guide to the left side of the iron-on transfers. Note: If you are using letter size iron-on transfers, adjusting the paper guide may not be necessary. Step 2: Customize the print settings 1 With your document open, click File Print. The Print dialog box appears. 2 From the Print dialog box, click Properties, Preferences, or Options. 3 Select a print quality: a From Print Properties dialog box, select the Quality/Copies tab.
Printing transparencies You can load up to 50 transparencies at a time, depending on the thickness of the transparencies. Step 1: Load the transparencies • Use transparencies designed for inkjet printers. • If your transparencies include instructions, read them carefully. • Load the transparencies vertically against the right side of the paper support. • Make sure the rough side (print side) of the transparencies is facing you.
Step 2: Customize the print settings 1 With your document open, click File Print. The Print dialog box appears. 2 From the Print dialog box, click Properties, Preferences, or Options. 3 Select a print quality: a From Print Properties dialog box, select the Quality/Copies tab. b From the Quality/Speed area, select Normal. 4 Select a paper type: a From Print Properties dialog box, select the Paper Setup tab. b From the Type area, select Transparency.
Printing your document in reverse order You can load up to 100 sheets of paper at a time, depending on the thickness of the paper. Step 1: Load the paper • Load the paper vertically against the right side of the paper support. • Make sure the print side is facing you. • Do not force the paper into the printer. • Squeeze and slide the paper guide to the left side of the paper. Note: If you are using letter size paper, adjusting the paper guide may not be necessary.
3 To print the last page first: a From Print Properties dialog box, select the Quality/Copies tab. b Select Print Last Page First. 4 Follow the steps for your paper type to further customize your document. 5 Click OK. Step 3: Print your document Click OK. Note: The paper exit tray holds up to 25 sheets of plain paper. If you want to print more, remove the first 25 sheets from the paper exit tray before the others print.
Printing a banner You can load up to 20 sheets of banner paper at a time. Step 1: Load the banner paper 1 Remove any paper from the printer. 2 Place a stack of banner paper with only the number of sheets you need to print your banner behind the printer. Note: Loading excess banner paper may cause a paper jam. For help, see “Printer has a paper jam” on page 57. 3 Load the leading edge of the banner paper into the printer against the right side of the paper support.
4 Squeeze and slide the paper guide to the left edge of the banner paper. Note: If you are using letter size banner paper, adjusting the paper guide may not be necessary. Step 2: Customize the print settings 1 With your document open, click File Print. The Print dialog box appears. 2 From the Print dialog box, click Properties, Preferences, or Options. 3 Select a print quality: a From Print Properties dialog box, select the Quality/Copies tab. b From the Quality/Speed area, select Normal.
7 Select a print layout: a From Print Properties dialog box, select the Print Layout tab. b From the Layout area, select Banner. 8 Click OK. Step 3: Print your banner Click OK. Printing on custom size paper You can load up to 100 sheets of custom size paper at a time, depending on the thickness of the paper. Step 1: Load the custom size paper • Make sure your paper size fits within these dimensions: – – Width: 76 to 216 mm (3 to 8.5 in.) Length: 127 to 432 mm (5 to 17 in.
• Squeeze and slide the paper guide to the left side of the paper. Step 2: Customize the print settings 1 With your document open, click File Print. The Print dialog box appears. 2 From the Print dialog box, click Properties, Preferences, or Options. 3 Create a custom paper size: a From Print Properties dialog box, select the Paper Setup tab. b From the Paper Size menu, select Custom Size. A dialog box displays on the screen. c From the Units area, select Millimeters or Inches.
3 Maintenance Replacing the print cartridges The Lexmark Z600 Series uses the following cartridges: Item: Part number: Color cartridge 26 or 27 Black cartridge 16 or 17 Note: You can use the printer with just a color cartridge or just a black cartridge. For information about ordering supplies, see page 48. Removing the used cartridges 1 Make sure the power light is on. 2 Raise the front cover. The cartridge carrier moves to the loading position, unless the printer is busy.
3 Squeeze the tabs on the cartridge lids, then lift the lids. 4 Remove the used cartridges. Store them in an airtight container or dispose of them properly. Installing the cartridges 1 If you are installing new cartridges, remove the sticker and transparent tape from the back and bottom of the cartridges. Warning: Do not touch or remove the gold contact areas on the back and bottom of the cartridges.
2 Insert the color cartridge in the left carrier. Insert the black cartridge in the right carrier. Note: To extend the life of your color cartridge and improve printing speed, install a black cartridge along with the color cartridge. 3 Snap the lids closed. 4 Close the front cover. Note: The front cover must be closed to start a print job.
Specifying cartridge settings in the printer software Before you specify the print cartridge settings in the printer software, install the cartridges. For help, see “Installing the cartridges” on page 43. 1 Open the LSC. For help, see “Lexmark Solution Center” on page 8. 2 From the Maintenance tab, click Install a new print cartridge. 3 Select the type of cartridge you installed. Note: Specify whether the cartridge is a new cartridge or an old cartridge (one that has been used before).
Improving print quality If you are not satisfied with the print quality of your document, make sure you: • Use the appropriate paper for the document. For example, use photo paper if you are printing a photo. • Use paper that is a heavier weight, bright white, or coated. • Select a higher print quality: 1 From your software program, click File Print. The Print dialog box appears. 2 From the Print dialog box, click Properties, Preferences, or Options.
c Gently hold the cloth against the nozzles for about three seconds, and then wipe in the direction shown. Nozzles d Using another clean section of the cloth, gently hold the cloth against the contacts for about three seconds, and then wipe in the direction shown. Contacts e With another clean section of the cloth, repeat step c through d. f Allow the nozzles and contacts to dry completely. g Reinsert the print cartridges. h Print your document again.
Ordering supplies To order supplies or locate a dealer near you, contact the Lexmark Web site at www.lexmark.com.
4 Setup troubleshooting Troubleshooting checklist Is the power supply firmly attached to your printer and a properly grounded electrical outlet? Are both your printer and computer on? Is your USB cable securely attached to your printer and to your computer or Lexmark adapter? Are any printer lights blinking? For help, see “Understanding error messages and flashing lights” on page 53.
Is the printer set as the default printer? To set the printer to be the default printer: 1 Click Start Settings Printers 2 Right-click the Lexmark Z600 Series and make sure that Set as Default is selected. Is your printer connected directly to your computer? If it is connected through an external device, such as a USB hub, switch box, scanner, or fax machine, follow these steps: 1 Disconnect your printer from any external devices. 2 Connect your printer directly to your computer with a USB cable.
3 Click Cancel on all screens similar to the following that appear. Windows 98/Me Windows 2000/XP 4 Eject and reinsert the printer software CD. 5 From your desktop, double-click My Computer. 6 Double-click your CD-ROM drive icon. If necessary, double-click setup.exe. 7 Follow the instructions on your screen to complete printer software installation.
Removing the printer software 1 From your desktop, click Start Programs Lexmark Z600 Series Uninstall. Lexmark Z600 Series 2 Follow the instructions on your screen to remove the printer software. 3 Restart the computer before reinstalling the printer software. Installing the printer software You can install the printer software using the printer software CD that came with your printer, or you can download it from the Lexmark Web site at www.lexmark.com.
5 General troubleshooting For information about: See page: Understanding error messages and flashing lights 53 Resolving unsuccessful or slow printing 54 Clearing paper misfeeds or jams 56 Solving print quality problems 58 Solving specialty media problems 60 Understanding error messages and flashing lights Use this section to understand printer software error messages on your computer screen and a blinking light on your printer.
The Power/Resume button is blinking Check your computer screen for error messages. • • If the printer is out of paper: 1 Load paper. 2 Press the button. If the printer has a paper jam, see “Printer has a paper jam” on page 57. Resolving unsuccessful or slow printing The following topics can help you improve unsuccessful or slow printing.
• Check the printer port: Windows 98/Me Windows 2000 1 Click Start Printers. 1 Click Start Printers. Settings Windows XP Settings 2 Right-click the Lexmark Z600 Series printer icon, and then click Properties. 2 Right-click the Lexmark Z600 Series printer icon, and then click Properties. 3 Click the Details tab. 3 Click the Ports tab. 4 From the Ports drop-down menu, check the printer port. 4 From the list of ports, select USB printer port.
Alignment page does not print Make sure: • You completely removed the transparent tape and sticker from the back and bottom of the print cartridges. For help, see “Replacing the print cartridges” on page 42. • You installed the cartridges correctly. For help, see “Installing the cartridges” on page 43. • You loaded the paper correctly and did not force the paper into the printer.
• You do not load too much paper. Depending on the weight of the paper, you can load up to 100 sheets of plain paper, 10 transparencies or labels, and 10 envelopes or cards. • You do not force the paper into the printer. For example, letter and A4 paper should extend slightly beyond the top of the paper support. • The paper guide is against the left edge of the paper. • The paper guide does not cause the paper to bow. • The printer is on a flat, level surface.
Solving print quality problems If print quality is unsatisfactory, you may need to adjust your margin settings, select a higher print quality, align the print cartridges, or clean the nozzles. The following topics can help you improve an unsatisfactory document. Print is too dark or smudged • Make sure the paper is straight and not wrinkled. • Let the ink dry completely before handling the paper.
Characters are missing or unexpected Like other printers, your printer cannot print on the extreme edges of the paper. Your margins must fall within these settings: Margin: Minimum setting: Left and right • 6.35 mm (0.25 in.) for U.S. Letter, U.S. Legal, Banner Letter, and custom paper sizes • 3.175 mm (0.125 in.) for envelopes • 3.37 mm (0.13 in.) for most paper sizes Top • 1.7 mm (0.067 in.) Bottom • 12.7 mm (0.5 in.) for black print jobs • 19 mm (0.75 in.
4 Click Select color settings manually. 5 Select Natural Color. Colors on the printout are faded Try the suggestions listed in the section “Colors on the printout differ from the colors on the screen” on page 59. If the colors still seem faded, clean the print cartridge nozzles and contacts. For help, see “Improving print quality” on page 46. Photos do not print as expected • Use a photo paper designed for inkjet printers. • Select a higher print quality. • Select photo paper as the paper type.
Notices Electronic emission notices Federal Communications Commission (FCC) compliance information statement The Lexmark Z600 Series Color Jetprinter, type 4126-001 has been tested and found to comply with the limits for a Class B digital device, pursuant to Part 15 of the FCC Rules. Operation is subject to the following two conditions: (1) this device may not cause harmful interference, and (2) this device must accept any interference received, including interference that may cause undesired operation.
Japanese VCCI notice The United Kingdom Telecommunications Act 1984 This apparatus is approved under the approval number NS/G/1234/J/100003 for the indirect connections to the public telecommunications systems in the United Kingdom.
Glossary alignment page. A page with printed alignment patterns that ejects from your printer during cartridge alignment. alignment values. Numbers corresponding to patterns on the alignment page. automatic alignment. A feature that automatically aligns the print cartridges. Automatic Sheet Feeder (ASF). A mechanism that automatically feeds paper into your printer. banner paper. Continuous sheets of perforated inkjet paper designed for banners. Also called continuous form paper. booklets.
handouts. Multiple-page images printed on a single sheet of paper. See N-up. label. Self-adhesive paper. landscape orientation. Page orientation in which text runs parallel with the long edge of the paper. line art. A printer software option used for printing simple line art and graphics. long-edge binding. A printer software option that arranges duplexed pages so they can be bound along the long side of the pages. manual alignment.
print queue. The location on the server where print jobs are stored for printing in the order in which they are sent. printer driver. See printer software. printer port. See USB port. printer software. (1) The program that lets you select settings to customize your print job. (2) The program that lets your computer communicate with your printer. program. Any software loaded on your computer that lets you perform a specific task, such as word processing or photo editing. reverse order printing.
Index A handouts See multiple images on one sheet index cards 17 iron-on transfers 32 labels 25 last page first 36 multiple images on one sheet 28 photo cards 17 photo paper 11 plain paper 10 postcards 17 poster 29 premium paper 13 printing color images in black and white 20 printing in reverse order 36 printing multiple images on one sheet 28 transparencies 34 t-shirt transfers 32 two-sided printing 14 aligning print cartridges 45 B banding 58 banner paper 38 booklet building 24 C cable, part numbers U
labels 25 photo cards 17 photo paper 11 postcards 17 poster 29 premium paper 13 print on both sides of the paper 14 transparencies 34 t-shirt transfers 32 two-sided printing 14 M margins, minimum settings 59 messages, error Ink Low 53 Paper Jam 53 multiple images on one sheet 28 N N-up 28 O ordering supplies 48 P Paper Jam message 53 paper jam, clearing 57 paper misfeeds 56 Paper Setup tab 8 part numbers black cartridge 48 color cartridge 48 USB cable 48 photo cards 17 photo paper 11 postcards 17 poster
index cards 17 iron-on transfers 32 labels 25 last page first 36 photo cards 17 photo paper 11 plain paper 10 postcards 17 poster 29 premium paper 13 print color images in black and white 20 print last page first 36 print on both sides of the paper 14 transparencies 34 t-shirt transfers 32 two-sided printing 14 settings, default 6 slow printing 56 software, printer 6 installing 52 removing 52 specialty paper solving problems with 60 supplies, ordering 48 printer software installation 50 slow printing 56 so
Lexmark and Lexmark with diamond design are trademarks of Lexmark International, Inc., registered in the United States and/or other countries. Color Jetprinter is a trademark of Lexmark International, Inc. © 2003 Lexmark International, Inc. 740 West New Circle Road Lexington, Kentucky 40550 www.lexmark.