ENGLISH LG-UK495 User Guide This guide helps you to get started using your tablet. • Some of the contents of this manual may not apply to your tablet, depending on the software and your service provider. • Google™, Google Maps™, Gmail™, YouTube™, Google Hangouts™ and Google Play™ are trademarks of Google, Inc. XXXXXXXXXXX (1.
• Copyright ©2015 LG Electronics, Inc. All rights reserved. LG and the LG logo are registered trademarks of LG Group and its related entities. All other trademarks are the property of their respective owners. • U.S.
Contents Contents...................................................................................................3 Getting to know your tablet....................................................................6 Your Home screen................................................................................. 16 Google account setup...........................................................................37 Connecting to Networks and Devices................................................ 38 Contacts...
WARNING Violation of the instructions may cause serious injury or death. WARNING: This product contains chemicals known to the State of California to cause cancer and birth defects or other reproductive harm. Wash hands after handling. # Never use an unapproved battery since this could damage the tablet and/ or battery and could cause the battery to explode. # Never place your tablet in a microwave oven as it will cause the battery to explode.
# Make sure that no sharp-edged items, such as animal’s teeth or nails, come into contact with the battery. This could cause a fire. # Store the battery out of reach of children. # Be careful that children do not swallow any parts (such as earphone, connection parts of the tablet, etc.) This could cause asphyxiation or suffocation resulting in serious injury or death. # Unplug the power cord and charger during lightning storms to avoid electric shock or fire.
Getting to know your tablet Tablet Overview Front View Front Camera NOTES • All screen shots in this guide are simulated. Actual displays may vary. • Instructions to perform tasks in this guide are based on the default settings and may change depending on the mode and software version on your tablet. 1. Front Camera Use to take pictures and record videos of yourself. You can also use this for video chatting. Keep the lens clean for optimal performance.
Getting to know your tablet Rear View Rear Camera Speakers 2. Rear Camera Use to take photos and record videos. Keep the lens clean for optimal performance. 3. Speakers Use to listen to the audio from the selected function (e.g., music, videos, sound clips, etc.). NOTE Your tablet is designed to have two speaker openings on the back side for aesthetic reasons. However, the actual sound comes from only one speaker. Please note that it’s not a product defect.
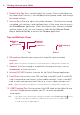
Getting to know your tablet 4. Power/Lock Key Press to lock/unlock the screen. Press and hold to turn the tablet on/off, restart it, activate/deactivate airplane mode, and change the sound settings. 5. Volume Keys Press to adjust the media volumes. If the Shortcut setting is enabled, you can press and hold both keys at the same time to access the QuickMemo+ application.
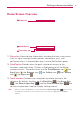
Getting to know your tablet Home Screen Overview Status bar QuickTap bar Touch keys bar 11. Status bar Shows device information, including the time, status icons (such as signal strength, battery power, connections, etc.), and notification icons. It also provides access to the Notifications panel. 12. QuickTap bar Provides icons for quick, one-touch access to the functions used most often. This bar is displayed on all of the Home screen canvases.
Getting to know your tablet The Battery and Power Your tablet has an internal, rechargeable battery that is not removable. It should only be replaced by LG or an authorized LG repair center. You should never try to open or take apart this tablet yourself. Opening the tablet can cause damage that will void your warranty. Charging Your Tablet Your tablet is powered by an internal, rechargeable battery.
Getting to know your tablet To View the Battery Charge Level 1. From the Home screen, touch and hold the Recent Apps Key (in the Touch keys bar) > System settings > About tablet > Battery. 2. The right side of the screen displays the battery status (charging or discharging) and percent of remaining charge. Optimizing Battery Life You can extend your battery’s life between charges by reducing the screen brightness and screen timeout to conserve your battery’s energy.
Getting to know your tablet Installing and Removing the SIM Card To install a SIM card: 1. Hold the tablet face down, then and open the card slot cover (located at the top of the tablet) and gently pull out the SIM card tray. NOTE When you open the cover, you'll see edge of the silver SIM card tray in the slot closest to the back of the tablet. 2. Insert the SIM card into the tray with the logo face up. Push the tray back into the slot until it's secured in the slot, then close the cover.
Getting to know your tablet NOTE The slot closest to the touchscreen is the microSD card slot (the slot with the silver tray is for the SIM card). 2. Position the microSD card with the gold strips facing toward the back of the tablet. Slide the microSD card into the slot until it clicks into place and replace the cover. Removing a microSD Card To remove your microSD card 1. From the Home screen, touch and hold the Recent Apps Key (in the Touch keys bar) > System settings > Storage > Unmount SD card.
Getting to know your tablet 3. If you set an unlock pattern, enter it, then tap Erase everything. The card will then be formatted and ready to use. Powering Your Tablet On/Off It’s important to fully charge the battery before turning on your tablet for the first time to maximize its life cycle. Turning the tablet on 4 Press and hold the Power/Lock Key on the right side of the tablet for a couple of seconds until the screen turns on.
Getting to know your tablet Unlocking the Screen Using the Knock Code Feature You can unlock the screen when the screen is off by tapping the correct area and sequence. 1. When the screen is off, tap the Knock Code sequence you created on the screen. 2. The screen will turn on and unlock. NOTE To activate Knock Code, tap Apps > Settings > Display > Lock screen > Select screen lock > Knock Code.
Your Home screen The Home Screen The Home screen is comprised of multiple canvases. Simply swipe your finger to the left or right to view them. You can set its background wallpaper, add additional canvases, and customize the items on each Home screen canvas. 4 The QuickTap bar (located at the bottom of all of the Home screen canvases) provides, one-touch access to the functions used most often.
Your Home screen Customizing the Home Screen You can customize your Home screen to provide convenient access by adding apps, widgets, and downloads to any of its canvases. You can also personalize your Home screen to reflect your personal style by setting the wallpaper background and setting customized images for its icons. To add items on your Home screen: To add apps and/or widgets: 1. Touch and hold an empty part of the Home screen. 2. Tap the Apps or Widgets tab (at the bottom of the screen). 3.
Your Home screen 4 Allow Home screen looping: Checkmark this setting so that the Home screen canvases rotate continuously (loops back to the first canvas after the last). 4 Home backup & restore: Allows you to backup and restore your Home screen app layout and wallpaper. 4 Help: Tap to view help information about customizing the Home screen. Customizing application icons on the Home screen You can customize each application icon with images from your Gallery. 1.
Your Home screen 3. Choose your icon image. 4 Tap an icon image from your Icon gallery, then tap OK. OR to create a custom icon image. When you create 4 Tap the New icon an icon image, you customize its size and crop its image. Created icons are displayed in your Icon gallery. NOTE You can delete a custom icon image from your Icon gallery by tapping the Delete icon (at the top right corner of the Icon change screen).
Your Home screen Using the touchscreen Your touchscreen provides an excellent way to interact with and use your Android™ device. With the touch of your finger, you can download and use available applications, make menu selections, and access data saved to your tablet. The following terms are used for describing the different available gestures using the touchscreen: Tap or touch A single finger tap selects items, links, shortcuts, and letters on the on-screen keyboard.
Your Home screen Double-tap Tap the screen twice quickly to zoom, highlight text, or turn the screen on/ off. For example, quickly double-tap a section of a webpage to adjust that section to fit the width of the screen and zoom in and out when viewing a picture and when using Maps. Double-tap a word to highlight it. Double-tap can also activate the KnockON feature to turn the touchscreen on or off. NOTE A triple-tap gesture is used for certain enabled Accessibility features.
Your Home screen Quick Access The Quick access feature allows you to open the Google Now application or the QuickMemo+ application instantly no matter where you are in the tablet’s software. Sliding your fingertip up from below the Touch keys bar displays the Google Now icon and the QuickMemo+ icon on a white arc. Continue dragging your finger to place it over the icon you want, then lift your finger to launch that application. Returning to Recently-used Applications 1.
Your Home screen Setting a screen lock Set a screen lock type for the level of security you want to use to guard against unauthorized access. Once set, you’ll need to perform its unlock sequence to gain access to your tablet from timeout, and also when you turn on the tablet. (in the 4 From the Home screen, touch and hold the Recent Apps Key Touch keys bar) > Lock screen settings > Select screen lock, select the screen lock you want to use, then follow the on-screen instructions to set it.
Your Home screen Performing a Hard Reset (Factory Reset) A hard reset will be initiated if you forget your unlock sequence and Backup PIN. The System recovery function will allow you to perform a hard reset as well, if necessary. WARNING! P erforming a hard reset deletes all of your user data, which includes pictures, videos, and music saved to your internal memory. Please make sure to back up your information prior to performing a hard reset. 1. Turn the tablet off. 2.
Your Home screen Multiple tablet user limitations 4 All users share the same battery, internal memory, and data usage with all of the other users. 4 The language set for the tablet by one user applies to all of the other users. 4 Each user can configure and use only their own content and data (e.g., Home screen settings, Sound settings, etc.). 4 Any user can accept updated application permissions on the behalf of all of the other users.
Your Home screen To switch users 1. Press the Power/Lock Key (on the right side of the tablet) to lock the tablet's screen. 2. Press the Power/Lock Key again to wake up the tablet's screen. 3. Tap one of the colored icons at the bottom of the Lock screen to switch to that user. To customize the User ID icons A user can change their generic colored User ID icon (used to switch users) to a personalized image. 1. From the Settings menu, tap Users. 2.
Your Home screen 4 Draw an “S” on the touch assistant board to launch the Settings application. 4 Draw an “L” on the touch assistant board to lock the screen. 4 Draw an “e” on the touch assistant board to launch the Email application. Restricting Touch Access Using the Touch control areas feature The Touch control areas feature allows you to restrict access from a selected portion of the screen. 1. Turn the feature on in the Accessibilities menu. Tap the Touch control areas switch to toggle it on (blue).
Your Home screen Accessing Your Notifications Swipe the Status bar downward to open the Notifications panel to access your notifications. To close the Notifications panel, swipe the bar at the bottom of the screen upward. The Notifications Panel The Notifications panel includes your notifications and the Quick Settings bar. You can choose to display the QSlide bar and/or the QuickRemote bar as well.
Your Home screen Rearranging the Quick Settings icons Open the Notifications panel, swipe the Quick Settings to the left, and tap the Edit icon to customize the Quick Settings bar. Checkmark icons to display (or remove the checkmark to hide) it. Drag an icon’s handle (on the right side of the screen) to move it to another position on the bar. NOTE Changing the checkmarks also reorganizes the icons on the Quick Settings bar.
Your Home screen NOTE Battery is charging Tablet is connected to PC via USB cable Content sharing is on Battery saver mode is on The location of the icons in the Status Bar may differ depending on the features, apps, and services being used. Text Entry Your tablet allows you to enter text manually using an on-screen keyboard or automatically by selecting a voice input function. The On-screen Keyboard An on-screen keyboard appears automatically on the touchscreen when you need to enter text.
Your Home screen Tap once to capitalize the next letter you type. Double-tap for all caps. Tap to switch to the numbers and symbols keyboard. Tap to select the keyboard language. Only available when multiple languages are enabled. Tap to access the LG keyboard settings. Touch and hold to access the Clip Tray and Voice input. Tap to enter a space. Tap to create a new line in the text field. Tap to delete the previous character.
Your Home screen Using Clip Tray Easily access the contents you stored in the Clip Tray whenever and wherever you want. You can copy images or texts and keep them in the Clip Tray. Then, you can paste them whenever and wherever you want. 1. Touch and hold text and images while viewing or editing them and tap Clip Tray. 2. Touch and hold the text input field and select Clip Tray. You can also access the Clip Tray by touching and holding > . NOTES • You can save up to 10 items in the Clip Tray.
Your Home screen Keyboard height and layout – Allows you to adjust the keyboard to control it more easily. Path input – Checkmark to enter a word by drawing a path through all of the letters. Show word suggestions – Checkmark to show words through text prediction. Auto-correction – Sets your level of automatic word correction. Choose from Off, Mild, Moderate, and Aggressive. Update word suggestions – Allows you to update your word suggestions based on your selected language.
Your Home screen To add additional languages for your keyboard (in the QuickTap bar) > Settings 4 From the Home screen, tap Apps > Language and input. Tap the Settings icon to the right of LG Keyboard, tap Input language and keyboard layout, then checkmark the languages you want the keyboard to be able to use.
Your Home screen (in the Touch keys bar), then tap Dual 4 Tap the Recent Apps Key window (at the bottom of the screen). NOTE If the Split view feature is activated, Dual window will automatically open when you tap a link on the full screen or tap an image email attachment. Using the Dual window feature 1. Tap the Dual window Key (in the Touch keys bar). 2. Tap (or drag) the icon for the application you want to open in the top window. 3.
Your Home screen Using QuickMemo+ to capture a screenshot 1. On the screen you want to capture, drag the Status bar downward and tap the QuickMemo+ icon (in the Quick Settings bar). OR Press and hold both of the Volume Keys tablet) at the same time. (on the right side of the 2. Create your memo, tap the Save icon in the toolbar (at the top of the screen), then select where to store the captured screenshot. Choose Gallery or QuickMemo+.
Google account setup Google Account Setup When you first turn on your tablet, you have the opportunity to activate the network, to sign into your Google Account and select how you want to use certain Google services. You must sign into a Google Account to use Gmail, Hangouts, Google Calendar, and other Google applications; to download apps from the Play Store; to back up your settings to Google servers; and to take advantage of other Google services on your tablet.
Connecting to Networks and Devices Connecting to Networks and Devices Wi-Fi With Wi-Fi, you can use high-speed Internet access within the coverage of the wireless access point (AP). Enjoy wireless Internet using Wi-Fi, without extra charges. Connecting to Wi-Fi networks To use Wi-Fi on your tablet, you need to access a wireless access point or ‘hotspot’. Some access points are open and you can simply connect to them.
Connecting to Networks and Devices Bluetooth You can use Bluetooth to send data by running a corresponding application, but not from the Bluetooth menu as on most other mobile phones or tablets. NOTES • LG is not responsible for the loss, interception or misuse of data sent or received via the Bluetooth wireless feature. • Always ensure that you share and receive data with devices that are trusted and properly secured.
Connecting to Networks and Devices To receive data using the Bluetooth wireless feature 1. From the Home screen, touch and hold the Recent Apps Key the Touch keys bar) > System settings > Bluetooth. (in 2. Tap the Bluetooth switch to turn Bluetooth on and mark the checkbox next to the tablet name to make the tablet visible on other devices. NOTE To select the length of time that your tablet will be visible, from the Bluetooth menu, > Visibility timeout. touch the Menu icon 3.
Connecting to Networks and Devices 4 If the device isn’t on the list, verify on the device that the wireless connection (Wi-Fi, Wi-Fi Direct, or Bluetooth) is turned on. Then tap Rescan. 4. The file is automatically sent. NOTE SmartShare Beam is accessed through selecting the Share option in some applications.
Connecting to Networks and Devices PC connections with a USB cable You can connect your tablet to your PC to charge it, transfer items to the PC from the tablet and vice versa. Transferring music, photos, and videos using the USB mass storage mode 1. Connect your tablet to a PC using the USB cable (power cord) included with your tablet. 2. If you haven't installed the LG Android Platform Driver on your PC, you'll need to manually change the settings.
Contacts Contacts You can add contacts on your tablet and synchronize them with the contacts in your Google Account(s) or other accounts that support syncing contacts. The Contacts application includes a navigation header at the top of the screen. The Groups tab, the Contacts tab, and the Favorites tab are on the left side, and the New icon and the Menu icon are on the right side.
Contacts 3. If you want to add a picture to identify the contact, tap the Photo icon . Choose Take photo (to take a picture using the camera) or Select from Gallery (to browse for and select an image). 4. Enter the Contact's name. Tap the More icon name information. to enter more specific 5. Enter all of the details for your contact. 6. Tap Save to save the contact entry. Favorite Contacts To add a contact to your favorites 1.
Contacts 3. Select the account where you want to create the group and enter a group name. 4. Tap the Add members icon and select the contacts you want to add, then tap Add (at the bottom of the screen). 5. Tap Save to save the group. NOTE If you delete a group, the contacts assigned to that group will not be lost. They'll remain in your contacts without a group designation.
Email Email You can use the Email application to read emails from services like Yahoo!, MSN, and AOL. The Email application supports the following account types: POP3, IMAP, and Exchange. Your service provider or system administrator can provide you with the account settings you need. To open the Email application # From the Home screen, tap the Email icon in the QuickTap bar.
Email Working with email account folders From the Email application, tap the Menu icon (in the top right corner of the screen), then tap Folders. Each account has an Inbox, Outbox, Sent, and Drafts folder. Depending on the features supported by your account’s service provider, you may have additional folders. Composing and sending email To compose and send a message: 1. From the Email application, tap the Compose icon screen in the Email header). (at the top of the 2.
Email Email Options menus NOTE The Options menus are opened by tapping Menu icon screen) or touching and holding the Recent Apps Key (in the top right corner of the (in the Touch keys bar). (in the top right corner of # From the Email Inbox, tap the Menu icon the screen) to access QSlide, Refresh, Folders, Sort by, Downloads, and Settings.
Email New message: Tap to begin a new Gmail message. Menu: Tap to open the Options menu to access Refresh and Manage labels. Search: Tap to search within your Gmail messages. Managing your Gmail messages 1. Tap the letter icon (or contact photo) next to one or more Gmail messages. 2. Tap an icon in the Inbox header (at the top of the screen). # Archive # Delete : Tap to send the message(s) to your archive folder. : Tap to delete the message(s).
Email Reading Your Messages # Tap a conversation that contains the message you want to read. The conversation opens to the first new (unread) message, or to the first starred message, if you’ve previously starred a message in the conversation. Inbox header Label button Tap to set labels for the message to help organize your messages. Tap the Contact's picture to open Quick Contact.
Email # Tap the Gmail icon your Inbox. (on the left side of the Inbox header) to return to To reread a message When you open a conversation, messages that you’ve already read are minimized into a tab that indicates the number of hidden messages. 1. From your Gmail Inbox, tap the conversation you want to view. 2. Tap the contact name to open that message (tap older messages to view all of the messages in the conversation, if necessary).
Email 5. Tap the Attach icon (to the right of the Subject field) to add an attachment to your message. Tap a file from the choices displayed or search for the file you want (tap the top left corner of the screen to access various locations where the files are stored), then tap the file to send with the message. NOTE You can also tap the Menu icon (in the top right corner of the screen), then tap Attach file to send an attachment with your message 6. Tap the Send icon message.
Email Google Account settings 1. From the Home screen, tap Apps (in the QuickTap bar) > the Apps tab (if necessary) > Google > Gmail . 2. Tap > Settings. 3. Tap General settings to change the settings for all accounts, including Archive & delete actions, Swipe to archive, Sender image, Reply all, Auto-fit messages, Auto-advance, Confirm before deleting, Confirm before archiving, and Confirm before sending.
Email Hangouts chatting list Touch and hold a friend’s name in the chat screen to display the following icons at the top of the screen. The icon(s) you tap are applied to that friend. Tap to turn notifications off for this friend. Tap to archive the conversation. Tap to delete the conversation. Blocking your Friends # To block a friend from exchanging messages with you, tap the friend in the chatting list. Tap the Menu icon (in the top right corner of the screen) > People & options.
Camera and Video Camera The Camera application not only allows you to take high quality pictures and share them, but also includes many specialized features eliminating the need for any other camera. The video feature is also integrated on the camera viewfinder so you can take a picture, then start recording video with a single tap without changing camera modes. To open the Camera application, tap Camera the Home screen.
Camera and Video a setting to toggle through its available settings. After changing the setting(s) as you want, tap the Settings icon again. Sets the resolution. For photos, choose from 5M, W4M, 3M, and 1M. For videos, choose from FHD, HD, and WVGA. NOTE If you choose a high resolution, the file size will increase which means you’ll be able to store fewer media files in your tablet’s memory. Allows you to take pictures by voice command. Disables the voice command function.
Camera and Video Additional front camera lens icons There are additional Settings icons specific to the front camera lens. The Flash icon uses the light from the touchscreen to brighten your face. The Mirror icon automatically mirrors the image viewed on the viewfinder (flips the right side to the left). Gesture shot using the front camera lens The Gesture shot function allows you to take a picture with a simple hand gesture.
Camera and Video 1. Open the Camera application and point the lens toward the subject you want to capture in your video. to start recording. 2. Tap the Record icon # A timer showing the length of the video will appear. # Tap the Capture icon video. to capture a still photo while you’re recording # While recording a video, place two fingers on the screen to use the dynamic zoom function (spread your fingers apart to zoom in and pinch them together to zoom back out). 3.
Camera and Video Tap to set the photo or video as a favorite and display it in your Gallery Favorites folder. Tap to edit the photo. See Editing photos. TIP! If you have a social networking account and set it up on your tablet, you can share your photo with your social networking community. NOTE All of your recent photos and videos are displayed in a thumbnail filmstrip at the bottom of the screen. Tap a thumbnail image to view it on the screen.
Camera and Video Add location – Tap to add the photo’s location information using the map provided. Rename – Tap to rename the photo or video. Print – Tap to select a printer via Cloud print to print the photo. Details – Tap to view the photo or video file details. Editing photos While viewing a photo, tap the Edit icon (at the top of the screen) to access the Edit photo screen to apply edits to the photo. 1.
Camera and Video Allows you to choose a spot on the photo to adjust the brightness, saturation, contrast, and center size. Drag your finger vertically to select the tune type, then adjust it by dragging your finger horizontally on the screen. Allows you to adjust the structure and sharpening. Drag your finger vertically to select the detail type, then adjust it by dragging horizontally across the screen.
Camera and Video 4 To view more photos and videos, swipe horizontally to scroll through them sequentially in full screen. 4 To select another photo or video to view, tap its thumbnail image in the scrolling list along the bottom edge of the screen. (in the top left corner of the screen) to display your 4 Tap the Back icon Camera folder in the Gallery application.
Camera and Video tips! While a video is playing using the Video application: • Slide • Slide your finger vertically along the right side of the screen to adjust the video volume. • Slide your finger horizontally across the screen to rewind or fast-forward. note your finger vertically along the left side of the screen to adjust the screen brightness. Don’t press too hard on the touchscreen; it’s sensitive enough to pick up a firm, light touch.
Multimedia Gallery Multimedia files (pictures and videos) are stored in your tablet’s internal memory for easy access to all of your files. You can also install an optional microSD card for additional portable storage. Use the Gallery application to view your multimedia files. 4 From the Home screen, tap Apps tab (if necessary) > Gallery . (in the QuickTap bar) > the Apps You can view, manage, and share all of your image and video files from the Gallery application.
Multimedia picture from the Email application creates an email folder and capturing a screenshot creates a Screenshots folder. Tap a folder to open it. To view additional folders and access (e.g., Favorites, Nearby devices, etc.) tap the upper-left corner of the screen. Playing Videos in Your Gallery 1. Select a video from the Gallery application by tapping the Play icon in the center of its preview image. 2. Select the application to use. Choose Video or Photos to play it automatically.
Multimedia Setting an image as wallpaper When viewing a photo, tap the screen (to display the control icons), then tap the Menu icon (in the top right corner of the screen). Tap Set image as and select Home screen wallpaper, Lock screen wallpaper, or Wallpaper. Crop the photo as necessary, then tap Done or OK (depending on the application used for cropping). NOTES • Some file formats are not supported, depending on the tablet software.
Multimedia note You can also change the volume while watching a video by pressing the Volume Keys (on the right side of the tablet). While a video is playing, slide your finger vertically along the right side of the screen to adjust the video volume. Video Options menu While the video is playing, tap the Menu icon (in the top right corner of the screen). The Video Options menu includes Screen ratio, Subtitles, Share, Trim, Settings, and Details.
Multimedia 4 Synchronize your tablet to a computer. 4 Receive files via Bluetooth. Transfer music using Media sync (MTP) 1. Connect the tablet to your PC using the USB cable included with your tablet. 2. Open the Notifications panel, tap the displayed USB connection method and select the Media device (MTP) option. Your tablet will appear as another hard drive on your computer. Click on the drive to view it. Copy the files from your PC to the drive folder. 3.
Multimedia Tap to set the audio effect. Sets the shuffle mode. Tap to toggle it On or Off Sets the repeat mode. Tap to toggle between On . song . , Off , and same Tap to share your music via the SmartShare function. Sets the current song as a favorite. Tap to toggle it On or Off . Tap to view the current playlist. Tap to open more options. Other music player options Touch and hold any song # From the Music library: Play, Add to playlist, Delete, Share, Details, and Search.
Multimedia • Music file copyrights may be protected by international treaties and national copyright laws. Therefore, it may be necessary to obtain permission or a license to reproduce or copy music. In some countries, national laws prohibit private copying of copyrighted material. Before downloading or copying the file, check the national laws of the relevant country concerning the use of such material. Play Store Play Store allows you to browse and search for free and paid apps.
Multimedia To download and install an app NOTE Before you can download a paid app, you must set up a billing arrangement. Price/Install button Indicates the cost or install for free apps. 1. From the Home screen, tap Play Store (in the QuickTap bar). 2. Tap a category from the Home page or tap the Search icon right corner of the screen) to search for an app. (in the top 3. Tap the app you want to open its details screen. 4. Tap INSTALL or the Price button to download the selected app. 5.
Multimedia Play Store settings Tap the Play Store Options menu icon (at the top left corner of the screen) > Settings to access Notifications, Auto-update apps, Add icon to Home screen, Clear search history, Content filtering, and Require password for purchases. You can also view the open source licenses and build versions. YouTube™ Opening YouTube and Watching Videos You can browse, search for, view, upload, and rank YouTube videos on your tablet with the YouTube application.
Multimedia YouTube settings Touch and hold the Recent Apps Key Settings to access YouTube’s settings. (in the Touch keys bar) > General: Limit mobile data usage, Uploads, Content localization, Improve YouTube, and Notifications. Connected TVs: Add a TV and Edit TVs. Search: Clear search history, Never remember history, and SafeSearch filtering. Captions: Text size and Subtitles style.