Test Report No.
LCD TV OWNER’S MANUAL LCD TV MODELS 19LG30 22LG30 Please read this manual carefully before operating your set. Retain it for future reference. Record model number and serial number of the set. See the label attached on the back cover and quote this information to your dealer when you require service. ENERGY STAR is a set of power-saving guidelines issued by the U.S. Environmental Protection Agency(EPA). As an ENERGY STAR Partner LGE U. S. A.,Inc.
WARNING / CAUTION WARNING / CAUTION To prevent fire or shock hazards, do not expose this product to rain or moisture. TO REDUCE THE RISK OF ELECTRIC SHOCK DO NOT REMOVE COVER (OR BACK). NO USER SERVICEABLE PARTS INSIDE. REFER TO QUALIFIED SERVICE PERSONNEL.
SAFETY INSTRUCTIONS IMPORTANT SAFETY INSTRUCTIONS Important safety instructions shall be provided with each apparatus. This information shall be given in a separate booklet or sheet, or be located before any operating instructions in an instruction for installation for use and supplied with the apparatus. This information shall be given in a language acceptable to the country where the apparatus is intended to be used. The important safety instructions shall be entitled “Important Safety Instructions”.
10 Use only with the cart, stand, tripod, bracket, or table specified by the manufacturer, or sold with the apparatus. When a cart is used, use caution when moving the cart/apparatus combination to avoid injury from tip-over. 11 Never touch this apparatus or antenna during a thunder or lighting storm. 12 Do not allow a impact shock or any objects to fall into the product, and do not drop onto the screen with something. 13 Refer all servicing to qualified service personnel.
CONTENTS WARNING / CAUTION . . . . . . . . . . . . . . . . . . . . . . . . . . . . 1 PICTURE CONTROL SAFETY INSTRUCTIONS . . . . . . . . . . . . . . . . . . . . . . . . . . 2 Picture Size (Aspect Ratio) Control . . . . . . . . . . . . . . . . . . 43 Preset Picture Settings - Picture Mode - Preset . . . . . . . . . . . . . . . . . . . . . . . . . . . . . . . 44 - Color Tone - Preset . . . . . . . . . . . . . . . . . . . . . . . . . . . . . . . . . . .
TIME SETTING Clock Setting - Auto Clock Setup . . . . . . . . . . . . . . . . . . . . . . . . . . . . . . . . . . . . 63 - Manual Clock Setup . . . . . . . . . . . . . . . . . . . . . . . . . . . . . . . . . 64 Auto On/Off Timer Setting . . . . . . . . . . . . . . . . . . . . . . . . . . . . . 65 Sleep Timer Setting . . . . . . . . . . . . . . . . . . . . . . . . . . . . . . . . . . . . . . . . . 66 Auto Shut-off Setting . . . . . . . . . . . . . . . . . . . . . . . . . . . . . . . . . . . . . . .
■ If the TV feels cold to the touch, there may be a small “flicker” when it is turned on. This is normal, there is nothing wrong with TV. ■ Some minute dot defects may be visible on the screen, appearing as tiny red, green, or blue spots. However, they have no adverse effect on the monitor's performance. ■ Avoid touching the LCD screen or holding your finger(s) against it for long periods of time. Doing so may produce some temporary distortion effects on the screen. On Disposal a.
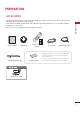
PREPARATION ACCESSORIES AV TV PO MO DE W PICT UR E SO UN D 1 4 5 - L FL AS HB IN PU T 3 8 6 0 VO Q.M EN U ER RAT IO 2 7 PREPARATION Ensure that the following accessories are included with your product. If an accessory is missing, please contact the dealer where you purchased the product. User must use shielded signal interface cables (D-sub 15 pin cable) with ferrite cores to maintain standard compliance for the product. The accessories can be different from the figures shown here.
PREPARATION FRONT PANEL INFORMATION PREPARATION ■ Image shown may differ from your TV ■ NOTE: If your product has a protection tape attached, remove the tape. And then wipe the product with a cloth (If a polishing cloth is included with your product, use it). INPUT MENU ENTER VOLUME CHANNEL Button Button Button (F,G)Buttons (E,D)Buttons INPUT MENU ENTER VOL CH Remote Control Sensor Power/Standby Indicator Illuminates red in standby mode. Illuminates blue when the set is switched on.
BACK PANEL INFORMATION ■ Image shown may differ from your TV PREPARATION 8 9 ANTENNA/CABLE IN 1 HDMI/DVI IN RGB(PC) IN AV IN AUDIO IN (RGB/DVI) S-VIDEO VIDEO AUDIO SERVICE ONLY RS-232C IN (CONTROL & SERVICE) 7 2 3 4 COMPONENT IN L(MONO) 1 3 2 L VIDEO 4 R R AUDIO 5 6 HDMI/DVI IN Connect a HDMI signal to this jack. Or DVI (Video) signal to this jack with a HDMI to DVI cable. RGB (PC) IN Connect the output from a PC. AUDIO (RGB/DVI) IN Connect the audio from a PC.
PREPARATION STAND INSTALLATION ■ PREPARATION 10 Image shown may differ from your TV 1 Carefully place the TV screen side down on a cushioned surface to protect the screen from damage. 2 Assemble the TV as shown.
BACK COVER FOR WIRE ARRANGEMENT ■ Image shown may differ from your TV Connect the cables as necessary. To connect an additional equipment, see the EXTERNAL EQUIPMENT SETUP section. 2 Install the CABLE MANAGEMENT CLIP as shown and manage the cable. PREPARATION 1 CABLE MANAGEMENT CLIP 3 Fit the CABLE MANAGEMENT CLIP as shown.
PREPARATION VESA WALL MOUNTING This product accepts a VESA-compliant mounting interface pad. (optional) There 4 threaded holes are available for attaching the bracket. PREPARATION 100 mm 100 mm ! NOTE G Screw length needed depends on the wall mount used. For further information, refer to the VESA Wall Mounting Instruction Guide. DESKTOP PEDESTAL INSTALLATION For proper ventilation, allow a clearance of 4 inches on all four sides from the wall.
POSITIONING YOUR DISPLAY Here shown may be somewhat different from your TV. ■ Adjust the position of the panel in various ways for maximum comfort.
PREPARATION KENSINGTON SECURITY SYSTEM PREPARATION - The TV is equipped with a Kensington Security System connector on the back panel. Connect the Kensington Security System cable as shown below. - For the detailed installation and use of the Kensington Security System, refer to the user’s guide provided with the Kensington Security System. For further information, contact h ttp://www.kensington.com, the internet homepage of the Kensington company.
ANTENNA OR CABLE CONNECTION ■ Image shown may differ from your TV. 1. Antenna (Analog or Digital) PREPARATION Wall Antenna Socket or Outdoor Antenna without a Cable Box Connections. For optimum picture quality, adjust antenna direction if needed.
EXTERNAL EQUIPMENT SETUP ■ To prevent the equipment damage, never plug in any power cords until you have finished connecting all equipment. HD RECEIVER SETUP This TV can receive Digital Over-the-air/Cable signals without an external digital set-top box. However, if you do receive digital signals from a digital set-top box or other digital external device, refer to the figure as shown below.
When connecting HDMI cable 1 Connect the digital set-top box to HDMI/DVI I N jack on the set. 2 No separated audio connection is necessary. HDMI supports both audio and video. HDMI/DVI IN SERVICE ONLY 2. How to use RGB(PC) IN RS-232C IN (CONTROL & SERVICE) 1 A (R EXTERNAL EQUIPMENT SETUP 1. How to connect Turn on the digital set-top box. (Refer to the owner’s manual for the digital set-top box.) ■ Select HDMI input source with using the INPUT button on the remote control.
EXTERNAL EQUIPMENT SETUP When connecting HDMI to DVI cable 1 Connect the DVI output of the digital set-top box to the HDMI/DVI I N jack on the set. RGB(PC) IN HDMI/DVI IN 2 Connect the audio output of the digital set-top box to the AUDIO I N ( RGB/DVI) jack on the set. SERVICE ONLY RS-232C IN (CONTROL & SERVICE) 2. How to use Turn on the digital set-top box. (Refer to the owner’s manual for the digital set-top box.) ■ Select HDMI input source with using the INPUT button on the remote control.
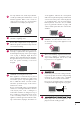
DVD SETUP When connecting Component cable 1. How to connect 2 Connect the video outputs (Y, PB, PR) of the DVD to the COMPONENT I N V IDEO jacks on the set. Match the jack colors (Y = green, PB = blue, and PR = red). Y Connect the audio outputs of the DVD to the COMPONENT I N A UDIO jacks on the set. PB PR L R 1 2 ANTENNA/CABLE IN 2. How to use ■ ■ Turn on the DVD player, insert a DVD. Select Component input source by using the I N P U T button on the remote control.
EXTERNAL EQUIPMENT SETUP When connecting with an S-Video cable 1. How to connect 2 Connect the S-VIDEO output of the DVD to the S -VIDEO input on the set. Connect the audio outputs of the DVD to the AUDIO input jacks on the set. 2. How to use ■ ■ ■ AUDIO IN (RGB/DVI) Turn on the DVD player, insert a DVD. Select A V input source by using the INPUT button on the remote control. Refer to the DVD player's manual for operating instructions.
VCR SETUP To avoid picture noise (interference), leave an adequate distance between the VCR and TV. ■ Use the ISM feature in the Option menu to avoid having a fixed image remain on the screen for a long period of time (Only Plasma TV model). If the 4:3 picture format is used; the fixed images on the sides of the screen may remain visible on the screen. This phenomenon is common to all manufactures and in consequence the manufactures warranty does not cover the product bearing this phenomenon.
EXTERNAL EQUIPMENT SETUP When connecting with a RCA cable N 1. How to connect AV IN AUDIO IN (RGB/DVI) S-VIDEO VIDEO AUDIO 1 COMPONENT IN L(MONO) Connect the AUDIO/VIDEO jacks between TV and VCR. Match the jack colors (Video = yellow, Audio Left = white, and Audio Right = red) N RVICE) L VIDEO R R AUDIO EXTERNAL EQUIPMENT SETUP 1 2. How to use ■ Insert a video tape into the VCR and press PLAY on the VCR. (Refer to the VCR owner’s manual.
HEADPHONE SETUP You can listen to the sound through the headphone. 1. How to connect Plug the headphone into the headphone socket. 2 To adjust the headphone volume, press the VOL + or - button. If you press the M U T E button, the sound from the headphone is switched off.
EXTERNAL EQUIPMENT SETUP PC SETUP This TV provides Plug and Play capability, meaning that the PC adjusts automatically to the TV's settings. When connecting D-sub 15 pin cable AUDIO IN (RGB/DVI) DMI/DVI IN RGB(PC) IN SERVICE ONLY RS-232C IN (CONTROL & SERVICE) S-VIDEO EXTERNAL EQUIPMENT SETUP 1 Connect the RGB output of the PC to the RG B ( P C) I N jack on the set. 2 Connect the PC audio output to the AUDIO I N ( RGB/DVI ) jack on the set. COMPONENT IN 1. How to connect 1 VIDEO 2 2.
! NOTES To get the the best picture quality, adjust the PC graphics card to 1440x900 (19LG30), 1680x1050 (22LG30). G Depending on the graphics card, DOS mode may not work if a HDMI to DVI Cable is in use. G If the video doesn’t fit the screen, try pressing the ADJUST button to adjust the screen position of TV. G G Check the image on your TV. There may be noise associated with the resolution, vertical pattern, contrast or brightness in PC mode.
EXTERNAL EQUIPMENT SETUP Screen Setup for PC mode Selecting Resolution PICTURE Move SCREEN Enter • Contrast 50 • Brightness 50 • Sharpness 50 • Color 50 • Tint 0 Resolution Position R G • Advanced Control Screen (RGB-PC) Size Phase Reset 1 MENU 2 Select PICTURE. ENTER Select SCREEN ( RGB-PC). ENTER Select Resolution. 3 4 5 MENU G Auto Config. • Picture Reset 26 Move MENU Prev.
Auto Configure Automatically adjusts picture position and minimizes image instability. After adjustment, if the image is still not correct, your TV is functioning properly but needs further adjustment. PICTURE Move SCREEN Enter E • Contrast 50 • Brightness 50 • Sharpness 50 • Color 50 • Tint 0 Move MENU Prev. Resolution Auto Config. G Position R Start Auto configuration.
PREPARATION Adjustment for screen Position, Size, and Phase PREPARATION If the picture is not clear after auto adjustment and especially if characters are still trembling, adjust the picture phase manually. This feature operates only in RGB-PC mode. PICTURE Move SCREEN Enter Move MENU Prev. E • Contrast 50 • Brightness 50 • Sharpness 50 • Color 50 • Tint 0 Resolution Auto Config.
Screen Reset (Reset to original factory values) PICTURE Move SCREEN Enter Move PREPARATION Returns to the default settings Resolution, Auto Config., Position, Size and Phase at the factory. MENU Prev. E • Contrast 50 • Brightness 50 • Sharpness 50 • Color 50 • Tint 0 Resolution Auto Config. Position R • Advanced Control Initialize Settings. G Size • Picture Reset Screen (RGB-PC) Phase Reset 1 MENU 2 Select PICTURE. ENTER Select SCREEN. ENTER Select Reset.
WATCHING TV / CHANNEL CONTROL REMOTE CONTROL FUNCTIONS When using the remote control, aim it at the remote control sensor on the TV. AV MODE It helps you select and set images and sounds when connecting AV devices. G p.42 POWER TV PICTURE Selects the factory preset picture depend on the viewing environment. G p.44 WATCHING TV / CHANNEL CONTROL SOUND Selects the factory preset sound for type of program. G p.53 RATIO Change the aspect ratio.G p.43 VOLUME UP Increase/decrease the sound level.
POWER Turns your TV on or off. TV In AV, Component, RGB-PC, and HDMI input sources, screen returns to the last TV channel. INPUT External input modes rotate in regular sequence — (DASH) Used to enter a program number for multiple program channels such as 2-1, 2-2, etc. FAV Scroll through the programmed Favorite channels. G p.
WATCHING TV / CHANNEL CONTROL TURNING ON TV POWER TV First, connect power cord correctly. At this moment, the TV switches to standby mode. ■ In standby mode to turn TV on, press the , INPUT, CH (D or E) button on the TV or press the POWER, INPUT, TV, CH (+ or -), Number (0~9) button on the remote control. 1 Select the viewing source by using the INPUT button on the remote control. ■ This TV is programmed to remember which power state it was last set to, even if the power cord is out.
QUICK MENU Your TV's OSD (On Screen Display) may differ slightly from what is shown in this manual. Q.Menu (Quick Menu) is a menu of features which users might use frequently. • Caption: Select a closed caption. • Multi A udio: Selects MTS sound. • Sleep T ime: Select the amount of time before your TV turns off automatically. • Del/Add/Fav: Select channel you want to add or delete or add the channel to the Favorite List.
WATCHING TV /CHANNEL CONTROL INITIAL SETTING This OSD (On Screen Display) is displayed automatically on the screen as figure after turning on the TV and you can adjust the Location, Time, Language, Auto tuning. Step1. Mode setting 1 Step1. Mode Setting Select Display M ode or Home M ode. WATCHING TV / CHANNEL CONTROL It sets a use environment. Select the set where mode.
Step3. Option setting 1 Step3. Option Setting F 2. Audio Language Setting English Select OSD L anguage S etting or Audio L anguage S etting. G French Enter EXIT Exit 2 Select your desired language. 3 ENTER Step4. Auto Tuning 1 Step4. Auto Tuning ENTER Auto Tuning can change channel map. Do you want to start Auto Tuning? Start Auto T uning. WATCHING TV / CHANNEL CONTROL 1. OSD Language Setting Enter Enter EXIT Exit ! NOTE • You can also adjust Initial S etting in the OPTION menu.
WATCHING TV /CHANNEL CONTROL ON-SCREEN MENUS SELECTION Your TV's OSD (On Screen Display) may differ slightly from that shown in this manual.
CHANNEL SETUP Auto Scan (Auto Tuning) Automatically finds all channels available through antenna or cable inputs, and stores them in memory on the channel list. Run Auto Tuning again after any Antenna/Cable connection changes. Move Enter CHANNEL Auto Tuning Auto Tuning Manual Tuning Manual Tuning Channel Edit Channel Edit Move Enter Selection Yes leads you to the Auto Tuning screen. Yes No 1 MENU Select CHANNEL. 2 ENTER Select Auto T uning.
PICTURE CONTROL PICTURE SIZE (ASPECT RATIO) CONTROL This feature lets you choose the way an analog picture with a 4:3 aspect ratio is displayed on your TV. When you receive an analog picture with a 4:3 aspect ratio on your 16:9 TV, you need to specify how the picture is to be displayed. ■ RGB-PC input source use 4:3 or 16:9 aspect ratio. ! NOTE G If a fixed image is displayed on the screen for a long time, the image may become imprinted on the screen and remain visible.
APPENDIX TROUBLESHOOTING The operation does not work normally. Check to see if there is any object between the product and the remote control causing obstruction. Ensure you are pointing the remote control directly at the TV. ■ Ensure that the batteries are installed with correct polarity (+ to +, - to -). ■ Ensure that the correct remote operating mode is set: TV, VCR etc. ■ Install new batteries.
The audio function does not work. Press the VOL or VOLUME button. ■ Sound muted? Press MUTE button. ■ Try another channel. The problem may be with the broadcast. ■ Are the audio cables installed properly? ■ Picture OK & No sound No output from one of the speakers Unusual sound from inside the product ■ Adjust Balance in menu option. ■ A change in ambient humidity or temperature may result in an unusual noise when the product is turned on or off and does not indicate a fault with the product.
MAINTENANCE Early malfunctions can be prevented. Careful and regular cleaning can extend the amount of time you can enjoy your new TV. Caution: Be sure to turn the power off and unplug the power cord before you begin any cleaning. Cleaning the Screen Here’s a great way to keep the dust off your screen for a while. Wet a soft cloth in a mixture of lukewarm water and a little fabric softener or dish washing detergent. Wring the cloth until it’s almost dry, and then use it to wipe the screen.
PRODUCT SPECIFICATIONS 19LG30 (19LG30-UA) MODELS 18.1 x 15.4 x 7.4 inches 20.6 x 17.0 x 7.4 inches 458.8 x 391.0 x 189.2 mm 522.2 x 432.4 x 189.2 mm 18.1 x 13.6 x 2.7 inches 20.6 x 15.1 x 2.7 inches 458.8 x 344.5 x 69.0 mm 522.2 x 383.3 x 69.0 mm including stand 11.5 pounds / 5.2 kg 12.8 pounds / 5.8 kg excluding stand 10.1 pounds / 4.6 kg 11.5 pounds / 5.
APPENDIX EXTERNAL CONTROL THROUGH RS-232C The RS-232C port allows you connect the RS-232C input jack to an external control device (such as a computer or an A/V control system) to control the TV’s functions externally. ■ Note: RS-232C on this unit is intended to be used with third party RS-232C control hardware and software. The instructions below are provided to help with programming software or to test functionality using telenet software.
RS-232C Configurations Either cable below can be used. 7-Wire Configuration (Serial female-female NULL modem cable) RXD TXD GND DTR DSR RTS CTS PC TV 2 3 5 4 6 7 8 3 2 5 6 4 8 7 D-Sub 9 D-Sub 9 3-Wire Configurations (Not standard) TXD RXD GND DSR DTR CTS RTS PC TV 2 3 5 4 6 7 8 3 2 5 6 4 7 8 D-Sub 9 D-Sub 9 RXD TXD GND DTR DSR RTS CTS TXD RXD GND DTR DSR RTS CTS Set ID Use this function to specify a TV ID number. Refer to ‘Real Data Mapping1’. G p.87.
APPENDIX Command Reference List COMMAND1 COMMAND2 01. Power DATA (Hexadecimal) 0~1 COMMAND1 COMMAND2 DATA (Hexadecimal) k j 0 ~ 64 11. Sharpness k k 0 ~ 64 12. OSD Select k l 0~1 k m 0~1 10. Tint k a 02. Input Select k b (G p.87) 03. Aspect Ratio k c (G p.87) 04. Screen Mute k d 0~1 13. Remote Control 05. Volume Mute k e 0~1 Lock Mode 06. Volume Control k f 0 ~ 64 14. Treble k r 0 ~ 64 07. Contrast k g 0 ~ 64 15. Bass k s 0 ~ 64 08.
01. Power ( Command: k a) To control Power On/Off of the TV. Transmission [k][a][ ][Set ID][ ][Data][Cr] Data 0 : Power Off Data 1 : Power On Acknowledgement [a][ ][Set ID][ ][OK/NG][Data][x] * In a like manner, if other functions transmit ‘FF’ data based on this format, Acknowledgement data feedback presents status about each function. * In this model, TV will send the Acknowledge after power on processing completion. * There might be a time delay between command and acknowledgement. 02.
APPENDIX 10. T int ( Command: k j ) 16. B alance ( Command: k t ) To adjust the screen tint. You can also adjust tint in the Video menu. Transmission [k][j][ ][Set ID][ ][Data][Cr] Data Red : 0 ~ Green : 64 To adjust balance. You can also adjust balance in the Audio menu. Transmission [k][t][ ][Set ID][ ][Data][Cr] Data Min: 0 ~ Max: 64(*transmit by Hexadecimal code) *Refer to ‘Real data mapping’. G p.87. Acknowledgement [ j ][ ][Set ID][ ][OK/NG][Data][x] *Refer to ‘Real data mapping’. G p.87.
Data5: 7 Main/Sub Picture 6 Two/One Part Channel 5 Using Physical Channel 4 3 2 1 0 Step NTSC Air NTSC Cable ATSC Air ATSC Cable_std ATSC Cable_hrc ATSC Cable_irc ATSC cable_auto Reserved Reserved Reserved 0 Main 0 Two 0 Use x 0 0 0 0 1 1 One 1 No Use x 0 0 0 1 x 0 0 1 0 x 0 0 1 1 x 0 1 0 0 x 0 1 0 1 x 0 1 1 0 x 0 1 1 1 x x x x x x 1 1 1 1 The table above lists the binary code which must be converted to Hexadecimal before sending.
Regulatory information Regulatory information
Regulatory Information cont. respecte toutes les exigences du Règlement sur le matériel brouilleur du Canada. FCC Compliance Statement This equipment has been tested and found to comply within the limits of a Class B digital device pursuant to Part 15 of the FCC Rules. These limits are designed to provide reasonable protection against harmful interference in a residential installation. NOTICE The regulations are applied only to the products with the ID LABEL indicating specific requirements.
Regulatory Information cont. Why do we have environmentally labelled computers? In many countries, environmental labelling has become an established method for encouraging the adaptation of goods and services to the environment. The main problem as far as computers and other electronic equipment are concerned is that environmentally harmful substances are used both in the products and during their manufacture.
Regulatory Information cont. Monitor Disposal relevant bio-accumulative TCO’95 requirement permits the inclusion of lead, as no replacement has yet been developed. WARNING If you need to dispose of a monitor, ask a qualified service representative for the proper procedure. Improper disposal could result in personal injury from implosion. Cadmium is present in rechargeable batteries and in the color-generating layers of certain computer displays.
Regulatory Information cont. Approval requirements cover a wide range of issues: ecology, ergonomics, emission of electrical and magnetical fields, energy consumption and electrical safety. TCO’99 requires that plastic components weighing more than 25 grams shall not contain flame retardants with organically bound bromine or chlorine. Flame retardants are allowed in the printed wiring board laminates due to the lack of commercially available alternatives.
Regulatory Information cont. with displays in 1992 and is now requested by users and IT-manufacturers all over the world. TCO’03 (TCO’03 applied model only) For more information, please visit www.tcodevelopment.com English Congratulations! The display you have just purchased carries the TCO’03 Displays label. This means that your display is designed,manufactured and tested according to some of the strictest quality and environmental requirements in the world.
Regulatory Information cont. environnement plus propre' en 1994 et celle-ci est restée, depuis lors, un principe directeur de notre entreprise. Cette déclaration a servi de base à notre réflexion et nous a permis de prendre en compte à la fois les aspects économiques et sociaux de nos activités, tout en respectant l’environnement. Deutsch Informationen zur Erhaltung der Umwelt Im Jahr 1994 verkündete LGE die 'LG Declaration for a Cleaner Environment' (LG Erklärung für eine sauberere Umwelt).
Regulatory Information cont. Noi della LG, promuoviamo attività a favore della tutela dell'ambiente sviluppando appositamente i nostri prodotti per cogliere il concetto del rispetto dell’ambiente riducendo i materiali dannosi presenti nei nostri prodotti. Ad esempio nei nostri monitor non è presente il cadmio. Informazioni per il riciclaggio Il monitor può presentare componenti che potrebbero risultare eventualmente dannosi per l'ambiente.
Regulatory Information cont. Informações relacionadas à reciclagem monitor aan het einde van zijn levensduur wordt gerecycled. Este monitor pode conter peças que podem representar riscos ao ambiente. É importante que ele seja reciclado após o uso. LGE. verwerkt alle afvalmonitors via een milieuvriendelijke recyclingmethode. Hiervoor worden er momenteel wereldwijd verscheidene inname- en recyclingsystemen gehanteerd.
Regulatory Information cont. KÓÔÓ‡ˆËˇ LGE Ô‡·‡Ú˚‚‡ÂÚ ‚Ò ·‡ÍÓ‚‡ÌÌ˚ ÏÓÌËÚÓ˚ Ò ÔÓÏÓ˘¸˛ ˝ÍÓÎӄ˘ÂÒÍË ÔËÂÏÎÂÏÓ„Ó ÏÂÚÓ‰‡ ÛÚËÎËÁ‡ˆËË ÓÚıÓ‰Ó‚. œÓ ‚ÒÂÏÛ ÏËÛ ‰ÂÈÒÚ‚Û˛Ú ÒËÒÚÂÏ˚ ÛÚËÎËÁ‡ˆËË ÓÚıÓ‰Ó‚ Ë ‚ÓÁ‚‡Ú‡ ËÒÔÓθÁÓ‚‡ÌÌÓÈ ÔÓ‰Û͈ËË. ÃÌÓ„Ë ÍÓÏÔÓÌÂÌÚ˚ ·Û‰ÛÚ ‚ÚÓ˘ÌÓ ËÒÔÓθÁÓ‚‡Ì˚ Ë ÛÚËÎËÁËÓ‚‡Ì˚, ‚ ÚÓ ‚ÂÏˇ Í‡Í ‚‰Ì˚ ‚¢ÂÒÚ‚‡ Ë ÚˇÊÂÎ˚ ÏÂÚ‡ÎÎ˚ ·Û‰ÛÚ Ó·‡·ÓÚ‡Ì˚ Ò ÔÓÏÓ˘¸˛ ˝ÍÓÎӄ˘ÂÒÍË ÔËÂÏÎÂÏÓ„Ó ÏÂÚÓ‰‡.