PLASMA TV OWNER’S MANUAL MODELS: TU-50PY22/TU-50PY2DR-UA TU-60PY22/TU-60PY2DR-UA R TruSurround XT TM Please read this manual carefully and completely before operating your TV. Retain this manual for future reference. Record model number and serial number of the TV in the spaces provided below. See the label attached on the back cover and relate this information to your dealer if you require service. Model Number : Serial Number : LG Electronics U.S.A., Inc.
Warning/Caution Warning/Caution WARNING/CAUTION RISK OF ELECTRIC SHOCK DO NOT OPEN WARNING/CAUTION: TO REDUCE THE RISK OF ELECTRIC SHOCK DO NOT REMOVE COVER (OR BACK). NO USER SERVICEABLE PARTS INSIDE. REFER TO QUALIFIED SERVICE PERSONNEL.
TV Guide On Screen Notices for U.S.A. In the United States, the TV Guide On Screen system and other related marks are registered marks of Gemstar-TV Guide On Screen system International, Inc. and/or one of its affiliates. In Canada,TV Guide On Screen system is a registered mark of Transcontinental Inc., and is used under license by Gemstar-TV Guide On Screen system International, Inc. The TV Guide On Screen system is manufactured under license from Gemstar-TV Guide On Screen system International, Inc.
Warning/Caution Safety Instructions IMPORTANT SAFETY INSTRUCTIONS Important safety instructions shall be provided with each apparatus. This information shall be given in a separate booklet or sheet, or be located before any operating instructions in an instruction for installation for use and supplied with the apparatus. This information shall be given in a language acceptable to the country where the apparatus is intended to be used.
Safety Instructions 13. Unplug this apparatus during lightning storms or when unused for long periods of time. 14. Refer all servicing to qualified service personnel. Servicing is required when the apparatus has been damaged in any way, such as power-supply cord or plug is damaged, liquid has been spilled or objects have fallen into the apparatus, the apparatus has exposed to rain or moisture, does not operate normally, or has been dropped. 15.
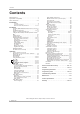
Contents Contents Warning/Caution . . . . . . . . . . . . . . . . . . . . . . . . . . . . . . . .2 Digital Cable Compatibility . . . . . . . . . . . . . . . . . . . . . . . . .3 Safety Instructions . . . . . . . . . . . . . . . . . . . . . . . . . . . . .4~5 Introduction Controls . . . . . . . . . . . . . . . . . . . . . . . . . . . . . . .8 Connection Options . . . . . . . . . . . . . . . . . . . . . .9 Remote Control Key Functions . . . . . . . . . .
Introduction Introduction What is a Plasma Display Panel (PDP)? A plasma display panel is the latest display technology and the best way to achieve flat panel displays with excellent image quality and large screen sizes that are easily viewable. The PDP can be thought of as a descendant of the neon lamp and it can be also be viewed as a series of fluorescent lamps.
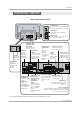
Introduction Controls - This is a simplified representation of front panel. Here shown may be somewhat different from your TV. Front Panel Controls CHANNEL Buttons VOLUME Buttons MENU Button TV/VIDEO Button TV GUIDE Button POWER Button Remote Control Sensor INDEX Switches LED Display on or off. Power Indicator Blinks orange in standby mode, blinks green when the TV is turned on. (•After orange stop the blinking,directly turn on the TV, but in case of green, screen is displayed at 3~4 minutes later.
Introduction Connection Options Back Connection Panel S-VIDEO Input A connection available to provide better picture quality than the video input. S-VIDEO FRONT A/V INPUT AUDIO INPUT VIDEO INPUT RS-232C INPUT (CONTROL/SERVICE) L DVD /DTV INPUT OUTPUT I 1 HDMI 2 COMPONENT2 INPUT E3 E9 R VIDEO COMPONENT 2 MONITOR OUTPUT COMPONENT 1 A/V INPUT1 DIGITAL AUDIO (OPTICAL) HDMI /DVI R AUDIO L / MONO VIDEO VIDEO Input Connects the video signal from a video device.
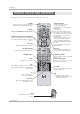
Introduction Remote Control Key Functions - When using the remote control, aim it at the remote control sensor on the TV. POWER Turns your TV or any other programmed equipment on or off, depending on mode. TV INPUT TV/VIDEO MODE X STUDIO Bring up the HOME menu to the screen. THUMBSTICK (Up/Down/Left/Right/ENTER) Allows you to navigate the on-screen menus and adjust the system settings to your preference. DAY DAY - + REC LIST Appear the thumbnail recorded list.
Introduction TV INPUT When you watch the TV, Antenna and Cable is toggled. In Video, Front Video, Component 1-2, RGB-DTV (or RGB-PC), HDMI1/DVI, HDMI2 and IEEE1394 input sources, screen return to the last TV channel. TV INPUT MODE Selects the remote operating mode: TV, DVD, VCR, AUDIO, CABLE or STB. Select other operating modes, for the remote to operate external devices.
Installation Installation Accessories Ensure that the following accessories are included with your plasma display. If an accessory is missing, please contact the dealer where you purchased the product. TV INP UT DE MO + DAY - DAY BK SH FLA 1.5V 1.
Installation GROUNDING Power Supply Ensure that you connect the grounding / earth wire to prevent possible electric shock. If grounding methods are not possible, have a qualified electrician install a separate circuit breaker. Do not try to ground the unit by connecting it to telephone wires, lightening rods, or gas pipes. Short-circuit Breaker • The TV can be installed in various ways such as on a wall, or on a desktop etc. • The TV is designed to be mounted horizontally.
Installation Remove or Attache the Plate Cover - When moving or connecting the power cord, be used the these methods. - And after removing the plate cover, you must install the wall brackets on the wall.
Installation Swivel function • After installing the TV, you can adjust the the TV set manually to the left or right direction by 20 degrees to suit your viewing position. Note: Before adjusting the angle, you must loosen (to the left) the shaft bolt on the middle of stand’s back. And when stand be level with TV, you must close (to the right) the shaft bolt to set the hole.
Installation External Equipment Connections Antenna or Cable Connection 1. Analog and Digital TV signals provided on antenna - Wall Antenna Socket or Outdoor Antenna without a Cable Box Connections - For optimum picture quality, adjust antenna direction if needed. Multi-family Dwellings/Apartments (Connect to wall antenna socket) AC INPUT Wall Antenna Socket CABLE ANTENNA Bronze Wire RF Coaxial Wire (75 ohm) VHF Antenna Turn clockwise to tighten.
Installation 3. Analog and Digital TV signals provided on cable and antenna Antenna Bronze Wire RF Coaxial Wire (75 ohm) AC INPUT Cable TV Wall Jack Turn clockwise to tighten. RF Coaxial Wire (75 ohm) ANTENNA CABLE Bronze Wire • In a poor signal area to improve picture quality, purchase and install a signal amplifier. ANTENNA • If the antenna needs to be split for two TV’s, install a “2Way Signal Splitter” in the connections.
Installation External A/V Source Setup How to connect RS-232C INPUT (CONTROL/SERVICE) Connect the audio and video cables from the external equipment's output jacks to the TV input jacks, as shown in the figure. When connecting the TV to external equipment, match the jack colors (Video = yellow, Audio Left = white, and Audio Right = red).
Installation TM CableCARDTM Setup How to use Insert the CableCARDTM received from the cable service provider to the TM CableCARDTM slot of TV back panel. If the pairing information about this TV and the CableCARD is automatically displayed on the screen, contact with the cable service provider by phone. RS-232C INPUT (CONTROL/SERVICE) OUTPUT HDMI 2 COMPONENT2 INPUT IEEE-1394 Note : TM have the types of Motorola, Scientific Atlanta, SCM etc..
Installation PC Setup - This TV provides Plug and Play capability, meaning that the PC adjusts automatically to the TV's settings. - The TV perceives 640x480, 60Hz as DTV 480p based on the PC graphic card, change the screen scanning rate for the graphic card accordingly. How to connect 1. Connect the PC to HDMI1/DVI port of this TV with an HDMI-to-DVI cable(not supplied with this product).
Installation Monitor Display Specifications (HDMI/DVI Mode) Horizontal Vertical Frequency(KHz) Frequency(Hz) Resolution 640x480 800x600 31.469 59.94 37.861 72.80 37.500 75.00 35.156 56.25 37.879 60.31 48.077 72.18 46.875 75.00 Resolution Horizontal Vertical Frequency(KHz) Frequency(Hz) 1024x768 48.363 60.00 56.476 70.06 60.023 75.
Installation HDMI - HDMITM, the HDMI logo and High-Definition Multimedia Interface are trademarks or registered trademarks of HDMI Licensing LLC." - This TV can receive the High-Definition Multimedia Interface(HDMI) or the Digital Visual Interface(DVI). - This TV supports HDCP(High-bandwidth Digital Contents Protection) Protocol for 720x480p, 1280x720p, and 1920x1080i resolution.
Installation Reference Cable sample HDMI Cable (not supplied with the product) HDMI to DVI Cable (not supplied with the product) Fiber Optic Digital Audio Cable (not supplied with the product) Analog Audio Cable(RCA type) (not supplied with the product) Analog Audio Cable(Stereo to RCA type) (not supplied with the product) Owner’s Manual 23
Installation How to use 1. Connect the HDMI1/DVI Source Devices(DVD Player or Set Top Box or PC) and the TV SET. 2. Turn on the display by pressing the POWER button on the TV SET and HDMI1/DVI Source Devices remote control. 3. Select HDM1/DVI Input source in Main Input option of SETUP menu.(Refer to P.62) 4. Check the image on your TV SET. There may be noise associated with the resolution, vertical pattern, contrast or brightness in HDMI1/DVI Source Devices.
Installation TV Guide On Screen Setup - The TV Guide On Screen system uses Setup information to provide you with show listings and lineups in your area—which are updated several times a day. - Once you set up the TV according to manufacturer’s instructions, you are ready to set up the TV Guide On Screen system. Note:The TV Guide On Screen system interactive program guide provides listings for cable-ready, cable box, and digital cable services as well as over-the-air broadcast.
Installation 3.Cable Service without a Cable Box VIDEO AUDIO L VIDEO AUDIO L R COMPONENT INPUT 2 AC INPUT R MONITOR OUTPUT DVD /DTV INPUT REMOTE CONTROL Cable ANTENNA CABLE (MONO) COMPONENT INPUT 1 S-VIDEO A/V INPUT 1 or ANT OUT VCR Front ANT IN VCR Rear OUT OUTPUT SWITCH 3 4 IN (R) AUDIO (L) VIDEO S-VIDEO Cable Box Front OUTPUT SWITCH 3 4 RF (R) AUDIO (L) VIDEO TV VCR Cable Cable Box Rear 4.
Installation Note: • The G-LINKTM cable is necessary for the TV Guide On Screen system to work with your Cable Box and VCR. See Page 23~24 for G-LINKTM connection instructions. TV Guide On Screen Setup 1.Reminder Screen The TV Guide On Screen system's Reminder Screen appears: -- after initial TV set up -- if you power Off the TV and then power it back On To make a selection, use the and press ENTER.
Installation 2. Screen 2: Enter Zip or Postal Code Option 1 • If you selected USA in Screen 1, you see the ZIP Code screen. • You input numbers by either pressing the number keys on the remote or using the D / E button to display a number, and then the F / G button to move to another field. • Press ENTER to display Screen 3. Option 2 • If you selected Canada in Screen 1, you see the Postal Code screen. • You input characters by using the D / E button, and then the F / G button to move to another field.
Installation 5. Screen 5: Which TV input is the cable box plugged into? • If you select Cable, you see Screen 6. • If you make any other choice, you see Screen 7 . 6. Screen 6: Cable Box Tuning Channel • Select the channel used for the cable box. • Press ENTER to display Screen 7. 7. Screen 7: Cable Box Configuration Diagram • The diagram shows the correct way to install the G-LINK Cable from the back of the device to the cable box. Make sure the G-LINKTM Cable is properly installed.
Installation 8. Screen 8: Cable Box Brand Name • Use the D / E button to select a cable box brand. • Press ENTER to display Screen 9. 9. Screen 9: Cable Box Preparation • Follow the on-screen instructions, and press ENTER to display Screen 10. 10. Screen 10: Cable Box Code Testing • When testing is done, Screen 11 displays automatically. 11. Screen 11: Cable Box Tuned to Channel 9? • If you select Yes, you see Screen 12. • If you select No, a different code is tested in Screen 10.
Installation 12. Screen 12: Do you have an antenna connected? •If you select Yes, you see Screen 13. Note: •If you selected No in Screen 3 then you must select Yes in this screen to receive a channel lineup and listings. •If you select No, you see Screen 13. 13. Screen 13: Are your basic settings correct? •If you select Yes, you see Screen 14. •If you select No, you see Screen 1. 14. Screen 14: Congratulations •Press ENTER to display Screen 15.
Installation 15. Screen 15: Helpful Information •This screen tells you valuable information on using your Guide. •Press ENTER to watch TV. Notes: • The TV Guide On Screen system receives program listings data through your cable or over-the-air video signal. In order to receive regular program listings, please remember to do the following: 1. Turn OFF your TV when it is not in use. (Do not unplug the power cord.) 2. If you have a Cable box connected, leave it ON. 3.
Operation Operation Turning the TV On 1. First, connect power cord correctly. At this moment, the TV switches to standby mode. In standby mode to turn TV on, press the power, TV/VIDEO, CH (D / E) button on the TV or press the POWER, TV/VIDEO, TV INPUT, CH (+, -), Number (0 ~ 9) button on the TV . 2. Select the viewing source by using TV/VIDEO, TV INPUT button on the remote control. This TV is programmed to remember which mode it was last set to, even if you turn the TV off. 3.
Operation HOME Menu - The menus can be shown on the screen in the selected language. First select your language.
Operation TV Setup On-screen Menus Language Selection - The menus can be shown on the screen in the selected language. First select your language. 1. Press the MENU button and then use button to select the OPTION menu. D / E button to select Language. E SETUP Advanced Aspect Ratio 2. Press the G button and then use D / VIDEO Caption Caption / Text 3. Press the G button and then use D / E button to select your desired language.
Operation Setup Menu Options EZ Scan (Channel Search) - Automatically finds all channels available through antenna or cable inputs, and stores them in memory on the channel list. - Run EZ Scan again after any Antenna/Cable connection changes. 1. Press the MENU button and then use 2. Press the G button and then use D /E D /E button to select the SETUP menu. button to select EZ Scan. 3. Press the ENTER button to begin the channel search.
Operation Channel Edit - Create two different types of channel lists in memory: “Custom list” and “Favorite channel list” from the default channel list created from the EZ Scan channel search. - A custom list can be created by toggling each channel on or off with ENTER button. The. The channels in the Custom List are displayed in black color, and the channels deleted from the Custom List are displayed in gray color.
Operation Setup Menu Options Channel Label Setup - Choose preset labels for your channels. - If a channel label is provided on the signal from the broadcasting station, the TV displays a short name for a channel even if you didn't preset a label for the channel. SETUP EZ Scan Manual Scan VIDEO Channel Edit DTV Signal AUDIO Channel Label Main Input TIME OPTION G Selection ( G or ) leads you to the channel logo screen. Sub Input Input Edit Set ID LOCK CABLE MENU Previous 1.
Operation V ideo Menu Options EZ Picture - EZ Picture adjusts the TV for the best picture appearance. Select the preset value in the EZ Picture menu based on the program category. - When adjusting Video menu options (contrast, brightness, color, sharpness, tint, and color temperature) manually, EZ Picture automatically changes to Custom. - Daylight, Normal, Night Time, Movie, Video Game, and Sports settings are preset for optimum picture quality at the factory and are not adjustable. 1.
Operation Audio Menu Options Audio Language - Other languages may be available if a digital signal is provided by the broadcasting station. SETUP VIDEO 1. Press the MENU button and then use D /E button to select the AUDIO menu. 3. Press the French. G D /E button and then use button to select Audio Language. D /E button to select: English, Spanish, or TIME OPTION 4. Press EXIT button to return to TV viewing or press MENU button to return to the previous menu.