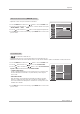
Operation Manual Sound Control ( Custom option) - Adjust the sound to suit your taste and room situations. SETUP 1. Press the MENU button and then use D 2. Press the G button and then use D (Balance, Treble, or Bass). /E 3. Press the G button and then use F /G /E button to select the AUDIO menu. EZ SoundRite VIDEO button to select the desired sound option 4. Press EXIT button to return to TV viewing or press MENU button to return to the previous menu.
Operation Audio Menu Options TV Speakers On/Off On/Off Setup - Turn TV speakers off if using external audio equipment. Feature turns the TV Speakers option On or Off. SETUP Audio Language EZ SoundRite VIDEO 1. Press the MENU button and then use D /E button to select the AUDIO menu. 2. Press the G button and then use D /E button to select TV Speaker. 3. Press the G button and then use D /E button to select On or Off. 4.
Operation T ime Menu Options Auto Clock Setup - The time is set automatically from a digital channel signal. The digital channel signal includes information for the current time provided by the broadcasting station. Set the clock manually, if the current time is set incorrectly by the auto clock function. When you set up TV guide on screen system, Auto Clock menu is not selected. 1. Press the MENU button and then use 2. Press the 3.
Operation T ime Menu Options Sleep Timer - The Sleep Timer turns the TV off at the preset time. Note that this setting is cleared when the TV is turned off. - You can also set up the Sleep Timer in the TIME menu. 1. Press the TIMER button repeatedly to select the number of minutes. First the Off option appears on the screen, followed by the following sleep timer options: 10, 20, 30, 60, 90, 120, 180, and 240 minutes. 2. When the number of minutes you want is displayed on the screen, press the ENTER button.
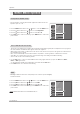
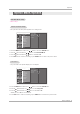
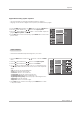
Operation Option Menu Options TimeShift Mode Setup - Refer to the p.? Cinema 3:2 Mode Setup - Set up the TV for the best picture appearance for viewing movies. SETUP VIDEO AUDIO G Advanced TimeShift Mode Aspect Ratio Cinema 3:2 Mode Caption Low Power Caption / Text LG Logo G Off On Caption Option Language TIME OPTION ISM Method Front Display Auto Demo LOCK CABLE MENU Previous 1. Press the MENU button and then use D /E 2. Press the G button and then use 3.
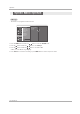
Operation Option Menu Options LG Logo - This function is only applied TU-60PY22 model. SETUP VIDEO AUDIO G Advanced Auto Buffering Aspect Ratio Cinema 3:2 Mode Caption Low Power Caption / Text LG Logo Caption Option G Off On Language TIME OPTION ISM Method Front Display Auto Demo LOCK CABLE MENU Previous 1. Press the MENU button and then use D /E button to select the OPTION menu. 2. Press the G button and then use D /E button to select LG Logo. 3.
Operation Aspect Ratio Control - Lets you choose the way an analog picture with a 4:3 aspect ratio is displayed on your TV with a 16:9 ratio picture format. When you receive an analog picture with a 4:3 aspect ratio on your 16:9 TV, you need to specify how the picture is to be displayed. - If you are viewing a picture with a 16:9 aspect ratio, you can’t use the Horizon aspect ratio option.
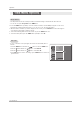
Operation Option Menu Options Caption 1. Press the MENU button and then use D /E button to select the OPTION menu. SETUP 2. Press the G button and then use 3. Press the G button and then use button to select Caption. / E button to select On or Off. D /E D 4. Press EXIT button to return to TV viewing or press MENU button to return to the previous menu.
Operation Digital Broadcasting System Captions - Choose the language you want the DTV/CADTV Captions to appear in. - Languages can be chosen for digital sources only if they are included on the program. 1. Press the MENU button and then use D / E button to select the OPTION menu. 2. Press the G button and then use D / E button to select Caption/Text. 3. Press the G button and then use D / E button to select available caption languages: English, Spanish, or French.
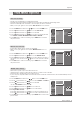
Operation Option Menu Options ISM (Image Sticking Minimization) Method - A frozen still picture from a PC/video game displayed on the screen for prolonged periods will result in an ghost image remaining; even when you change the image. Avoid allowing any fixed image to remain on the TV's screen for a long period of time. 1. Press the MENU button and then use D /E button to select the OPTION menu. SETUP 2. Press the G button and then use D /E button to select ISM Method. Aspect Ratio VIDEO 3.
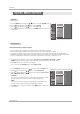
Operation Auto Demo - Displays the slide show to explain the main features of this TV. SETUP Advanced Aspect Ratio VIDEO 1. Press the MENU button and then use D /E button to select the OPTION menu. 2. Press the G button and then use D /E Caption Caption / Text AUDIO button to select Auto Demo. TIME Caption Option Language ISM Method 3. Press EXIT button to stop Auto Demo. OPTION Front Display Auto Demo LOCK CABLE MENU G Selection ( G or to the demo.
Operation Lock Menu Options Parental Control can be used to block specific channels, ratings and other viewing sources. The Parental Control Function (V-Chip) is used to block program viewing based on the ratings sent by the broadcasting station. The default setting is to allow all programs to be viewed. Viewing can be blocked by the type of program and by the categories chosen to be blocked. It is also possible to block all program viewing for a time period.
Operation Parental Lock Setup - Set up blocking schemes to block specific channels, ratings, and external viewing sources. - A password is required to gain access to this menu if the Lock System is turned on. 1. Press the MENU button and then use D Then, press the G button /E button to select the LOCK menu. SETUP Lock System Set Password • If Lock is already set, enter the password as requested. • The TV is set up with the initial password “0-0-0-0”.
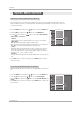
Home Menu Recorded TV - When you press the button, HOME menu is displayed. From here, you can view the recorded program list. - Or pressing the REC LIST button, you directly enter the recording list. 1. Select the Recorded TV in HOME menu or press the REC LIST button to view the recording list as shown below. A. B. 3. Select the desired folder in the folder list and then press the ENTER button to view the detailed menu. • Create: Create new folder. • Delete: Delete folder (except ‘My TV’).
Home Menu D. - The current thumbnail recorded list is shown above. 1. Use the CH +/- button to navigate thumbnail photo in pages. 2. Use MARK button to add or delete the marked photo to the mark list and only marked photos are toggling. 3. Use D / E / F / G button to navigate the appropriate thumbnail photo, then press the ENTER button to open the pop-up menu. • Play: Begin playback of selected recording. • Mark All: mark all photos on the screen. • Unmark All: Change marked photos to unmarked photos.
Operation Using the Memory Card What is Memory Card This is a device equipment to communicate the data between AV external equipment. It’s used to a digital camera, camcorder, MP3 player, notebook or PDA. Precaution for Using the Memory Card - Insert the memory card correctly. - Don’t insert the metal substances into the slots of the memory card. - Do not bend, drop or apply strong shock to memory card.
Home Menu Entry Modes- 1.Using the Memory Card / 2. Enter the HOME Menu 1.Using the Memory Card How to insert and eject the Memory Card W A. Inserting a Card 1. Insert the Memory Card to Memory card slots of TV side panel, refer to the figure shown on the left. 2. Two slots support defferent types of the Memory Cards. 3. If Memory Card is not inserted, each slot is disable. W Ejecting a card 1. Press the M/C EJECT button on the remote control. 2.
W Select the Photo or Music - When you plug the Memory Card, this screen is displayed, automatically. C. B. 1. Press the F / G button to select Photo/Music. and use D / E button to select Slot1 or Slot2. 2. Press ENTER button to move Photo List/Music List of the each slot. (Directly move to p.41_pic.C) - 2.Enter the HOME Menu Photo List - When you press the button, HOME menu is displayed. It’s available to play and copy the Photo file of Memory Card.or HDD. 1.
Home Menu Screen Components Marked thumbnail photo number Current page/Total page Usable HDD Folder List Current page/Total page C. D. 3. Select the desired folder in the folder list and then press the ENTER button to view the detailed menu. • Create: Create new folder. • Delete: Delete folder (except ‘My Photo' ).. • Rename: Edit folder name. • Cancel: Close the detailed menu. E. -> Use the D / E / F / G button to input the wanted name. -> And then select OK and press the ENTER button to save.
Home Menu F. or - As shown, up to current thumbnail photos listed per page. HDD mode Memory Card 1or 2 1. Use the CH D / E button to navigate in the thumbnail photo page. 2. Use MARK button to mark or unmark a photo. When one or more photos are marked, you can view or slide show only the marked ones. If no photo is marked, you can view or slide show all photos in the folder. 3.
Home Menu Music List A. - When you press the button, HOME menu is displayed. It’s available to play and copy the Photo / Music file of Memory Card.or HDD. 1. Use D / E button and then use the ENTER button or to select the Music List . G button B. 2. Use D / E button to select the HDD/ Memory Card 1/ Memory Card 2 and then you will see a list of music titles (pic.C,D). C. D. 3. Select the desired folder in the folder list and then press the ENTER button to view the detailed menu.
Home Menu F. or - As shown , up to 8 music titles are listed per page. 1. Use the CH D /E Memory Card 1or 2 HDD mode button to navigate in the music titles page. 2. Use MARK button to mark or unmark a music title. When one or more music titles are marked, the marked music will be played by turns. For example, if you want to hear only 1 music repeatedly, just mark the music only and play it. If no music title is marked, all the music in the folder will be played by turns. 3.
Home Menu 4. Repeatedly, press EXIT button to return to TV viewing or press button to return to the previous menu. - If you don't press any button for 40 seconds, the play information box(as shown in the below) will float as a screen saver. (a) For example : Note: • When music is playing, is displayed in front of the music title. • Press any button except VOL D / E , MUTE, Play (G), Pause (||), Stop ( ),Skip Next and Skip Previous ( FF, GG ) buttons, to stop the screen saver.
Operation T imeShift TimeShift Mode - This function allows the unit to automatically record live TV and make it available for reviewing at any time. With Auto Buffering turned on, you may pause and rewind normal TV viewing at any time without missing any of the live broadcast.
Operation 2. When finishing the Timeshift function, enter the Menu and then Timeshift Mode is to be Off. Notes: •PVR (Personal Video Recorder) : A device which records and plays broadcast program contents onto a hard disk in TV or SET TOP BOX. •When the TimeShift closes, the file (min. 10 seconds) is automatically stored in the record list. •If available hard-disk space is low when TimeShift is initiated, It will disappear automatically from the oldest part.
Operation Recording - This function is able to record channel watched on main screen of an Analog or Digital broadcasting. W Instant Record - This function records the currently displayed channel. 1.Select the desired channel to record while watching program. 2. Use the F / G button to select the OK ( as illustrated pic.A.) or Options or Stop Record. If you select the OK or press the RECORD (Ó) button in the TV mode, recording will start as marking , and recording will begin with basic settings. A. 3.
Operation 4. You can also add recording time by pressing the RECORD (Ó) button during the Instant Record. Press the F / G repeatedly to add to the recording time. Each press of F / G button changes the recording duration in the sequence shown below. basic value-> +10min -> +20min -> +30min -> +40min ->+50min -> +1hr The extra recording time added to existed setting value makes final recording time length. C. 5. After adjusting the recording time, select OK and the progress bar will be displayed.
W Watching & Record - While recording, you can change channel s or inputs, without disturbing the recording. The program being recorded will show in the lower-right corner of the main screen. 1. After starting an Instant Recording or Reserved Recording, change the channel or input • Check screen of recording is shown in the lower-right corner the screen (as shown below). • Pressing the PIP button will toggle the check screen on or off.
TV Guide On Screen System TV Guide On Screen ® System Overview - Your new TV contains the TV Guide On Screen Interactive Program Guide. - The TV Guide On Screen system has features that help you get the most out of your viewing experience. TV Guide On Screen Overview The TV Guide On Screen system has the following features: •Eight days of show listings (today plus seven days). •Icons that indicate show rating, stereo, HDTV, new episode, etc.
TV Guide On Screen System TV Guide On Screen ® System continued Screen Components - The screens displayed in the TV Guide On Screen system share many of the same compo- nents, as shown in the following figure: •Video Window - displays TV video while the Guide is displayed •Service Bar - provides access to the 4 main Guide Services •Current Service Label - indented to indicate current Service displayed •Tile - displays show title •Highlight - indicates an active tile •Info Box - provides information for
TV Guide On Screen System TV Guide On Screen ® System continued • Panel Menu Panel Menu Default Command Button Hightlight Entry Box Odometer •A Panel Menu appears when the Menu key is pressed on a highlighted tile and additional options are available. It also appears when you press ENTER on a show starting in the future. •When a Panel Menu appears, the highlighted tile changes color to indicate the Panel Menu relates to this tile. •The Panel Menu displays below the Video Window.
TV Guide On Screen System TV Guide On Screen ® System continued Main Services V < Listings > - Access Listings by pressing the TV Guide button on your remote or on the front panel of your TV. - Listings is always the first Service displayed in the Guide. - With Listings highlighted, press the Info button to display a Help screen. Press the Info button again to close the screen.
TV Guide On Screen System TV Guide On Screen ® System continued V < Search > - Search lets you find shows by category (Alphabetical, Movies, Sports, Children, Educational, News, Variety, Series, HDTV) or by Keyword. - With Search highlighted, press the Info button to display a Help screen. Press the Info button again to close the screen. •Category Search Example: Movies 1. From Search, use the E button to highlight Movies.
TV Guide On Screen System TV Guide On Screen ® System continued 2. Use the E button to highlight a subcategory (for example, All). 3. Press ENTER to display a list of all Movies, organized by date and time. 4. Highlight a show and press ENTER to watch (if on now) or the Menu key to display the Episode Options menu. You can choose to set a recording, a reminder, or tune to the channel. Go to Service Bar - closes the menu, changes no information, and returns to the Search Service Bar.
TV Guide On Screen System TV Guide On Screen ® System continued • Keyword Search - Keyword search lets you enter a word(s) to look for a particular show by category or for every show title that matches. 1. Highlight the Keyword navigation label, and press ENTER button to display the Keyword Search menu. 2. Highlight New Search, and press ENTER button. 3. The Search Options menu is displayed. 4. Highlight Category, and use the F / G button to select a category to search (e.g.
TV Guide On Screen System TV Guide On Screen ® System continued 7. A list of all matching shows for that keyword is displayed. Like the Category Search Example, you can highlight a show, and press ENTER to display all airings. You can then highlight a specific listing and press ENTER to watch (if On now) or the Menu key to display the Episode Options menu. From the Episode Options menu, choose to set a recording, a reminder, or tune to the channel, as previously described.
TV Guide On Screen ® System continued V < Recordings > Recordings displays a list of previously recorded or currently recording shows on a DVR or the currently inerted DVD in a DVD recorder. With Recordings highlighted, press the INFO button to display a Help screen. Press the INFO button again to close the screen. Choose the way Recordings are displayed by highlighting Recordings on the Service Bar and then press the MENU button to display the Recordings Options menu.
TV Guide On Screen ® System continued To view an episode, you can do one of the following: • highlight an episode, and press ENTER to view it now. The episode either starts from where it was last stopped(if viewed previously) or from the brginning. W Go th Service bar - close the menu, changes no information, and returns to th Schedule Service Bar. W Resume - starts from where it was last stopped(if viewde previously) or from the beginning.
TV Guide On Screen System TV Guide On Screen ® System continued V < Setup > - After you initially complete Guide Setup, you can make changes to Guide settings in the following areas: • Change System Settings • Change Channel Display • Change Default Options Highlight a choice, press ENTER, and follow the on-screen instructions. With Setup highlighted, press the Info button to display a Help screen. Press the Info button again to close the screen.
TV Guide On Screen System TV Guide On Screen ® System continued • Change Channel Display Change Channel Display lets you edit channel information that appears in Listings. With Change Channel Display you can : • Re-order the position or the channel appears in Listings • Change the tune channel number • Switch a channel W On - the channel is always displayed W Off - the channel is never displayed W Auto-Hide - the channel is only displayed when program information is available.