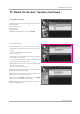
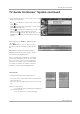
TV Guide On Screen System TV Guide On Screen ® System continued • Change Default Options Change Default Options lets you change default settings in the following categories: •General Default Options •Record Defaults •Remind Defaults Highlight Change Default Options, and press ENTER. General Default Options lets you set defaults for the following: •The initial Info Box size when the TV guide on screen system is entered.
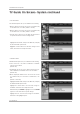
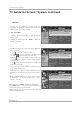
TV Guide On Screen System TV Guide On Screen ® System continued < Record Defaults> Record Default Options lets you set defaults for the following: • When to start the record event. Choices are 120 minutes early to 120 minutes late, to On time. (Default = On time) • When to end the record event. Choices are 120 minutes early to 120 minutes late, to On time. (Default = On time) • Recorder choice: Please choose the HDD only. This TV does not provide other devices with a recording feature.
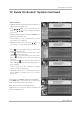
TV Guide On Screen System TV Guide On Screen ® System continued Record And Remind Features V < Record > You can set a show to Record in Listings, Search, and Schedule or change Record settings for a show in Schedule. There are 3 ways to set a show to Record: 1) Using the Record Button on the Remote • Press the Record button on the remote to record the show Once with current default settings (Start and End recording On Time).
TV Guide On Screen System TV Guide On Screen ® System continued When finished, press ENTER to highlight Schedule Recording. Press ENTER again to close the menu. You see a Record icon for the selected frequency next to the show title. Highlight Cancel to close the menu, change no information, and return to the highlighted show. 3) Manual Recording •Highlight the Schedule Service label, and press Menu to display the Schedule Options menu. •Use the D / E / F / G buttons to move through the options.
TV Guide On Screen System TV Guide On Screen ® System continued •Use the left and right arrows to choose between Once, Daily, Weekly, and Off, as follows. Once —records the time, channel, input, recorder combination one time. W Daily —records the time, channel, input, recorder combination Monday through Friday.
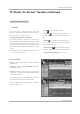
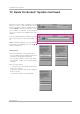
TV Guide On Screen System TV Guide On Screen ® System continued V < Remind > You can set a show Reminder in Listings, Search, and Schedule or change Reminder settings for a show in Schedule. There are 2 ways to set a show Reminder: 1) From a Panel Menu • Highlight a show, and press Menu to display the Episode Options menu. • Highlight Set Reminder, and press ENTER to display the Remind Options menu.
TV Guide On Screen System TV Guide On Screen ® System continued 2) Manual Reminder •Highlight the Schedule Service label, and press the Menu key to display the Schedule Options menu. •Use the D / E / F the number or D as necessary. /G buttons to move through the options. Use buttons to change the information, /E /F /G •Highlight New Manual Reminder and press the ENTER key to display the Remind Options menu. •Current information (i.e., date, start and end times, channel, input, frequency, etc.
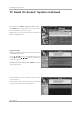
TV Guide On Screen System TV Guide On Screen ® System continued Based on your option settings, a notification screen will appear, if your TV is On at the reminder time. You can then choose to hide the reminder, or highlight the show, and press ENTER to tune to the show. If there is no activity for 3 minutes, the notification screen automatically closes and completes the highlighted item (hide reminders).
Schedule Functions Schedule - Schedule lets you review, edit, or delete Record and Remind events that you set previously. - With Schedule highlighted, press the Info button to display a Help screen. Press the Info button again to close the screen.
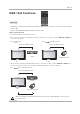
IEEE 1394 IEEE 1394 Functions IEEE 1394 - It's available to communicate to either direction and you can give and take a image, sound, or each control command with one cable. - Only use the DVHS and MicroMV Camcorder to work the 1394. How to connect the 1394 •To work the 1394, this 3 methods can used. 1. When connecting the DVHS or the MicroMV Camcorder, as shown in the (a) or (b) figure, select the IEEE 1394 in HOME menu to show the control panel.
IEEE 1394 IEEE 1394 functions continued DVHS How to play the DVHS V 1. Connect the IEEE 1394 jack of the TV to the IEEE 1394 jack of the DVHS with IEEE 1394 Cable. 2. When watching the TV, press the button to move the IEEE 1394 in HOME menu and then ENTER button. 2. Press the D / E buttons to select the DVHS and then use the ENTER button. • The control panel of DVHS -Depending on the connected equipment, marked control panel may differ. • Show the control panel of DVHS. 1.
IEEE 1394 functions continued V How to play the instant reecord to the DVHS 1. When watching the TV, press the button to move the IEEE 1394 in HOME menu and then ENTER button. 2. Press the D / E buttons to select the DVHS and then use the ENTER button. • Show the control panel of DVHS. 3. Press the D / E / F / G buttons to move to " and then use the ENTER button. You can record the current program to the DVHS. 4. Press the D / E / F / G buttons to move to use the ENTER button.
IEEE 1394 functions continued How to save the DVHS to the DVR V 1. On playing the DVHS, press the D /E /F /G buttons to move to DVR $ and then use the ENTER button. • Save the current screen to the DVR. 2. Press the D /E /F /G buttons to move to DVR # and then use the ENTER button to end a saving. When you save the program which is copy - protected to the PVR, display on the screen and don’t save to the PVR.
IEEE 1394 functions continued V How to save the DVR to the DVHS 1. When press the button, record list is displayed. You can select the wanted program by pressing the D / E / F / G buttons. And then press the ENTER button. 2. Select the DVHS Out by pressing the D / E / F / G buttons and then press the ENTER button. 3. Press the D / E buttons to select the wanted device and move to the Record 4. Press the D / E / F / G buttons to move to the START and then press the ENTER button to save to DVHS. 5.
IEEE 1394 IEEE 1394 functions continued MicroMV Camcorder How to play the MicroMV Camcorder E. 1. Connect the IEEE 1394 jack of the TV to the IEEE 1394 jack of the MicroMV Camcorder with IEEE 1394 Cable. 2. When watching the TV, press the button to move the IEEE 1394 in HOME menu and then ENTER button. 2. Press the D /E buttons to select the • The control panel of MicroMV Camcorder -Depending on the connected equipment, marked control panel may differ.
IEEE 1394 IEEE 1394 functions continued how to save the MicroMV Camcorder to the DVR 1. On playing the MicroMV Camcorder, press the ENTER button. D /E /F /G buttons to move to DVR $ and then use the • Save the current screen to the DVR. 2. Press the D /E /F /G 96 Plasma TV buttons to move to DVR # and then use the ENTER button to end a saving.
IEEE 1394 IEEE 1394 functions continued How to connect the 1394 • When connecting these 3 methods, the 1394 will not work properly. (a) LOOP Connection (b) Daisy Chain How to save the DVHS to the DVR V 1. On playing the DVHS, press the D / E / F / G buttons to move to " and then use the ENTER button.
98 Plasma TV
Operation CableCARD ™ Function * In this manual, the OSD (On Screen Display) may be different from your TV’s because it is just example to help the TV operation. Cable menu options In case of Scientific Atlanta CableCARD™ - The Cable sub menu displays when inserting the CableCARDTM to the TV. - The CableCARDTM type is Motorola, Scientific Atlanta (SA), or SCM etc. The OSD (On screen display) is different from your TV according to your CableCARDTM type. 1. Press the MENU button and then use 2.
Operation Cable Channel List 1. 2. SETUP EZ Scan Manual Scan VIDEO Channel Edit DTV Signal AUDIO G Selection ( G or ) leads you to the channel edit screen. Channel Label Main Input TIME OPTION Sub Input Input Label Set ID LOCK CABLE 3. MENU Previous 4. 1. If you enter the Channel Edit after running the EZ Scan, you can see the cable channel list. 2. Inserting the CableCARDTM. Then, the TV receive a new cable channel list. At this time, it takes about 2~3 minutes.
Operation Remote Control PIP (Picture-In-Picture) / POP / Twin Picture - PIP lets you view 2 different inputs (sources) on your TV screen at the same time. One source will be large, and the other source will show a smaller inset image. - Twin Picture mode splits the screen into 2, allowing 2 picture sources to be shown on the TV screen at the same time. Each source is given half the screen.
Operation W Moving the PIP sub picture In PIP mode, press the screen. W button to move the sub picture to a different location on the Adjusting Main and Sub Picture Sizes for Twin Picture Use the D /E /F /G i.e) W D /E /F /G button to change main and sub picture sizes in Twin Picture mode. If screen is adjusted to the maximal size, the large screen is filled with entire screen vertically as shown.
Operation Information Operation: • Watching TV/DTV/CATV/CADTV • Watching Video, Front Video • Watching IEEE 1394 • In Component1, Component2, RGB, HDMI1/DVI,HDMI2 modes, INFO button is not working. 4:3 16 : 9 480i 480p 720p Screen Ratio of Input Signal 4:3 Screen Ratio of Input Signal 16:9 Resolution Resolution Resolution 1080i Resolution Function: • Show the present screen information. • On Watching with the upper Input signal, press the INFO button. • Press the INFO button or EXIT button to exit.
Operation EZ Mute - Nothing to do with Caption on/Off using Mute button, the mode selected Caption/Text is to be displayed. - When you repeatedly press the Mute button, the screen is displayed in turn. (Refer to the lower picture) Note: • EZ Mute only operates in DTV/Analog/Video/Front Video/IEEE1394.
External Control Device Setup External Control Device Setup - Connect the RS-232C input jack to an external control device (such as a computer or an A/V control system) and control the Monitor’s functions externally. - Connect the serial port of the control device to the RS-232C jack on the Monitor back panel. - RS-232C connection cables are not supplied with the Monitor.
External Control Device Setup Set ID Use this function to specify a monitor ID number. Refer to ‘Real Data Mapping’. See page 82. SETUP Manual Scan VIDEO 1. Press the MENU button and then use D /E 2. Press the G button and then use button to select SET ID. button to select the SETUP menu. Channel Edit DTV Signal AUDIO D /E EZ Scan Channel Label Main Input 3. Press the G button and then use D / E button to adjust SET ID to choose the desired monitor ID number.
External Control Device Setup 01. Power (Command2:a) 05. Volume Mute (Command2:e) G To control Power On/Off of the Monitor. G To control volume mute on/off. You can also adjust mute using the MUTE button on remote control.
External Control Device Setup 09. Color (Command2:i) 14. PIP / POP / Twin Picture (Command2:n) G To adjust the screen color. You can also adjust color in the Video menu. G To control the PIP (Picture-in-Picture)/POP/Twin picture. You can also control the PIP/POP/Twin picture using the PIP button on the remote control. Transmission Transmission [k][i][ ][Set ID][ ][Data][Cr] [k][n][ ][Set ID][ ][Data][Cr] Data Min : 0 ~ Max : 64 • Refer to ‘Real data mapping’. See page 82.
External Control Device Setup 19. Color Temperature (Command2:u) 24. Orbiter Pixel Setting (Command2:s) G To adjust color temperature. You can also adjust color temperature in the Video menu. G To adjust pixel number in orbiter function. [ j ][s][ ][Set ID][ ][Data][Cr] Transmission [k][u][ ][Set ID][ ][Data][Cr] Data 0: Cool Transmission 1: Medium 2: Warm Acknowledgement [u][ ][Set ID][ ][OK][Data][x] Data Min: 1 ~ Max: 3 Acknowledgement [s][ ][Set ID][ ][OK][Data][x] 25.
26. Channel Add/Del (Command: m b) 29. PIP Input Select(Command: x y) G To add and delete the channels G To adjust input source for sub picture in PIP mode Transmission Transmission [m][b][ ][Set ID][ ][Data][Cr] [x][y][][Set ID][][Data][Cr] Data 0: Channel Delete 1: Channel Add Acknowledgement Data Structure LSB MSB [b][ ][Set ID][ ][OK][Data][x] [b][ ][Set ID][ ][NG][Data][x] 0 27.
IR Codes IR Codes How to Connect G Connect your wired remote control to the Remote Control port on the TV. Remote Control IR Codes G Output waveform Single pulse, modulated with 37.
IR Codes Code (Hexa) 0B 08 C4 C5 79 0E 10 ~ 19 4C 1A 09 02 03 00 01 1E AA 39 40 41 07 06 44 43 52 4D 5B 60 72 71 61 63 65 0A CB D6 5A D0 BF D4 D5 D7 C6 CC 76 77 AF 70 87 B0 BA B1 BD 8F 8E B2 B3 A9 92 C4 80 C8 7D 112 Plasma TV Function TV/VIDEO POWER POWER ON POWER OFF RATIO TIMER Number Key 0~ 9 - (Dash) FLASHBK MUTE VOL D VOLE CH D CH E FAV INFO CC D E F G ENTER MENU EZ SOUND EZ PIC EXIT PIP PIPCH PIPCH + PIP INPUT SWAP FREEZE SAP ADJUST TV VIDEO Front Video COMPONENT 1 COMPONENT 2 RGB-PC RGB-DTV HDMI1
Programming Codes Programming the Remote G The remote control is a multi-brand or universal remote control. It can be programmed to operate most remote-controllable devices of other manufacturers. Note that the remote control may not control all models of other brands. Programming a code into a remote mode 1. Test your remote control.
Programming the Remote Programming Codes VCRs Brand Codes Brand Codes Brand Codes Brand Codes AIWA AKAI 034 016 125 072 031 012 035 028 108 003 031 005 065 112 108 012 034 059 006 029 036 129 003 034 031 107 132 012 004 043 031 031 012 040 043 012 048 130 KENWOOD 014 047 001 101 034 003 017 040 031 067 012 069 101 027 031 003 033 101 045 013 013 049 151 034 024 012 048 043 053 066 133 013 063 031 031 067 101 013 PORTLAND PULSAR QUARTZ QUASAR RCA 108 072 011 033 013 040 107 145 003 031 053 058
Programming Codes HDSTB Brand Codes Brand ALPHASTAR DSR AMPLICA BIRDVIEW BSR CAPETRONICS CHANNEL MASTER 123 050 051 053 053 013 036 008 054 050 005 011 141 024 038 093 097 122 089 EUROPLUS FUJITSU CHAPARRAL CITOH CURTIS MATHES DRAKE DX ANTENNA ECHOSTAR ELECTRO HOME 126 129 014 015 018 055 009 012 077 145 006 007 010 052 112 116 046 040 094 098 056 057 095 099 076 058 096 100 Codes 114 017 133 GENERAL INSTRUMENT 003 031 HITACHI 139 033 HOUSTON TRACKER 057 HUGHES 068 HYTEK 053 JANIEL 060 JERROL
Troubleshooting Checklist Troubleshooting Checklist • Check whether the TV is turned on. No picture & No sound • Is the power cord inserted into wall power outlet? • Test the wall power outlet, plug another product’s power cord into the outlet where the TV’s power cord was plugged in. Picture OK & No sound • Press the VOLUME (G) button. • Sound muted? Press MUTE button. • Check to see if there is any object between the TV and the remote control causing obstruction.
Maintenance Maintenance - Early malfunctions can be prevented. Careful and regular cleaning can extend the amount of time you will have your new TV. Be sure to turn the power off and unplug the power cord before you begin any cleaning. Cleaning the Screen 1. Here’s a great way to keep the dust off your screen for a while. Wet a soft cloth in a mixture of lukewarm water and a little fabric softener or dish washing detergent. Wring the cloth until it’s almost dry, and then use it to wipe the screen. 2.
Specification Product Specifications MODELS TU-50PY22/TU-50PY2DR-UA TU-60PY22/TU-60PY2DR-UA Width (inches / mm) 55.2 / 1402 67.24 / 1708 Height (inches / mm) 31.4 / 798.5 36.6 / 931 Depth (inches / mm) 11.9 / 302.5 12.6 / 320.7 Weight (pounds / kg) 122 / 55.3 189.2 / 85.8 Resolution 1366 x 768 (Dot) Power requirement AC100-240V ~ 60Hz Television System NTSC-M, ATSC Program Coverage VHF 2 ~ 13, UHF 14 ~ 69, CATV 1 ~ 135, CADTV 1 ~ 135.
LG ELECTRONICS, INC. PLASMA TV — U.S. LIMITED WARRANTY Your LG Plasma TV will be repaired or replaced in accordance with the terms of this warranty, at LGE’s option, if it proves to be defective in material or workmanship under normal use, during the warranty period (“Warranty Period”) listed below, effective from the date (“Date of Purchase”) of original consumer purchase of the product.
THIS LIMITED WARRANTY DOES NOT APPLY TO: ● ● ● ● ● ● ● ● damage caused in shipping or transit service required as a result of improper installation, including incorrect or insufficient AC supply (please consult the owner’s manual for power supply requirements) installation or repair of antenna systems, cable converters, cable company supplied equipment, or other components in a video system set-up or adjustment on consumer controls, or damage caused by improper adjustments damage caused by other system